Build a StockX clone where users can sell and bid on items using Whop Payments Network, connected accounts infrastructure, and Next.js.
Key takeaways
- Whop's single SDK replaces multiple complex integrations for authentication, escrow payments, KYC, and seller payouts in marketplace apps.
- Combining Next.js, Supabase Realtime, and Whop enables a full bid/ask marketplace with live pricing without managing WebSocket servers.
- An escrow payment pattern with platform verification protects both buyers and sellers before releasing funds.
Building a real-time marketplace like StockX involves integrating multi-party payment systems into the project, configuring an external user authentication system, setting up WebSockets for live pricing, and creating custom KYC workflows for sellers.
Fortunately for you, Whop solves the most challenging parts of these steps with a single SDK: OAuth authentication, connected accounts, escrow payments, KYC, and embedded chats.
This tutorial will guide you through building a platform from scratch based on a live bid/ask system, which we've named "Swaphause," a StockX clone.
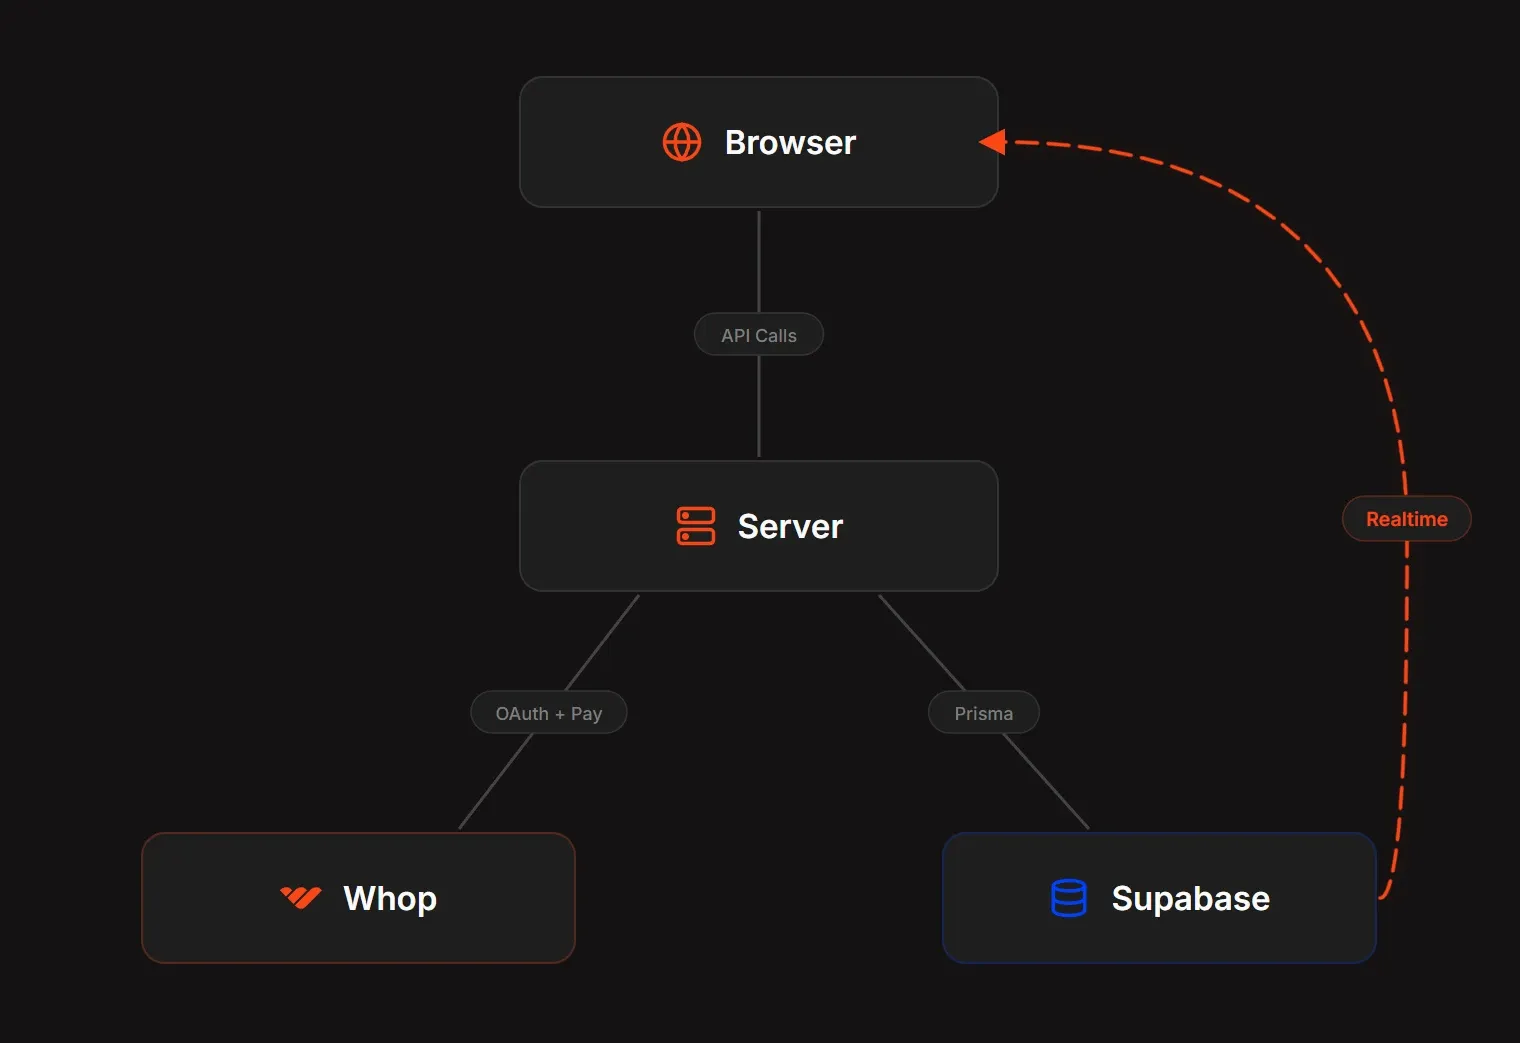
The project has three main parts:
- Next.js app - handles the frontend, API routes, and the matching engine
- Supabase (PostgreSQL + Realtime) - stores all data and pushes live price updates to every connected client
- Whop infrastructure - handles user authentication, payment processing, seller payouts, and buyer-seller chat
You can preview the finished product demo here and find the full codebase in this GitHub repository.
Project overview
Before we start coding, here's what you'll be building.
Pages
/- Homepage with trending products, live stats, and category browsing/products- Browse all products with search, category filters, and pagination/products/[id]- Product detail page with bid/ask forms, order book, price history, and size selector/dashboard- User dashboard showing active bids, asks, trade history, and portfolio value/trades/[id]- Trade detail page with status tracking, payment, and embedded buyer-seller chat
Core features
- Authentication - Whop OAuth (PKCE flow) for "Sign in with Whop" - no registration forms, no password resets
- Bid/Ask matching engine - buyers place bids, sellers place asks. When a bid meets the lowest ask, the trade executes automatically
- Real-time pricing - Supabase Realtime pushes every new bid and ask to all connected clients instantly. No WebSocket server to manage
- Escrow payments - Whop Payments Network handles buyer charges, seller connected accounts, KYC, and platform fee splits
- Seller onboarding - one-click connected account creation with built-in identity verification through Whop
- Buyer-seller chat - embedded Whop chat component creates a private DM channel for each trade automatically on match
- Webhooks - payment events from Whop sync trade status to the database in real time
- Notifications - in-app notification feed for trade matches, payments, and status changes
- Search and browse - full-text search, category filtering, and custom pagination
- Product verification - admin review flow for authenticating items before releasing seller payouts
Part 1: Architecture
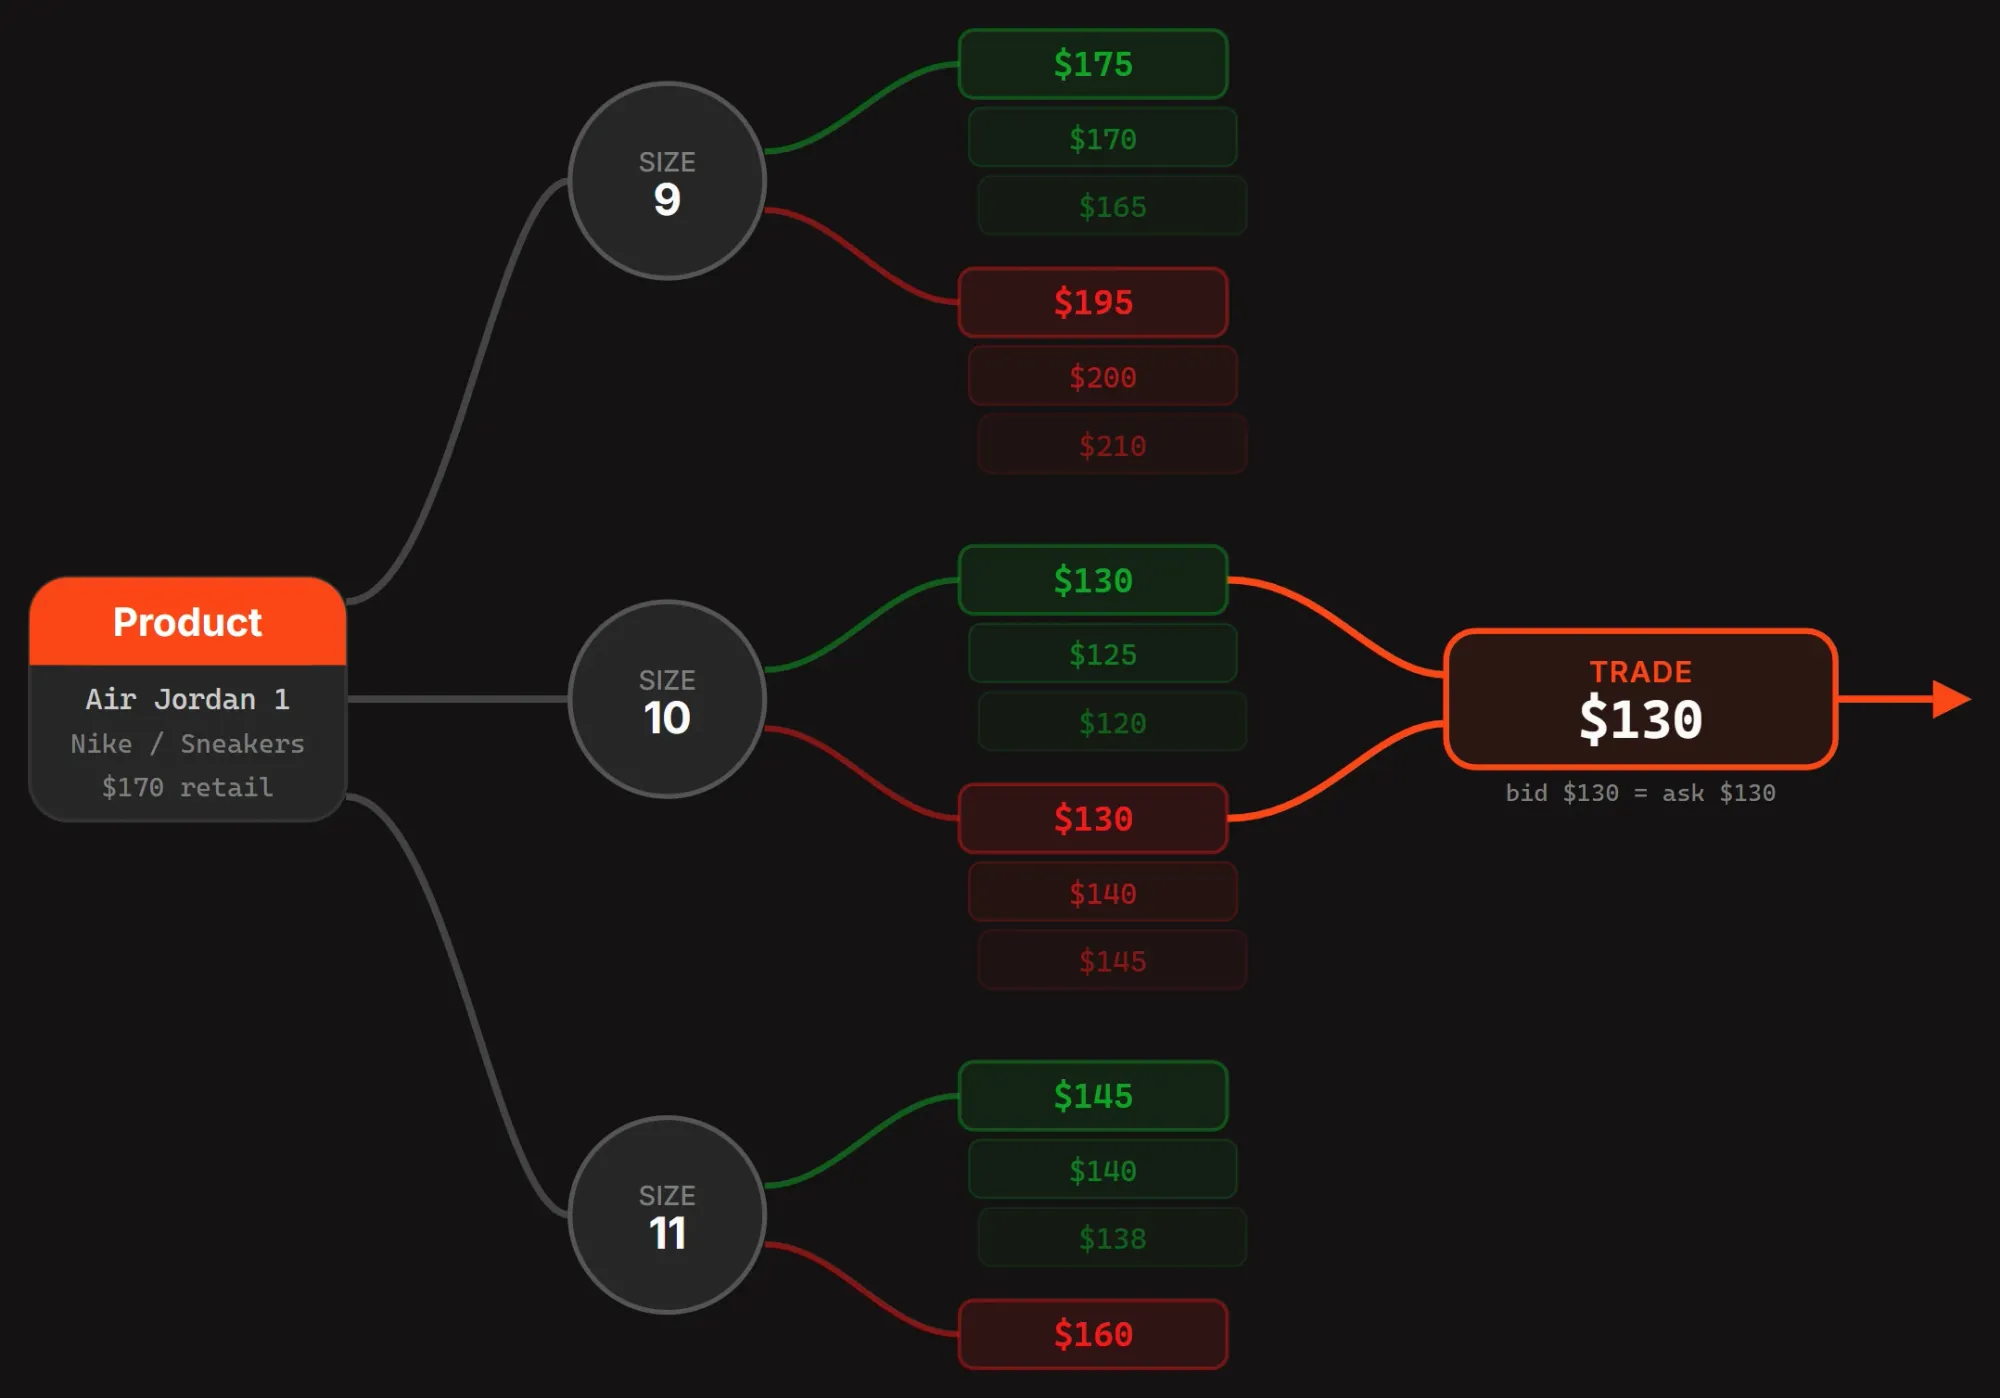
In this guide, we'll be building a StockX clone where buyers and sellers trade products through a bid system. During trades, buyers name their price (bid), and sellers name their (ask). When a bid meets or exceeds the lowest ask, the trade is executed.
While building this project, we're going to use several services for things like user authentication, payments, testing, and validation. Whop's OAuth and Whop Payment Network are two of the biggest players we'll use, so let's understand why we're using Whop.
Why Whop
In marketplace projects like this, you'll face two hard infrastructure problems: user authentication and money movement:
Payments
A marketplace platform like this requires the developers to integrate multiple systems that handle connected accounts, KYC compliance, escrow holds, refund processing, and other complex payment flows.
As the number of external services increases, the time spent integrating each one (and stitching them together) grows exponentially.
Luckily, the Whop Payments Network handles all of this through a single API: connected seller accounts, escrow holds, payouts, and refunds, and more.
As a cherry on the cake, you'll use Whop for easy user authentication too, allowing you to integrate a fully functional user authentication system without storing passwords or managing 2Fa yourself.
Authentication
Whop OAuth gives you the "Sign in with Whop" button that uses a standard OAuth 2.1 + PKCE flow. Users authorize your app, you get an access token, and you have a verified identity without building registration forms, email verification, or password reset flows. All authentication needs are solved with a single integration.
Other flows like bid/ask matching, real-time price feeds, product pages, search, notifications, etc. will be custom code.
How money moves
The payment flow of this project follows an escrow pattern:
- A bid matches an ask, the trade executes
- The buyer is charged via Whop (direct charge on the seller's connected account with an application fee for the platform)
- Funds are held, the seller hasn't been paid yet
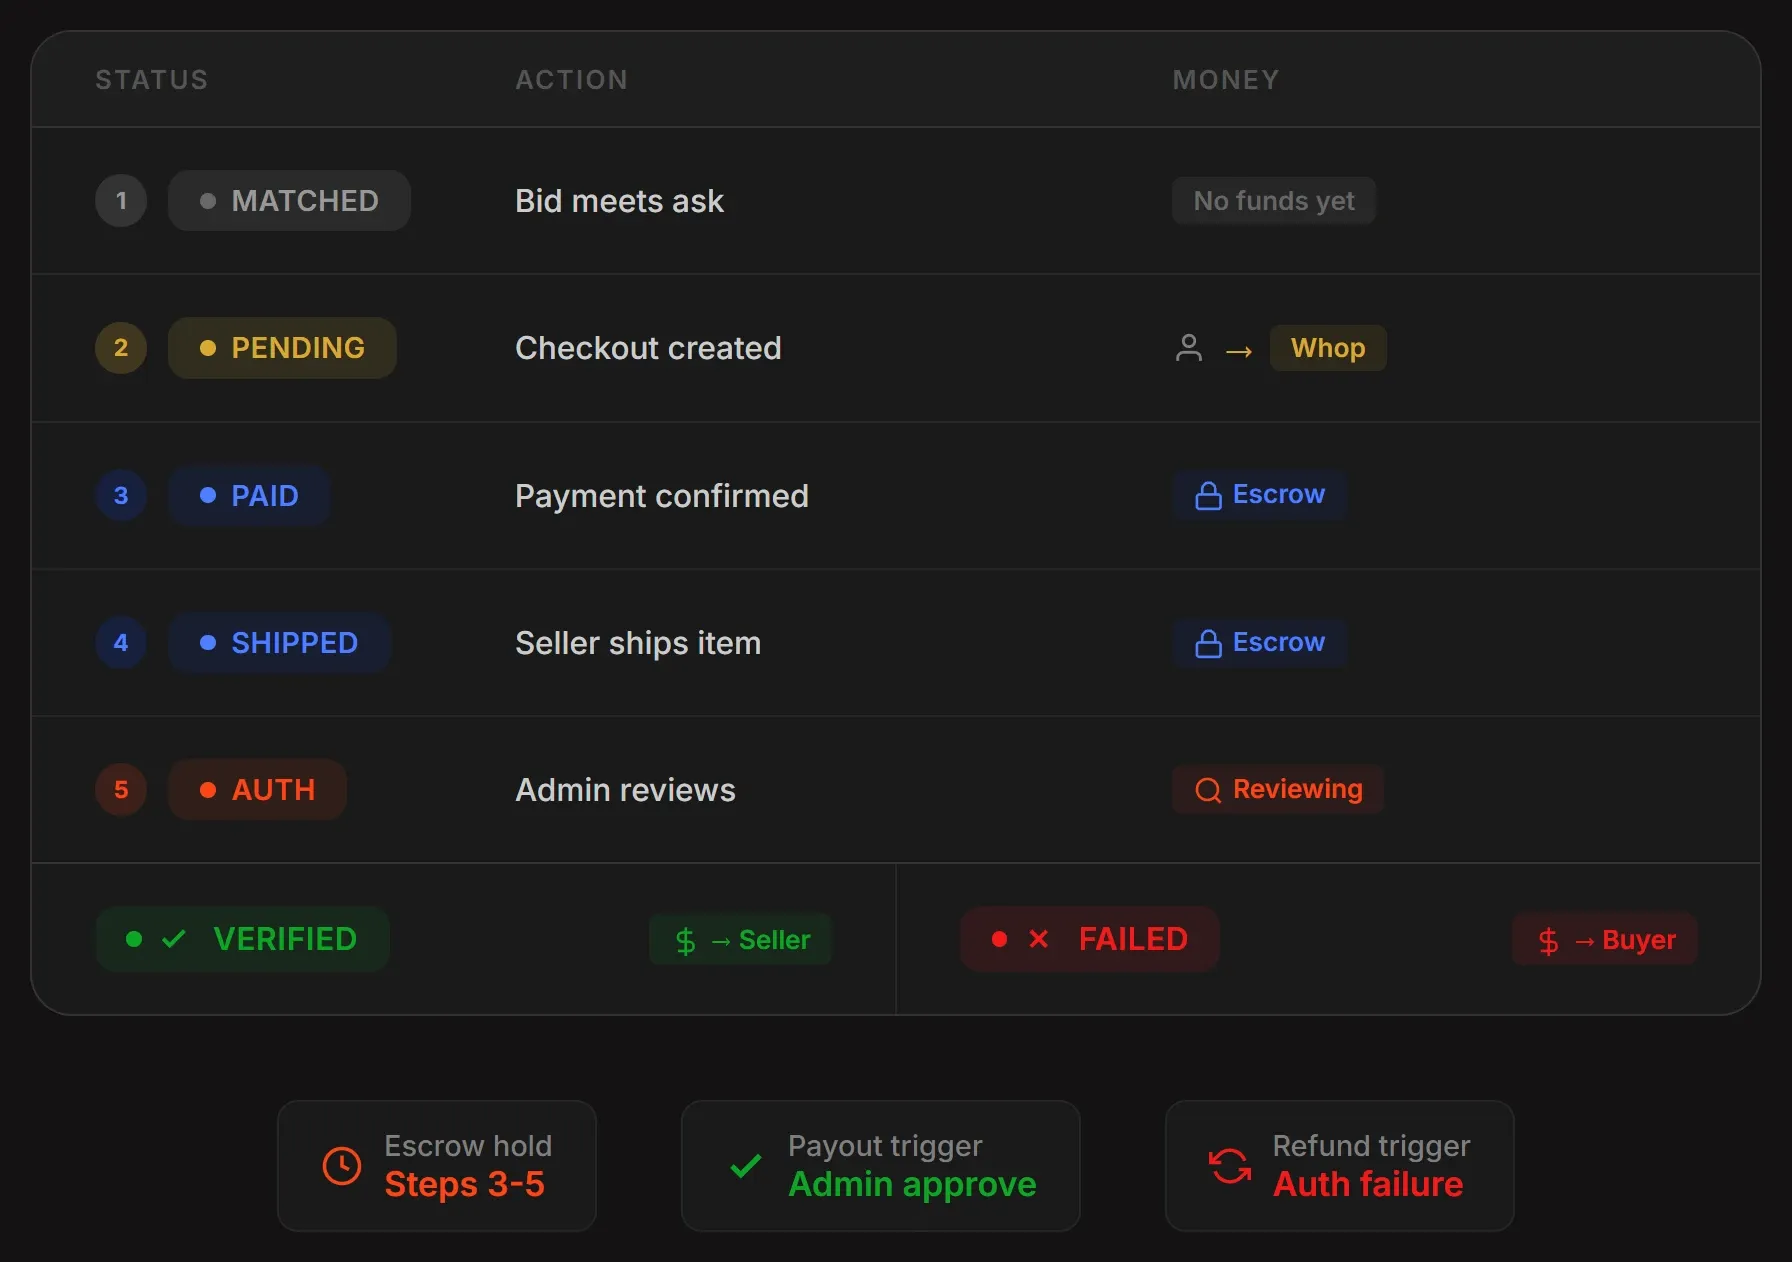
- The seller ships the item to the platform for authentication
- The platform verifies the item is legitimate
- If verified: the seller's payout is released via their Whop connected account
- If failed: the buyer is refunded through Whop, the item is returned, and the listing can be reposted
The platform takes a percentage on every successful transaction via the application_fee_amount on the checkout configuration. The seller receives the remainder. Whop handles the fee split, the KYC, and the payout rails.
| Layer | Choice | Why |
|---|---|---|
| Framework | Next.js (App Router) | Server components, API routes, and deployment on Vercel in one package |
| Auth | Whop OAuth | Already in the Whop ecosystem, standard PKCE flow, no auth infrastructure to build |
| Payments | Whop Payments Network | Connected accounts + escrow + KYC |
| Database | Supabase (PostgreSQL) | Managed Postgres built-in Realtime |
| Real-time | Supabase Realtime | Subscribe to database changes. When a new bid lands, every connected client sees it instantly. No WebSocket server to manage |
| ORM | Prisma | Type-safe database access, migration management, schema-as-documentation |
| Validation | Zod | Runtime validation on API routes, env variables, and webhook payloads |
| Deployment | Vercel | Zero-config Next.js hosting, vercel.ts for typed configuration |
Scaffold and deploy
In this guide, we're going to follow a deploy-first workflow that gets us a live URL before we start writing marketplace code. First, let's set up three services: Next.js on Vercel, a Supabase database, and a Whop app (on Whop's sandbox):
Create the Next.js project and deploy to Vercel
To create the Next.js project, go to the directory you want to develop your project in and run the command below:
npx create-next-app@latest stockx-clonestockx-clone” part of the command with the project name you want. For the sake of simplicity, we’ll refer to the folder as “stockx-clone” in this guide.At some point, it will ask you "Would you like to use the recommended Next.js defaults?," and you should select the "Yes, use recommended defaults" option. This will install the required packages.
Then, let's push the project into GitHub by running the commands below:
cd stockx-clone
git init
git add .
git commit -m "Initial scaffold"
gh repo create stockx-clone --private --source=. --push
The gh repo create command creates the repo on GitHub, sets the remote, and pushes in one step. If you don't have the GitHub CLI, install it from cli.github.com and run gh auth login first.
Now, let's create a Vercel project:
- Go to vercel.com and sign in with your GitHub account
- Click Add New > Project
- Import your
stockx-clonerepository from the list - Leave the default settings (Vercel auto-detects Next.js) and click Deploy
- The first deploy will show the default Next.js page. That's fine, we'll add environment variables next
Set up Supabase
Now, let's set up Supabase by creating an account and starting a new project. In Supabase, you'll create the project in an organization. If you don't have any, follow the steps below to create an organization:
- Go to the Supabase dashboard and click New organization
- Give your organization a name, select its type, and plan
- Click Create organization
This will redirect you to the Create a new project page, where you should give your project a name, set a strong database password, select the region you want the database to be located in, and click Create new project.
Once you create the project, let's grab some values you'll use later. Click the Connect button at the top of your project dashboard - it shows your Project URL, API keys, and connection strings in one place. You can also find the API keys under Settings > API Keys:
| Value | Where to find it | Env var name |
|---|---|---|
| Project URL | Connect dialog or Settings > API Keys | NEXT_PUBLIC_SUPABASE_URL |
| Anon public key | Connect dialog or Settings > API Keys (labeled anon) |
NEXT_PUBLIC_SUPABASE_ANON_KEY |
| Service role key | Settings > API Keys (labeled service_role) |
SUPABASE_SERVICE_ROLE_KEY |
| Connection string | Connect dialog > Connection String (Session pooler) | DATABASE_URL |
For the connection string, replace [YOUR-PASSWORD] with the database password you set during project creation. Use the Session pooler connection string - it works with both IPv4 and IPv6 and is the recommended default.
sb_publishable_... and sb_secret_...). The legacy JWT-based anon and service_role keys still work and are what we use in this project. You'll see both key types in your dashboard - use the legacy JWT keys.Get Whop sandbox keys
In the development phase, you're going to use Whop's sandbox environment - it allows you to simulate all flows using Whop without moving real money.
- Create a sandbox account at sandbox.whop.com (this is separate from a regular Whop account)
- Go to sandbox.whop.com/dashboard/developer and create a new app
- In your app settings, set the OAuth Redirect URI to
http://localhost:3000/api/auth/callback - Grab these values from your app dashboard:
| Value | Env var name |
|---|---|
| API Key | WHOP_API_KEY |
| App ID | WHOP_APP_ID |
| Client ID | WHOP_CLIENT_ID |
| Client Secret | WHOP_CLIENT_SECRET |
| Webhook Secret | WHOP_WEBHOOK_SECRET |
| Company ID | WHOP_COMPANY_ID |
WHOP_API_KEY must be a company API key, not an app API key. You'll find it under your company's Settings > API Keys in the Whop dashboard. The company API key has broader permissions (like creating connected accounts for sellers) that the app API key doesn't. Your WHOP_COMPANY_ID is the biz_... value from the URL when you're on your company dashboard.You'll also need one more env var that tells the app to use sandbox:
WHOP_API_BASE=https://sandbox-api.whop.comThis single variable controls whether the entire app talks to sandbox or production Whop. OAuth, SDK calls, and webhooks will use this variable. Set it to https://sandbox-api.whop.com for development and preview deployments. For production, you'll set it to https://api.whop.com later.
Configure environment variables
Now, let's configure the environment variables of the project. First, go to your Vercel dashboard, open the project, and go to its settings.
There, open the Environment Variables page and add each variable from Steps 2 and 3. Vercel lets you set different values per deployment context (Production, Preview, Development), you can use this to separate sandbox from production:
| Context | WHOP_API_BASE |
Whop keys from |
|---|---|---|
| Production | https://api.whop.com |
whop.com/dashboard/developer |
| Preview | https://sandbox-api.whop.com |
sandbox.whop.com/dashboard/developer |
| Development | https://sandbox-api.whop.com |
sandbox.whop.com/dashboard/developer |
For each context, add the matching WHOP_API_KEY, WHOP_APP_ID, WHOP_CLIENT_ID, WHOP_CLIENT_SECRET, WHOP_WEBHOOK_SECRET, and WHOP_COMPANY_ID from the corresponding Whop dashboard.
The Supabase variables (DATABASE_URL, NEXT_PUBLIC_SUPABASE_URL, etc.) are the same across all contexts unless you want a separate test database.
Next, add two app-level variables:
| Env var | Value |
|---|---|
NEXT_PUBLIC_APP_URL |
https://your-project.vercel.app (your Vercel deployment URL) |
SESSION_SECRET |
A random string, at least 32 characters |
Generate a session secret with:
node -e "console.log(require('crypto').randomBytes(32).toString('hex'))"Pulling variables locally
Once everything is set up in Vercel, pull the variables to your local development environment. This requires the Vercel CLI, and you can install it using these commands:
npm i -g vercel
vercel login
vercel link
Then pull the variables:
vercel env pull .env.localThis creates a .env.local file with all your Development-context variables. The file is gitignored and never committed.
Deployment configuration
You'll use vercel.ts instead of vercel.json for deployment configuration - you get type safety and IDE autocomplete.
Create vercel.ts in your project root (next to package.json, not inside src/) with the content:
interface VercelConfig {
  framework?: string;
  buildCommand?: string;
  outputDirectory?: string;
  headers?: Array<{
    source: string;
    headers: Array<{ key: string; value: string }>;
  }>;
}

const config: VercelConfig = {
  framework: "nextjs",
  buildCommand: "next build",
  outputDirectory: ".next",
  headers: [
    {
      source: "/api/(.*)",
      headers: [
        { key: "X-Content-Type-Options", value: "nosniff" },
        { key: "X-Frame-Options", value: "DENY" },
      ],
    },
  ],
};

export default config;
rules later.
Next.js image configuration
If your app displays remote images (like placeholder images from placehold.co or user avatars), Next.js needs to know which domains are allowed. Create next.config.ts in the project root (next to package.json) with:
import type { NextConfig } from "next";

const nextConfig: NextConfig = {
	images: {
		dangerouslyAllowSVG: true,
		remotePatterns: [
			{
				protocol: "https",
				hostname: "placehold.co",
			},
		],
	},
};

export default nextConfig;
dangerouslyAllowSVG is needed because placehold returns SVG images, which Next.js image optimization rejects by default. Add any other image domains your app uses to remotePatterns.
Environment variable validation
Lastly before deploying the project, let's validate all required environment variables exist at startup.
This will crash your app at startup when you're missing environment variables, so that you don't run into issues later down the tutorial and spend time finding the cause.
Install Zod (we'll use it throughout the project for all input validation, not just env variables):
npm install zodNext, create the src/lib/ directories and a file in it called env.ts with the content:
import { z } from "zod";

const envSchema = z.object({
  WHOP_API_KEY: z.string().trim().min(1),
  WHOP_APP_ID: z.string().trim().min(1),
  WHOP_CLIENT_ID: z.string().trim().min(1),
  WHOP_CLIENT_SECRET: z.string().trim().min(1),
  WHOP_WEBHOOK_SECRET: z.string().trim().min(1),
  WHOP_COMPANY_ID: z.string().trim().min(1),
  WHOP_API_BASE: z.string().trim().url().default("https://api.whop.com"),
  DATABASE_URL: z.string().trim().url(),
  NEXT_PUBLIC_SUPABASE_URL: z.string().trim().url(),
  NEXT_PUBLIC_SUPABASE_ANON_KEY: z.string().trim().min(1),
  NEXT_PUBLIC_APP_URL: z.string().trim().url(),
  SESSION_SECRET: z.string().trim().min(32),
  SUPABASE_SERVICE_ROLE_KEY: z.string().trim().min(1),
  PLATFORM_FEE_PERCENT: z.coerce.number().default(9.5),
});

export type Env = z.infer<typeof envSchema>;

let _env: Env | undefined;

export const env: Env = new Proxy({} as Env, {
  get(_, prop: string) {
    if (!_env) {
      _env = envSchema.parse(process.env);
    }
    return _env[prop as keyof Env];
  },
});
If you see a ZodError listing missing fields when running npm run dev, your .env.local is incomplete, go back to Step 4.
Deploy the project to Vercel
If you set up via the Vercel dashboard, your project is already deploying on every push to main. Just commit and push using the commands below:
git add .
git commit -m "Add environment config"
git push
Now, when you open your Vercel deployment URL, you should see the default Next.js page. Check the build logs in the Vercel dashboard and see if any environment variables are missing, the build will fail with a ZodError listing exactly which ones. Fix those in Settings > Environment Variables and redeploy.
Once the page loads, you have a live URL connected to a real Supabase database with all environment variables in place. You're ready to write marketplace code.
Part 2: Data models and authentication
You have deployed the Next.js app and wired your environment variables. Now, you need two things before starting to work on the marketplace logic: a database schema that models how StockX actually works, and a secure way for users to sign in.
Designing the data model
The core logic behind StockX's data model is that every product has one canonical page, and every size of that product is its own market. There's no "create a listing" flow where five sellers each make their own page for the same sneaker.
Instead, there's one page for the Nike Dunk Low Panda, and within that page, each size (US 9, US 10, US 11) has its own bid/ask order book with its own price history.
This means we need a Product with multiple ProductSize records.
Bids and asks attach to a specific ProductSize, not to the product itself. When a bid matches an ask on the same size, we create a Trade, a single record that tracks the entire lifecycle from match to delivery (or refund).
A few non-obvious decisions:
- Bids and asks are separate tables. You could model them as one
Ordertable with asidecolumn, but separate tables make the matching queries cleaner and let us add size-specific constraints to each side independently. - Trades reference both the bid and the ask. This creates a clear audit trail, you can always trace a completed sale back to the exact bid and ask that created it.
- Payments are a separate table from trades. A trade can have multiple payment events (charge, refund, payout release), so we keep them in their own table linked by
tradeId. - ProductSize caches aggregate stats. Rather than computing the lowest ask and highest bid on every page load, we store
lowestAsk,highestBid,lastSalePrice, andsalesCountdirectly on theProductSizerecord and update them when the order book changes. This keeps product listing queries fast. - Notifications are stored in the database. This is a custom in-app notification feed - no external service. Each notification ties to a user and stores structured metadata as JSON.
First, install Prisma and the Prisma Client:
npm install @prisma/client
npm install -D prisma
Initialize Prisma in your project. This creates the prisma/ directory with a schema.prisma file:
npx prisma initNow, let's create the Prisma schema by going into the /prisma folder in the project and updating the schema.prisma contents with:
datasource db {
  provider = "postgresql"
  url      = env("DATABASE_URL")
}

generator client {
  provider = "prisma-client-js"
}

// Enums
enum UserRole {
  USER
  SELLER
  ADMIN
}

enum BidStatus {
  ACTIVE
  MATCHED
  CANCELLED
  EXPIRED
}

enum AskStatus {
  ACTIVE
  MATCHED
  CANCELLED
  EXPIRED
}

enum TradeStatus {
  MATCHED
  PAYMENT_PENDING
  PAID
  SHIPPED
  AUTHENTICATING
  VERIFIED
  DELIVERED
  FAILED
  REFUNDED
}

enum PaymentStatus {
  PENDING
  SUCCEEDED
  FAILED
  REFUNDED
}

enum NotificationType {
  BID_MATCHED
  ASK_MATCHED
  TRADE_COMPLETED
  ITEM_SHIPPED
  ITEM_VERIFIED
  ITEM_FAILED
  PRICE_ALERT
  SYSTEM
}

// Models
model User {
  id                 String   @id @default(cuid())
  whopId             String   @unique
  email              String
  username           String
  displayName        String?
  avatarUrl          String?
  role               UserRole @default(USER)
  whopAccessToken    String?
  whopRefreshToken   String?
  connectedAccountId String?
  createdAt          DateTime @default(now())
  updatedAt          DateTime @updatedAt

  bids          Bid[]
  asks          Ask[]
  buyerTrades   Trade[]        @relation("BuyerTrades")
  sellerTrades  Trade[]        @relation("SellerTrades")
  notifications Notification[]
}

model Product {
  id          String    @id @default(cuid())
  name        String
  brand       String
  sku         String    @unique
  description String
  images      String[]
  category    String
  retailPrice Float
  releaseDate DateTime?
  createdAt   DateTime  @default(now())
  updatedAt   DateTime  @updatedAt

  sizes ProductSize[]
}

model ProductSize {
  id            String   @id @default(cuid())
  productId     String
  size          String
  lastSalePrice Float?
  lowestAsk     Float?
  highestBid    Float?
  salesCount    Int      @default(0)
  createdAt     DateTime @default(now())

  product Product @relation(fields: [productId], references: [id], onDelete: Cascade)
  bids    Bid[]
  asks    Ask[]
  trades  Trade[]

  @@unique([productId, size])
}

model Bid {
  id            String    @id @default(cuid())
  userId        String
  productSizeId String
  price         Float
  status        BidStatus @default(ACTIVE)
  expiresAt     DateTime?
  createdAt     DateTime  @default(now())
  updatedAt     DateTime  @updatedAt

  user        User        @relation(fields: [userId], references: [id], onDelete: Cascade)
  productSize ProductSize @relation(fields: [productSizeId], references: [id], onDelete: Cascade)
  trade       Trade?

  @@index([productSizeId, status])
}

model Ask {
  id            String    @id @default(cuid())
  userId        String
  productSizeId String
  price         Float
  status        AskStatus @default(ACTIVE)
  expiresAt     DateTime?
  createdAt     DateTime  @default(now())
  updatedAt     DateTime  @updatedAt

  user        User        @relation(fields: [userId], references: [id], onDelete: Cascade)
  productSize ProductSize @relation(fields: [productSizeId], references: [id], onDelete: Cascade)
  trade       Trade?

  @@index([productSizeId, status])
}

model Trade {
  id            String      @id @default(cuid())
  buyerId       String
  sellerId      String
  productSizeId String
  bidId         String      @unique
  askId         String      @unique
  price         Float
  platformFee   Float
  chatChannelId String?
  status        TradeStatus @default(MATCHED)
  createdAt     DateTime    @default(now())
  updatedAt     DateTime    @updatedAt

  buyer       User        @relation("BuyerTrades", fields: [buyerId], references: [id], onDelete: Cascade)
  seller      User        @relation("SellerTrades", fields: [sellerId], references: [id], onDelete: Cascade)
  productSize ProductSize @relation(fields: [productSizeId], references: [id], onDelete: Cascade)
  bid         Bid         @relation(fields: [bidId], references: [id], onDelete: Cascade)
  ask         Ask         @relation(fields: [askId], references: [id], onDelete: Cascade)
  payment     Payment?

  @@index([buyerId])
  @@index([sellerId])
}

model Payment {
  id              String        @id @default(cuid())
  tradeId         String        @unique
  whopPaymentId   String        @unique
  amount          Float
  platformFee     Float
  status          PaymentStatus @default(PENDING)
  idempotencyKey  String        @unique
  createdAt       DateTime      @default(now())
  updatedAt       DateTime      @updatedAt

  trade Trade @relation(fields: [tradeId], references: [id], onDelete: Cascade)
}

model Notification {
  id        String           @id @default(cuid())
  userId    String
  type      NotificationType
  title     String
  message   String
  read      Boolean          @default(false)
  metadata  Json?
  createdAt DateTime         @default(now())

  user User @relation(fields: [userId], references: [id], onDelete: Cascade)

  @@index([userId, read])
}
After updating the Prisma schema, push it to your Supabase database. But first, Prisma CLI reads DATABASE_URL from .env, not .env.local. Since Vercel env pull wrote everything to .env.local, you need a separate .env file for Prisma:
echo 'DATABASE_URL="your-supabase-connection-string"' > .envCopy the DATABASE_URL value from your .env.local file. This .env is already covered by .gitignore. To prevent it from being uploaded during Vercel deploy, create a .vercelignore file in the project root with the content:
.env
.env.local
Now push the schema using the command below:
npx prisma db pushEnable Realtime
Before moving on, let's go to Supabase and enable Realtime for the Bid and Ask tables. In Supabase, in the Database page of your project, go to Replication, and toggle Realtime on for both tables.
This tells Supabase to broadcast row changes (inserts, updates, deletes) over its Realtime channels. We'll subscribe to these changes on the frontend in Part 3. Without this, the client-side subscriptions we build later will silently receive nothing.
Whop OAuth
Users sign in with their Whop account via OAuth 2.1. Before writing code, create an app in the Whop developer dashboard.
For development, use the sandbox dashboard at sandbox.whop.com/dashboard/developer, this gives you test credentials that won't process real payments. For production, use the regular whop.com dashboard. You'll need:
- A Client ID and Client Secret (these should already be in your Vercel env vars from Part 1 - sandbox keys for dev, production keys for prod)
- A Redirect URI set to
https://your-domain.com/api/auth/callback(orhttp://localhost:3000/api/auth/callbackfor local development)
Notice that the OAuth routes below useenv.WHOP_API_BASEinstead of hardcodinghttps://api.whop.com. This env var switches the entire app between sandbox (https://sandbox-api.whop.com) and production (https://api.whop.com), allowing you to easily switch between Whop environments without having to edit all routes individually.
The flow works in two steps: a login route that redirects the user to Whop, and a callback route that exchanges the authorization code for tokens and creates the session.
Before writing the routes, you need a Prisma client singleton and the session management dependency. Install iron-session using the command below:
npm install iron-sessionNow, let's create the Prisma client singleton. This file reuses one PrismaClient instance across hot reloads in development. It also appends connection_limit=1 to the database URL.
Without this, each Vercel serverless function opens its own connection pool, which quickly exhausts Supabase's session pooler limit and causes 500 errors. Go to src/lib and create a file called prisma.ts with the content:
import { PrismaClient } from "@prisma/client";

const globalForPrisma = globalThis as unknown as {
	prisma: PrismaClient | undefined;
};

function buildDatasourceUrl(): string {
	const url = process.env.DATABASE_URL!;
	if (url.includes("connection_limit")) return url;
	const separator = url.includes("?") ? "&" : "?";
	return `${url}${separator}connection_limit=1`;
}

export const prisma =
	globalForPrisma.prisma ??
	new PrismaClient({
		datasources: { db: { url: buildDatasourceUrl() } },
});

if (process.env.NODE_ENV !== "production") {
	globalForPrisma.prisma = prisma;
}
Time to create the auth routes. In Next.js App Router, each API route lives in its own folder with a route.ts file. Let's go to the src/app/api/auth folder and create two folders called login and callback.
Then, open the src/app/api/auth/login folder and create a file called route.ts with the content:
import { NextResponse } from "next/server";
import { env } from "@/lib/env";

function base64url(buffer: ArrayBuffer): string {
  const bytes = new Uint8Array(buffer);
  let binary = "";
  for (const byte of bytes) {
    binary += String.fromCharCode(byte);
  }
  return btoa(binary).replace(/\+/g, "-").replace(/\//g, "_").replace(/=+$/, "");
}

export async function GET() {
  const codeVerifierBytes = new Uint8Array(32);
  crypto.getRandomValues(codeVerifierBytes);
  const codeVerifier = base64url(codeVerifierBytes.buffer);

  const digest = await crypto.subtle.digest(
    "SHA-256",
    new TextEncoder().encode(codeVerifier)
  );
  const codeChallenge = base64url(digest);

  const stateBytes = new Uint8Array(16);
  crypto.getRandomValues(stateBytes);
  const state = Array.from(stateBytes)
    .map((b) => b.toString(16).padStart(2, "0"))
    .join("");

  const nonceBytes = new Uint8Array(16);
  crypto.getRandomValues(nonceBytes);
  const nonce = Array.from(nonceBytes)
    .map((b) => b.toString(16).padStart(2, "0"))
    .join("");

  const redirectUri = `${env.NEXT_PUBLIC_APP_URL}/api/auth/callback`;

  const authUrl = new URL(`${env.WHOP_API_BASE}/oauth/authorize`);
  authUrl.searchParams.set("client_id", env.WHOP_CLIENT_ID);
  authUrl.searchParams.set("redirect_uri", redirectUri);
  authUrl.searchParams.set("response_type", "code");
  authUrl.searchParams.set("code_challenge", codeChallenge);
  authUrl.searchParams.set("code_challenge_method", "S256");
  authUrl.searchParams.set("scope", "openid profile email");
  authUrl.searchParams.set("state", state);
  authUrl.searchParams.set("nonce", nonce);

  const cookieValue = JSON.stringify({ codeVerifier, state });

  const response = NextResponse.redirect(authUrl.toString());
  response.cookies.set("oauth_pkce", cookieValue, {
    httpOnly: true,
    secure: env.NEXT_PUBLIC_APP_URL.startsWith("https"),
    sameSite: "lax",
    path: "/",
    maxAge: 600, // 10 minutes
  });

  return response;
}
When the user authorizes a Whop login, they get redirected them back to your callback route with an authorization code.
Now, you need a callback route that handles the redirect from Whop by exchanging the authorization code for tokens, fetching the user's profile, and creating or updating their account in the database.
Note that it imports sessionOptions from @/lib/auth, which we'll create next.
To create the callback route, go to src/app/api/auth/callback and create a file called route.ts with the content:
import { NextRequest, NextResponse } from "next/server";
import { getIronSession } from "iron-session";
import { cookies } from "next/headers";
import { prisma } from "@/lib/prisma";
import { type SessionData, sessionOptions } from "@/lib/auth";
import { env } from "@/lib/env";

interface TokenResponse {
  access_token: string;
  refresh_token: string;
  token_type: string;
  expires_in: number;
}

interface UserInfoResponse {
  sub: string;
  email?: string;
  email_verified?: boolean;
  preferred_username?: string;
  name?: string;
  picture?: string;
}

export async function GET(request: NextRequest) {
  const { searchParams } = new URL(request.url);
  const code = searchParams.get("code");
  const state = searchParams.get("state");

  if (!code || !state) {
    return NextResponse.redirect(
      `${env.NEXT_PUBLIC_APP_URL}/?error=missing_params`
    );
  }

  const pkceCookie = request.cookies.get("oauth_pkce");
  if (!pkceCookie?.value) {
    return NextResponse.redirect(
      `${env.NEXT_PUBLIC_APP_URL}/?error=missing_pkce`
    );
  }

  let storedState: string;
  let codeVerifier: string;
  try {
    const parsed = JSON.parse(pkceCookie.value) as {
      state: string;
      codeVerifier: string;
    };
    storedState = parsed.state;
    codeVerifier = parsed.codeVerifier;
  } catch {
    return NextResponse.redirect(
      `${env.NEXT_PUBLIC_APP_URL}/?error=invalid_pkce`
    );
  }

  if (state !== storedState) {
    return NextResponse.redirect(
      `${env.NEXT_PUBLIC_APP_URL}/?error=state_mismatch`
    );
  }

  const redirectUri = `${env.NEXT_PUBLIC_APP_URL}/api/auth/callback`;

  const tokenRes = await fetch(`${env.WHOP_API_BASE}/oauth/token`, {
    method: "POST",
    headers: { "Content-Type": "application/json" },
    body: JSON.stringify({
      grant_type: "authorization_code",
      code,
      redirect_uri: redirectUri,
      client_id: env.WHOP_CLIENT_ID,
      client_secret: env.WHOP_CLIENT_SECRET,
      code_verifier: codeVerifier,
    }),
  });

  if (!tokenRes.ok) {
    const errBody = await tokenRes.text().catch(() => "no body");
    console.error("Token exchange failed:", tokenRes.status, errBody);
    return NextResponse.redirect(
      `${env.NEXT_PUBLIC_APP_URL}/?error=token_exchange_failed&status=${tokenRes.status}&detail=${encodeURIComponent(errBody.slice(0, 200))}`
    );
  }

  const tokenData = (await tokenRes.json()) as TokenResponse;

  const userInfoRes = await fetch(`${env.WHOP_API_BASE}/oauth/userinfo`, {
    headers: { Authorization: `Bearer ${tokenData.access_token}` },
  });

  if (!userInfoRes.ok) {
    const errBody = await userInfoRes.text().catch(() => "no body");
    console.error("Userinfo failed:", userInfoRes.status, errBody);
    return NextResponse.redirect(
      `${env.NEXT_PUBLIC_APP_URL}/?error=userinfo_failed&status=${userInfoRes.status}&detail=${encodeURIComponent(errBody.slice(0, 200))}`
    );
  }

  const userInfo = (await userInfoRes.json()) as UserInfoResponse;

  const user = await prisma.user.upsert({
    where: { whopId: userInfo.sub },
    update: {
      email: userInfo.email ?? undefined,
      username: userInfo.preferred_username ?? undefined,
      displayName: userInfo.name ?? undefined,
      avatarUrl: userInfo.picture ?? undefined,
      whopAccessToken: tokenData.access_token,
      whopRefreshToken: tokenData.refresh_token,
    },
    create: {
      whopId: userInfo.sub,
      email: userInfo.email ?? "",
      username: userInfo.preferred_username ?? userInfo.sub,
      displayName: userInfo.name,
      avatarUrl: userInfo.picture,
      whopAccessToken: tokenData.access_token,
      whopRefreshToken: tokenData.refresh_token,
    },
  });

  const cookieStore = await cookies();
  const session = await getIronSession<SessionData>(
    cookieStore,
    sessionOptions
  );
  session.userId = user.id;
  session.whopId = user.whopId;
  session.accessToken = tokenData.access_token;
  await session.save();

  const response = NextResponse.redirect(env.NEXT_PUBLIC_APP_URL);
  response.cookies.delete("oauth_pkce");
  return response;
}
Session Management
We use iron-session for stateless and encrypted sessions stored in an httpOnly cookie named stockx_session. The session holds the user's internal userId, their whopId, and their access token for making API calls on their behalf.
Access tokens expire after one hour and when a token refresh is needed, we use the stored refresh token from the database to get a new pair.
You imported sessionOptions in the callback route, so let's actually create the auth file. Go src/lib and create a file called auth.ts with the content:
import { getIronSession, type SessionOptions } from "iron-session";
import { cookies } from "next/headers";
import { prisma } from "@/lib/prisma";
import type { User } from "@prisma/client";

export interface SessionData {
  userId: string;
  whopId: string;
  accessToken: string;
}

export const sessionOptions: SessionOptions = {
  cookieName: "stockx_session",
  password: process.env.SESSION_SECRET!,
  cookieOptions: {
    httpOnly: true,
    secure: process.env.NODE_ENV === "production",
    sameSite: "lax" as const,
    maxAge: 60 * 60 * 24 * 7, // 7 days
  },
};

export async function getSession() {
  const cookieStore = await cookies();
  return getIronSession<SessionData>(cookieStore, sessionOptions);
}

export async function getCurrentUser(): Promise<User | null> {
  const session = await getSession();

  if (!session.userId) {
    return null;
  }

  const user = await prisma.user.findUnique({
    where: { id: session.userId },
  });

  return user;
}

export async function requireAuth(): Promise<User> {
  const user = await getCurrentUser();

  if (!user) {
    throw new Response(JSON.stringify({ error: "Unauthorized" }), {
      status: 401,
      headers: { "Content-Type": "application/json" },
    });
  }

  return user;
}
Every API route and server component that needs the current user calls getCurrentUser(). Routes that require authentication use requireAuth(), which throws a 401 if no session exists. You use a single file and a single place to add token refresh logic later, and one place to check if your code breaks.
Part 3: Bid/ask engine and real-time pricing
So far, you've deployed the Next.js app to Vercel, set up a Supabase database, and built the Whop OAuth so users can sign in. Now, it's time to build one of the main parts of your project, the bid/ask engine.
Every product in the project has its own order book (open bids with buy orders and open asks with sell orders). When a bid meets or exceeds the lowest ask, it executes at the bid price.
API routes for bids and asks
The bid and ask API routes follow the same pattern. Let's break them down:
POST /api/bids - Place a new bid:
- Authenticate the request via
requireAuth() - Validate the request body with a Zod schema:
productSizeId(string),price(positive number),expiresAt(ISO date string, optional, must be in the future) - Confirm the
ProductSizeexists - Create the
Bidrecord with statusACTIVE - Run the matching engine - if a match is found, the engine creates the trade within a transaction
- Return the created bid (and the trade, if matched)
- Touches:
Bid,Ask,Trade,ProductSize
POST/api/asks- Place a new ask: - Same pattern as bids, but for the sell side
- Touches:
Ask,Bid,Trade,ProductSize
Both routes require a valid session (no anonymous bids), validate prices with Zod against a min/max range defined in/src/constants/index.ts, and apply a simple in-memory rate limiter for every user ID to prevent spams. Bids and asks can include an expires, optionally.
At timestamp, a cron job marks expired entries in intervals, but the matching engine also checks expiration at match time so an expired bid never matches even if the cron hasn't run yet.
Checkout redirect on match
When the bid API returns { matched: true, trade: { id } }, the BidForm component doesn't just clear the form - it immediately redirects the buyer to Whop checkout.
The component calls POST /api/trades/{tradeId}/checkout to get a checkoutUrl, then navigates to it with window.location.href. This applies to both "Place Bid" (when the bid price meets or exceeds an existing ask) and "Buy Now" (which places a bid at the lowest ask price, guaranteeing an immediate match). The checkout flow is covered in part four.
Shared Constants
Before building the matching engine, let's create a shared constants file. It will define the platform fee, price limits, product categories, and pagination defaults used across the entire project.
First, go to src/constants (create the folder if you don't have it) and create a file in it called index.ts with the content:
export const PLATFORM_FEE_PERCENT = 9.5;

export const MIN_BID_PRICE = 1;

export const MAX_BID_PRICE = 100_000;

export const BID_EXPIRY_DAYS = 30;

export const CATEGORIES = [
  "Sneakers",
  "Streetwear",
  "Electronics",
  "Collectibles",
  "Accessories",
  "Trading Cards",
] as const;

export type Category = (typeof CATEGORIES)[number];

export const ORDER_STATUSES: Record<string, string> = {
  MATCHED: "Matched",
  PAYMENT_PENDING: "Payment Pending",
  PAID: "Paid",
  SHIPPED: "Shipped",
  AUTHENTICATING: "Authenticating",
  VERIFIED: "Verified",
  DELIVERED: "Delivered",
  FAILED: "Authentication Failed",
  REFUNDED: "Refunded",
};

export const ITEMS_PER_PAGE = 24;
The PLATFORM_FEE_PERCENT at 9.5% is the platform's cut of every trade made in the app. You can change this rate to your liking. The matching engine, checkout configuration, and trade records all reference this constant.
Building the matching engine
The matching engine is the core of the marketplace project you're working on. When a new bid or ask is created by users, the matching engine checks if it can be immediately matched across the order book.
If it can, it will create a Trade and update both the bid and the ask statuses, calculate the platform fee, update the cached stats on ProductSize, and sends notifications to both users.
The engine has a double-checking pattern. It first searches outside the transaction to find a potential match, then re-fetches both records inside the transaction to confirm they're still ACTIVE before proceeding. This prevents conditions where two concurrent requests try to match against the same bid or ask.
Now, let's go to the src/lib folder and create a file called matching-engine.ts with the content:
import { BidStatus, AskStatus, TradeStatus, NotificationType } from "@prisma/client";
import type { Prisma, Trade } from "@prisma/client";
import { prisma } from "@/lib/prisma";
import { PLATFORM_FEE_PERCENT } from "@/constants";
import { createDmChannel, sendSystemMessage } from "@/services/chat";

type TransactionClient = Prisma.TransactionClient;

export async function matchBid(bidId: string) {
  const bid = await prisma.bid.findUnique({
    where: { id: bidId },
  });

  if (!bid || bid.status !== BidStatus.ACTIVE) {
    return null;
  }

  const lowestAsk = await prisma.ask.findFirst({
    where: {
      productSizeId: bid.productSizeId,
      status: AskStatus.ACTIVE,
      price: { lte: bid.price },
    },
    orderBy: { price: "asc" },
  });

  if (!lowestAsk) {
    return null;
  }

  const trade = await prisma.$transaction(async (tx: TransactionClient) => {
    const freshBid = await tx.bid.findUnique({ where: { id: bidId } });
    const freshAsk = await tx.ask.findUnique({ where: { id: lowestAsk.id } });

    if (
      !freshBid ||
      freshBid.status !== BidStatus.ACTIVE ||
      !freshAsk ||
      freshAsk.status !== AskStatus.ACTIVE
    ) {
      return null;
    }

    const tradePrice = freshAsk.price;
    const platformFee = Number(
      (tradePrice * (PLATFORM_FEE_PERCENT / 100)).toFixed(2)
    );

    await tx.bid.update({
      where: { id: freshBid.id },
      data: { status: BidStatus.MATCHED },
    });

    await tx.ask.update({
      where: { id: freshAsk.id },
      data: { status: AskStatus.MATCHED },
    });

    const newTrade = await tx.trade.create({
      data: {
        buyerId: freshBid.userId,
        sellerId: freshAsk.userId,
        productSizeId: freshBid.productSizeId,
        bidId: freshBid.id,
        askId: freshAsk.id,
        price: tradePrice,
        platformFee,
        status: TradeStatus.MATCHED,
      },
    });

    await updateProductSizeStats(freshBid.productSizeId, tx);

    await tx.notification.createMany({
      data: [
        {
          userId: freshBid.userId,
          type: NotificationType.BID_MATCHED,
          title: "Bid matched!",
          message: `Your bid of $${freshBid.price.toFixed(2)} was matched at $${tradePrice.toFixed(2)}.`,
          metadata: { tradeId: newTrade.id },
        },
        {
          userId: freshAsk.userId,
          type: NotificationType.ASK_MATCHED,
          title: "Ask matched!",
          message: `Your ask of $${freshAsk.price.toFixed(2)} was matched. Prepare to ship your item.`,
          metadata: { tradeId: newTrade.id },
        },
      ],
    });

    return newTrade;
  });

  if (trade) {
    await setupTradeChat(trade);
  }

  return trade;
}

export async function matchAsk(askId: string) {
  const ask = await prisma.ask.findUnique({
    where: { id: askId },
  });

  if (!ask || ask.status !== AskStatus.ACTIVE) {
    return null;
  }

  const highestBid = await prisma.bid.findFirst({
    where: {
      productSizeId: ask.productSizeId,
      status: BidStatus.ACTIVE,
      price: { gte: ask.price },
    },
    orderBy: { price: "desc" },
  });

  if (!highestBid) {
    return null;
  }

  const trade = await prisma.$transaction(async (tx: TransactionClient) => {
    const freshAsk = await tx.ask.findUnique({ where: { id: askId } });
    const freshBid = await tx.bid.findUnique({ where: { id: highestBid.id } });

    if (
      !freshAsk ||
      freshAsk.status !== AskStatus.ACTIVE ||
      !freshBid ||
      freshBid.status !== BidStatus.ACTIVE
    ) {
      return null;
    }

    const tradePrice = freshAsk.price;
    const platformFee = Number(
      (tradePrice * (PLATFORM_FEE_PERCENT / 100)).toFixed(2)
    );

    await tx.bid.update({
      where: { id: freshBid.id },
      data: { status: BidStatus.MATCHED },
    });

    await tx.ask.update({
      where: { id: freshAsk.id },
      data: { status: AskStatus.MATCHED },
    });

    const newTrade = await tx.trade.create({
      data: {
        buyerId: freshBid.userId,
        sellerId: freshAsk.userId,
        productSizeId: freshAsk.productSizeId,
        bidId: freshBid.id,
        askId: freshAsk.id,
        price: tradePrice,
        platformFee,
        status: TradeStatus.MATCHED,
      },
    });

    await updateProductSizeStats(freshAsk.productSizeId, tx);

    await tx.notification.createMany({
      data: [
        {
          userId: freshBid.userId,
          type: NotificationType.BID_MATCHED,
          title: "Bid matched!",
          message: `Your bid of $${freshBid.price.toFixed(2)} was matched at $${tradePrice.toFixed(2)}.`,
          metadata: { tradeId: newTrade.id },
        },
        {
          userId: freshAsk.userId,
          type: NotificationType.ASK_MATCHED,
          title: "Ask matched!",
          message: `Your ask of $${freshAsk.price.toFixed(2)} was matched. Prepare to ship your item.`,
          metadata: { tradeId: newTrade.id },
        },
      ],
    });

    return newTrade;
  });

  if (trade) {
    await setupTradeChat(trade);
  }

  return trade;
}

async function setupTradeChat(trade: Trade) {
  try {
    const [buyer, seller, productSize] = await Promise.all([
      prisma.user.findUnique({
        where: { id: trade.buyerId },
        select: { whopId: true },
      }),
      prisma.user.findUnique({
        where: { id: trade.sellerId },
        select: { whopId: true },
      }),
      prisma.productSize.findUnique({
        where: { id: trade.productSizeId },
        include: { product: { select: { name: true } } },
      }),
    ]);

    if (!buyer?.whopId || !seller?.whopId || !productSize) return;
    if (buyer.whopId === seller.whopId) {
      console.log("setupTradeChat: skipping DM for self-match trade");
      return;
    }

    const channelName = `Trade: ${productSize.product.name} Size ${productSize.size}`;
    const channelId = await createDmChannel(
      buyer.whopId,
      seller.whopId,
      channelName
    );

    await prisma.trade.update({
      where: { id: trade.id },
      data: { chatChannelId: channelId },
    });

    await sendSystemMessage(
      channelId,
      `Trade matched at $${trade.price.toFixed(2)}! Use this chat to coordinate shipping details.`
    );
  } catch (error: unknown) {
    console.error("Failed to set up trade chat:", error);
  }
}

async function updateProductSizeStats(
  productSizeId: string,
  tx: TransactionClient
) {
  const lowestActiveAsk = await tx.ask.findFirst({
    where: { productSizeId, status: AskStatus.ACTIVE },
    orderBy: { price: "asc" },
    select: { price: true },
  });

  const highestActiveBid = await tx.bid.findFirst({
    where: { productSizeId, status: BidStatus.ACTIVE },
    orderBy: { price: "desc" },
    select: { price: true },
  });

  const lastTrade = await tx.trade.findFirst({
    where: { productSizeId, status: TradeStatus.DELIVERED },
    orderBy: { createdAt: "desc" },
    select: { price: true },
  });

  await tx.productSize.update({
    where: { id: productSizeId },
    data: {
      lowestAsk: lowestActiveAsk?.price ?? null,
      highestBid: highestActiveBid?.price ?? null,
      lastSalePrice: lastTrade?.price ?? undefined,
    },
  });
}
Real-time order book updates
In Part 2 you enabled Realtime on the Bid and Ask tables on Supabase. Now, when the matching engine inserts a new bid or updates an ask's status to MATCHED, Supabase sends that change to every client that's subscribed to that table.
The frontend listens for any changes to bids or asks on selected sizes of items. New bid, matched ask, cancellations, and other actions update the order book in real-time.
To wire this up, you need two things: a Supabase client that runs in the browser, and a React hook that subsribes the changes for selected item sizes.
First, let's install the Supabase client library using the command below:
npm install @supabase/supabase-js
Then, go to src/services (create the folder if you don't have it) and create a file called supabase.ts with the content:
import { createClient, type SupabaseClient } from "@supabase/supabase-js";

let browserClient: SupabaseClient | null = null;

export function createBrowserClient(): SupabaseClient {
  if (browserClient) return browserClient;

  browserClient = createClient(
    process.env.NEXT_PUBLIC_SUPABASE_URL!,
    process.env.NEXT_PUBLIC_SUPABASE_ANON_KEY!,
  );

  return browserClient;
}

export function createServerClient(): SupabaseClient {
  return createClient(
    process.env.NEXT_PUBLIC_SUPABASE_URL!,
    process.env.SUPABASE_SERVICE_ROLE_KEY!,
  );
}
The browser client is a single instance that's reused since it runs in the browser with the anonymous key. The server client creates a new instance each time since it uses the service role key for access.
The useRealtimeBids hook
Now, let's create the hook that ties the Realtime subscription to React. Go to src/hooks and create a file called useRealtimeBids.ts with the content:
"use client";

import { useEffect, useState, useCallback } from "react";
import { createBrowserClient } from "@/services/supabase";

interface Bid {
  id: string;
  userId: string;
  productSizeId: string;
  price: number;
  status: string;
  expiresAt: string | null;
  createdAt: string;
}

interface Ask {
  id: string;
  userId: string;
  productSizeId: string;
  price: number;
  status: string;
  expiresAt: string | null;
  createdAt: string;
}

interface UseRealtimeBidsReturn {
  bids: Bid[];
  asks: Ask[];
  isLoading: boolean;
  error: string | null;
}

export function useRealtimeBids(productSizeId: string): UseRealtimeBidsReturn {
  const [bids, setBids] = useState<Bid[]>([]);
  const [asks, setAsks] = useState<Ask[]>([]);
  const [isLoading, setIsLoading] = useState(true);
  const [error, setError] = useState<string | null>(null);

  const fetchBids = useCallback(async () => {
    try {
      const res = await fetch(
        `/api/bids?productSizeId=${encodeURIComponent(productSizeId)}`
      );
      if (!res.ok) throw new Error("Failed to fetch bids");
      const data = await res.json();
      setBids(
        (data.bids ?? data ?? []).sort(
          (a: Bid, b: Bid) => b.price - a.price
        )
      );
    } catch (err) {
      setError(err instanceof Error ? err.message : "Failed to fetch bids");
    }
  }, [productSizeId]);

  const fetchAsks = useCallback(async () => {
    try {
      const res = await fetch(
        `/api/asks?productSizeId=${encodeURIComponent(productSizeId)}`
      );
      if (!res.ok) throw new Error("Failed to fetch asks");
      const data = await res.json();
      setAsks(
        (data.asks ?? data ?? []).sort(
          (a: Ask, b: Ask) => a.price - b.price
        )
      );
    } catch (err) {
      setError(err instanceof Error ? err.message : "Failed to fetch asks");
    }
  }, [productSizeId]);

  useEffect(() => {
    setIsLoading(true);
    setError(null);

    Promise.all([fetchBids(), fetchAsks()]).finally(() => setIsLoading(false));

    const supabase = createBrowserClient();

    const channel = supabase
      .channel(`orderbook-${productSizeId}`)
      .on(
        "postgres_changes",
        {
          event: "*",
          schema: "public",
          table: "Bid",
          filter: `productSizeId=eq.${productSizeId}`,
        },
        () => {
          fetchBids();
        }
      )
      .on(
        "postgres_changes",
        {
          event: "*",
          schema: "public",
          table: "Ask",
          filter: `productSizeId=eq.${productSizeId}`,
        },
        () => {
          fetchAsks();
        }
      )
      .subscribe();

    return () => {
      supabase.removeChannel(channel);
    };
  }, [productSizeId, fetchBids, fetchAsks]);

  return { bids, asks, isLoading, error };
}
The hook loads all active bids and asks for the selected size when the element first renders in the user's end. After that, it listens to changes like new bids, matching asks, or order cancellations.
Bids are sorted highest-first, asks lowest-first. When the user navigates away, the connection is cleaned up automatically.
At this point you should have:
- Constants file at
/src/constants/index.tswith platform fee, price boundaries, categories, and pagination defaults - Bid and ask API routes with Zod validation, auth checks, and rate limiting
- Matching engine in
/src/lib/matching-engine.tsthat atomically pairs bids with asks - Double-check pattern preventing race conditions on concurrent matches
- Platform fee calculated and stored on every trade
- ProductSize stats updated automatically after each match
- Notifications created within the matching transaction
- Buy Now and Sell Now working through the same matching logic
- BidForm auto-redirects to Whop checkout when a bid matches immediately (calls
POST /api/trades/{id}/checkoutand navigates to thecheckoutUrl) - Supabase client at
/src/services/supabase.tswith browser singleton and server factory - Supabase Realtime broadcasting bid/ask table changes
useRealtimeBidshook at/src/hooks/useRealtimeBids.tsproviding live order book data to the frontend- A product page where the bid/ask spread updates in real time
Part 4: Payments, escrow, and webhooks
We talked about how the money flows in the project in part one, now, let's build it. By the end of this section, you'll have:
- Buyer charges
- Seller payouts
- Escrow hold pattern
- Webhook handlers
All of these flows will use Whop Payments Network.
Why use Whop Payments Network?
A marketplace project like this with multiple sellers needs connected accounts. Each seller gets their own identity with the payments service, and their payouts. Your app sits in the middle, takes a platform cut, and orchestrates the flow.
Using Whop Payments Network for payments services keeps everything in one ecosystem, plus you use it for user authentication as well.
When it comes to charges, you're going to use direct charges - the charge is created on seller's account, making it the merchant of record. The platform specifies an application_fee_amount that gets routes to your project automatically.
Seller onboarding
Before your sellers can start receiving payouts, they need a connected account with a completed KYC and a payout method file. The onboarding flow you'll use in the project follows these steps:
- The seller signs up on your platform via Whop OAuth
- When they navigate to "Start selling," the platform creates a connected account for them via the Whop API
- The seller is redirected to Whop-hosted onboarding where they verify their identity, provide business information, and add a bank account or other payout method
- Whop sends a callback/webhook when onboarding completes
- The platform stores the seller's connected account status and
company_id
Requirements for the seller onboarding flow you're going to build are:- Track connected account status per user (
PENDING,ACTIVE,SUSPENDED) - Store the seller's Whop
company_id(you'll need this for every charge) - Handle the KYC completion callback and update the seller's status
- Gate all selling actions (creating asks) behind
ACTIVEconnected account status - Show onboarding progress clearly to the seller
- Track connected account status per user (
The seller onboarding API route (POST /api/sellers/onboard) creates a child company under your parent company via whopsdk.companies.create(), passing env.WHOP_COMPANY_ID as the parent_company_id. This env var is the biz_... value from your company dashboard URL.
The WHOP_API_KEY must be a company API key (found in company Settings > API Keys), not an app API key - only company keys have the company:create_child permission needed for creating connected accounts.
Gating the sell UI
To enforce the onboarding requirement in the frontend, create a useCurrentUser hook at src/hooks/useCurrentUser.ts that fetches the current user from /api/auth/me (which already returns role and connectedAccountId):
"use client";

import { useState, useEffect } from "react";

interface CurrentUser {
  id: string;
  username: string;
  displayName: string | null;
  avatarUrl: string | null;
  role: string;
  connectedAccountId: string | null;
}

export function useCurrentUser() {
  const [user, setUser] = useState<CurrentUser | null>(null);
  const [isLoading, setIsLoading] = useState(true);

  useEffect(() => {
    fetch("/api/auth/me")
      .then((res) => (res.ok ? res.json() : null))
      .then((data) => {
        if (data?.user) setUser(data.user);
      })
      .catch(() => {})
      .finally(() => setIsLoading(false));
  }, []);

  return { user, isLoading };
}
Use this hook in two places:
AskFormcomponent, before rendering the ask form, checkuser.connectedAccountId. If the user isn't logged in, show a "Sign in to sell" prompt. If they're logged in but haven't onboarded, show a "Become a Seller" button that callsPOST /api/sellers/onboardand redirects to the Whop KYC page.- Dashboard Selling tab, same check. If the user hasn't completed seller onboarding, show an onboarding prompt instead of the active asks table.
This way, the onboarding flow is surfaced everywhere a user tries to sell - they're never left wondering why they can't place an ask.
The payment orchestration lives in two service files. First, let's go to src/services and create a file called whop.ts with the content:
import { whopsdk } from "@/lib/whop";
import { env } from "@/lib/env";

interface TradeForCheckout {
  id: string;
  price: number;
  platformFee: number;
  buyerId: string;
  sellerId: string;
  seller: {
    whopId: string;
    connectedAccountId?: string | null;
  };
}

interface CheckoutResult {
  checkoutUrl: string;
  checkoutId: string;
}

export async function createCheckoutForTrade(
  trade: TradeForCheckout
): Promise<CheckoutResult> {
  if (!trade.seller.connectedAccountId) {
    throw new Error("Seller does not have a connected Whop account");
  }

  const checkoutConfig = await whopsdk.checkoutConfigurations.create({
    redirect_url: `${env.NEXT_PUBLIC_APP_URL}/api/trades/${trade.id}/payment-callback`,
    plan: {
      company_id: trade.seller.connectedAccountId,
      currency: "usd",
      initial_price: trade.price,
      plan_type: "one_time",
      application_fee_amount: trade.platformFee,
    },
    metadata: {
      tradeId: trade.id,
      buyerId: trade.buyerId,
      sellerId: trade.sellerId,
    },
  });

  if (!checkoutConfig || !checkoutConfig.id) {
    throw new Error("Failed to create checkout session");
  }

  return {
    checkoutUrl: checkoutConfig.purchase_url as string,
    checkoutId: checkoutConfig.id,
  };
}

export async function getPaymentStatus(paymentId: string) {
  const payment = await whopsdk.payments.retrieve(paymentId);
  return payment;
}

export async function refundPayment(paymentId: string) {
  const refund = await whopsdk.payments.refund(paymentId);
  return refund;
}

export async function createTransfer(
  amount: number,
  originCompanyId: string,
  destinationCompanyId: string,
  metadata: Record<string, string>
) {
  const transfer = await whopsdk.transfers.create({
    amount,
    currency: "usd",
    origin_id: originCompanyId,
    destination_id: destinationCompanyId,
    metadata,
  });

  return transfer;
}
Now create the payment orchestration service that uses these wrappers. Go to src/services and create a file called payments.ts with the content:
import { TradeStatus, PaymentStatus, NotificationType } from "@prisma/client";
import { prisma } from "@/lib/prisma";
import { createCheckoutForTrade, refundPayment } from "@/services/whop";

export async function initiatePayment(tradeId: string) {
  const trade = await prisma.trade.findUnique({
    where: { id: tradeId },
    include: {
      seller: true,
      productSize: { include: { product: true } },
    },
  });

  if (!trade) {
    throw new Error("Trade not found");
  }

  if (trade.status !== TradeStatus.MATCHED) {
    throw new Error(`Trade is in ${trade.status} state, expected MATCHED`);
  }

  const checkout = await createCheckoutForTrade({
    id: trade.id,
    price: trade.price,
    platformFee: trade.platformFee,
    buyerId: trade.buyerId,
    sellerId: trade.sellerId,
    seller: {
      whopId: trade.seller.whopId,
      connectedAccountId: trade.seller.connectedAccountId,
    },
  });

  await prisma.trade.update({
    where: { id: trade.id },
    data: { status: TradeStatus.PAYMENT_PENDING },
  });

  return checkout;
}

export async function processRefund(tradeId: string) {
  const trade = await prisma.trade.findUnique({
    where: { id: tradeId },
    include: { payment: true, ask: true, productSize: { include: { product: true } } },
  });

  if (!trade || !trade.payment) {
    throw new Error("Trade or payment not found");
  }

  if (trade.status !== TradeStatus.FAILED) {
    throw new Error(`Trade is in ${trade.status} state, expected FAILED`);
  }

  await refundPayment(trade.payment.whopPaymentId);

  await prisma.$transaction(async (tx) => {
    await tx.payment.update({
      where: { id: trade.payment!.id },
      data: { status: PaymentStatus.REFUNDED },
    });

    await tx.trade.update({
      where: { id: trade.id },
      data: { status: TradeStatus.REFUNDED },
    });

    if (trade.ask) {
      await tx.ask.update({
        where: { id: trade.ask.id },
        data: { status: "ACTIVE" },
      });
    }

    await tx.notification.createMany({
      data: [
        {
          userId: trade.buyerId,
          type: NotificationType.ITEM_FAILED,
          title: "Refund processed",
          message: `Your payment of $${trade.price.toFixed(2)} for ${trade.productSize.product.name} has been refunded.`,
          metadata: { tradeId: trade.id },
        },
        {
          userId: trade.sellerId,
          type: NotificationType.ITEM_FAILED,
          title: "Item relisted",
          message: `Your ask for ${trade.productSize.product.name} has been relisted after authentication failure.`,
          metadata: { tradeId: trade.id },
        },
      ],
    });
  });
}
The initiatePayment function creates the Whop checkout on the seller's connected account and transitions the trade to PAYMENT_PENDING. processRefund handles the reverse - refunding the buyer, reopening the seller's ask, and notifying both parties.
For managing these flows, you're going to need a dashboard, and we're going to cover that in part six.
Payment on match
When your matching engine matches a bid and an ask, it creates a trade and the payment flow gets activated - following the steps below:
- The matching engine creates a
Traderecord with statusMATCHED - The platform creates a checkout configuration on the seller's connected account using
client.checkoutConfigurations.create(), specifying the trade amount and the platform'sapplication_fee_amount - Whop generates a checkout link
- The buyer is directed to complete payment through the Whop-hosted checkout
- On successful payment, Whop fires a
payment.succeededwebhook
Notice the redirect_url parameter in our checkout configuration - this tells Whop where to send the buyer after they complete (or cancel) payment.
Whop appends query parameters to this URL including payment_id and checkout_status, which our callback route uses to verify the payment server-side. Without redirect_url, the buyer ends up on a generic Whop page instead of back in your app.
The BidForm component handles this automatically - when a bid matches immediately (either through "Place Bid" at a matching price or "Buy Now"), the component detects { matched: true, trade: { id } } in the API response, calls POST /api/trades/{tradeId}/checkout to get the checkout URL, and redirects the buyer to Whop's payment page.
Buyers can also reach checkout from the trade detail page (we'll cover that later down the article) if they navigate away before paying.
In this tutorial, we're redirecting the buyers to a Whop hosted checkout page, but if you'd prefer to keep the buyer on your site, Whop also offers an embedded checkout component.
The escrow pattern
One thing we should clear up is that payments does not mean payout. When a buyer pays, the funds are held instead of directly being transferred to sellers.
This is an escrow pattern and it protects buyers from receiving misrepresented or wrong items.
The trade moves through these statuses after payment:
- PAID - Buyer has been charged. Funds held via Whop
- SHIPPED - Seller has shipped the item to the platform for authentication. Seller provides tracking number
- AUTHENTICATING - Item received by the platform. Admin review in progress
- VERIFIED - Item passes authentication. Payout released to seller
Each status transition is an event. Each event triggers notifications (which we'll look at in part six) and potentially a financial action. The webhook handler and admin actions taken from your platform moderators drive these transitions.
Payout release
When an admin of your platform marks an item as verified, the platform releases the payout to the seller.
Since you're using direct charges, the funds are already linked to the seller's connected account. The payout goes to whatever method the seller selected during KYC.
Refund on Authentication Failure
If the item fails authentication, the project follows the a reverse flow:
- Admin marks the item as
FAILED - Trade status moves to
FAILED - Buyer is refunded via Whop (full refund of the original charge)
- Item is returned to the seller
- The seller's original ask can be reposted
- Both buyer and seller receive notifications explaining the outcome
The refund is processed through Whop's API against the original charge. Because we stored thewhopPaymentIdon the trade's Payment record, we have the reference we need.
Webhook handler
After the buyer completes the payment, Whop sends an POST message to your webhook endpoint with the result. Your webhook handler then verifies the signature, updates the database, and notifies both parties in-app.
Before creating the handler file, you need the Whop SDK wrapper. It uses lazy initialization (same Proxy pattern as env.ts) so it doesn't crash during builds.
To install the Whop SDK, run the command below in your terminal:
npm install @whop/sdk
Then, go to src/lib and create a file called whop.ts with the content:
import { Whop } from "@whop/sdk";
import { env } from "@/lib/env";

let _whopsdk: Whop | undefined;

export function getWhopSDK(): Whop {
  if (!_whopsdk) {
    _whopsdk = new Whop({
      appID: env.WHOP_APP_ID,
      apiKey: env.WHOP_API_KEY,
      webhookKey: btoa(env.WHOP_WEBHOOK_SECRET),
      baseURL: `${env.WHOP_API_BASE}/api/v1`,
    });
  }
  return _whopsdk;
}

export const whopsdk = new Proxy({} as Whop, {
  get(_, prop) {
    const sdk = getWhopSDK();
    const value = sdk[prop as keyof Whop];
    if (typeof value === "function") {
      return value.bind(sdk);
    }
    return value;
  },
});
The baseURL is built from WHOP_API_BASE. The same env var that controls sandbox vs production for OAuth (which we've covered in part two).
In development, this points to https://sandbox-api.whop.com/api/v1 so that you can simulate Whop flows without moving real money. In production, you'll change it to https://api.whop.com/api/v1.
The webhook handler uses waitUntil from @vercel/functions to process events asynchronously after returning 200. You can install it using the command below:
npm install @vercel/functions
Now, let's go to src/app/api/webhooks/whop and create a file called route.ts with the content:
import { NextRequest } from "next/server";
import {
  PaymentStatus,
  TradeStatus,
  BidStatus,
  AskStatus,
  NotificationType,
} from "@prisma/client";
import { waitUntil } from "@vercel/functions";
import { whopsdk } from "@/lib/whop";
import { prisma } from "@/lib/prisma";
import { sendSystemMessage } from "@/services/chat";

export async function POST(request: NextRequest) {
  try {
    const bodyText = await request.text();
    const headers = Object.fromEntries(request.headers);

    let webhookData: { type: string; data: Record<string, unknown> };
    try {
      webhookData = (await whopsdk.webhooks.unwrap(bodyText, {
        headers,
      })) as unknown as {
        type: string;
        data: Record<string, unknown>;
      };
    } catch {
      return new Response("Invalid webhook signature", { status: 401 });
    }

    waitUntil(processWebhook(webhookData));

    return new Response("OK", { status: 200 });
  } catch (error: unknown) {
    console.error("Webhook handler error:", error);
    return new Response("OK", { status: 200 });
  }
}

async function processWebhook(webhookData: {
  type: string;
  data: Record<string, unknown>;
}) {
  try {
    const paymentId = webhookData.data.id as string | undefined;
    if (!paymentId) return;

    // Idempotency check - skip if already processed
    const existingPayment = await prisma.payment.findFirst({
      where: { whopPaymentId: paymentId },
    });
    if (existingPayment) return;

    const tradeId = webhookData.data.metadata
      ? ((webhookData.data.metadata as Record<string, unknown>).tradeId as string | undefined)
      : undefined;

    switch (webhookData.type) {
      case "payment.succeeded": {
        if (!tradeId) return;

        const trade = await prisma.trade.findUnique({
          where: { id: tradeId },
        });
        if (!trade) return;

        await prisma.$transaction(async (tx) => {
          await tx.payment.create({
            data: {
              tradeId: trade.id,
              whopPaymentId: paymentId,
              amount: trade.price,
              platformFee: trade.platformFee,
              status: PaymentStatus.SUCCEEDED,
              idempotencyKey: `payment_succeeded_${paymentId}`,
            },
          });

          await tx.trade.update({
            where: { id: trade.id },
            data: { status: TradeStatus.PAID },
          });

          await tx.notification.createMany({
            data: [
              {
                userId: trade.buyerId,
                type: NotificationType.TRADE_COMPLETED,
                title: "Payment confirmed",
                message: `Your payment of $${trade.price.toFixed(2)} has been confirmed.`,
                metadata: { tradeId: trade.id },
              },
              {
                userId: trade.sellerId,
                type: NotificationType.ITEM_SHIPPED,
                title: "New sale - ship your item",
                message: `A buyer has paid $${trade.price.toFixed(2)}. Please ship your item for authentication.`,
                metadata: { tradeId: trade.id },
              },
            ],
          });
        });

        if (trade.chatChannelId) {
          await sendSystemMessage(
            trade.chatChannelId,
            "Payment confirmed! Seller, please ship your item for authentication."
          );
        }

        break;
      }

      case "payment.failed": {
        if (!tradeId) return;

        const trade = await prisma.trade.findUnique({
          where: { id: tradeId },
          include: { bid: true, ask: true },
        });
        if (!trade) return;

        await prisma.$transaction(async (tx) => {
          await tx.payment.create({
            data: {
              tradeId: trade.id,
              whopPaymentId: paymentId,
              amount: trade.price,
              platformFee: trade.platformFee,
              status: PaymentStatus.FAILED,
              idempotencyKey: `payment_failed_${paymentId}`,
            },
          });

          await tx.trade.update({
            where: { id: trade.id },
            data: { status: TradeStatus.FAILED },
          });

          if (trade.bid) {
            await tx.bid.update({
              where: { id: trade.bid.id },
              data: { status: BidStatus.ACTIVE },
            });
          }

          if (trade.ask) {
            await tx.ask.update({
              where: { id: trade.ask.id },
              data: { status: AskStatus.ACTIVE },
            });
          }

          await tx.notification.create({
            data: {
              userId: trade.buyerId,
              type: NotificationType.ITEM_FAILED,
              title: "Payment failed",
              message: "Your payment could not be processed. Your bid has been reopened.",
              metadata: { tradeId: trade.id },
            },
          });
        });

        if (trade.chatChannelId) {
          await sendSystemMessage(
            trade.chatChannelId,
            "Payment failed. The bid and ask have been reopened."
          );
        }

        break;
      }
    }
  } catch (error: unknown) {
    console.error("Webhook processing error:", error);
  }
}
Key patterns in this handler:
- Signature verification first -
whopsdk.webhooks.unwrap()verifies the request came from Whop. If it fails, returns 401 and stops - Return 200 immediately - Whop retries webhooks that don't get a 200. We return right away and use
waitUntilfrom@vercel/functionsto process in the background - Idempotency - Webhooks can arrive more than once. Before processing, we check if a Payment with this
whopPaymentIdalready exists. If so, skip. The unique constraint onwhopPaymentIdin the database protects against race conditions too - Single transaction - Payment record, trade status update, and notifications all happen inside one Prisma
$transaction. Everything succeeds or nothing does - Bid/ask reopening on failure - A failed payment kills the trade but reopens the original bid and ask so the matching engine can find new counterparties
Payment verification callback
Webhooks are the primary mechanism for learning about payment outcomes, but they're not the only one.
After the buyer completes payment on Whop's checkout page, Whop redirects them back to the redirect_url we set on the checkout configuration, with payment_id and checkout_status as query parameters. We use this redirect to verify the payment server-side as a fallback.
Create the callback route by going to the src/app/api/trades/[id]/payment-callback folder and creating a file called route.ts with the content:
import { NextRequest, NextResponse } from "next/server";
import {
  PaymentStatus,
  TradeStatus,
  NotificationType,
} from "@prisma/client";
import { prisma } from "@/lib/prisma";
import { env } from "@/lib/env";
import { getPaymentStatus } from "@/services/whop";
import { sendSystemMessage } from "@/services/chat";

export async function GET(
  request: NextRequest,
  { params }: { params: Promise<{ id: string }> }
) {
  const { id: tradeId } = await params;
  const paymentId = request.nextUrl.searchParams.get("payment_id");
  const checkoutStatus = request.nextUrl.searchParams.get("checkout_status");

  const dashboardUrl = `${env.NEXT_PUBLIC_APP_URL}/dashboard`;

  if (!tradeId || !paymentId) {
    return NextResponse.redirect(`${dashboardUrl}?payment=error`);
  }

  try {
    const trade = await prisma.trade.findUnique({
      where: { id: tradeId },
    });

    if (!trade) {
      return NextResponse.redirect(`${dashboardUrl}?payment=error`);
    }

    if (trade.status === TradeStatus.PAID) {
      return NextResponse.redirect(
        `${dashboardUrl}?payment=success&tradeId=${tradeId}`
      );
    }

    if (checkoutStatus !== "success") {
      return NextResponse.redirect(
        `${dashboardUrl}?payment=failed&tradeId=${tradeId}`
      );
    }

    const payment = await getPaymentStatus(paymentId);
    const whopPayment = payment as {
      status?: string;
      substatus?: string;
    };
    const isPaid =
      whopPayment.status === "paid" ||
      whopPayment.substatus === "succeeded";

    if (isPaid) {
      const existingPayment = await prisma.payment.findFirst({
        where: { whopPaymentId: paymentId },
      });

      if (!existingPayment) {
        await prisma.$transaction(async (tx) => {
          await tx.payment.create({
            data: {
              tradeId: trade.id,
              whopPaymentId: paymentId,
              amount: trade.price,
              platformFee: trade.platformFee,
              status: PaymentStatus.SUCCEEDED,
              idempotencyKey: `payment_callback_${paymentId}`,
            },
          });

          await tx.trade.update({
            where: { id: trade.id },
            data: { status: TradeStatus.PAID },
          });

          await tx.notification.createMany({
            data: [
              {
                userId: trade.buyerId,
                type: NotificationType.TRADE_COMPLETED,
                title: "Payment confirmed",
                message: `Your payment of $${trade.price.toFixed(2)} has been confirmed.`,
                metadata: { tradeId: trade.id },
              },
              {
                userId: trade.sellerId,
                type: NotificationType.ITEM_SHIPPED,
                title: "New sale - ship your item",
                message: `A buyer has paid $${trade.price.toFixed(2)}. Please ship your item for authentication.`,
                metadata: { tradeId: trade.id },
              },
            ],
          });
        });
      }

      if (trade.chatChannelId) {
        await sendSystemMessage(
          trade.chatChannelId,
          "Payment confirmed! Seller, please ship your item for authentication."
        );
      }

      return NextResponse.redirect(
        `${dashboardUrl}?payment=success&tradeId=${tradeId}`
      );
    }

    return NextResponse.redirect(
      `${dashboardUrl}?payment=pending&tradeId=${tradeId}`
    );
  } catch (error: unknown) {
    console.error("Payment callback error:", error);
    return NextResponse.redirect(
      `${dashboardUrl}?payment=error&tradeId=${tradeId}`
    );
  }
}
This route does the same work as the webhook handler - create a Payment record, update the trade to PAID, notify both parties - but it's triggered by the buyer's browser redirect instead of a server-to-server webhook.
The idempotency check ensures that if both the webhook and the callback fire, only the first one creates the Payment record. In production, webhooks usually arrive first; in sandbox, this callback is the primary path.
Trade details page
Every trade needs a detail page where the buyer can see the status, product info, parties involved, and - if the trade is waiting for payment - a "Pay Now" button. This page is also the destination when a user clicks a notification.
First, create a GET endpoint that returns a single trade with all its related data. Go to src/app/api/trades/[id] and create a file called route.ts with the content:
import { NextRequest, NextResponse } from "next/server";
import { prisma } from "@/lib/prisma";
import { requireAuth } from "@/lib/auth";

export async function GET(
  request: NextRequest,
  { params }: { params: Promise<{ id: string }> }
) {
  try {
    const user = await requireAuth();
    const { id } = await params;

    const trade = await prisma.trade.findUnique({
      where: { id },
      include: {
        productSize: {
          include: {
            product: {
              select: {
                id: true,
                name: true,
                brand: true,
                images: true,
                sku: true,
              },
            },
          },
        },
        buyer: { select: { id: true, username: true, displayName: true } },
        seller: { select: { id: true, username: true, displayName: true } },
        payment: true,
      },
    });

    if (!trade) {
      return NextResponse.json(
        { error: "Trade not found" },
        { status: 404 }
      );
    }

    if (trade.buyerId !== user.id && trade.sellerId !== user.id) {
      return NextResponse.json(
        { error: "Not authorized to view this trade" },
        { status: 403 }
      );
    }

    return NextResponse.json({ trade });
  } catch (error: unknown) {
    if (error instanceof Response) {
      return NextResponse.json(
        { error: "Authentication required" },
        { status: 401 }
      );
    }
    console.error("Failed to fetch trade:", error);
    return NextResponse.json(
      { error: "Internal server error" },
      { status: 500 }
    );
  }
}
The endpoint is auth-gated - only the buyer or seller of the trade can view it.
Then create the trade detail page at src/app/trades/[id]/page.tsx. This is a client component that:
- Fetches the trade from
GET /api/trades/{id}on mount - Displays the product image, name, brand, size, and SKU
- Shows a status badge using the
ORDER_STATUSESmap from/src/constants/index.ts - For trades in
MATCHEDstatus (awaiting payment), shows a prominent "Pay Now" button that callsPOST /api/trades/{id}/checkoutand redirects to Whop checkout - Displays trade details in a grid: price, platform fee, the user's role (buyer/seller), and trade date
- Shows both parties (buyer and seller names)
- If a payment exists, shows payment status, amount, Whop payment ID, and date
- Links to the product page for quick navigation back
This page serves two purposes: it's the landing page when a user clicks a trade-related notification (bid matched, payment confirmed, item shipped, etc.), and it's the place where a buyer who didn't complete checkout immediately can return to pay.
At this point you should have:
- Seller onboarding flow with connected account creation and KYC
- Checkout configuration creation on bid/ask match using Direct Charges
- BidForm auto-redirect to Whop checkout when a bid matches immediately
- Payment redirect back to your app via
redirect_url - Payment verification callback as a webhook fallback
- Escrow pattern: payment held until authentication passes
- Payout release after successful verification
- Refund flow for failed authentication
- Webhook handler at
/api/webhooks/whop/route.tswith signature verification - Idempotency checks on all webhook and callback event processing
- Notifications sent on payment success and failure
- Trade detail page at
/trades/[id]with "Pay Now" for pending trades - Trade GET endpoint at
/api/trades/[id]with auth gating
Part 5: Product authentication, product pages, and market data
So far, you have a matching engine that links bids with asks and a payments system that charges buyers and holds funds in escrow. One of the most critical parts of moving money between buyers and sellers is the item authentication, where you verify the item's legitimacy before releasing funds.
This authentication flow is what makes StockX work - instead of a trust-based system, buyers have their backs covered by the platform. This project replicates this with an admin review flow.
If you don't need the authentication for your marketplace, you can skip this section and use a trust-based system instead where payment release happens automatically after seller ships the item. The escrow flow from Part 4 still works, you'd just remove the AUTHENTICATING step and move directly from SHIPPED to DELIVERED.
The status state machine
Every trade follows a linear path with one decision point:
- MATCHED -> PAID: Triggered by the
payment.succeededwebhook (Part 4) - PAID -> SHIPPED: Triggered when the seller submits a tracking number
- SHIPPED -> AUTHENTICATING: Triggered when the platform confirms receipt of the item
- AUTHENTICATING -> VERIFIED: Admin marks the item as passing authentication
- AUTHENTICATING -> FAILED: Admin marks the item as failing authentication
- VERIFIED -> DELIVERED: Shipping confirmation shows the item was delivered to the buyer
- FAILED -> REFUNDED: Buyer refund is processed, item returned to seller
What happens on failure
If an items fails the authentication these steps occur:
- The trade status moves to
FAILED - The buyer receives a full refund via Whop (against the original charge)
- The seller is notified that authentication failed, with the reason
- The item is flagged for return shipping to the seller
- Once the seller receives the item back, they can optionally relist it (create a new ask)
- The original bid is also reopened, the buyer still wants the product, just not a counterfeit one
The failure reason matters. "Wrong size sent" is different from "Counterfeit item." Your admin panel should capture this and display it to the seller.
Admin review process
The admin control flow should be handled by the admin panel, protected behind an admin role check at the admin/authentication. It requires a list of trades with the AUTHENTICATING status (oldest to newest) and, in addition, should have easy-to-use approve/reject buttons.
In the event of a rejection, admins must provide an explanation. An audit trail is generated for all actions taken by admins.
Centralized product pages
This project will utilise centralised product pages. On sites such as eBay or Etsy, each product, for example the Nike Jordan 1 Royal, has individual pages linked to sellers, and each has different images and prices. On StockX, each product has a single page, and sellers' asks and buyers' bids are aggregated on a single canonical page.
This gives the platform control over the product catalogue. Instead of listing a product, sellers create an ask on an existing product page. If the product is not available on the platform, admins can add it to the catalogue. This centralisation enables the bid and ask market model to function.
Each product page needs:
- Product images (platform-controlled, not seller-uploaded)
- Product name, brand, SKU, colorway, release date
- Description and specifications
- Retail price (for reference - the market price will be different)
- Size picker that switches the entire page's market context
- Order book showing current bids and asks for the selected size
- Price history chart for the selected size
- Bid and Ask action buttons
Let's create the product page route. Go to src/app/products/[id] and create a file called page.tsx with the content:
export const dynamic = "force-dynamic";

import { notFound } from "next/navigation";
import { prisma } from "@/lib/prisma";
import { ProductDetail } from "@/components/ProductDetail";

async function getProduct(id: string) {
  const product = await prisma.product.findUnique({
    where: { id },
    include: {
      sizes: {
        orderBy: { size: "asc" },
        include: {
          trades: {
            select: { price: true, createdAt: true },
            orderBy: { createdAt: "asc" },
            take: 100,
          },
        },
      },
    },
  });
  return product;
}

export default async function ProductPage({
  params,
}: {
  params: Promise<{ id: string }>;
}) {
  const { id } = await params;
  const product = await getProduct(id);

  if (!product) {
    notFound();
  }

  const allTrades = product.sizes.flatMap((s) =>
    s.trades.map((t) => ({
      price: t.price,
      createdAt: t.createdAt.toISOString(),
    }))
  );

  const totalSales = product.sizes.reduce((sum, s) => sum + s.salesCount, 0);
  const avgPrice =
    allTrades.length > 0
      ? allTrades.reduce((sum, t) => sum + t.price, 0) / allTrades.length
      : null;
  const lastSale =
    allTrades.length > 0 ? allTrades[allTrades.length - 1].price : null;
  const premiumDiscount =
    lastSale !== null
      ? (((lastSale - product.retailPrice) / product.retailPrice) * 100).toFixed(0)
      : null;

  const serializedSizes = product.sizes.map((s) => ({
    id: s.id,
    size: s.size,
    lowestAsk: s.lowestAsk,
    highestBid: s.highestBid,
    lastSalePrice: s.lastSalePrice,
    salesCount: s.salesCount,
  }));

  return (
    <div className="max-w-7xl mx-auto px-4 sm:px-6 lg:px-8 py-8">
      <ProductDetail
        product={{
          id: product.id,
          name: product.name,
          brand: product.brand,
          sku: product.sku,
          description: product.description,
          images: product.images,
          retailPrice: product.retailPrice,
          category: product.category,
        }}
        sizes={serializedSizes}
        trades={allTrades}
        marketSummary={{
          lastSale,
          avgPrice,
          totalSales,
          premiumDiscount,
        }}
      />
    </div>
  );
}
The size/SKU picker
Sizes or product types on the platform have their own independent marketplaces. A size 10 Air Jordan 1 Royal may be sold for $180, while a size 13 may be sold for $220. The size and product type selector controls transitions between these marketplaces. When a user selects a size or type:
- The lowest ask and highest bid update to reflect that size's order book
- The price history chart redraws with that size's trade history
- The bid and ask forms pre-fill with the selected size
- The "last sale" price updates
Requirements for the size picker are: - Grid layout showing all available sizes
- Each size tile displays the lowest ask price for that size (or "No Asks" if none exist)
- Visual highlight on the selected size
- Sizes with no market activity should still be selectable (users should be able to place the first bid or ask)
- URL state: selecting a size updates the URL query parameter (
?size=10) so the page is shareable and bookmarkable - Default to the most popular size (highest trade volume) when no size is specified
Real-time market data
Markets without live price feeds can feel dull. If a user browsing a product page doesn't see the data when someone else places a bid on the same product, the experience StockX promises is ruined.
That's why we used Supabase Realtime in part one – it allows us to use real-time database changes without having to develop our own WebSocket infrastructure.
Live price ticker
Products and their sizes or types are updated in real time with their latest sale prices, and all users viewing the products can see the new prices without having to refresh the page whenever a transaction is completed on the platform.
This is achieved by Supabase Realtime tracking the Trade table and filtering by product.
Requirements for the live ticker:
- Subscribe to new trades for the currently viewed product/size
- Update the "Last Sale" price immediately when a new trade is inserted
- Show a brief visual indicator (green/red flash) when the price changes
- Unsubscribe when the user navigates away (cleanup on unmount)
- Handle connection drops by reconnecting and fetching the latest price
The useRealtimeBids hook we created in part three powers this.
Price history chart
The chart on product pages lists prices that change over time. This is one of StockX's most recognisable features and presents product pages to users with an experience similar to a stock chart.
Data points the chart needs:
- Last sale price: the most recent trade price (real-time)
- Average sale price (30-day): rolling average over the past 30 days
- Total sales volume: number of trades for this product/size, shown as context
- Highest sale: the peak price this product/size has ever traded at
- Lowest sale: the floor price
- Premium/discount vs. retail: current market price as a percentage above or below the original retail price (e.g., "+42% above retail")
Charts should also support timeframe options such as 1 day, 7 days, 30 days, 90 days, 1 year, and all time. Each timeframe selection reloads the price history and refreshes the chart.
Requirements for the price chart: - Line chart with trade price on the Y axis and date on the X axis
- Time range selector (
1D,7D,30D,90D,1Y,ALL) - Hover tooltip showing exact price and date for each data point
- Volume bars along the bottom (optional but adds context)
- Summary stats displayed alongside the chart (last sale, average, high, low, premium/discount)
- Responsive: works on mobile screens without losing readability
Part 6: Search, notifications, and deployment
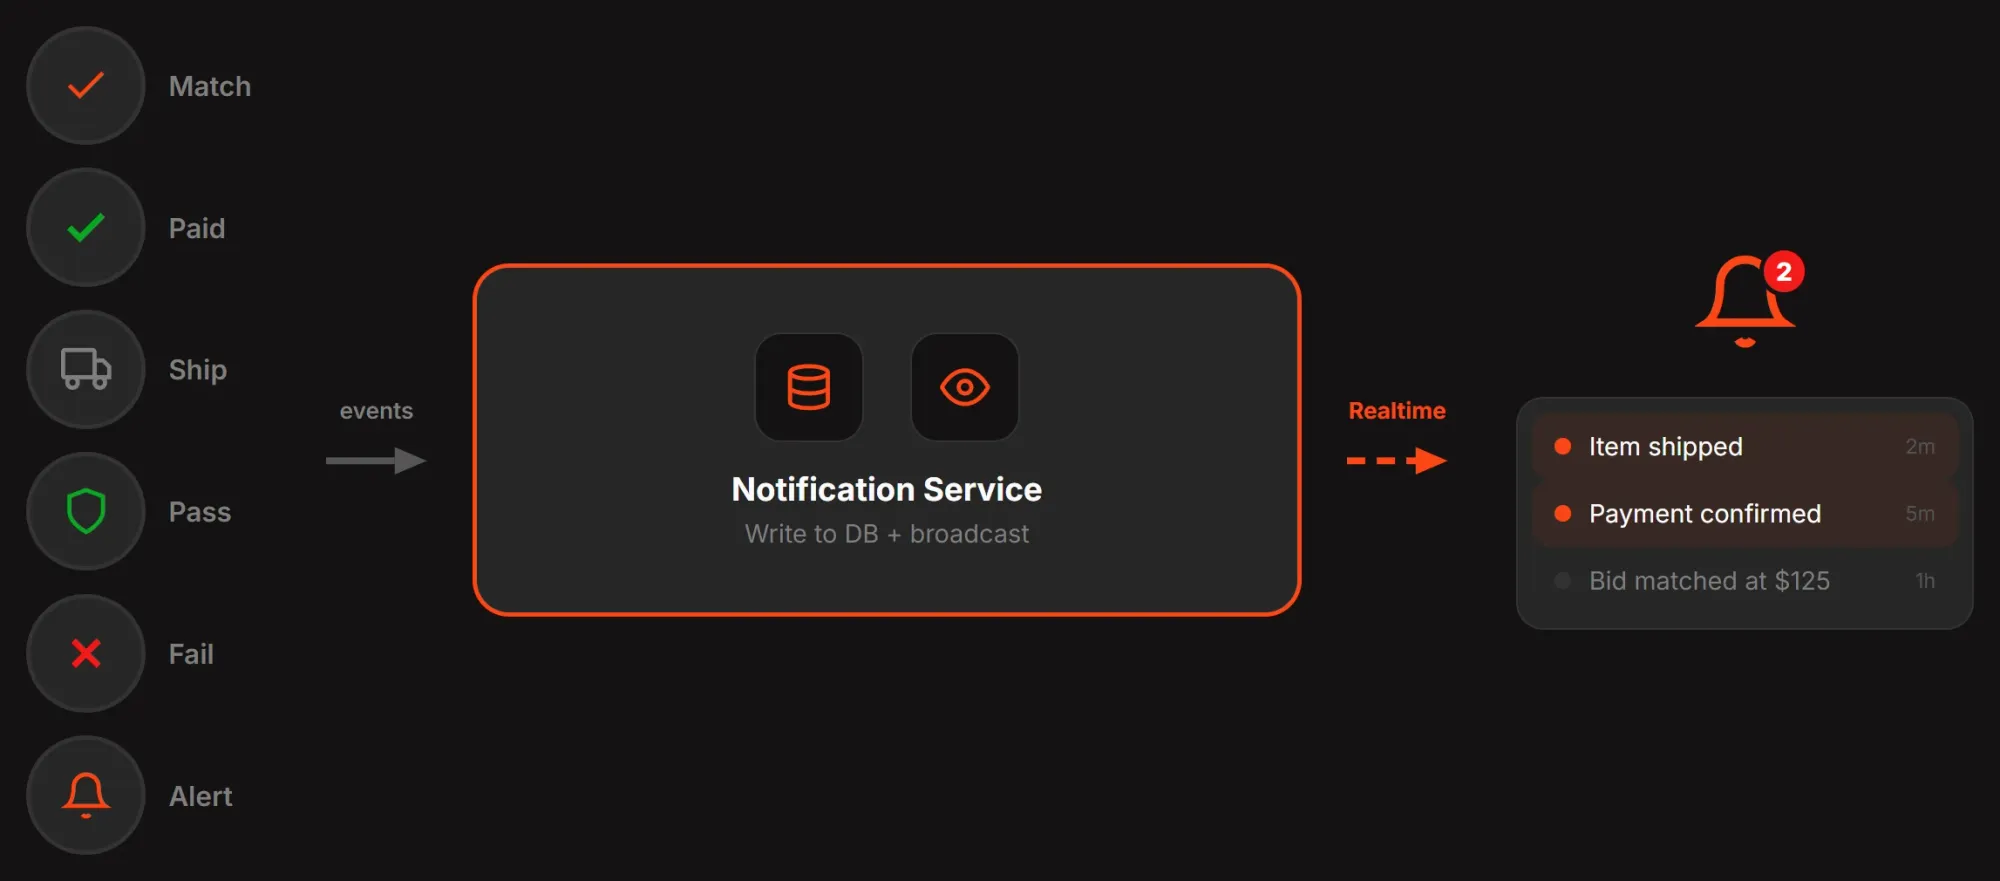
So far, we have covered market logic, bid and ask matching, payment flow, escrow logic, product verification, product pages, and live market data.
This final section will address the features that will enable you to use the project on a large scale: search, notifications, and user dashboards.
Full-text search
Markets hosting hundreds or even thousands of products require powerful search capabilities. Users visiting the site with the intention to purchase will have specific product names in mind and should be able to find them easily.
We will avoid using external systems by leveraging PostgreSQL's built-in text search feature via Prisma. The search indexes product name, brand, and SKU using tsvector columns, and queries use tsquery with ranking.
Requirements for search:
- Search across product name, brand, and SKU simultaneously
- Debounced input: don't fire a query on every keystroke, wait 300ms after the user stops typing
- Autocomplete suggestions: show a dropdown of matching products as the user types, with product images and current lowest ask price
- Highlighted matches: bold the matching portion of each result so the user can scan quickly
- Empty state: show trending products when the search box is empty or has no results
- Keyboard navigation: arrow keys to move through suggestions, Enter to select
- Mobile-friendly: full-screen search overlay on small screens
Create the search component at src/components/SearchBar.tsx. This component manages filter state locally, debounces the search input (300ms delay after the user stops typing), and calls an onChange callback with the current filters.
It renders a search input, dropdowns for category/brand/size, min/max price fields, and removable filter pills for active filters. The CATEGORIES constant from /src/constants/index.ts populates the category dropdown; brand and size options are passed as props from the parent page.
Filter system
Users can find products using the search system you have developed, but they also need filtering systems to find the specific products and types they want.
Available filters:
- Category: Sneakers, Streetwear, Electronics, Collectibles (or whatever categories your catalog uses)
- Brand: Nike, Adidas, New Balance, etc. dynamically populated from your product catalog
- Size: Varies by category, shoe sizes for sneakers, clothing sizes for streetwear
- Price range: Min/max slider or input fields, filtering by lowest ask price
Requirements for the filter system: - URL-persisted filter state: every filter combination maps to a URL query string (
?category=sneakers&brand=nike&minPrice=100). Users can bookmark filtered views and share links - Combinable filters: all filters work together (brand + size + price range narrows results progressively)
- Result count update: show how many products match the current filter combination, updating as filters change
- Clear filters: one-click reset to remove all active filters
- Filter pills: show active filters as removable chips/pills above the results grid
- Responsive sidebar: filters in a collapsible sidebar on desktop, a bottom sheet or modal on mobile
Trending and most popular
Home and discover pages require systems to bring attention-grabbing products to users. This increases engagement while also allowing new users to discover other content offered by your platform.
The trending algorithm tracks new activity signals and determines a score:
- Trade volume (24h): products that are actively selling rank higher
- Bid count (24h): products with many active bids have demand even if they haven't traded recently
- Price movement: products with significant price changes (up or down) are interesting, a 15% price jump in a day is newsworthy
You can weight these however makes sense for your catalog. A simple starting point:score = (trades_24h * 3) + (bids_24h * 1) + (abs(price_change_pct) * 2). Adjust the multipliers based on what produces good results with your data.
Requirements: - Trending section on the homepage showing the top 8-12 products by trending score
- "Most Popular" as a sort option on browse/search pages
- Recalculate trending scores periodically (every 15 minutes via a cron job, or on-demand with caching)
- Show the signal: "12 sales today" or "+8% this week" alongside trending products so users understand why they're featured
Custom pagination
Due to the nature of the platform, product lists can be very long, and most likely will be.
While other marketplace sites solve this problem through methods such as infinite scroll, there are drawbacks, the biggest being performance. Instead of such solutions, you will use a page-based solution in this project.
Requirements for pagination:
- Page size: configurable, default 40 products per page
- Total count: display "Showing 41-80 of 1,247 products" so users know the scale
- Next/previous navigation with page numbers
- URL-persisted page state:
?page=3or?cursor=abc123in the URL - Preserve filter state across pages, changing pages shouldn't reset active filters
Create the pagination component atsrc/components/Pagination.tsx. It takescurrentPage,totalPages, and anonPageChangecallback. The component renders first/previous/next/last buttons with SVG icons, page numbers with ellipsis for large ranges (showing at most 7 page buttons), and disables navigation buttons at the boundaries. It returnsnullwhentotalPagesis 1 or less.
In-app notification system
Users should receive notifications when an interaction requiring their attention occurs (such as a bid matching or a payment completing).
Let's set up this system. We will deliver notifications to users within the application without using any external services. A notification button in the navigation bar should display the user's notification count and, when clicked, open a menu listing the notifications.
Notification triggers:
- Bid matched: your bid found a seller at your price or lower - "Your bid for Air Jordan 15 (Size 10) was matched at $285"
- Ask matched: your ask found a buyer - "Your Air Jordan 15 (Size 10) sold for $290. Ship it for authentication."
- Payment confirmed: charge went through - "Payment of $285 confirmed for your purchase"
- Payment failed: charge failed - "Payment failed. Your bid has been reopened."
- Item shipped: seller provided tracking - "Your item has shipped. Tracking: [number]"
- Authentication complete: item was verified - "Your Jordan 4 Bred passed authentication and is on its way"
- Authentication failed: item failed verification - "Authentication failed. A refund has been initiated."
- Price alert: a product on your watchlist hit a target price - "Air Jordan 15 (Size 10) dropped below your $250 alert"
Requirements for the notification system: Notificationtable in the database (already in the Prisma schema) with fields: userId, type, message, metadata (JSON), read status, createdAt- Bell icon in the nav bar with a badge showing the unread count
- Dropdown panel showing the most recent notifications, grouped by read/unread
- Mark individual notifications as read (on click)
- "Mark all as read" button
- Notification detail: clicking a notification navigates to the relevant page (trade detail, product page, dashboard)
- Polling or Supabase Realtime subscription to check for new notifications without page refresh
- Notification preferences: let users choose which notification types they want (future enhancement - start with all enabled)
Create the notification hook at src/hooks/useNotifications.ts. This hook fetches notifications from /api/notifications, subscribes to Supabase Realtime on the Notification table filtered by userId for live updates, and exposes markAsRead (patches a single notification) and markAllAsRead (patches all unread). It returns { notifications, unreadCount, markAsRead, markAllAsRead, isLoading }.
Then create the notification button component in the src/components/NotificationBell.tsx location. It should use a useNotifications hook and have a bell icon with a notification count badge. Clicking a notification should mark it as read and - if the notification's metadata contains a tradeId - navigate to /trades/{tradeId} (the trade detail page from part four).
This gives users a direct path from "Your bid was matched" to the trade page where they can pay or track status. Use Next.js useRouter for the navigation and close the dropdown on click.
User dashboards
User dashboards should provide users with information such as active orders, history, and product positions. Naturally, these dashboards should vary depending on the user type (seller, buyer, or both).
The buyer dashboard shows:
- Active bids: all open bids with current status, product info, and a cancel option
- Purchase history: completed trades with dates, prices, and authentication status
- Items awaiting delivery: trades that have been verified and are in transit
- Portfolio value: the total market value of items the buyer owns, based on current lowest ask prices
The seller dashboard shows: - Active asks: all open asks with current status, product info, and ability to update price or cancel
- Sales history: completed trades with dates, sale price, fees, and net earnings
- Items to ship: trades in
PAIDstatus that need the seller to ship for authentication - this is action-required, so make it prominent - Earnings summary: total earnings, pending payouts, completed payouts
Order history
A filterable, sortable table showing every trade the user has been involved in:
- Trade date, product, size, price, role (buyer/seller), status
- Filters by status (active, completed, failed), role, date range
- Sortable by date, price, or status
- Expandable rows showing trade detail (tracking number, authentication result, payment info)
Create the dashboard page at src/app/dashboard/page.tsx. This is a client component with four tabs - Overview, Buying, Selling, and Portfolio. It uses a usePortfolio hook (at src/hooks/usePortfolio.ts) that loads the user's active bids, asks, completed trades, payment totals, and portfolio value from /api/user/portfolio.
The Overview tab shows summary cards, the Buying tab shows active bids and purchase history tables, the Selling tab gates behind seller onboarding - if the user hasn't completed Whop KYC, it shows a "Become a Seller" button that triggers POST /api/sellers/onboard and redirects to the Whop-hosted verification flow, otherwise it shows active asks.
The Portfolio tab shows each owned item with purchase price, current market price, and gain/loss percentage. The same onboarding gate applies to the AskForm component on product pages - both use the useCurrentUser hook (from part four) to check connectedAccountId.
Deployment and production readiness
Your app has been running on Vercel since part one, so let's take a look at some important factors to consider before you move the project to production:
- You should use the Whop API (
https://api.whop.com) for theWHOP_API_BASEenvironment variable on production. For preview and development, you used Whop sandbox (https://sandbox-api.whop.com) - Make sure
WHOP_API_KEYis a company API key in all environments, andWHOP_COMPANY_IDis set correctly - Your webhook signature verification is active and tested (in part four), rate limiting applies to all API routes, and each has Zod validation.
- There are no secrets in
NEXT_PUBLIC_environment variables - CORS and CSRF configurations are set up
- Sanitized input for storage and render
Part 7: Buyer-seller chat with Whop embedded components

So far, the project has authentication, bid/ask matching, payments, product pages, search, and notifications. One thing is missing: buyers and sellers can't talk to each other.
We'll add chat to every trade using Whop's embedded chat components - drop-in UI that handles messaging, presence, and real-time updates without building any chat infrastructure.
Why Whop embedded chat?
Building a chat system from scratch means: message storage, WebSocket connections, delivery guarantees, typing indicators, read receipts, media uploads, moderation. That's a project on its own.
Whop provides:
- A pre-built chat UI that drops into any React app
- Real-time messaging over WebSockets (handled for you)
- DM channels scoped to your company
- Short-lived access tokens so your server controls who can chat
- No OAuth scope changes - access tokens bypass OAuth entirely
The architecture is simple: your server creates DM channels and tokens via the Whop API, and the client renders the chat UI using those tokens.
What we're building
- Auto-create a DM channel between buyer and seller when a trade matches
- Show the chat side-by-side with trade details (stacked on mobile)
- Send automated system messages on trade status changes (payment confirmed, payment failed)
- Add a chat icon in the navbar linking to the dashboard
Step 1: Install packages
You need to install two packages: the React wrapper components and the underlying vanilla JS runtime:
npm install @whop/embedded-components-react-js@0.0.13-beta.4 @whop/embedded-components-vanilla-js@0.0.13-beta.4
0.0.13-beta release. The stable 0.0.12 only has payouts components.Step 2: Whop dashboard permissions
Your company API key needs these permissions for chat to work:
| Permission | Purpose |
|---|---|
chat:read |
Read chat messages |
chat:message:create |
Send messages (system messages) |
dms:read |
List and retrieve DM channels |
dms:message:manage |
Manage messages in DM channels |
dms:channel:manage |
Create and manage DM channels |
Go to your company dashboard, Settings, API Keys and enable these on the same API key you're using for WHOP_API_KEY.
Step 3: Environment variable
The embedded chat component needs to know whether to connect to Whop's sandbox or production environment. Add this to your Vercel environment variables:
| Variable | Value | Purpose |
|---|---|---|
NEXT_PUBLIC_WHOP_ENVIRONMENT |
sandbox (dev/preview) or production (prod) |
Tells the embedded chat which Whop environment to connect to |
This is a NEXT_PUBLIC_ variable because the chat component runs in the browser and needs to know the environment at runtime.
Step 4: What was already set up
Several chat integration points were already built into earlier parts of this tutorial:
- Part 2: The
chatChannelIdfield on the Trade model stores the Whop DM channel ID - Part 3: The matching engine's
setupTradeChatfunction auto-creates a DM channel when a trade matches and sends an initial system message - Part 4: The webhook handler and payment callback both send system messages to the trade's chat channel on payment success/failure
The rest of this part covers the new files needed to complete the chat feature.
Step 5: Chat service
Go to src/services and create a file called chat.ts with the content below, including three functions that call the Whop API directly. These endpoints aren't in @whop/sdk@0.0.27, so we use fetch.
import { env } from "@/lib/env";

export async function createAccessToken(oauthToken: string): Promise<string> {
  const res = await fetch(`${env.WHOP_API_BASE}/api/v1/access_tokens`, {
    method: "POST",
    headers: {
      Authorization: `Bearer ${oauthToken}`,
      "Content-Type": "application/json",
    },
    body: JSON.stringify({}),
  });

  if (!res.ok) {
    const text = await res.text();
    throw new Error(`Failed to create access token: ${res.status} ${text}`);
  }

  const data = (await res.json()) as { token: string };
  return data.token;
}

export async function createDmChannel(
  buyerWhopId: string,
  sellerWhopId: string,
  tradeName: string
): Promise<string> {
  const res = await fetch(`${env.WHOP_API_BASE}/api/v1/dm_channels`, {
    method: "POST",
    headers: {
      Authorization: `Bearer ${env.WHOP_API_KEY}`,
      "Content-Type": "application/json",
    },
    body: JSON.stringify({
      with_user_ids: [buyerWhopId, sellerWhopId],
      company_id: env.WHOP_COMPANY_ID,
      custom_name: tradeName,
    }),
  });

  if (!res.ok) {
    const text = await res.text();
    throw new Error(`Failed to create DM channel: ${res.status} ${text}`);
  }

  const data = (await res.json()) as { id: string };
  return data.id;
}

export async function sendSystemMessage(
  channelId: string,
  content: string
): Promise<void> {
  const res = await fetch(`${env.WHOP_API_BASE}/api/v1/messages`, {
    method: "POST",
    headers: {
      Authorization: `Bearer ${env.WHOP_API_KEY}`,
      "Content-Type": "application/json",
    },
    body: JSON.stringify({ channel_id: channelId, content }),
  });

  if (!res.ok) {
    const text = await res.text();
    console.error(`Failed to send system message: ${res.status} ${text}`);
  }
}
Step 6: Token endpoint
The embedded chat component needs a token to authenticate. Let's create a simple endpoint that returns one for the logged-in user. Go to src/app/api/token and create a file called route.ts with the content:
import { NextResponse } from "next/server";
import { getSession } from "@/lib/auth";
import { createAccessToken } from "@/services/chat";

export async function GET() {
  try {
    const session = await getSession();

    if (!session.accessToken) {
      return NextResponse.json(
        { error: "Authentication required" },
        { status: 401 }
      );
    }

    const token = await createAccessToken(session.accessToken);
    return NextResponse.json({ token });
  } catch (error: unknown) {
    console.error("Token creation error:", error);
    return NextResponse.json(
      { error: "Failed to create token" },
      { status: 500 }
    );
  }
}
Step 7: TradeChat component
Now, let's create the React component that renders the embedded chat. Go to src/components and create a file called TradeChat.tsx with the content:
"use client";

import { useMemo } from "react";
import {
  ChatElement,
  ChatSession,
  Elements,
} from "@whop/embedded-components-react-js";
import { loadWhopElements } from "@whop/embedded-components-vanilla-js";
import type { ChatElementOptions } from "@whop/embedded-components-vanilla-js/types";

const whopEnvironment =
  (process.env.NEXT_PUBLIC_WHOP_ENVIRONMENT as "sandbox" | "production") ||
  "production";

const elements = loadWhopElements({ environment: whopEnvironment });

async function getToken({ abortSignal }: { abortSignal: AbortSignal }) {
  const response = await fetch("/api/token", { signal: abortSignal });
  const data = await response.json();
  return data.token;
}

interface TradeChatProps {
  channelId: string | null;
}

export function TradeChat({ channelId }: TradeChatProps) {
  const chatOptions: ChatElementOptions = useMemo(() => {
    return { channelId: channelId ?? "" };
  }, [channelId]);

  if (!channelId) {
    return (
      <div className="flex items-center justify-center h-64 text-gray-500 text-sm">
        Chat will be available once the trade is matched.
      </div>
    );
  }

  return (
    <Elements elements={elements}>
      <ChatSession token={getToken}>
        <ChatElement
          options={chatOptions}
          style={{ height: "500px", width: "100%" }}
        />
      </ChatSession>
    </Elements>
  );
}
Key points:
loadWhopElements({ environment })runs once at module level - it loads the Whop JS runtime and connects to the correct environment (sandbox or production) based onNEXT_PUBLIC_WHOP_ENVIRONMENTgetToken({ abortSignal })fetches from our/api/tokenendpoint. TheChatSessioncalls this automatically and refreshes before expiry. TheabortSignalparam lets the component cancel in-flight requests on unmountElementsprovides the Whop runtime context to child componentsChatSessionmanages authentication stateChatElementrenders the actual chat UI for a specific channel
Step 8: Trade detail page - side-by-side layout
Update the src/app/trades/[id]/page.tsx file to show the chat alongside trade details.
Add the import at the top:
import { TradeChat } from "@/components/TradeChat";
Add chatChannelId to the Trade interface:
interface Trade {
  id: string;
  price: number;
  platformFee: number;
  chatChannelId: string | null;
  // ... rest is unchanged
}
Change the layout from a single column to a responsive grid. The key changes:
- Add an
isParticipantcheck before the return:
const isParticipant = currentUserId === trade.buyerId || currentUserId === trade.sellerId;- Replace the
max-w-3xlcontainer with a responsive width:
<div className={`mx-auto ${isParticipant && trade.chatChannelId ? "max-w-6xl" : "max-w-3xl"}`}>- Wrap the trade card and chat panel in a responsive grid:
<div className={`grid gap-6 ${isParticipant && trade.chatChannelId ? "grid-cols-1 lg:grid-cols-2" : "grid-cols-1"}`}>
  {/* Existing trade card */}
  <div className="card p-6 space-y-6">
    {/* ... all existing trade details unchanged ... */}
  </div>

  {/* Chat Panel */}
  {isParticipant && trade.chatChannelId && (
    <div className="card p-4">
      <h2 className="text-sm font-medium text-gray-400 mb-3">Trade Chat</h2>
      <TradeChat channelId={trade.chatChannelId} />
    </div>
  )}
</div>
On desktop (lg breakpoint), the trade details and chat sit side-by-side. On mobile, the chat stacks below.
Step 9: Navbar chat icon
Add a chat bubble icon to the navbar that links to the dashboard (where users can find their trade chats).
Go to src/components and update the Navbar.tsx file to add a chat icon before the NotificationBell:
{user && (
  <Link
    href="/dashboard"
    className="p-2 rounded-lg hover:bg-gray-800 transition-colors"
    title="Trade Chats"
  >
    <svg
      className="w-5 h-5 text-gray-400"
      fill="none"
      viewBox="0 0 24 24"
      strokeWidth="1.5"
      stroke="currentColor"
    >
      <path
        strokeLinecap="round"
        strokeLinejoin="round"
        d="M8.625 12a.375.375 0 1 1-.75 0 .375.375 0 0 1 .75 0Zm0 0H8.25m4.125 0a.375.375 0 1 1-.75 0 .375.375 0 0 1 .75 0Zm0 0H12m4.125 0a.375.375 0 1 1-.75 0 .375.375 0 0 1 .75 0Zm0 0h-.375M21 12c0 4.556-4.03 8.25-9 8.25a9.764 9.764 0 0 1-2.555-.337A5.972 5.972 0 0 1 5.41 20.97a5.969 5.969 0 0 1-.474-.065 4.48 4.48 0 0 0 .978-2.025c.09-.457-.133-.901-.467-1.226C3.93 16.178 3 14.189 3 12c0-4.556 4.03-8.25 9-8.25s9 3.694 9 8.25Z"
      />
    </svg>
  </Link>
)}
{user && <NotificationBell userId={user.id} />}
Step 10: Test it
Walk through the complete flow:
- Sign in with two different accounts (or use the same account for a self-match test)
- Place an ask at $50 for any product/size
- Place a bid at $50 for the same product/size - the matching engine creates a trade
- Navigate to
/trades/{tradeId}- you should see the trade details on the left and a chat panel on the right - Send a message in the chat - it appears in real-time
- Complete payment via the "Pay Now" button - after payment, a system message appears: "Payment confirmed! Seller, please ship your item for authentication."
- Check the navbar - the chat bubble icon appears next to the notification bell
Wrapping up the project
Over the course of this tutorial, we built a full StockX-style marketplace from scratch:
- Architecture (Part 1): chose the stack, set up the project, deployed to Vercel
- Data model and auth (Part 2): designed the Prisma schema, implemented Whop OAuth
- Matching engine (Part 3): built the bid/ask system that automatically matches trades
- Payments and escrow (Part 4): integrated Whop Payments Network infrastructure with Direct Charges, built the webhook handler
- Products and market data (Part 5): authentication flow, centralized product pages, real-time pricing
- Search, notifications, and deployment (Part 6): full-text search, in-app notifications, dashboards, production hardening
- Buyer-seller chat (Part 7): embedded Whop chat components, DM channels, system messages on trade events
At this point you should have:
- Search component at
src/components/SearchBar.tsxwith debounced input, filters, and removable filter pills, Full-text search with autocomplete, filters, and URL-persisted state - Trending/most popular algorithm for product discovery, pagination component at
src/components/Pagination.tsxwith cursor-based custom pagination - Notification hook at
src/hooks/useNotifications.tswith Supabase Realtime subscription, notification bell component atsrc/components/NotificationBell.tsxwith unread count badge, dropdown, and click-to-navigate to trade detail pages - Dashboard page at
src/app/dashboard/page.tsxwith Overview, Buying, Selling, and Portfolio tabs, and ortfolio hook atsrc/hooks/usePortfolio.tsfor fetching user trading data - Production environment variable separation (production vs. preview)
- Security hardening: rate limiting, Zod validation, webhook verification, CORS, CSRF. Performance optimizations: ISR, edge caching, connection pooling
- Chat service at
src/services/chat.tswith access token, DM channel, and system message functions, and token endpoint atsrc/app/api/token/route.tsfor embedded chat authentication - TradeChat component at
src/components/TradeChat.tsxwith Whop embedded chat UI, and auto-created DM channels on trade match via matching engine - System messages on payment success/failure in webhook handler and payment callback. Chat icon in navbar linking to dashboard
- A complete, deployed, production-ready StockX clone
Where to go from here
- Different product categories: the architecture supports any product type - sneakers, trading cards, electronics, vintage clothing. Add categories and adjust the authentication criteria
- Analytics dashboard: trade volume over time, most-traded products, price movement trends, platform revenue
- Mobile app: the API routes are already RESTful - a React Native or Flutter app could consume them directly
- Seller ratings: track authentication pass rates per seller, display trust scores, restrict sellers with high failure rates
- Price alerts via email/SMS: extend the notification system with external delivery channels for high-priority alerts
Start building your own StockX clone with Whop
That's everything you need to build a fully functional StockX clone using Whop infrastructure. If you haven’t already, go to Whop.com, create an account, and build your business.
If you want to learn more about the Whop Payments Network and the Whop infrastructure, visit our documentation.