Upsells are one of the coolest features of ecommerce platforms. With the latest Whop update, you can upsell individual apps before checkout, after checkout, or directly inside your whop. Learn how to do so in this guide.
Key takeaways
- Whop's locked apps feature lets creators upsell products at three key moments: before checkout, after checkout, or inside the whop.
- Upselling existing customers is more profitable than acquiring new ones, making this feature valuable for revenue growth.
- After-checkout upsell pages can be customized with titles, descriptions, and videos to maximize conversion rates.
Gaining a new customer is always a great feeling - but upselling a customer is even better.
Upselling is a great way to market a higher-priced product to an already-converting (or converted) customer. With the new à la carte product purchase feature on Whop, you’ll be able to do exactly that.
In this guide, we’re going to take a look at how you can upsell your apps and how you can customize your after checkout upsell page.
How to upsell products on Whop
First, to upsell a product on Whop, you need to mark the product as a 'locked app'.
1. Create a locked app
What is a locked app?
Well, before the release of this feature, there were two visibility options for apps: Draft (hidden), which would hide the app from all the members, and Visible, which let everyone in your whop access the app.
Now, there’s a third option: Locked.
Locked apps can be free or paid (one-time), and if you select the free option, you’ll be able to lock your app behind a whitelist. This is especially useful for instances where you want to control which members of your whop can access a certain app.
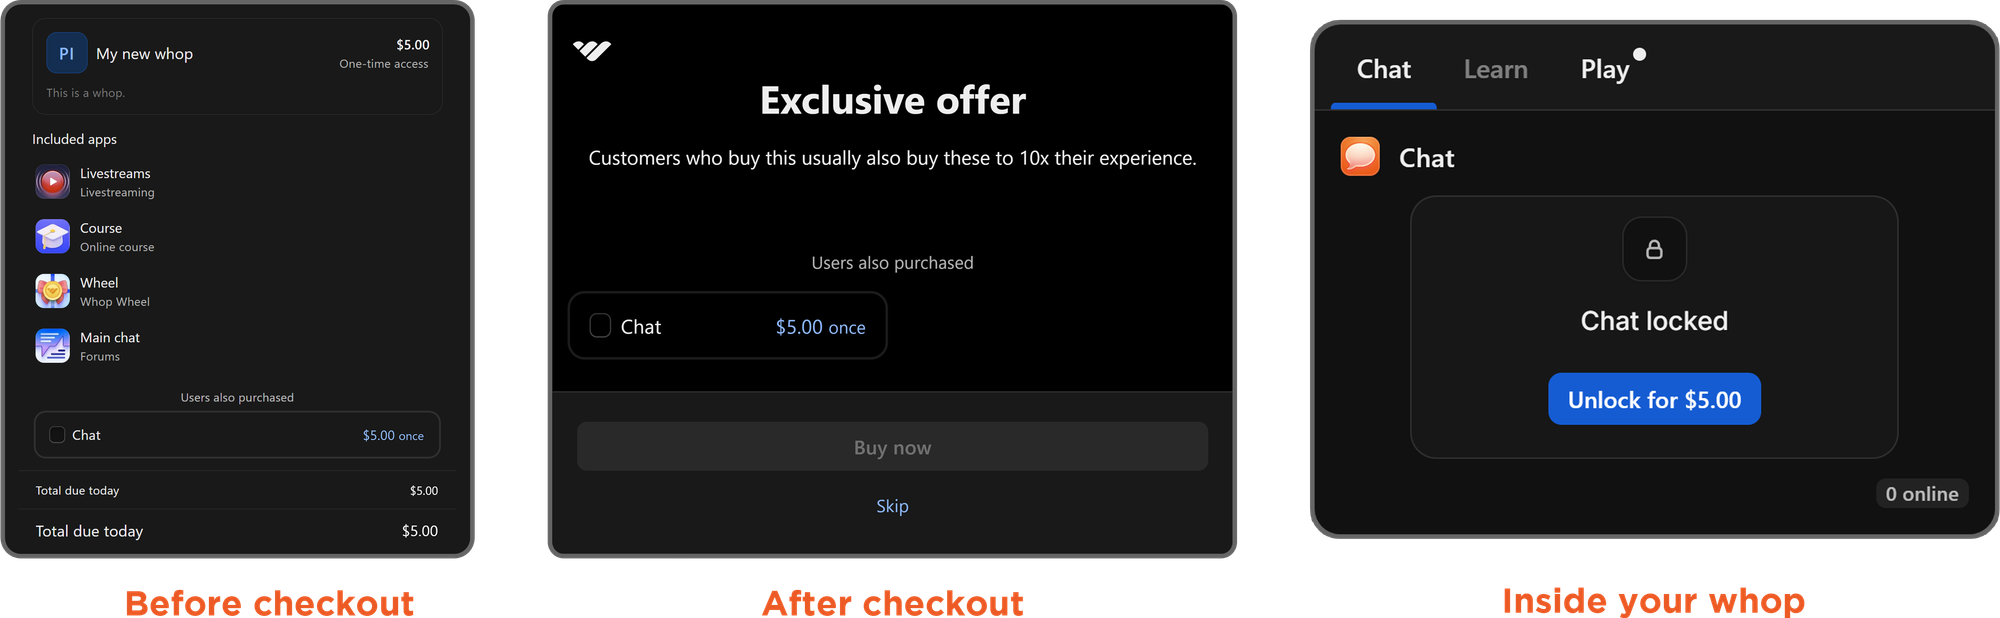
Selecting the paid option will display three sections: the price of the app (and its currency), its expiration date (optional), and its upsell method. There are three upsell methods you can choose from:
- Before checkout: Selecting this option will display the app as an addition on the checkout page
- After checkout: Selecting this option will display the option to buy the app after the user completes a checkout in the upsell page
- Inside your whop: Selecting this option will display the app as locked in the app list of your whop
2. Choosing an upsell method
Now that we know what the upsell options are and how they work, let’s see how you can actually upsell an app on your whop:
- First, let’s click on the settings option of an app to see the App settings popup.
- In the popup, scroll down until you see the Visibility section and select the Locked option.
- After selecting Locked, select either the Free or the Paid (one-time) options. We’ll go with Paid (one-time) as an example.
- Then, fill out the price field, optionally set an expiration date, and select the upsell method. We’ll select After checkout as an example.
- Once you’re done, click the Save button at the bottom right of the settings popup to save the changes.
Customizing the 'after checkout' upsell page
If you're choosing to create an 'after checkout' upsell, then you can create a customized upsell page. This is the page that your customers will see after completing a purchase. The three customizable fields of this page are its title, description, and video.
You can customize the upsell page with just a few clicks:
- First, let’s click on the context menu button of your whop and select the Manage store there. This is going to display the Edit details popup on the right side of your screen.
- In the popup, scroll down until you see the Upsells card and click on it. This will display another popup with three fields: the Upsell title, Upsell description, and Upload video.
- After filling out the title, description (up to 180 characters), and optionally uploading a video with a 16:9 aspect ratio, click the Save button at the bottom of the popup to save the changes.
Upgrade your customers with Whop upsells
There you have it - creating upsells on Whop is super easy, and will help to boost your sales. Now, it’s time for you to give them a try.
If you still don’t have a whop, don’t worry. Creating one takes less than 5 minutes - it’s your time to join the winners.


