Discord has many great features, and clips is one of them. Read this article to understand what Discord Clips is and how you can use it.
Key takeaways
- Discord Clips lets streamers capture and share the last 30 seconds to 2 minutes of their streams to boost engagement.
- Only the streamer can create clips of their own stream using ALT+C or the save clip button.
- Clips can be edited within Discord to adjust length, audio, and title before sharing with your community.
Discord is full of fantastic features, and Clips is just one of them. Clips is a great tool, and if you are using Discord to stream, then you should be using clips to create engagement between your content and your members.
Let’s take a look at what Discord Clips are and how you can use clips in your community.
What are Discord Clips?
Discord Clips is a beta feature that began rolling out in August 2023. Discord Clips allows you to “clip” a stream that you're watching. “Clipping” means capturing the last 30 seconds, 1 minute, or 2 minutes of the stream.
In addition to choosing the length of the clip, you also have the option to select the maximum resolution, maximum frame rate, keybind, and the save location of clips as well. Plus, you can opt out of having your voice recorded when other users clip a stream that you're in!
This guide will teach you how to use clips and adjust the settings. As of March 2024, the feature is still in beta and is available as early access to Nitro users, so you might not be able to use clips or see any of the settings. Don’t worry; there is nothing wrong with your account or server. You will have access when the rollout expands.
How to use Discord Clips
Like any other Discord feature, clips are very easy to use. The only part where you might need a little guidance is in the settings.
Let's begin by enabling clips.
Enabling Clips on Discord
Before being able to use the feature, you first have to turn it on through your User Settings. Since clips are basically videos, they’re rendered with your GPU, and there’s a system requirement. Here’s what you need:
- A Windows PC. The clips feature is currently not available on MacOS and mobile devices.
- At least Nvidia GTX 980s-1600s, any RTX model, or an AMD Radeon RX 500. If you have an Nvidia RTX 2000 or a Radeon RX57000, the clips feature might be turned on by default.
Remember that clips is in the Nitro early access stage as of March 2024, so if you don’t have a Nitro subscription, you are not going to see the settings we show you here. But, let’s say you are a Nitro subscriber - here’s how you can enable Discord clips.
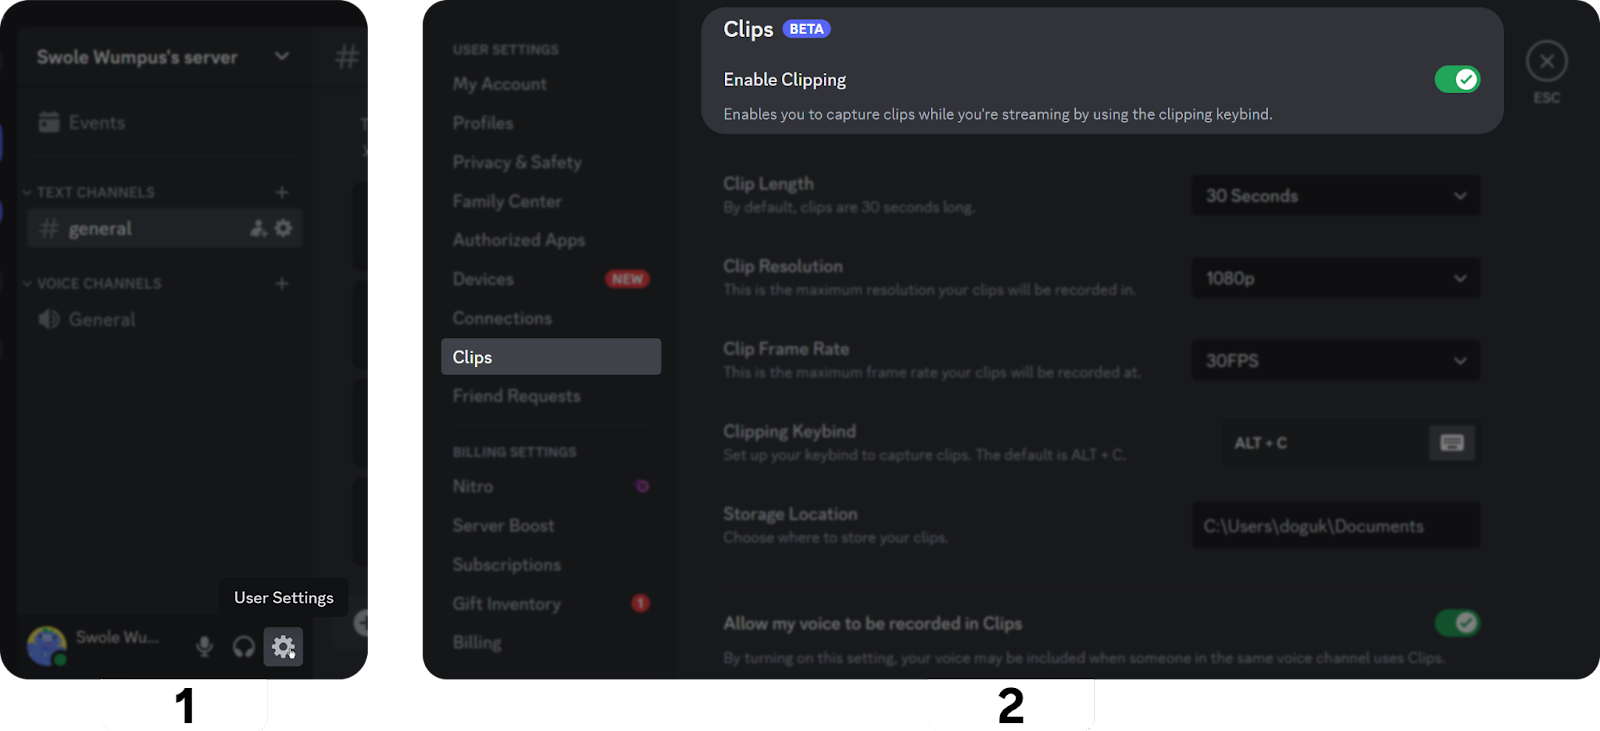
- Click the User Settings button (cogwheel icon) at your user mini dashboard to open the settings.
- In your User Settings, navigate to the 'Clips' section. If you don’t have a Nitro subscription, you’ll only see the “Allow my voice to be recorded in Clips” setting there. If you do have Nitro, you’ll see much more. Now, turn on the Enable Clipping setting to turn on the feature.
That’s it - you now have the clips feature turned on.
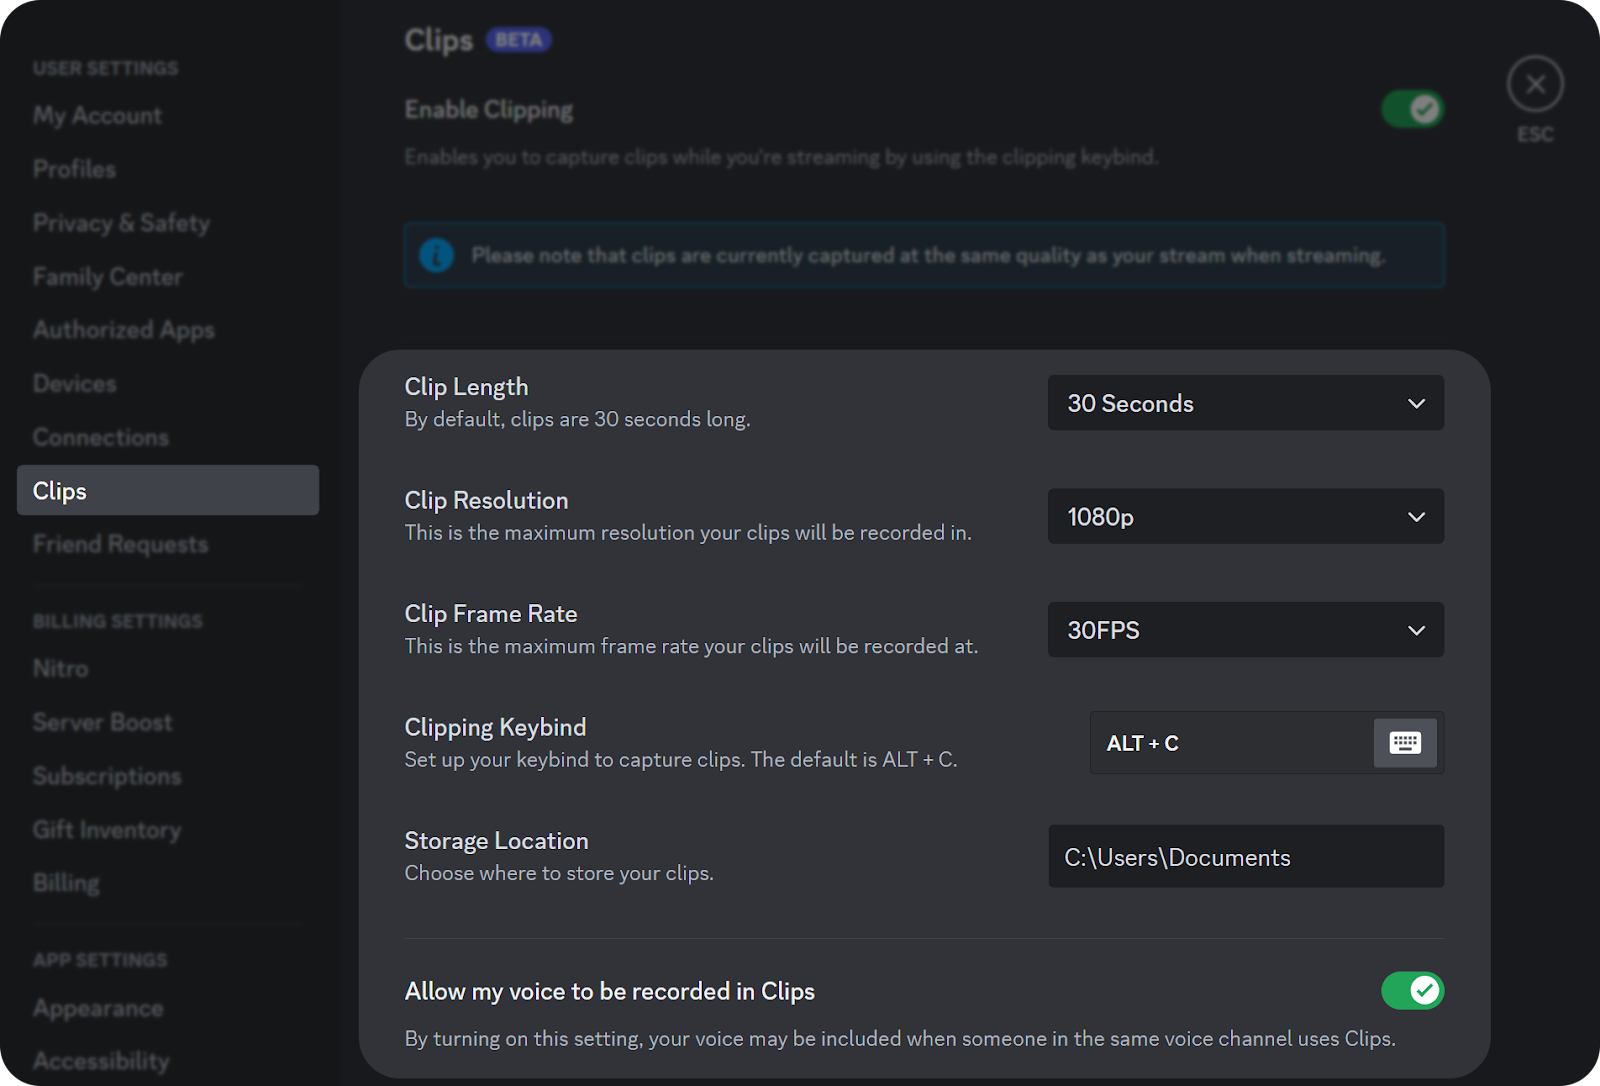
Adjusting Clip settings
- Clip Length—This setting determines how long your clip will be. Let’s say you selected 30 Seconds. When you create a clip, Discord will take the last 30 seconds of your stream and make it a clip.
Options: 30 Seconds, 1 Minute, 2 Minutes - Clip Resolution—This setting determines the maximum resolution of your clips. We want to point out that this setting does not determine your clip resolution. When you create a clip, it will be the same resolution as your stream. This setting allows you to set a maximum. Let’s say you’re streaming at Source resolution, which is the highest option. If you don’t want your clip file to be too big, you can set the Clip Resolution setting to 1080p so that your clip will be 1080p, even though your stream is Source.
Options: 480p, 720p, 1080p, 1440p, Source - Clip Frame Rate—This setting determines the maximum frame rate of your clips. Just like the Clip Resolution setting, this does not determine your clip frame rate; it just sets a maximum. The frame rate can play a huge role in rendering speed and file size, so setting a maximum can help lower the stress on your system.
Options: 15FPS, 30FPS, 60FPS - Clipping Keybind—This setting determines the key bind that will make you save a clip once hit. The default is ALT + C, but you can customize it however you want!
Options: Custom - Storage Location—This setting determines where your clips will be saved.
Options: Custom - Allow my voice to be recorded in Clips—This setting determines if your voice will be captured when someone else in your voice channel streaming saves a clip.
Options: On, Off
Making Discord Clips
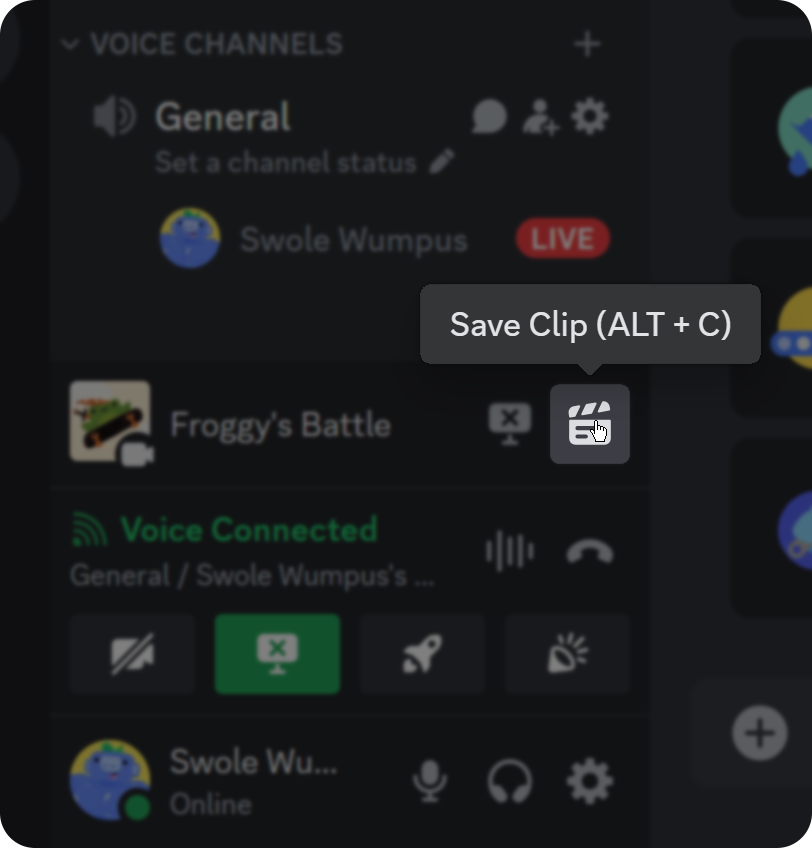
Now that the feature is enabled, let's use it! Making a Discord Clip is incredibly easy. First, you need to be streaming. Other people can’t create clips of your stream. There are two ways to create a clip:
- Click the Save Clip button (Clapper button).
- Hit the key bind ALT + C. This is the default key bind; you can change it to any key bind you want via the clips section of your User Settings.
That’s it - your clip is saved. Now let’s take a look at editing your clips so they’re ready to be shared.
How to edit Discord Clips
Once you save a clip, you might want to edit it because it’s too long, or maybe you want to remove the audio of other people talking. You can do all of this within Discord. To edit a clip:
- Click the attachment button (plus icon) in your input box to open the attachment menu.
- There, click Share a clip to open the clips window.
- This window shows all the clips you’ve saved. To add a title, click on the “Add a title” text on a clip. Next, click the Edit button (cut icon) to open the editor.
- In the editor, you can adjust the length, change the title, and turn on/off stream and participant audio. Clicking the Save Changes button at the bottom right will save your edits. You can also use the clip’s audio as a sound for your Soundboard or download the edited clip via the three-dot menu at the bottom right.
How to share Discord Clips
Sharing clips is as easy as sending an image on Discord. All you have to do is click the Share button (send icon) to attach it to your message. You can mark it as a spoiler by clicking on the eye icon at the top right of the clip. The message you send your clip in will be like any other message; they can be deleted, edited, and pinned.
How to delete Discord Clips
Deleting a clip is simple. Just open the clips window, hover over a clip, and click the delete button (trash can icon). Discord will ask you for confirmation because deleting a clip is irreversible.
Discord streamer? Monetize your community with Whop
Are you a Discord streamer? Why not monetize your community with Whop?
Discord is a great way to share content and generate an income, and Whop is here to help you on that journey. Whop has helped thousands of creators make money with Discord - and you could be next.
Signing up to Whop and listing your server takes less than 10 minutes. What are you waiting for?