Learn how to use MidJourney in 2026. Discover the latest features and tools, including using the website, customizing image settings, and creating stunning images with this powerful generative AI. Explore the step-by-step guide and make the most of MidJourney's capabilities.
Key takeaways
- MidJourney's website interface replaces the confusing Discord setup with an intuitive six-section layout for creating AI images.
- Eight customizable settings let you control stylization, weirdness, variety, and speed to fine-tune your generated images.
- The built-in editor works like Photoshop's generative fill, letting you erase and regenerate specific parts of images.
MidJourney is still one of the best generative image AIs out there, if not the best. It was released on July 12, 2022, and has gone through a lot of changes since then. It’s much easier to use now, plus it's more powerful. So, let’s walk through how you can use the tools and features MidJourney offers in 2026, starting with perhaps the most asked question about MidJourney nowadays:
Do you need Discord to use MidJourney?
When MidJourney first came out, it was only possible to use it on Discord, in either MidJourney’s server (which is still the biggest Discord server out there) or through the Discord DMs of the MidJourney bot. However, this isn’t the case anymore. You can still use the Discord legs of MidJourney, but you can also use the MidJourney.com website to create images as well. Plus, it’s much easier to use the website.
So, let’s ditch the Discord server and bot and normalize using the website instead.
Using MidJourney on the website
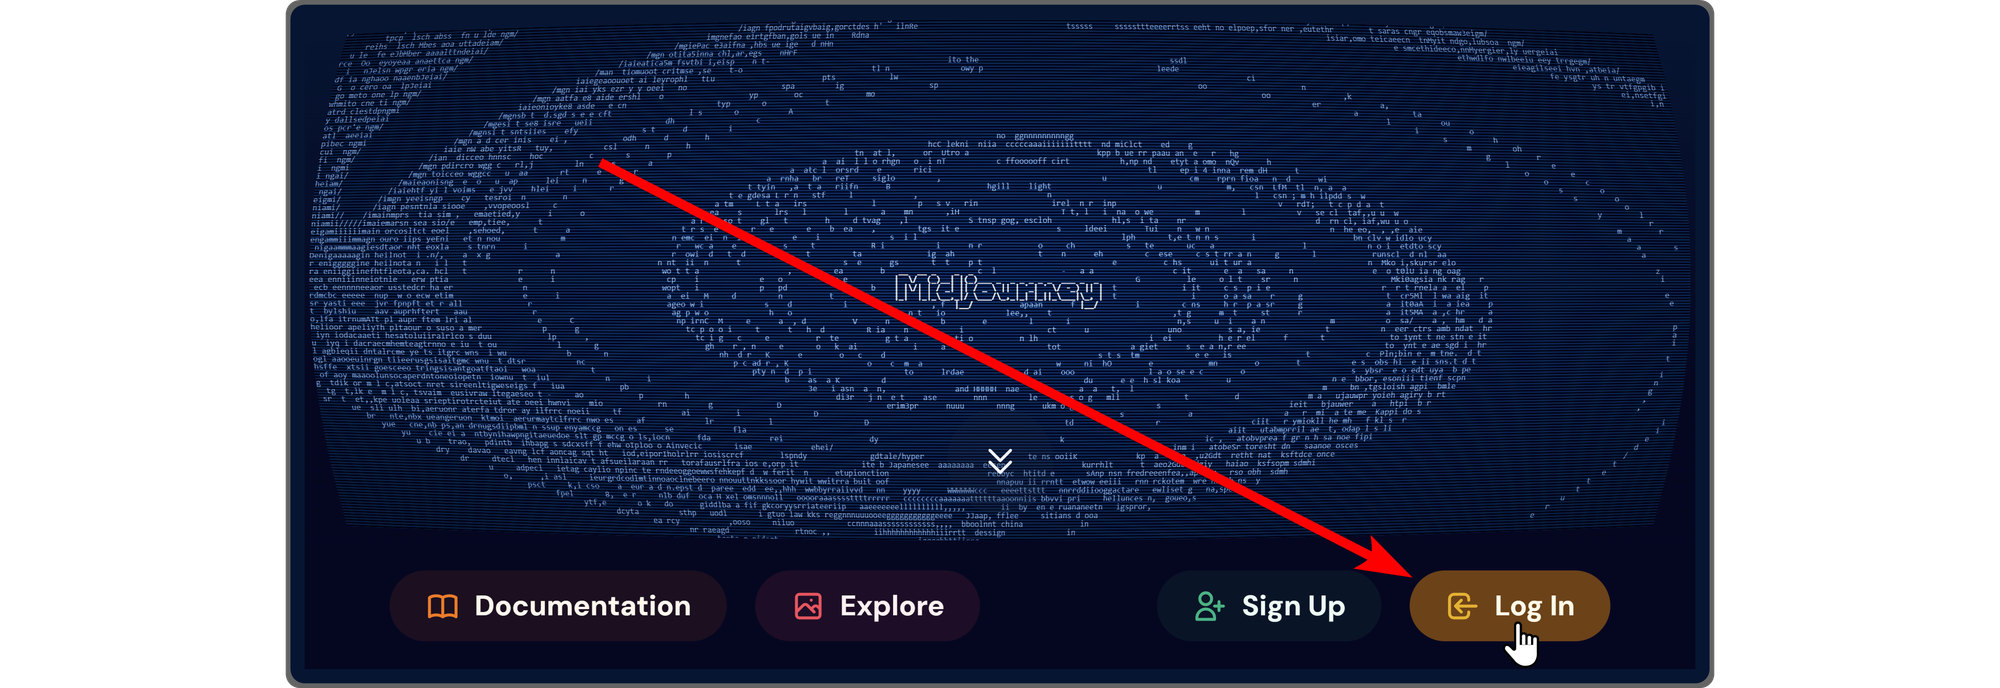
To use MidJourney on its website, you first need to log into your MidJourney account using the Log In button at the bottom right of your screen. You can log in using Discord or Google accounts.
After you log in to MidJourney, you’re going to be directed to the site’s Explore section. There are six sections of the website:
- Explore: where you can explore other people’s creations.
- Create: where you can create images.
- Organize: where you can see all of your creations, download them, put them into folders, and more.
- Personalize: where you can train MidJourney for it to understand your requests better. You can also earn free hours as you train the model.
- Chat: where you can participate in chat rooms, but they require passwords.
- Tasks: where you can complete tasks like voting on the community frontpage to earn free hours.
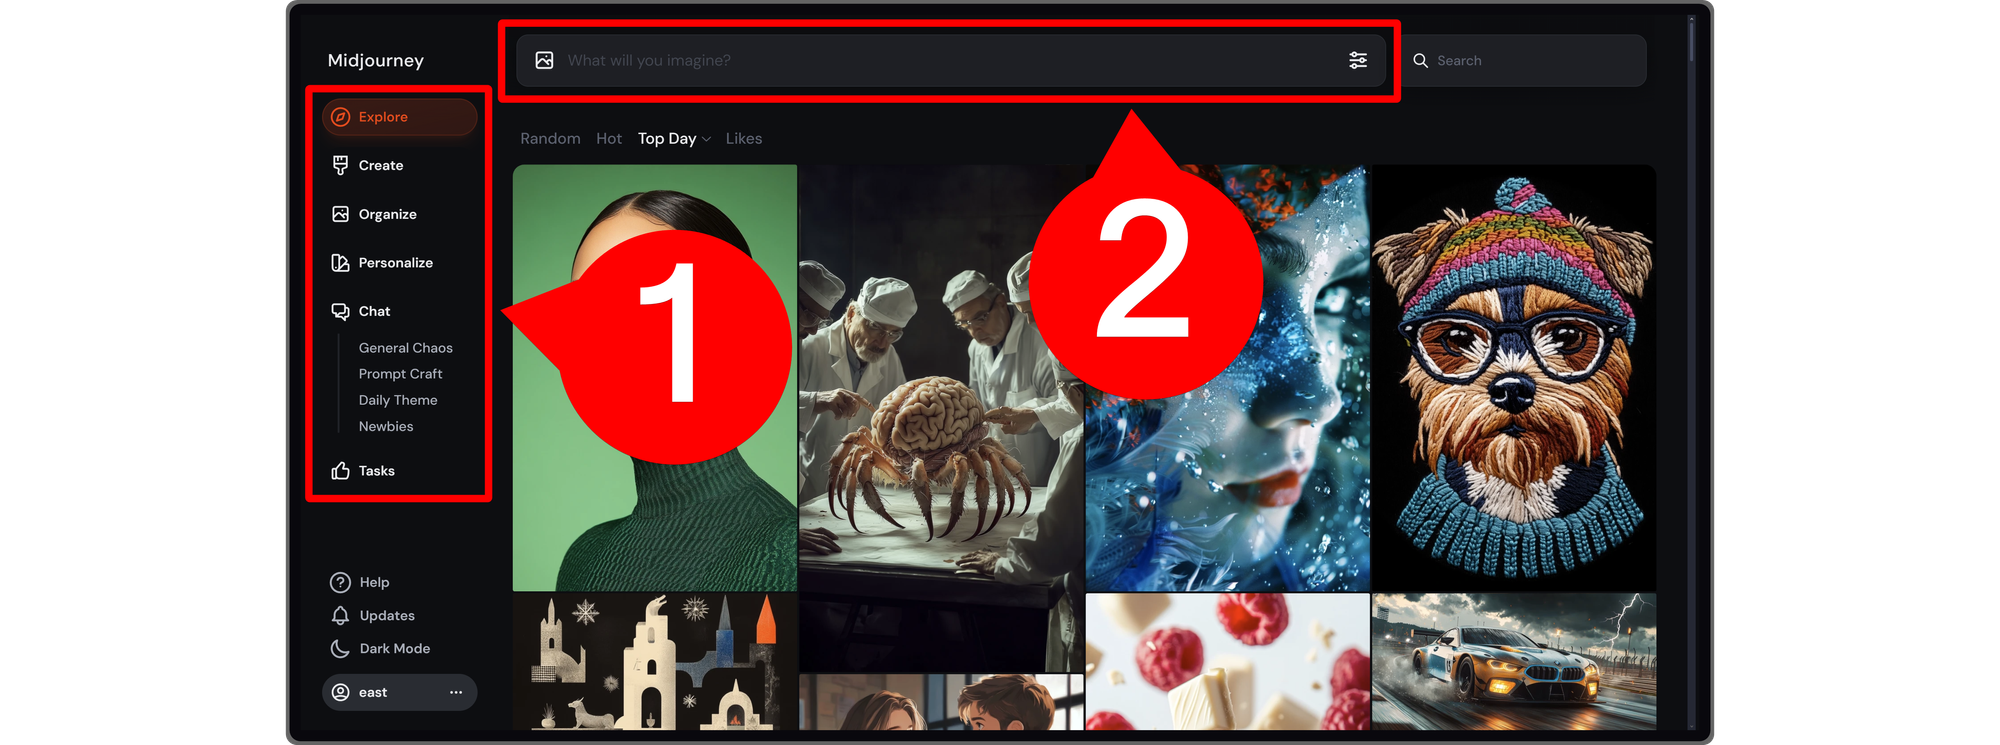
You can also see the Imagine bar at the top of your screen, which is an input field. You can start generating images using this Imagine bar. Once you input a prompt and press enter, you’ll be directed to the Create section of the website.
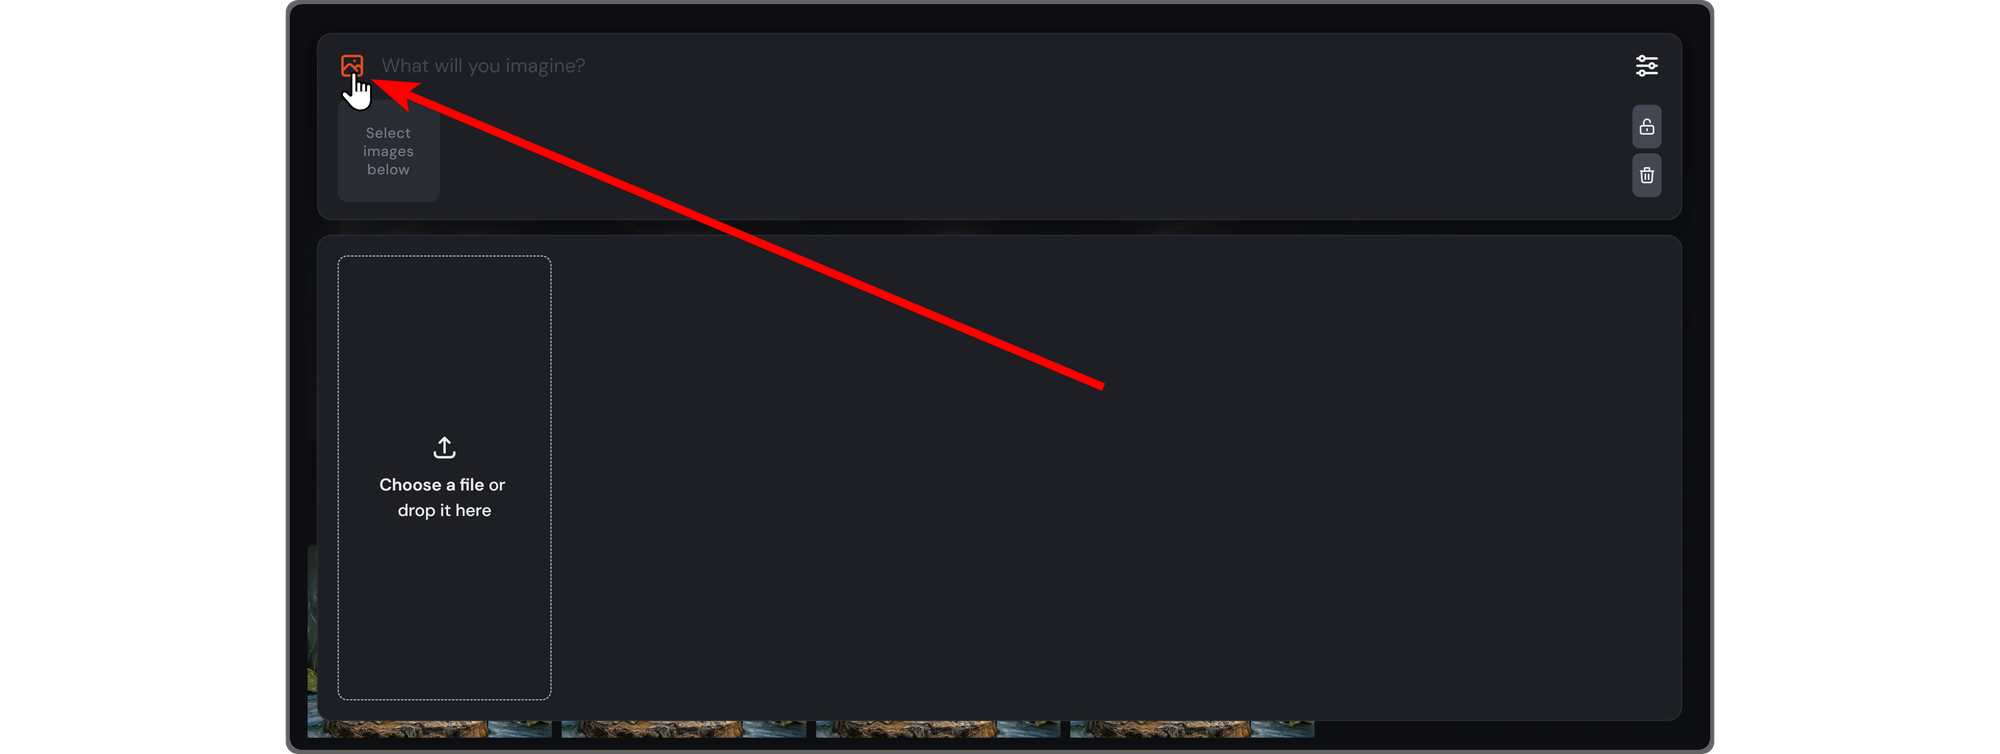
Before inputting a prompt, let’s take a look at the features you can use along with the input field. The first is reference images for MidJourney to use, which have a button on the left side of the input field. Clicking on the little painting icon will open up a section where you can upload files. You can select the files for MidJourney to reference. Using the lock and delete buttons on the right will apply a reference to all creations and delete all uploaded images, respectively.
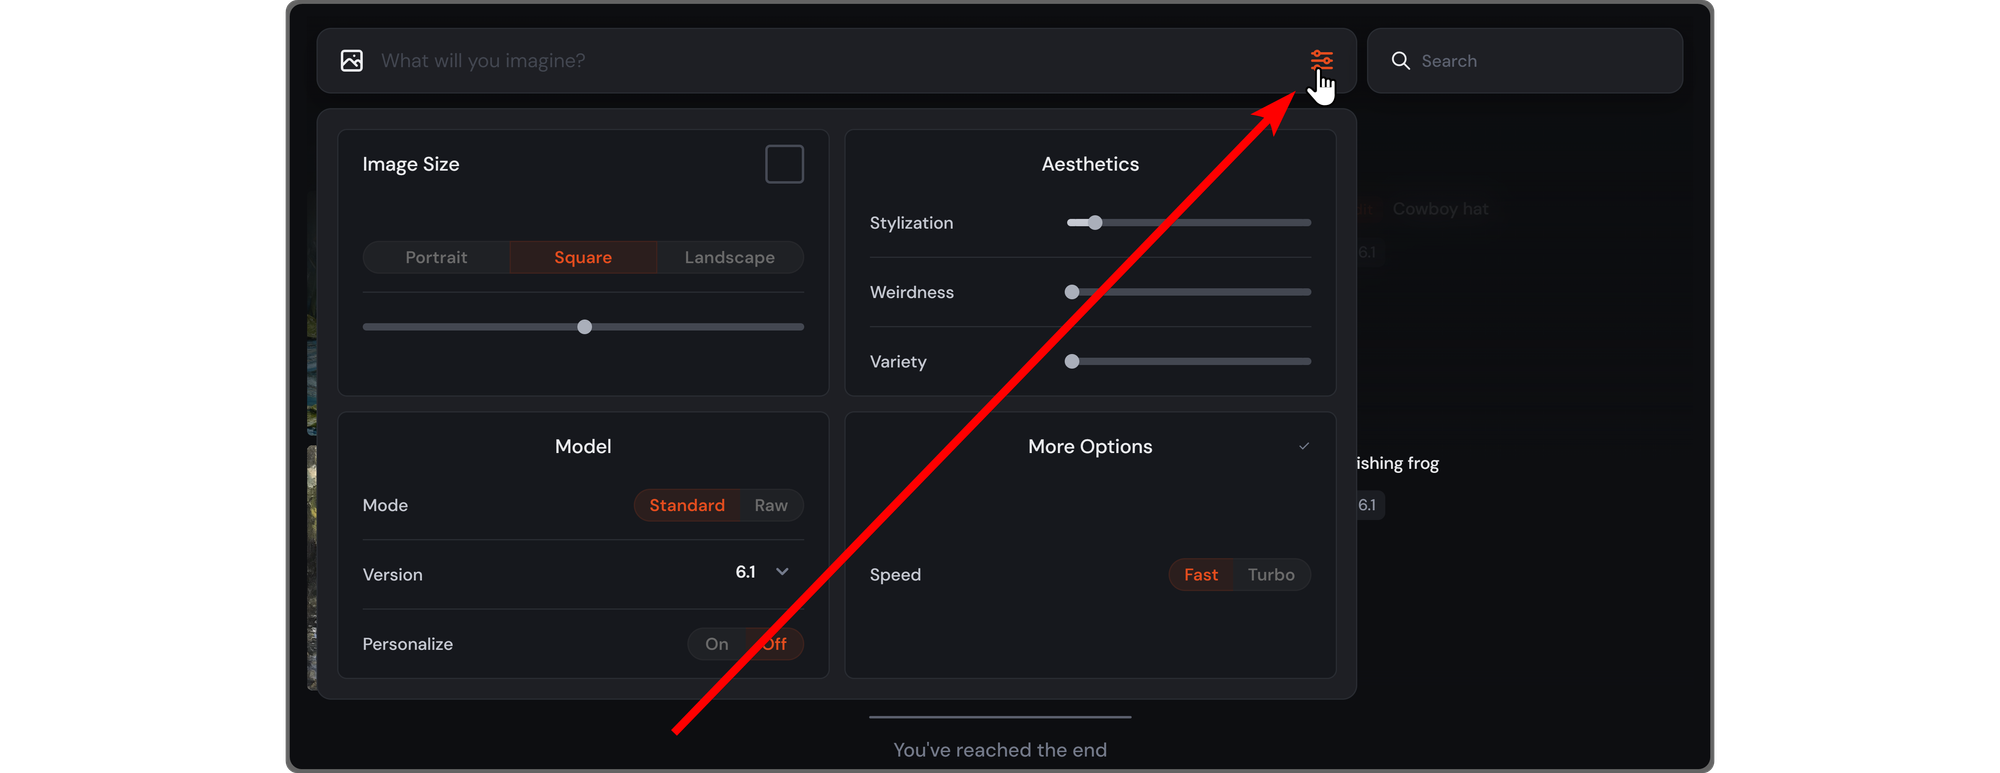
If you click on the settings button on the right of the input field, you’re going to see the settings of the image creation. There are a total of eight settings across four categories:
- Image size: This setting has two controls: three buttons (portrait, square, and landscape) and a slider. Using any of them is going to determine the size of the image. The default setting is square, which will result in your images having an aspect ratio of 1:1.
- Mode: The mode setting has two options: standard and raw. If you select the raw model, the aesthetic of the classic MidJourney will be replaced. This can help you create more photo-realistic images, cinematic scenes, and more.
- Version: This dropdown menu, as its name suggests, allows you to select which version of MidJourney you want to use. Going for the most recent version is always a good idea if you want the best results.
- Personalize: You can turn this setting on and off. If you turn this setting on, MidJourney will take the selections you made in the Personalize section of the website when creating the images. This is available for versions 6 or higher.
- Stylization: The stylization slider determines how artistic the images are. The lower the slider (to the left), the closer the image is to your prompt. The higher it is, the more artistic the image will be.
- Weirdness: This setting features a slider that will make your images more unpredictable and unique. The default setting is 0.
- Variety: As you might know, when you generate an image using MidJourney, you get four similar variants. If you increase the variety slider, those four images will be different from each other.
- Speed: There are three options for this setting: relax, fast, and turbo. The relax option isn’t available for the Basic plan subscribers, and the setting simply adjusts the speed at which your images are created. Fast and turbo options will use Fast Hours of your account.
Creating an image using MidJourney
After you’re done with the image references and the settings, which you don’t really have to meddle with necessarily, you can use the “What will you imagine?” input field to enter a prompt, then press enter to generate the image you want.
Once you’ve entered your prompt, you’ll be taken to the Creations section of the website and will see how your image is being created live. All image creations will come with four variants as a batch, and you’ll notice four buttons on the right side of the batch:
- Rerun: Clicking this button is going to re-run your prompt through MidJourney to create another batch.
- Use: Clicking this button will paste the prompt you’ve used for the batch into the input field.
- Hide: Clicking this button will hide the batch from your creations.
- More: Clicking this will display the context menu of the batch. The menu has Copy, Report, Download, and Open in Discord buttons.

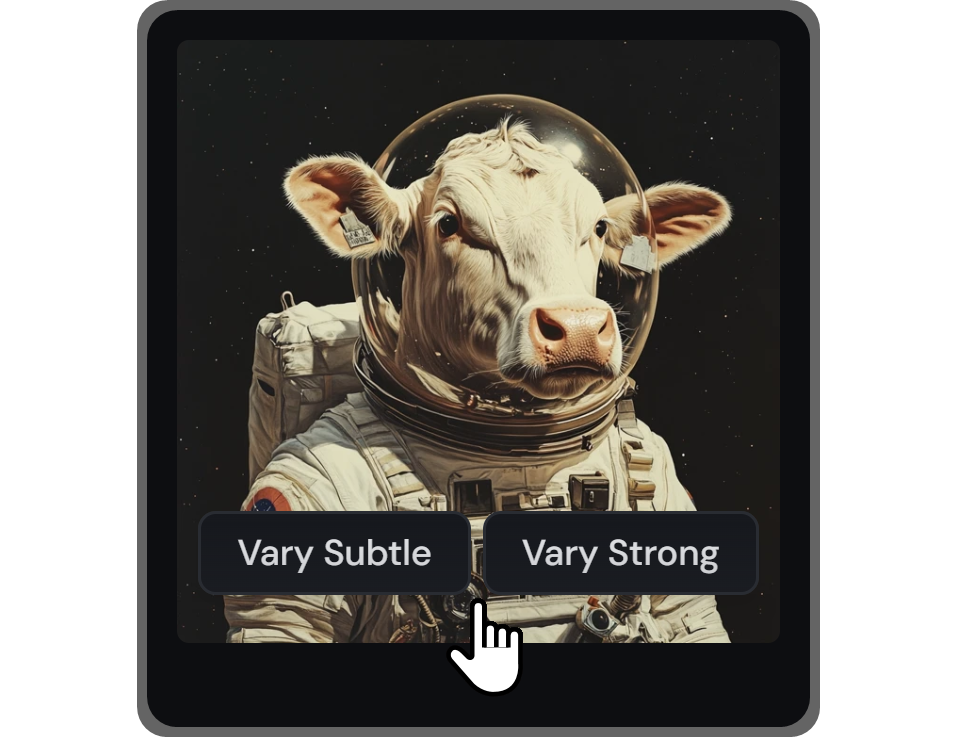
When you hover over an image you’ve created, you’re going to see two buttons: Vary Subtle and Vary Strong. Clicking them is going to create variations of that specific image. As their name suggests, the Vary Subtle button will make the variations similar to the image, while Vary Strong is going to make them even more different.
If you click on the image itself, you’re going to be taken to its page where you can create variations, upscale it, remix it, and more.
Everything you can do on the image page
When you click on an image and open its page, you’re going to see a bunch of buttons at the bottom right of your screen, your creations at the right side, the image in the middle, and the imagine bar at the top, as usual.
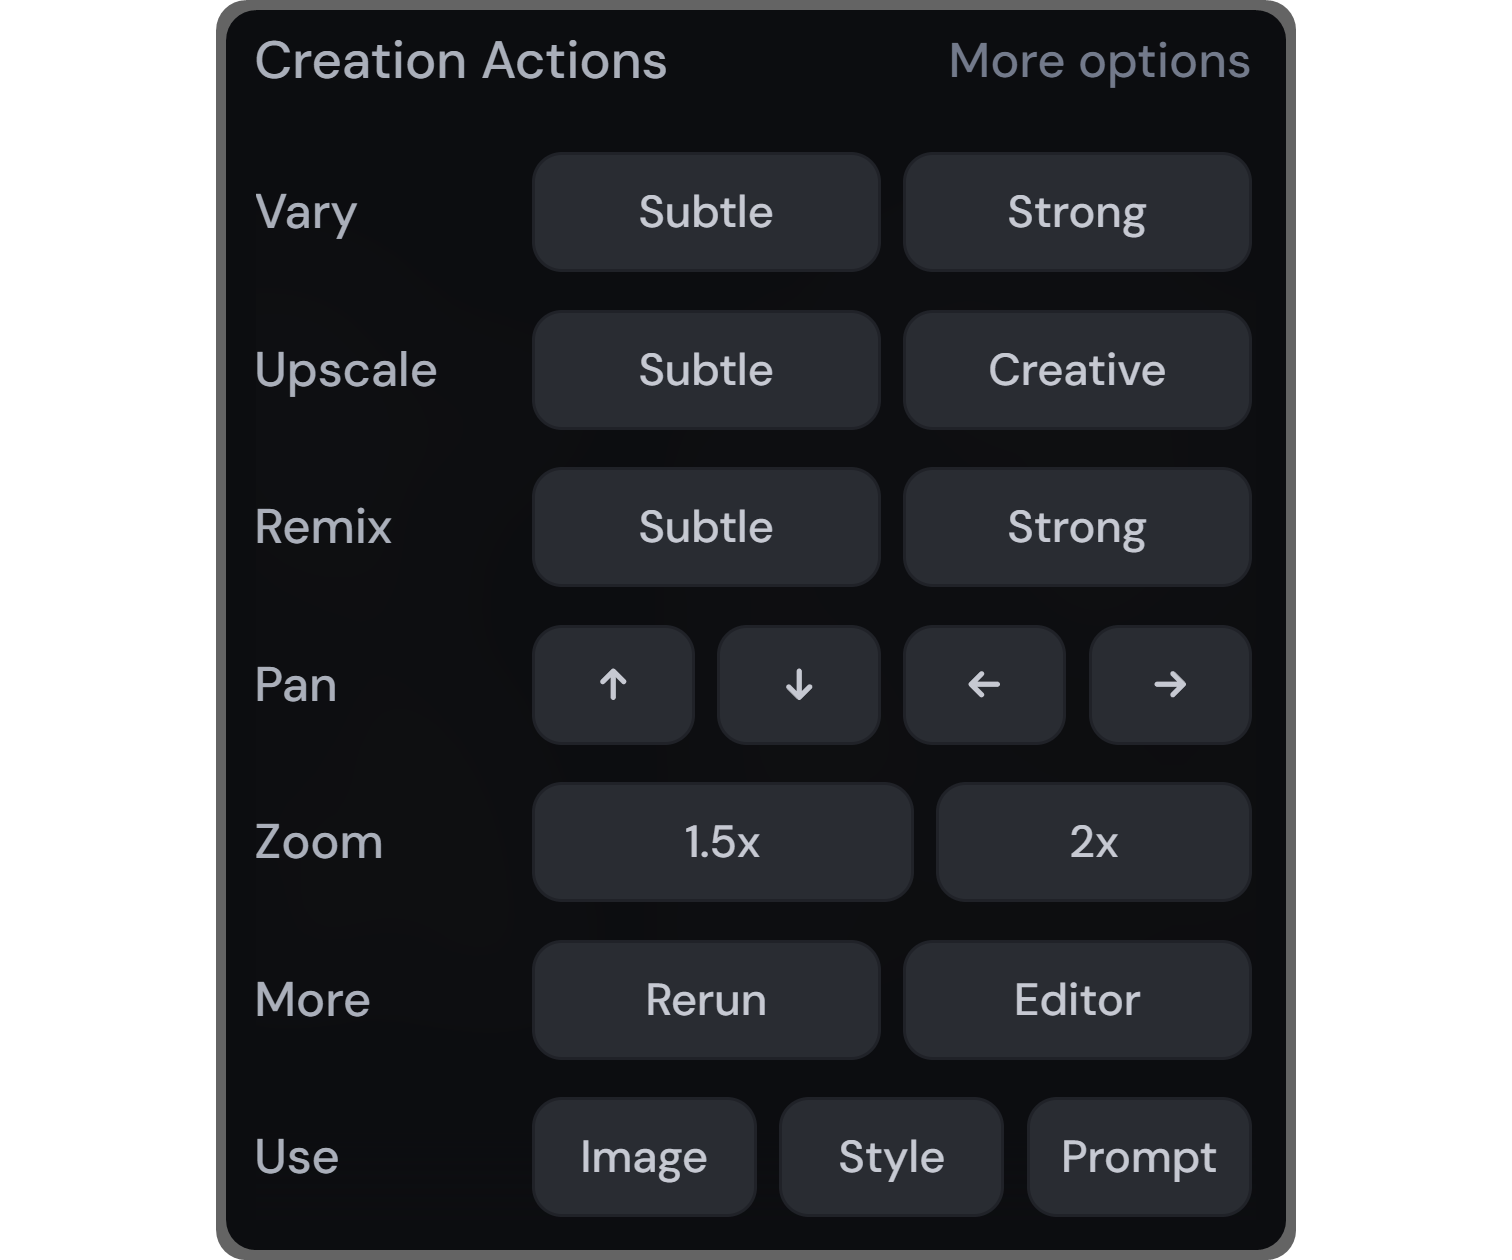
What we’re looking at here is the Creation Actions, the seven action categories that are located at the bottom right. You can click on the More options button next to the Creation Actions text to reveal a list of all options.
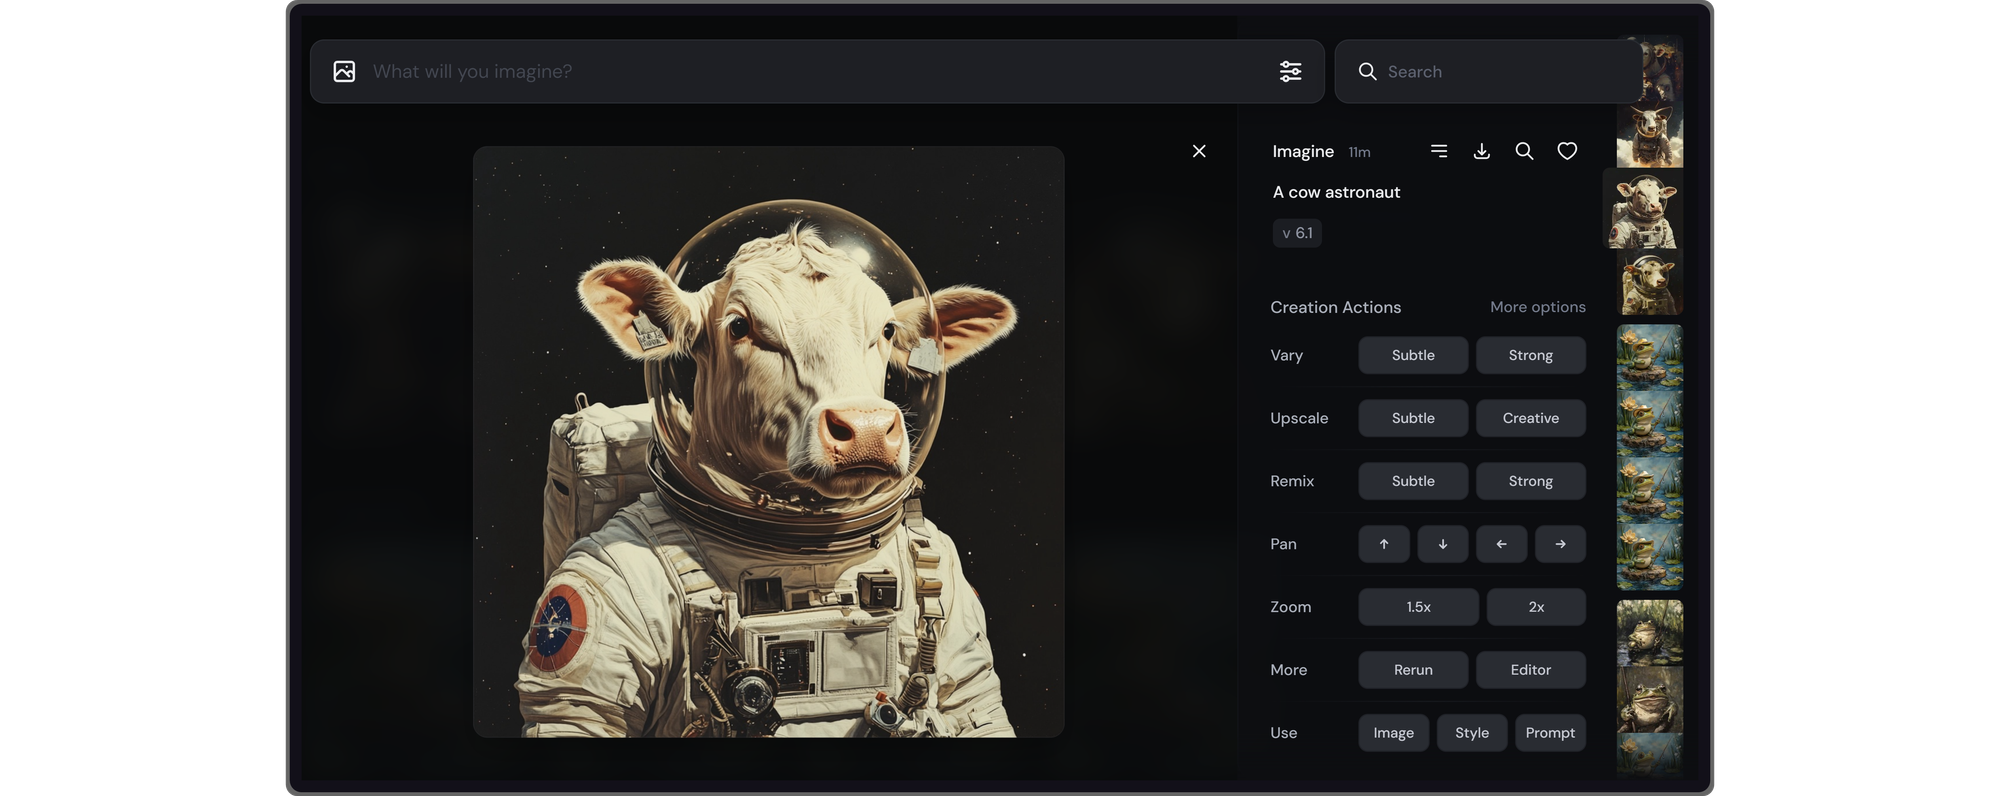
Let’s examine what each button under the Creation Actions section does:
- Vary Subtle: Will create similar images with minor changes.
- Vary Strong: Will create similar images with medium/major changes.
- Upscale Subtle: Will double the size of your image, resulting in higher-res while keeping details the same.
- Upscale Creative: Will also double the size of your image but adds new details.
- Remix Subtle: Will add the image as a reference to the image bar at the top for your new prompt.
- Remix Strong: Will also add the image as a reference, but the result of the prompts will have larger differences.
- Pan buttons: The up, down, left, and right pan buttons will increase the canvas size in the respective direction and fill it with new generative parts.
- Zoom buttons: Will zoom out the image and create new details. The 2x button can be customized to zoom out as much as you want.
- Rerun: Will use the same prompt to generate another batch of images.
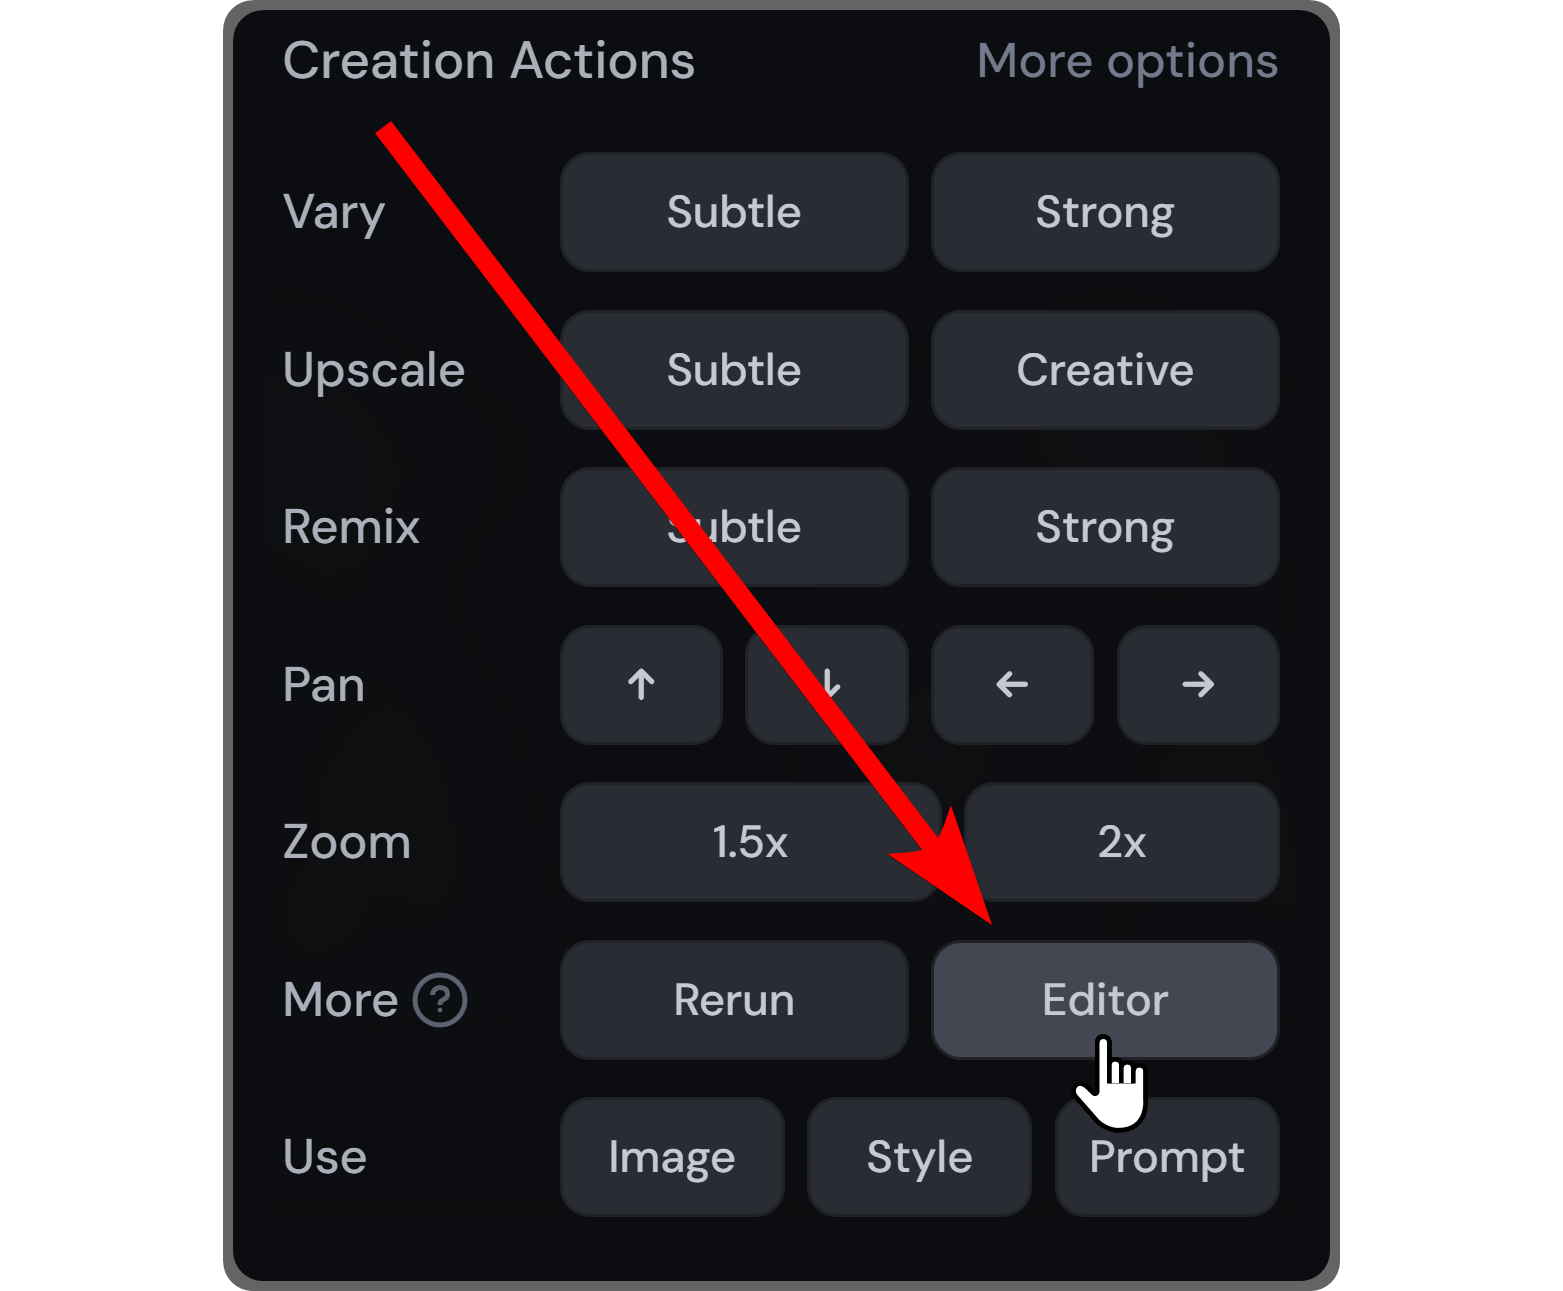
- Editor: Will open the editor - we will get into detail about this in the next section.
- Use Image: Will add the image as a reference to your imagine prompt field.
- Use Style: Will add the image style as a reference to your image prompt field.
- Use Prompt: Will add the image’s prompt to your prompt field.
Using the editor
The editor might be one of the most fascinating features that MidJourney offers. If you’ve used Photoshop recently, you might be familiar with the generative fill tool - the editor is exactly like that. Let’s click the Editor button on an image page to navigate to the Editor.
Once you’re in the editor, you’re going to see a new set of tools at the top of your screen, your prompt and the list of creations on the right, and your image in the center. As you can see in the picture below, there is a move tool in the middle of the image. It’s going to allow you to move the image on the canvas. You can also use the bars at the sides of the image to adjust the size of the canvas in that direction.
As you make changes to the image or the canvas size, you’re going to notice some parts of the canvas will be left empty. That’s exactly what the editor is for. The editor’s purpose is to fill the empty spaces in the canvas.
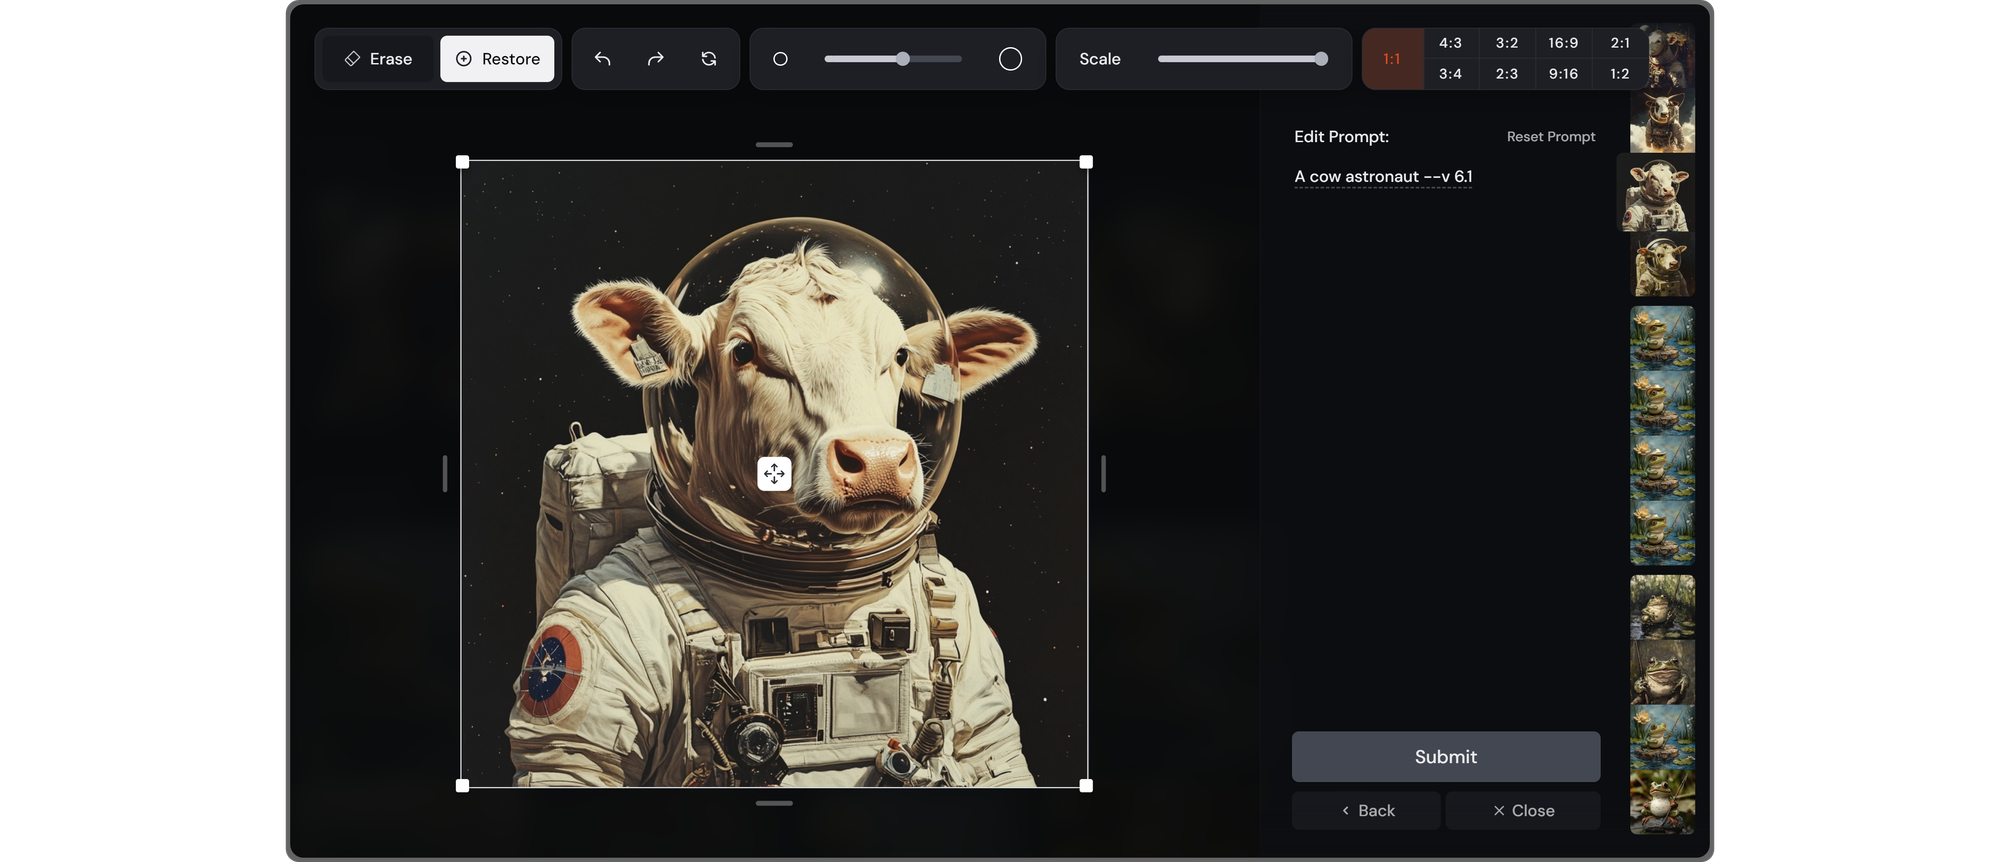
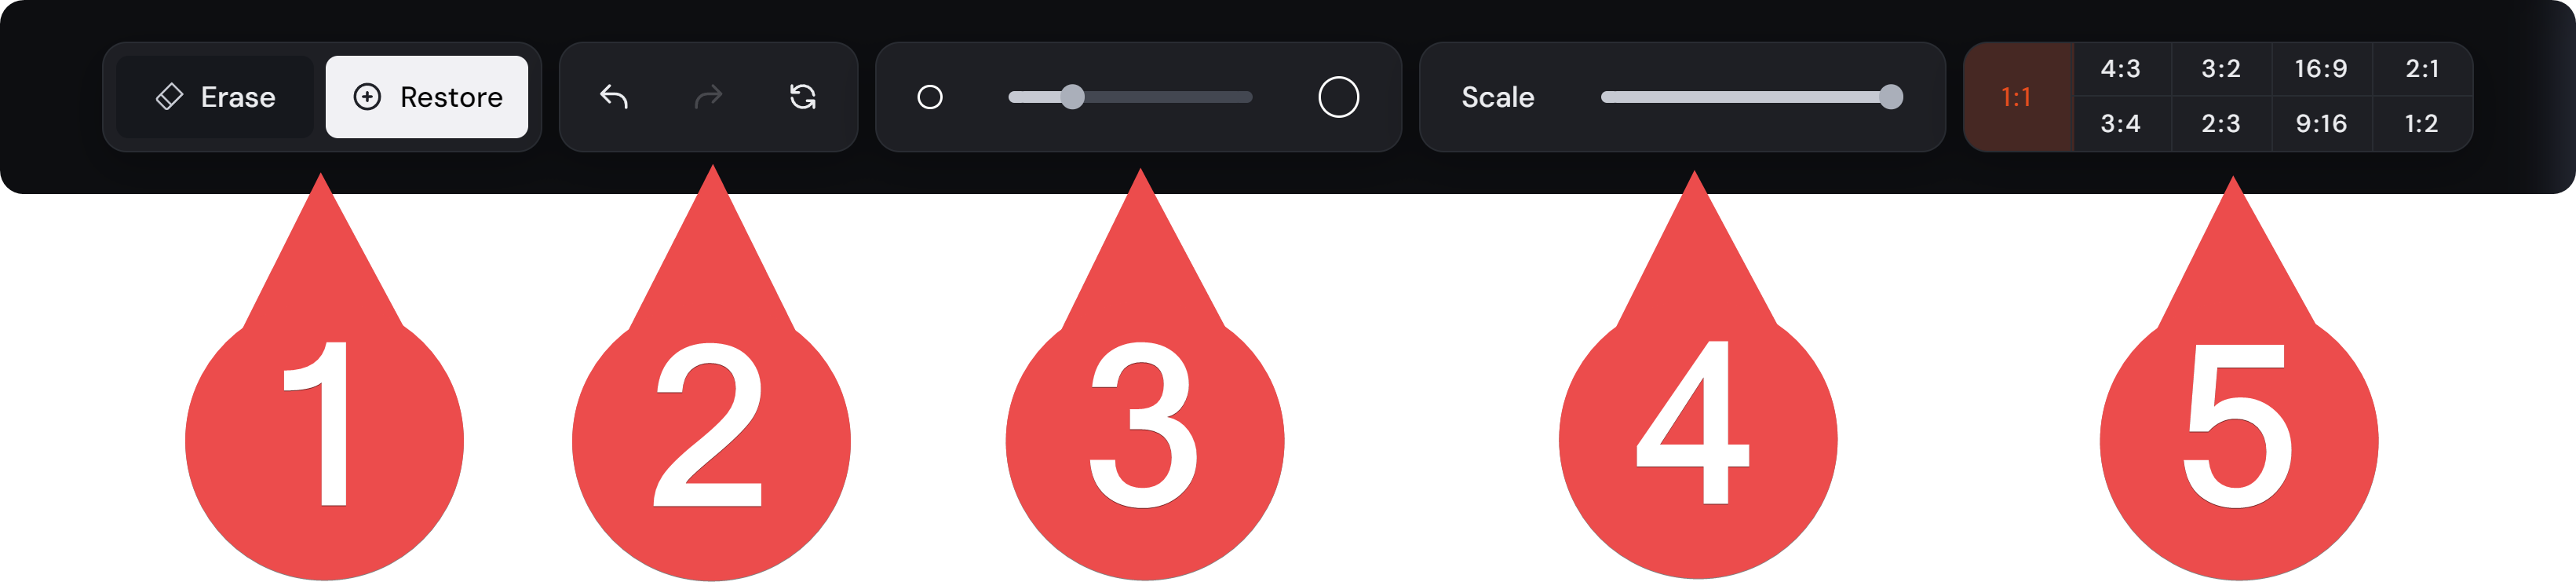
Before we see how you can fill those empty spaces, let’s take a look at the toolset you have at the top of your screen.
- You can use your cursor as a brush to Erase parts of your image or Restore them.
- The undo, redo, and reset buttons allow you to control the edits you make.
- The brush size slider allows you to change the side of your brush.
- The scale slider will change the size of your image relative to the canvas size.
- The aspect ratio buttons will change the aspect ratio of your canvas - this won’t change the size of the image.
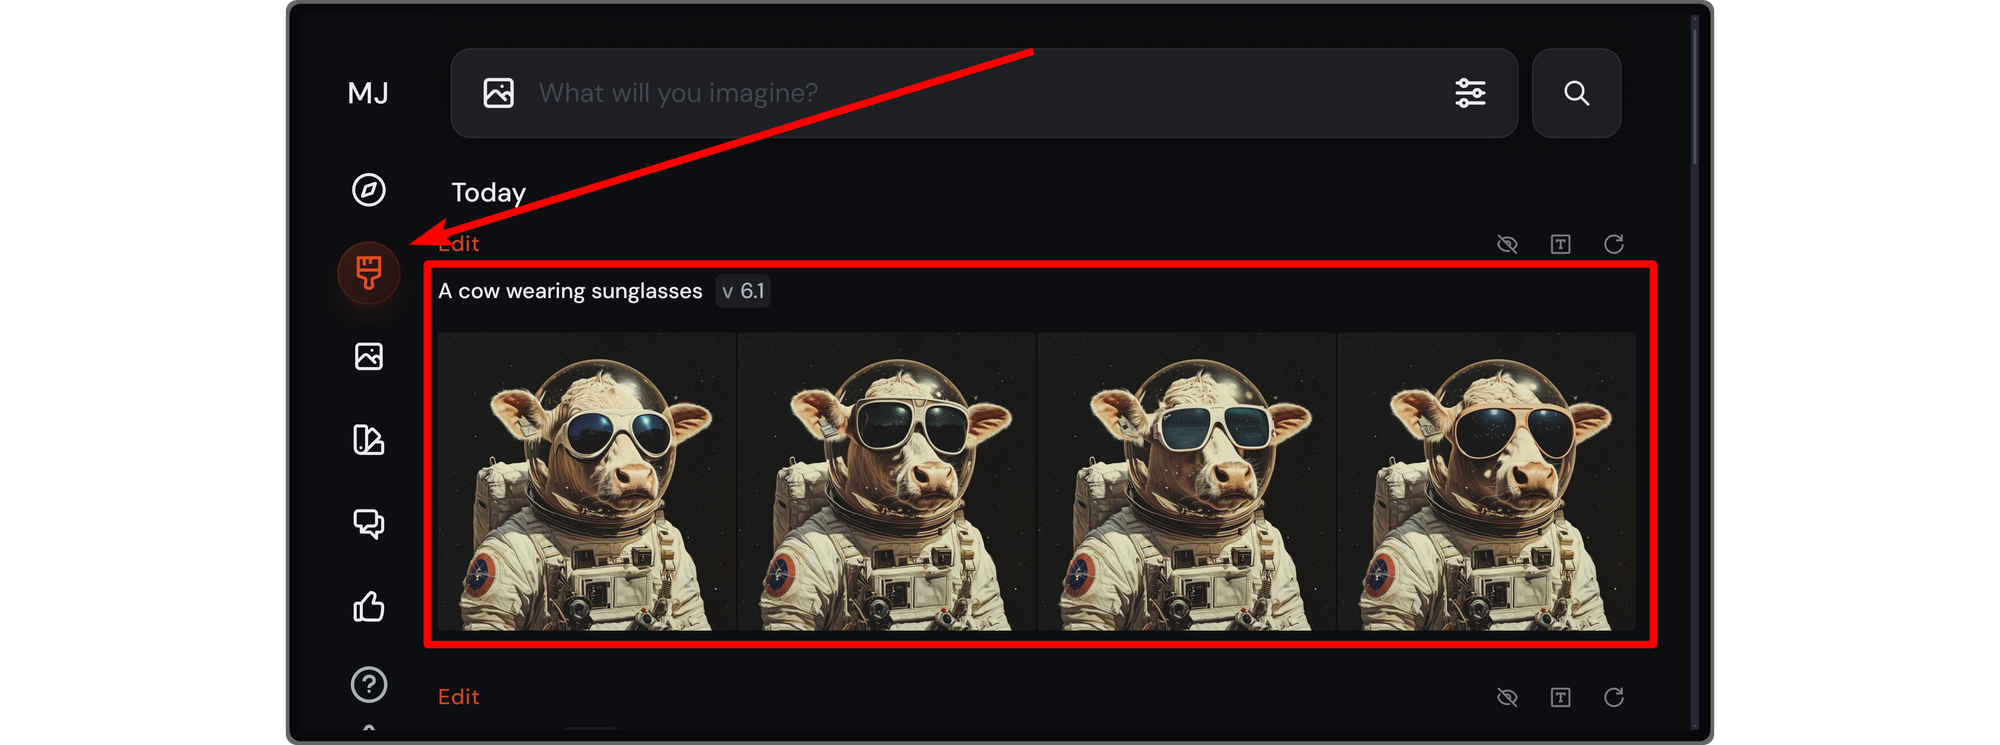
While a cow astronaut is pretty cool, sunglasses can make it even cooler. So, let’s select the Erase tool and erase the area where we want our cow to have a sunglass. Then, we’re going to edit our prompt so it’s not going to fill the erased area with regular cow eyes. Once we’re done, clicking the Submit button is going to fill the erased area.
After you click the Submit button, a new image batch is going to be generated. To see it, let’s click on the Creations button at the left side of your screen - and there we go, our cow now wears sunglasses.
Join Whop and find like-minded communities
Since you’re here learning about MidJourney, you might be interested in joining Whop - a place where you can find communities centered around all kinds of topics, including AI. Spoiler alert: these communities are not like the ones you can find somewhere else - they’re ✨premium✨. Further your AI design education and meet like-minded people with which to share your journey.
Signing up to Whop and finding the perfect community for you takes less than 5 minutes.