A comprehensive step-by-step guide on setting up a Discord server, covering everything from understanding Discord's interface, to creating a server and setting up categories, channels, and roles.
Key takeaways
- Creating a Discord server takes just a few clicks: tap the plus icon, choose a template or start fresh, name it, and you're done.
- Discord offers six ready-made templates (Gaming, School Club, Study Group, Friends, Artists, Local Community) to jumpstart your server setup.
- Customize your server extensively with channels, roles, and permissions to build the perfect private hub for friends or public community.
Discord is an online messaging platform where you can create groups and communities within Discord servers. These groups are invite-only, and so are a great option for friends, fan groups, and businesses. Setting up your own Discord server is an easy way to create your own private hub without having to make your own online messaging platform from scratch.
To make a simple server, click the "Add a Server" button (plus icon) at the bottom of the channel list, select "Create My Own" in the pop-up, choose if your server is private or public, upload a server icon and select a name for your server, and click "Create."
That's all there is to it - you now have a Discord server! However, although the initial setup is simple, Discord offers a lot of customization options so that you can create your ideal, personalized server. Adjusting all the settings and using the tools Discord offers can be complex. Today, we will guide you through creating your first Discord server as a beginner - from creation to channels, roles, permissions, and everything else!
Click to jump ahead to:
- What are Discord servers?
- Understanding Discord's user interface
- Creating a Discord server
- Discord server examples
- Setting up your discord server
- Create an income with your Discord server
What are Discord servers?
Discord servers can be explained as virtual clubs. Think of your local book club; they have meetings (around several topics), several rooms for its members to use, occasional events, and a member hierarchy. Discord is the same concept, just online. Discord servers have categorized channels for members to use, occasionally host events, and a role system that defines the member hierarchy.
The features that separate Discord from other communication apps are servers, unparalleled customization, both text and voice chats in the same place, bots, integrated games, and much more. Plus, while other apps' groups/servers can usually host up to a thousand members at most, Discord can host millions of people in a single server.
Discord is for everyone and every interest - there are Discord servers about everything from hamster care to stock trading to graphic design. There are 19 million active servers; so rest assured that your server has a place in Discord. The two main categorizations we can make of servers are private and public. Private servers make up over 90% of the servers in Discord, and they tend to have a small number of people in them, usually friend groups. Public servers, on the other hand, have a large number of people in them; thus, they are a community. Both have different setup and managing ways that should be taken into consideration.
For a more comprehensive look at Discord servers, read 'what is a Discord server'
Understanding Discord's user interface
The Discord interface, while simple, can be overwhelming at first with a variety of options and icons. Before we look at creating your own Discord server let's first unpack how to read and use the Discord interface across all devices.
Discord Desktop user interface
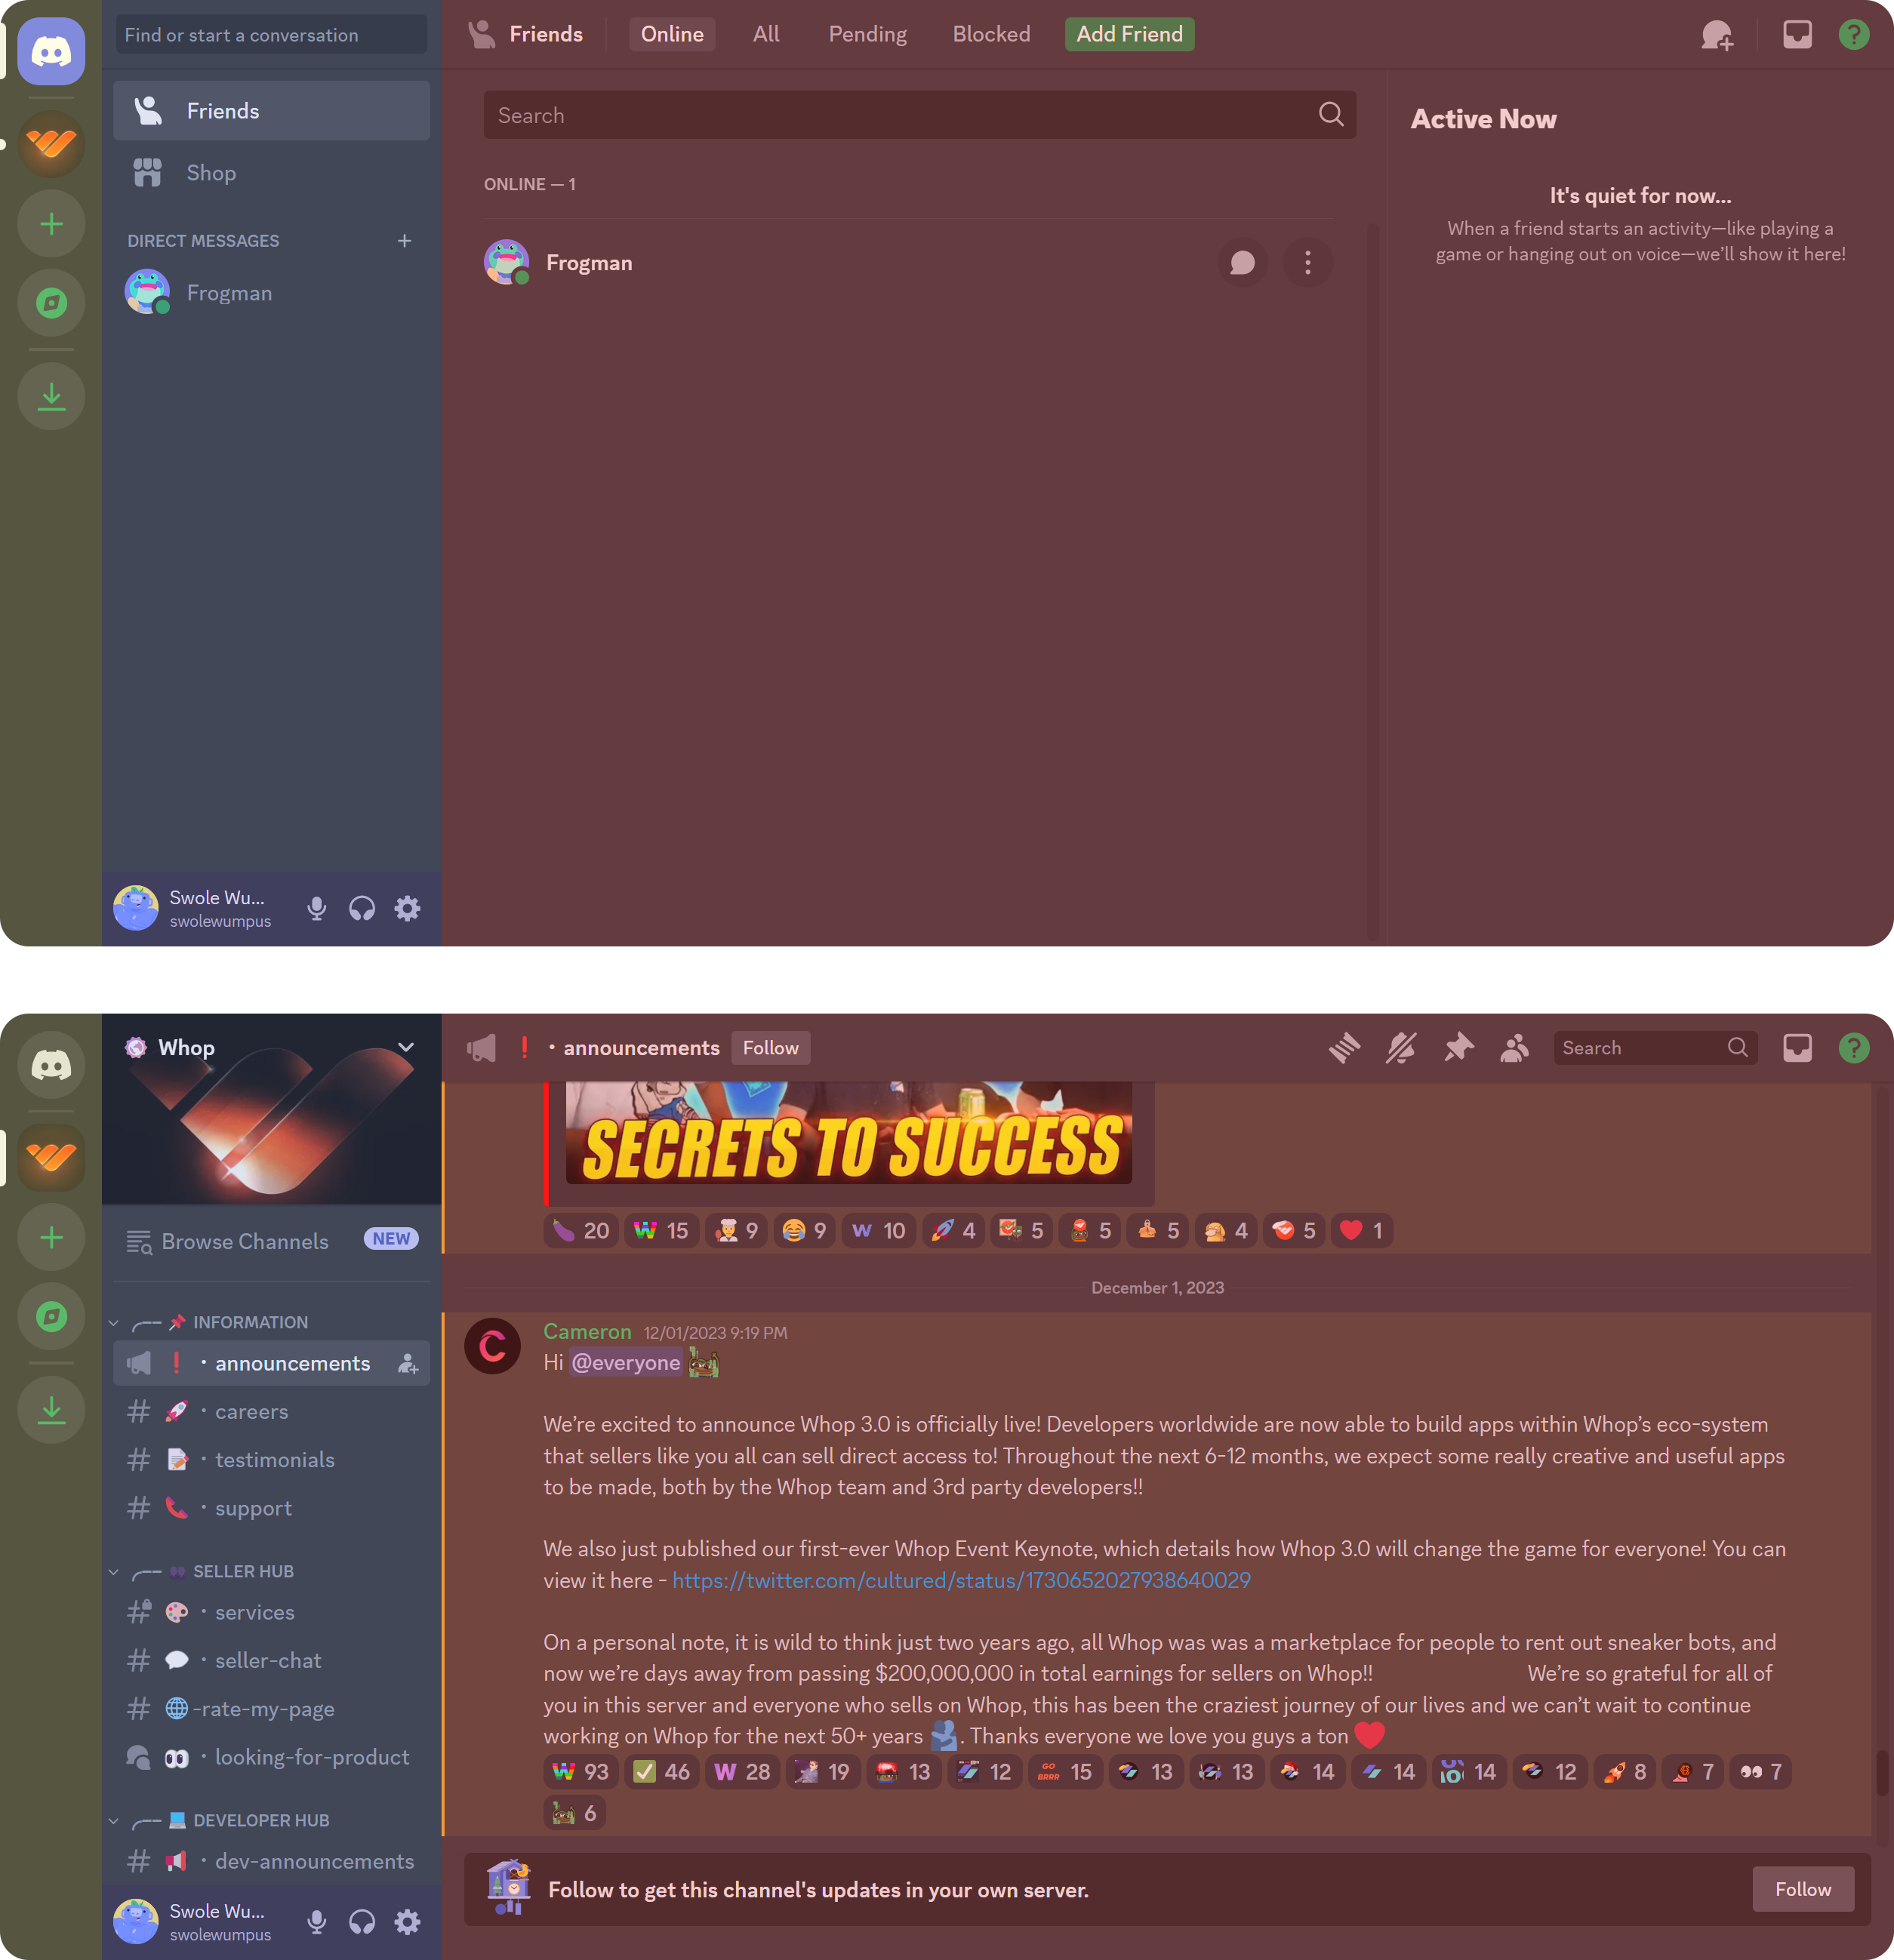
Here's how the Discord interface looks on a desktop computer:
- Yellow - the server list: The Discord logo is at the top of this list. Clicking it will redirect you to your Direct Messages, where you can see your friends list, your direct messages, your friends' activity, and the shop button. Below it, you will notice a list of all the servers you're a member of. You can navigate between them by clicking the server icons.
- Blue - the channel list: The channel list shows the different channels you can navigate between. If you're on the direct messages screen, you'll see your direct messages; if you're on a server, you'll see the channels of the server.
- Purple - user board: The user board contains settings like deafen/undeafen, mute/unmute, and user profile settings. Mute will stop others in the voice channel from hearing you, deafen will mute you but also prevent you from hearing others. Profile settings will simply open the settings.
- Red - main area: If you're in the Direct Messages screen, which you open by clicking the button with the Discord logo at the top left, you can see your friends listed in the main area. If you're in a server, you will see the selected channel's chat.
Discord's iOS user interface

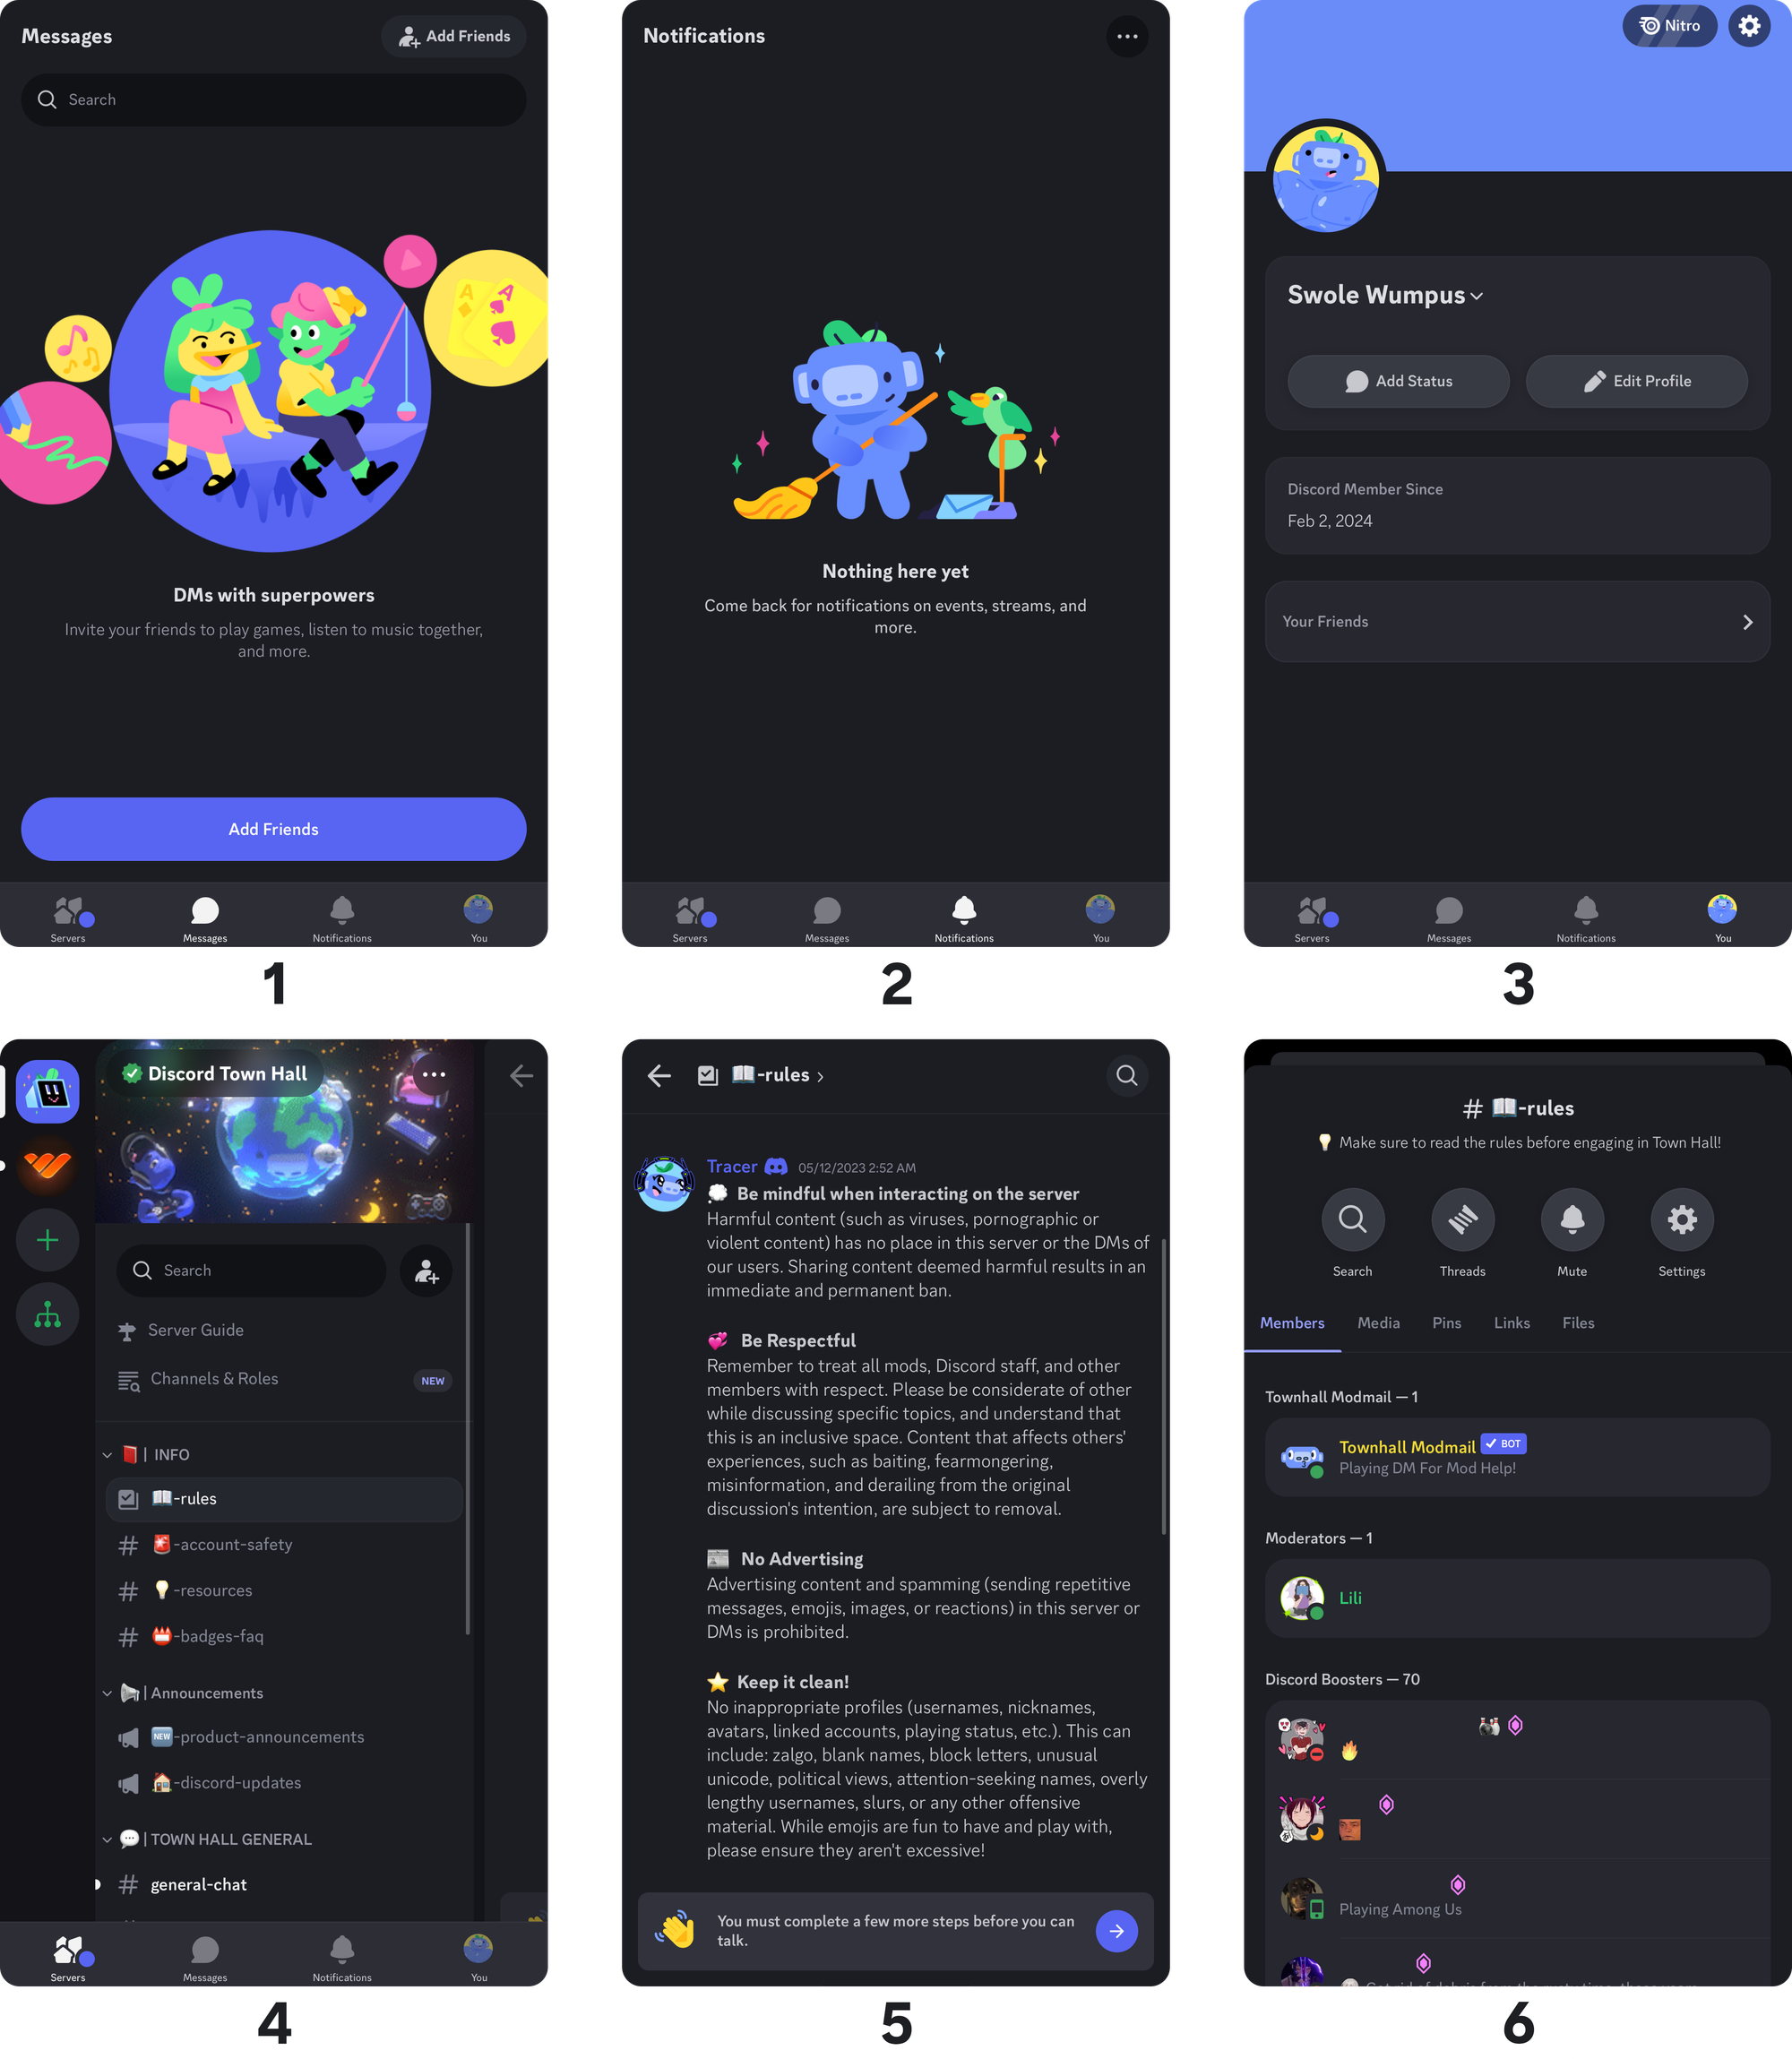
Discord's iOS user interface is as simple as on other platforms. Let's go over all the common tabs a regular user might use:
- Messages tab: This tab opens by default when you launch the app. You can see your direct messages there.
- Notifications tab: This tab shows all your notifications, from friend requests to pings (when a user mentions you).
- You tab: This tab contains your profile, settings, and more. It's all about you!
- Servers tab: This tab displays the last server you visited by default. When pressed, it displays the server and the channel list. If it's not open by default, meaning you can't see the servers and channels list, you can open it by swiping right.
- The chat: By swiping left on the Servers tab, you can hide the server and channel lists and see the chat of the selected channel. You can re-open the Servers tab by swiping right.
- Channel and members tab: In the chat tab, you can open the channel and members tab by pressing the channel name above. Once you press the channel name, you will see the channel name, its description, buttons like "Search," "Threads, "Mute," and "Settings," the server members, media list, pins, sent links, and lastly, the sent files.
Discord's Android user interface
Here's what you can find in Discord's Android user interface:
- Messages tab: This tab opens by default when you launch the app. You can see your direct messages there.
- Notifications tab: This tab shows all your notifications, from friend requests to pings (when a user mentions you).
- You tab: This tab contains your profile, settings, and more. It's all about you!
- Servers tab: This tab displays the last server you visited by default. When pressed, it displays the server and the channel list. If it's not open by default, meaning you can't see the servers and channels list, you can open it by swiping right.
- The chat: By swiping left on the Servers tab, you can hide the server and channel lists and see the chat of the selected channel. You can re-open the Servers tab by swiping right.
- Channel and members tab: In the chat tab, you can open the channel and members tab by pressing the channel name above. Once you press the channel name, you will see the channel name, its description, buttons like "Search," "Threads," "Mute," and "Settings," the server members, media list, pins, sent links, and, lastly, the sent files.
Creating a Discord server
Now that you understand Discord's user interface, it's time to create your first server! We will go through creating servers on Desktop, iOS, and Android, so scroll through to find the information relevant to you.
Creating a Discord server on Desktop
Now you know the user interface, let's create your first server. Follow these steps to make your server:
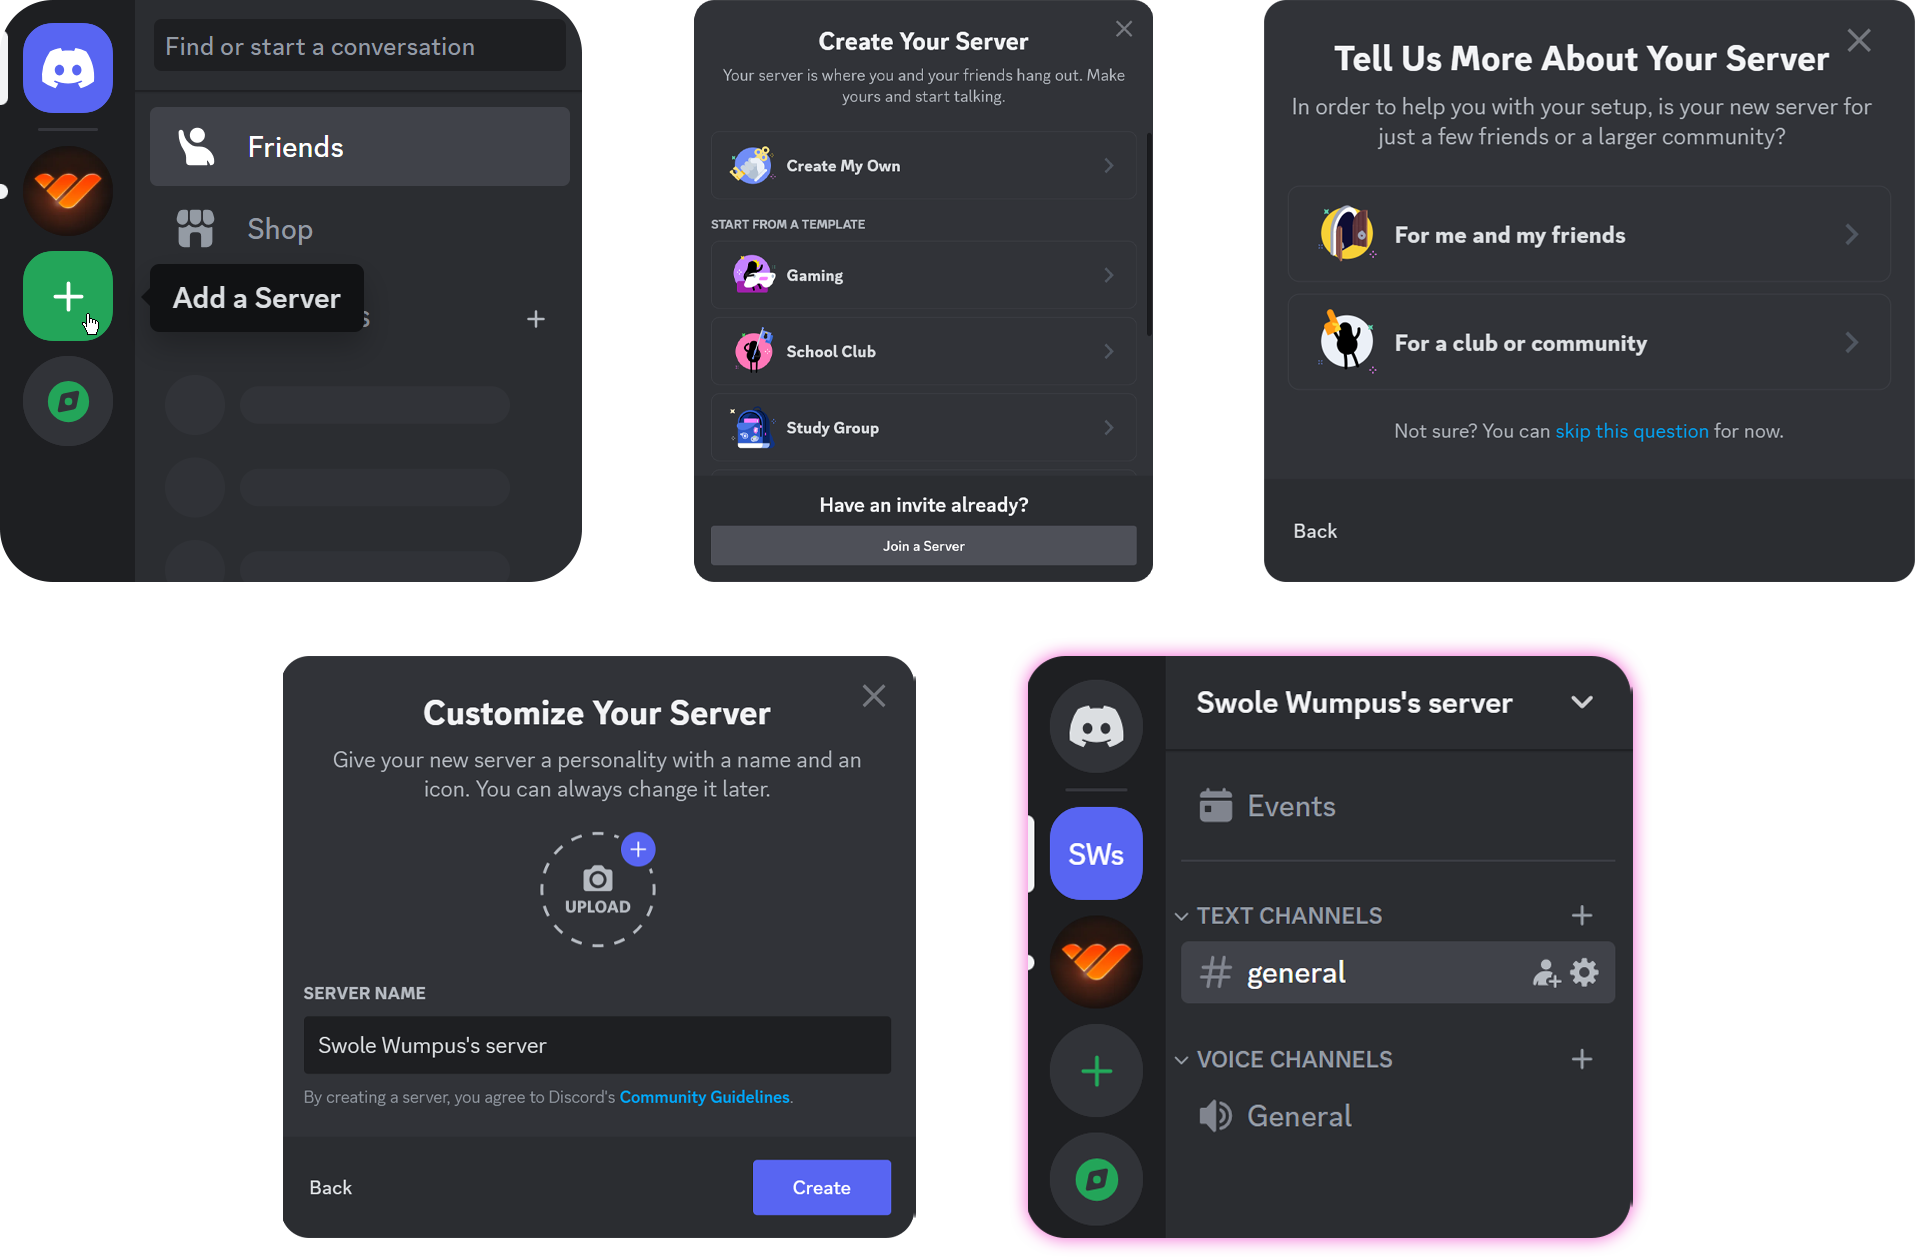
- Navigate to the bottom of your channel list and click on the "Add a Server" button with a plus icon.
- In the "Create Your Server" pop-up, select either "Create My Own" to start from scratch (a "general" text channel and a "General" voice channel) or one of the templates below it to begin with a basic outline. Selecting a template will only create additional channels at the end, and it doesn't change any part of the setup process.
- Gaming Template: "general" and "clips and highlights" text channels and "Lobby" and "Gaming" voice channels
- School Club Template: "welcome-and-rules," "announcements," "general," "meeting-plans," and "off-topic" text channels and "Lounge," "Meeting Room 1", and "Meeting Room 2" voice channels
- Study Group Template: "welcome-and-rules," "notes-resources," "general," "homework-help," "session-planning," and "off-topic" text channels and "Lounge," "Study Room 1", and "Study Room 2" voice channels
- Friends Template: "general," "games," and "music" text channels and "Lounge" and "Stream Room" voice channels
- Artists & Creators Template: "welcome-and-rules," "announcements," "general," "events," and "ideas-and-feedback" text channels and "Lounge," "Community Hangout," and "Stream Room" voice channels
- Local Community Template: "welcome-and-rules," "announcements," "resources," "general," and "meeting-plans," and "off-topic" text channels and "Lounge" and "Meeting Room" voice channels
- Choose what kind of server you want to create; private ("For me and my friends") or public ("For a club or community"). Your selection in this step won't make a functional difference, so choose what you want. You can skip the question by clicking the blue "skip the question" text below the buttons.
- Upload a server icon, choose a server name, and click "Create"
There you go! You just created your first server!
Creating a server on iOS
We tackled the user interface on iOS, so let's get straight to creating a server! To make a server on an iOS device, you should:
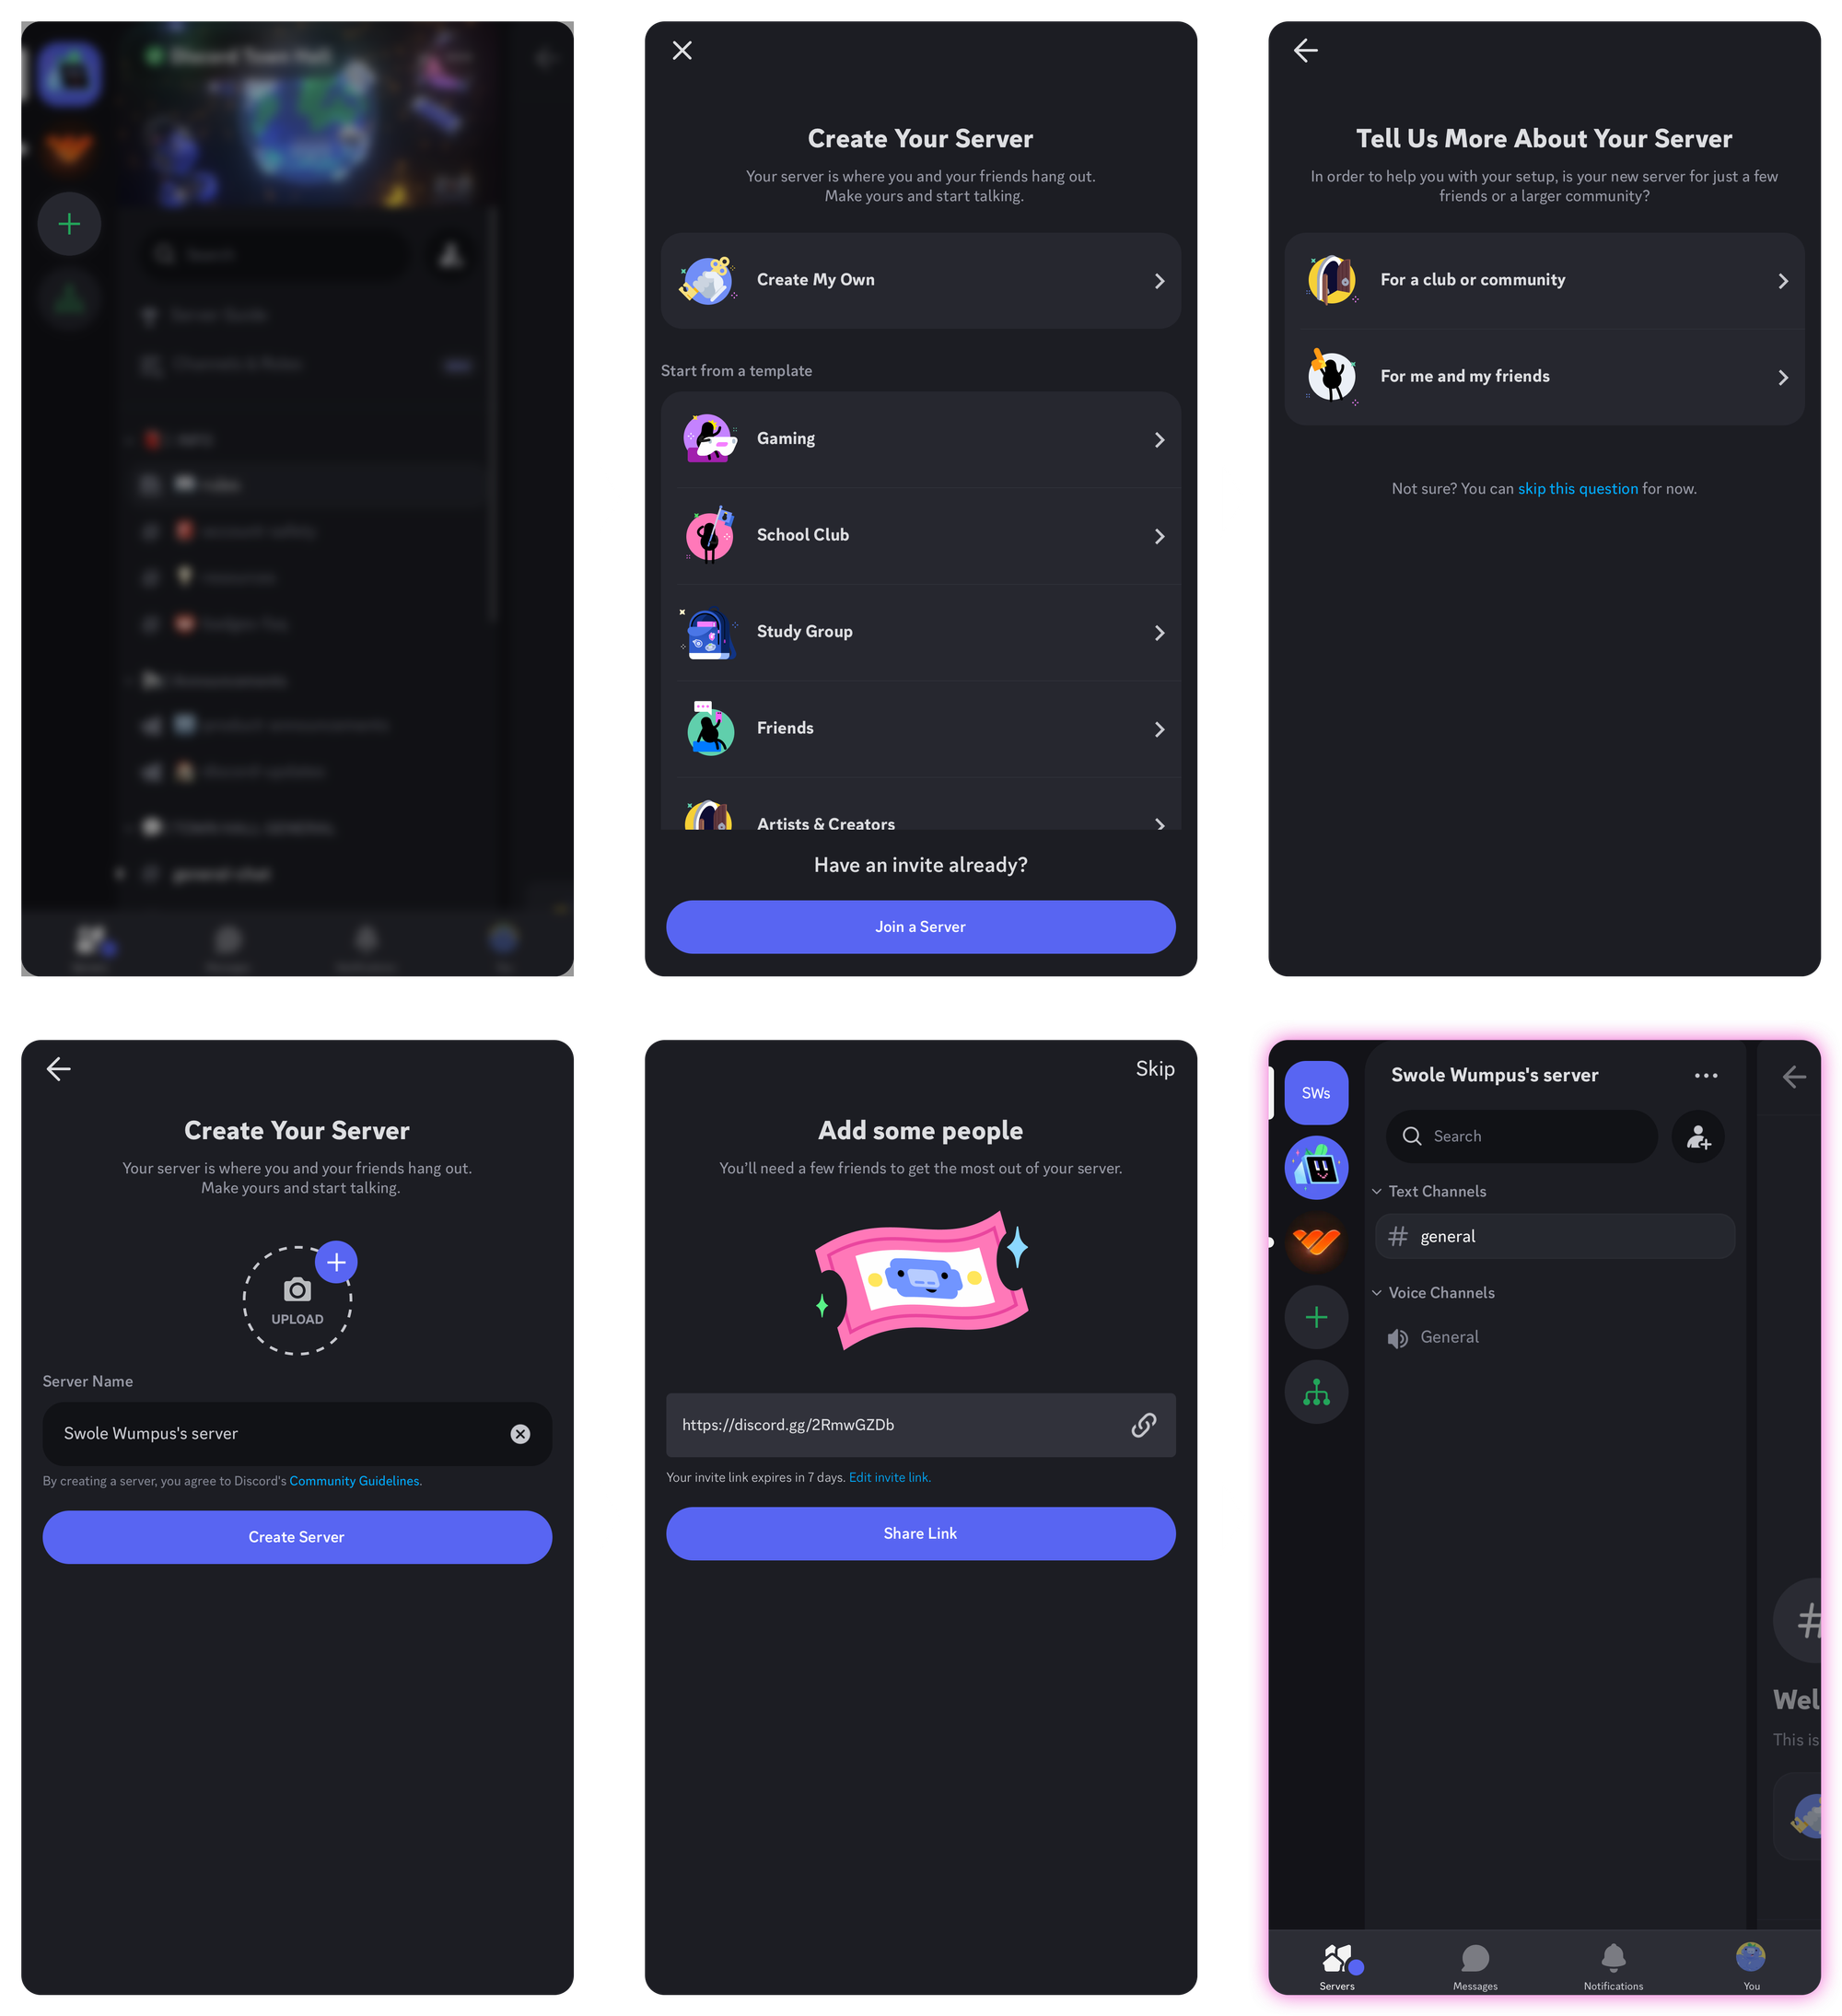
- Scroll to the bottom of your channel list and press the "Add a Server" button, which has a plus icon.
- In the "Create Your Server" screen, select either "Create My Own" to start from scratch (a "general" text channel and a "General" voice channel) or one of the templates below it to begin with a basic outline. Selecting a template will only create additional channels at the end, and it doesn't change any part of the setup process.
- Gaming Template: "general" and "clips and highlights" text channels and "Lobby" and "Gaming" voice channels
- School Club Template: "welcome-and-rules," "announcements," "general," "meeting-plans," and "off-topic" text channels and "Lounge," "Meeting Room 1", and "Meeting Room 2" voice channels
- Study Group Template: "welcome-and-rules," "notes-resources," "general," "homework-help," "session-planning," and "off-topic" text channels and "Lounge," "Study Room 1", and "Study Room 2" voice channels
- Friends Template: "general," "games," and "music" text channels and "Lounge" and "Stream Room" voice channels
- Artists & Creators Template: "welcome-and-rules," "announcements," "general," "events," and "ideas-and-feedback" text channels and "Lounge," "Community Hangout," and "Stream Room" voice channels
- Local Community Template: "welcome-and-rules," "announcements," "resources," "general," and "meeting-plans," and "off-topic" text channels and "Lounge" and "Meeting Room" voice channels
- Choose what kind of server you want to create; private ("For me and my friends") or public ("For a club or community"). Your selection in this step won't make a functional difference, so feel free when choosing. You can skip the question by pressing the blue "skip the question" text below the buttons.
- Upload a server icon, choose a name, and press "Create."
- You can see your first invite link in the "Add some people" screen. That link expires in 7 days, so you can edit its properties by pressing the blue "Edit invite link" text below the invite. From there, you can adjust your invite link to never expire and have unlimited uses.
Ta-da! You just created your first server. Congratulations!

Creating a server on Android
To make a server on an Android device, follow these steps:
- Scroll to the bottom of your channel list and press the "Add a Server" button, which has a plus icon.
- In the "Create Your Server" screen, select either "Create My Own" to start from scratch (a "general" text channel and a "General" voice channel) or one of the templates below it to begin with a basic outline. Selecting a template will only create additional channels at the end, and it doesn't change any part of the setup process.
- Gaming Template: "general" and "clips and highlights" text channels and "Lobby" and "Gaming" voice channels
- School Club Template: "welcome-and-rules," "announcements," "general," "meeting-plans," and "off-topic" text channels and "Lounge," "Meeting Room 1", and "Meeting Room 2" voice channels
- Study Group Template: "welcome-and-rules," "notes-resources," "general," "homework-help," "session-planning," and "off-topic" text channels and "Lounge," "Study Room 1", and "Study Room 2" voice channels
- Friends Template: "general," "games," and "music" text channels and "Lounge" and "Stream Room" voice channels
- Artists & Creators Template: "welcome-and-rules," "announcements," "general," "events," and "ideas-and-feedback" text channels and "Lounge," "Community Hangout," and "Stream Room" voice channels
- Local Community Template: "welcome-and-rules," "announcements," "resources," "general," and "meeting-plans," and "off-topic" text channels and "Lounge" and "Meeting Room" voice channels
- Choose what kind of server you want to create; private ("For me and my friends") or public ("For a club or community"). Your selection in this step won't make a functional difference, so feel free when choosing. You can skip the question by pressing the blue "skip the question" text below the buttons.
- Upload a server icon, choose a name, and press "Create."
- In the "Add some people" screen, you can see your first invite link. That link expires in 7 days, so you can edit its properties by pressing the blue "Edit invite link" text below the invite. From there, you can adjust your invite link to never expire and have unlimited uses.
Your first server is now created!
Discord server examples
With your Discord server created it's now time to set up your channels, bots, roles, and more. You likely already have an idea in mind for your Discord server setup, but if you need more inspiration then you can analyze the works of experts to get new ideas.
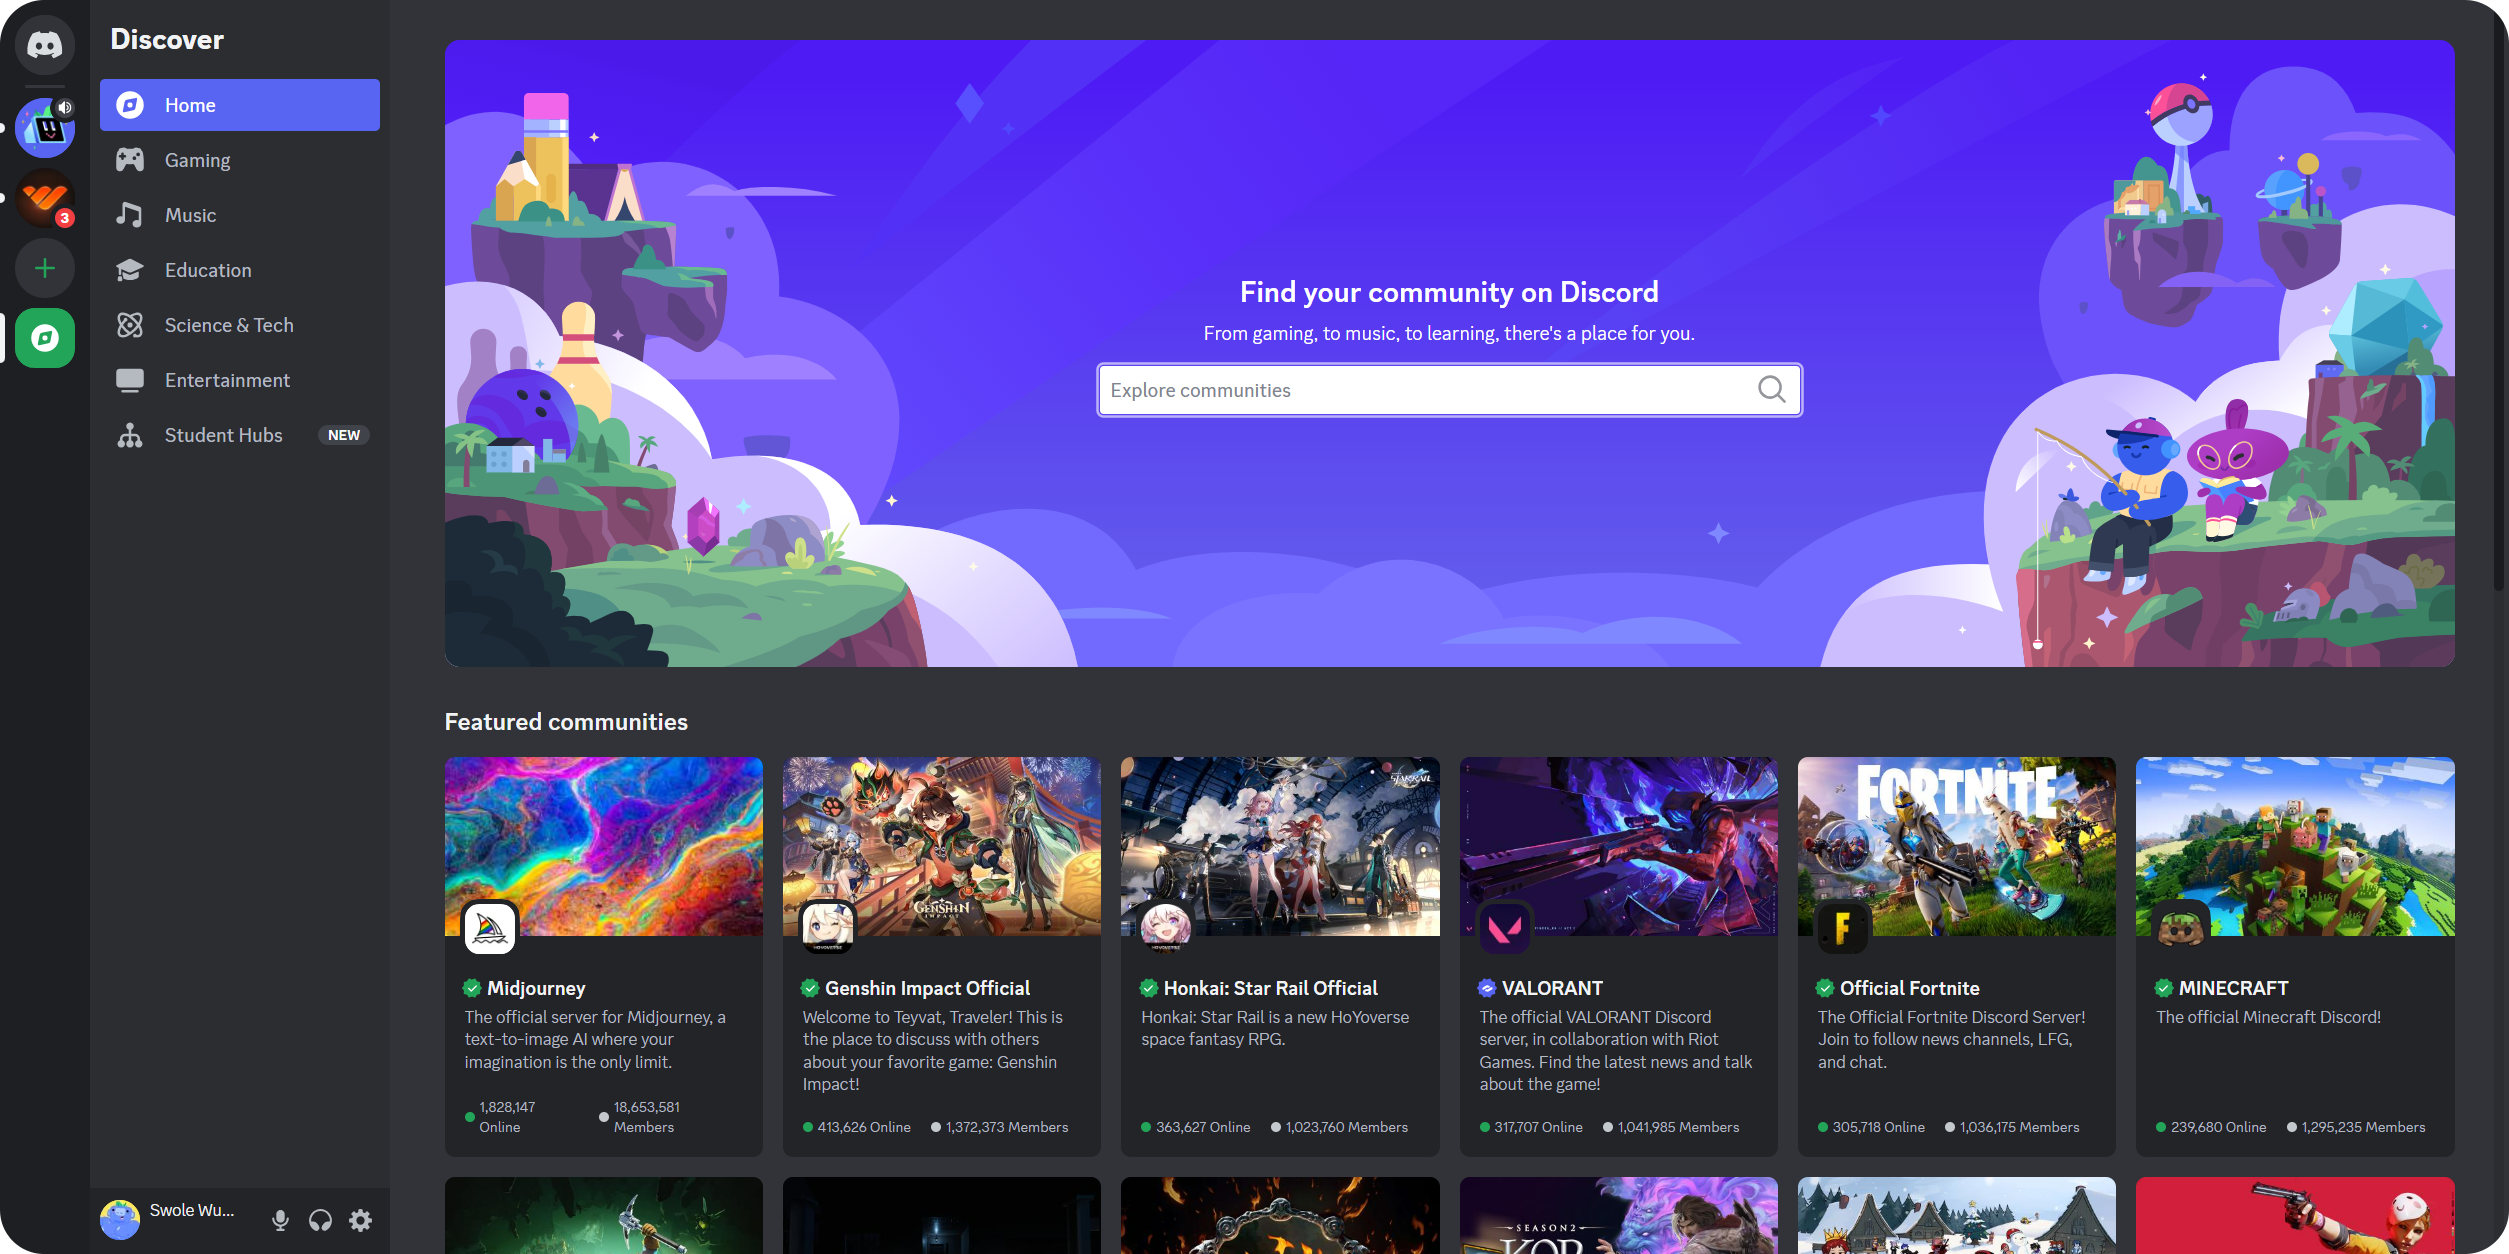
To find great Discord server examples visit the Server Discovery tab via the compass icon at the bottom of the channel list. You'll see the home section of the Server Discovery when you click the icon. Here you can see some of the best servers Discord offers. You can visit any of them by just clicking on their card. Take a look at their channels, categorization, roles, rules, and bots because we'll move on to setting up your server next!
Setting up your Discord server
Follow these steps to set up everything inside your Discord server, from channels to categories, roles, and permissions.
Discord server outline example
Creating a server outline before creating categories, channels, and roles will make your work much easier since you'll have a plan before you begin creating your server structure. The outline will change drastically depending on the topic it revolves around. Here's an example outline of a basic server:
- Topic: Chatting / Casual
- Target audience: People above 16, who use Discord daily
- Categories and Channels:
- Core channels:
- #rules
- #getting-started
- #suggestions
- Main channels:
- #general
- #off-topic
- #spoiler-talk
- #art
- #gaming
- #bot-commands
- Main voice channels:
- General
- Off-topic
- Private
- Staff channels:
- #staff-chat
- #bot-testing
- Core channels:
- Roles:
- Admin: Admins are the users with authority in your server.
- Moderator: Moderators are users who have permissions like mute, kick, and ban. Their role is to keep the server safe and fun.
- Member: All of your users can have a member role, making organizing easier.
- Bot: Bots will come with their own role, but giving them a common role will make your job easier since you'll only have to manage the permissions of a single role rather than several.
As you can see in the example outline above, the Rules channel is at the top, meaning it will be the first channel new users will see upon joining your server. Every community has rules tailored specifically to them. Still, you can look at the example below and elaborate it to your needs:
- Adult content (+18) is prohibited.
- Discussions of language, religion, race, war/politics, and history are prohibited.
- Posting threatening, abusive, obscene, vulgar, rude, hateful, or unwanted messages, even if implied or censored; sending messages and using materials that discriminate against religion, language, or race is prohibited.
- Advertising other Discord servers, sites, groups, or pages is prohibited - unless permission is obtained from the administrators.
- Pirated content is prohibited.
- Your username must be taggable. If your profile photo or status violates the rules, you will receive a warning, and failure to comply will result in expulsion from the server.
- According to the Discord Terms of Service, Posting someone else's personal information (phone number, email address, photo, etc.) is prohibited. It may result in the termination of the user's account.
- Common etiquette is essential.
- It is forbidden to spoil any content outside the spoiler channel. Spoilers are valid for two weeks.
Creating Discord channels and categories on Desktop
You can create categories and channels on your desktop with just a few clicks. There are several ways to achieve this. The first one is by using the server menu:
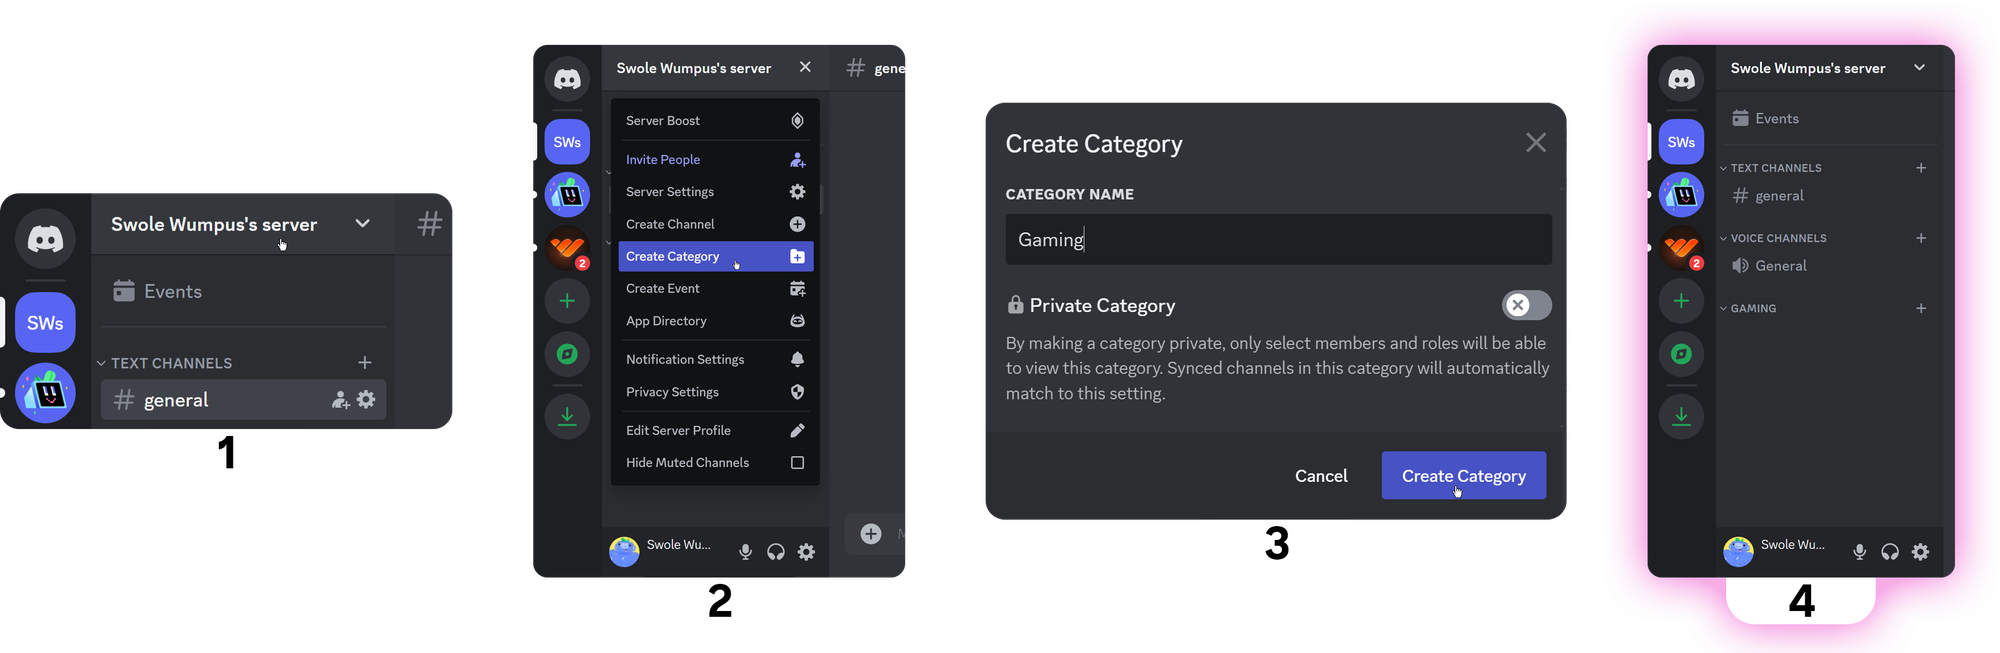
- Click the server name at the top of the channel list
- Select the "Create Category" option
- Give your category a great name and click the "Create Category" button
You can also right-click whitespace on the channel list to create categories:
- Navigate to a whitespace (a blank area that doesn't have any item) and right-click and select the "Create Category" option from the list
- Choose a category name and click the "Create Category" button. Your category is now created!

Creating channels follows a very similar approach:
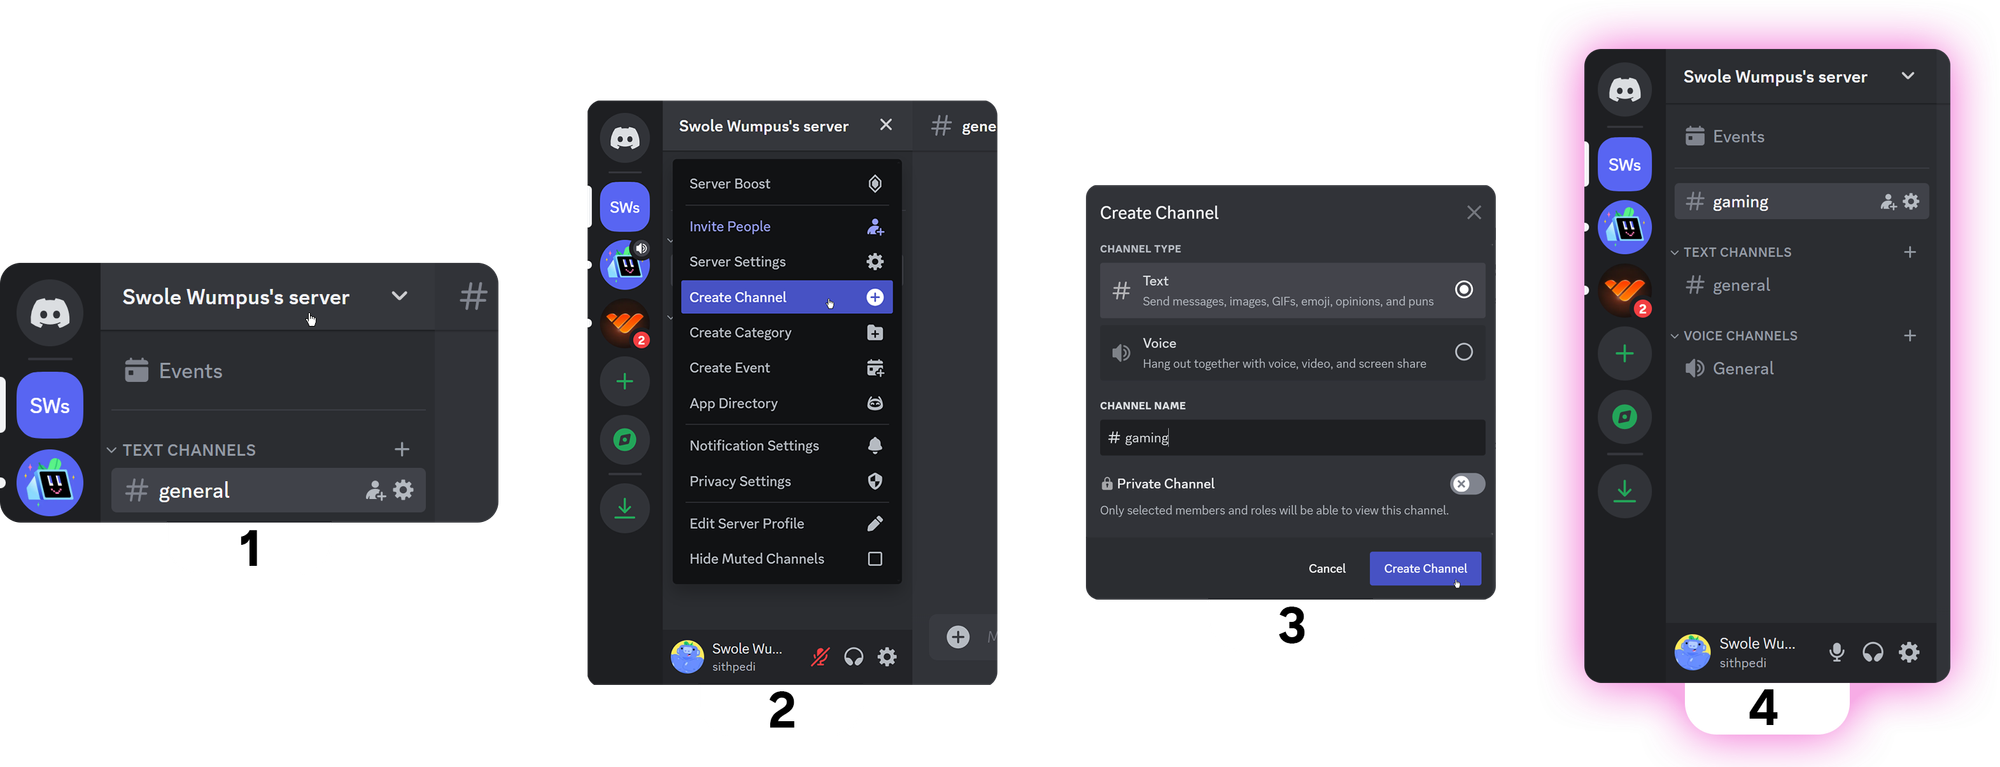
- Click the server name at the top of the channel list
- Select the "Create Channel" option
- Give your channel a cool name in the screen that pops up, and click "Create Channel" when you're done.
Well done, you created a channel!
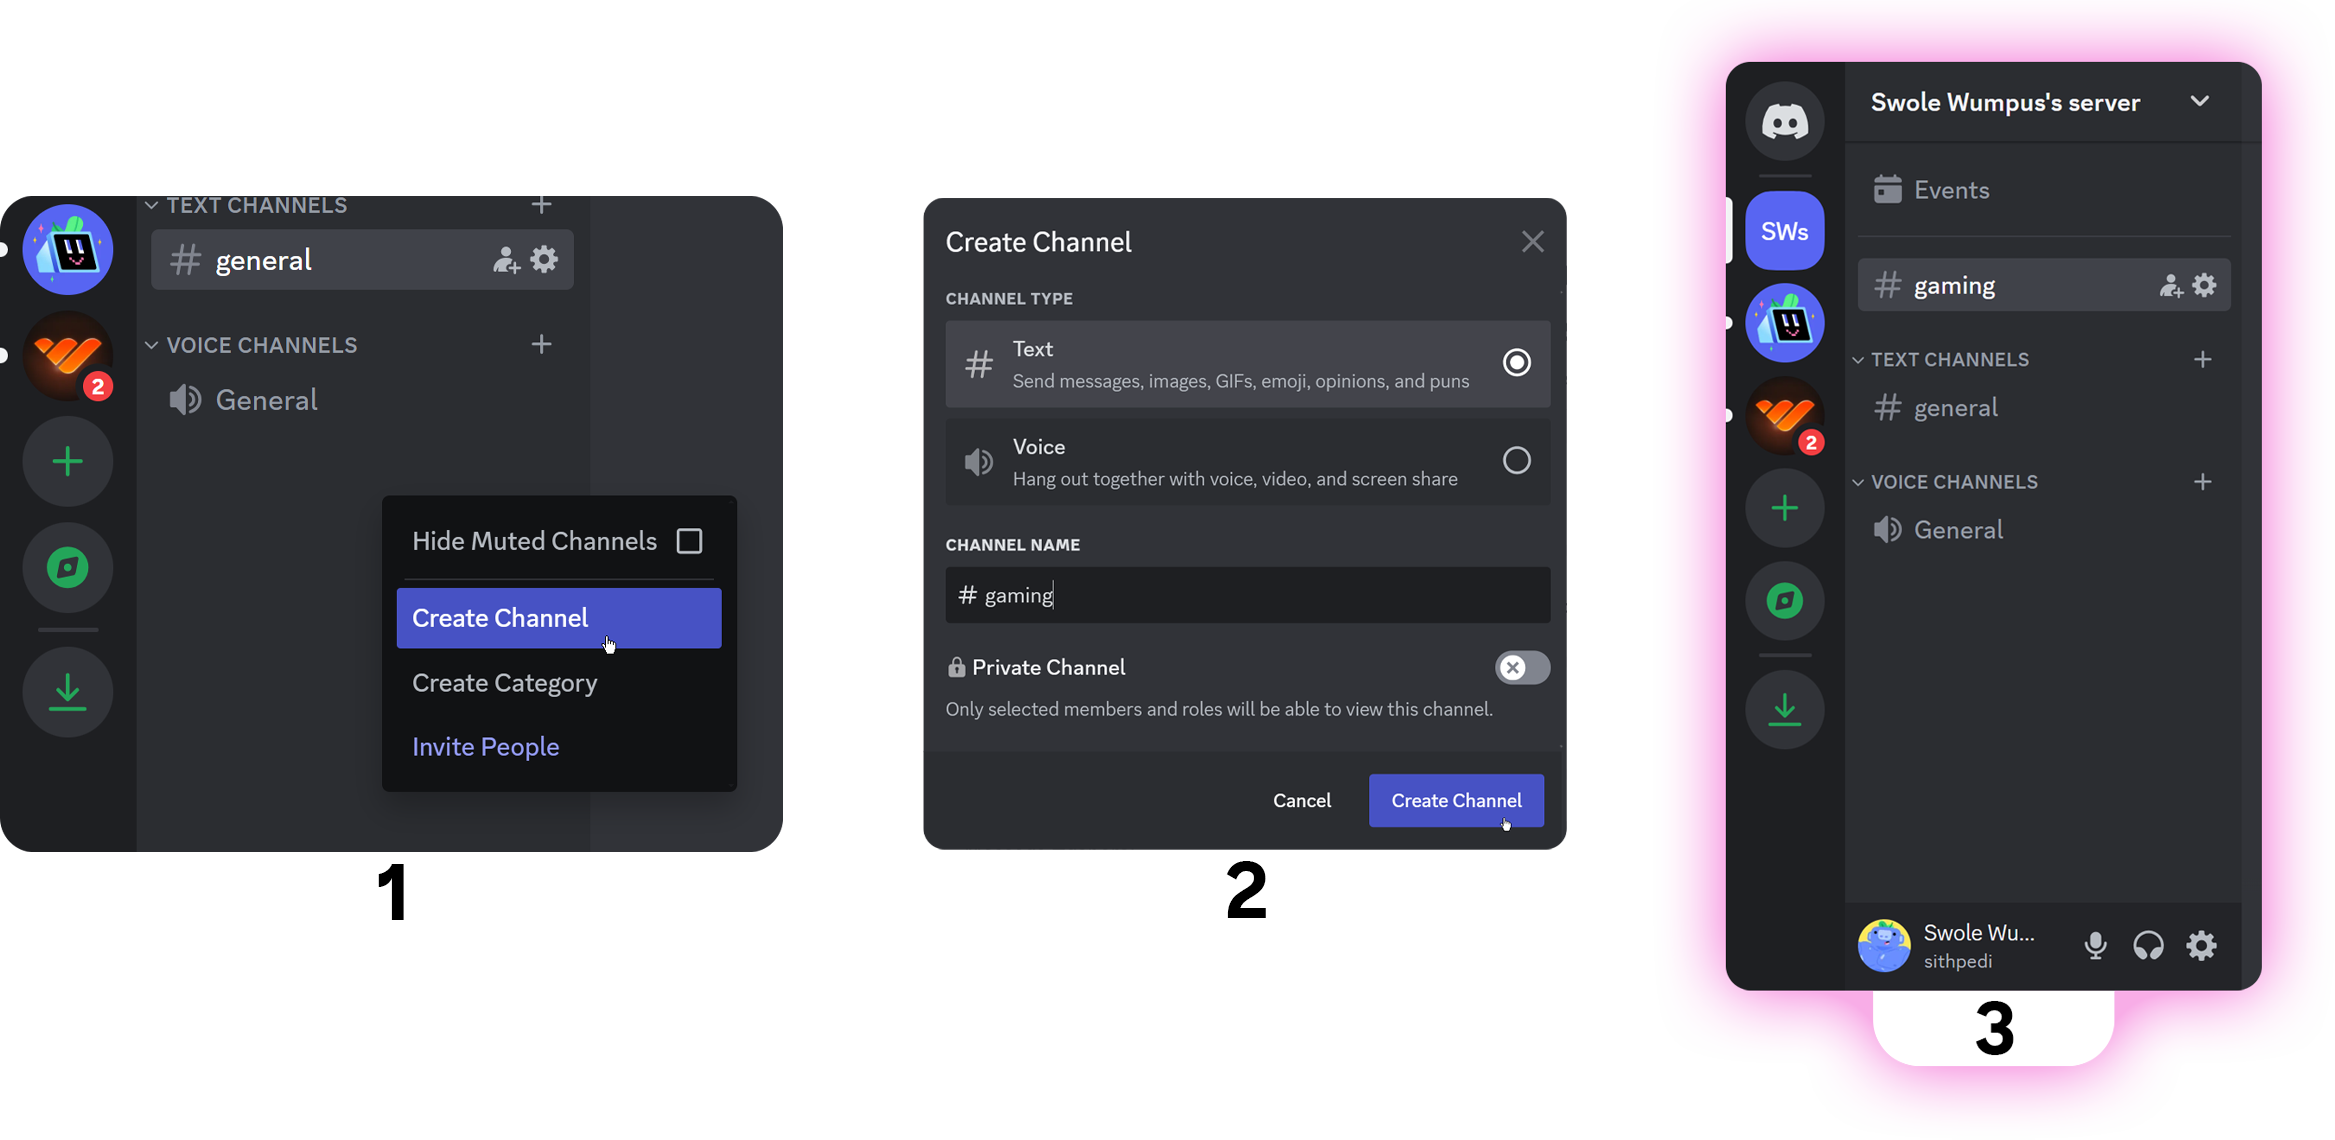
You can also use the right-click method to create channels:
- Navigate to a whitespace (a blank area that doesn't have any item) and right-click and select the "Create Channel" option from the list
- Choose a channel name and click the "Create Channel" button
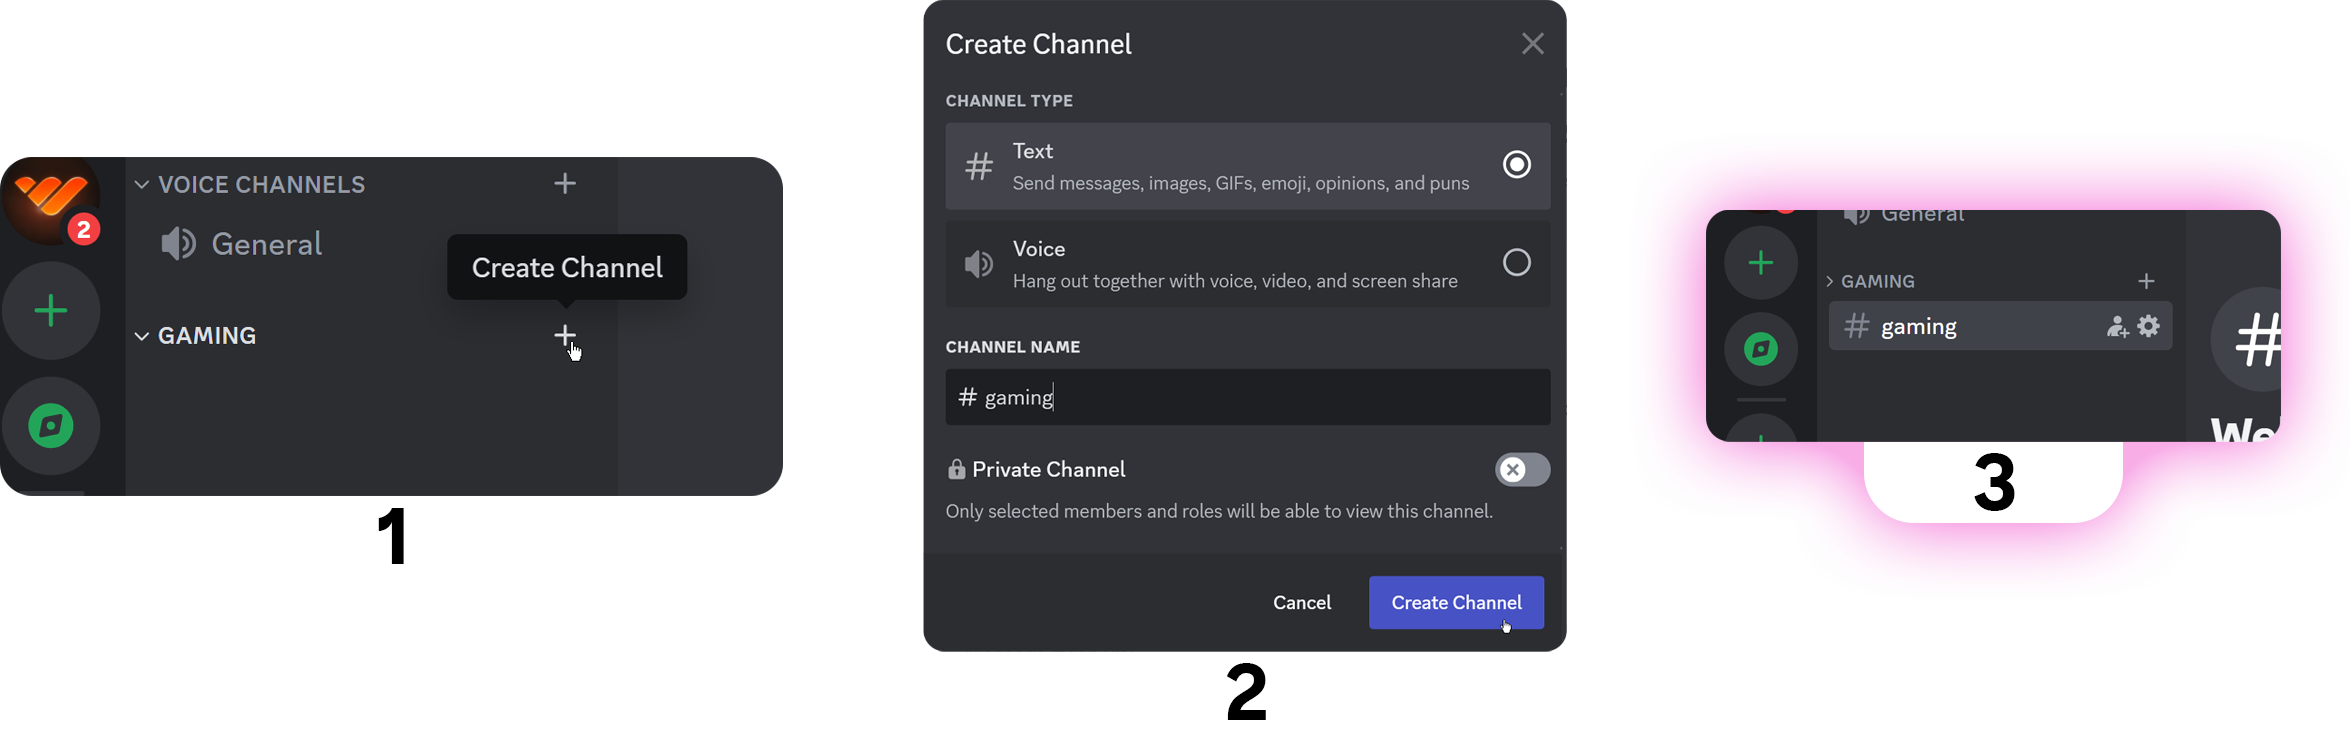
Creating channels with the two methods listed above will make the channel appear at the top of the channel list. One thing to keep in mind is that when a user joins your server, the first channel they see will be your topmost channel. You can always move your channels around, but you can create channels under categories as well:
- Hover over a category, and you will see a plus icon with the "Create Channel" tooltip to the right of it. Click on it
- In the "Create Channel" pop-up, give your channel a name and click the "Create Channel" button at the bottom right
Your new channel is created under the category!
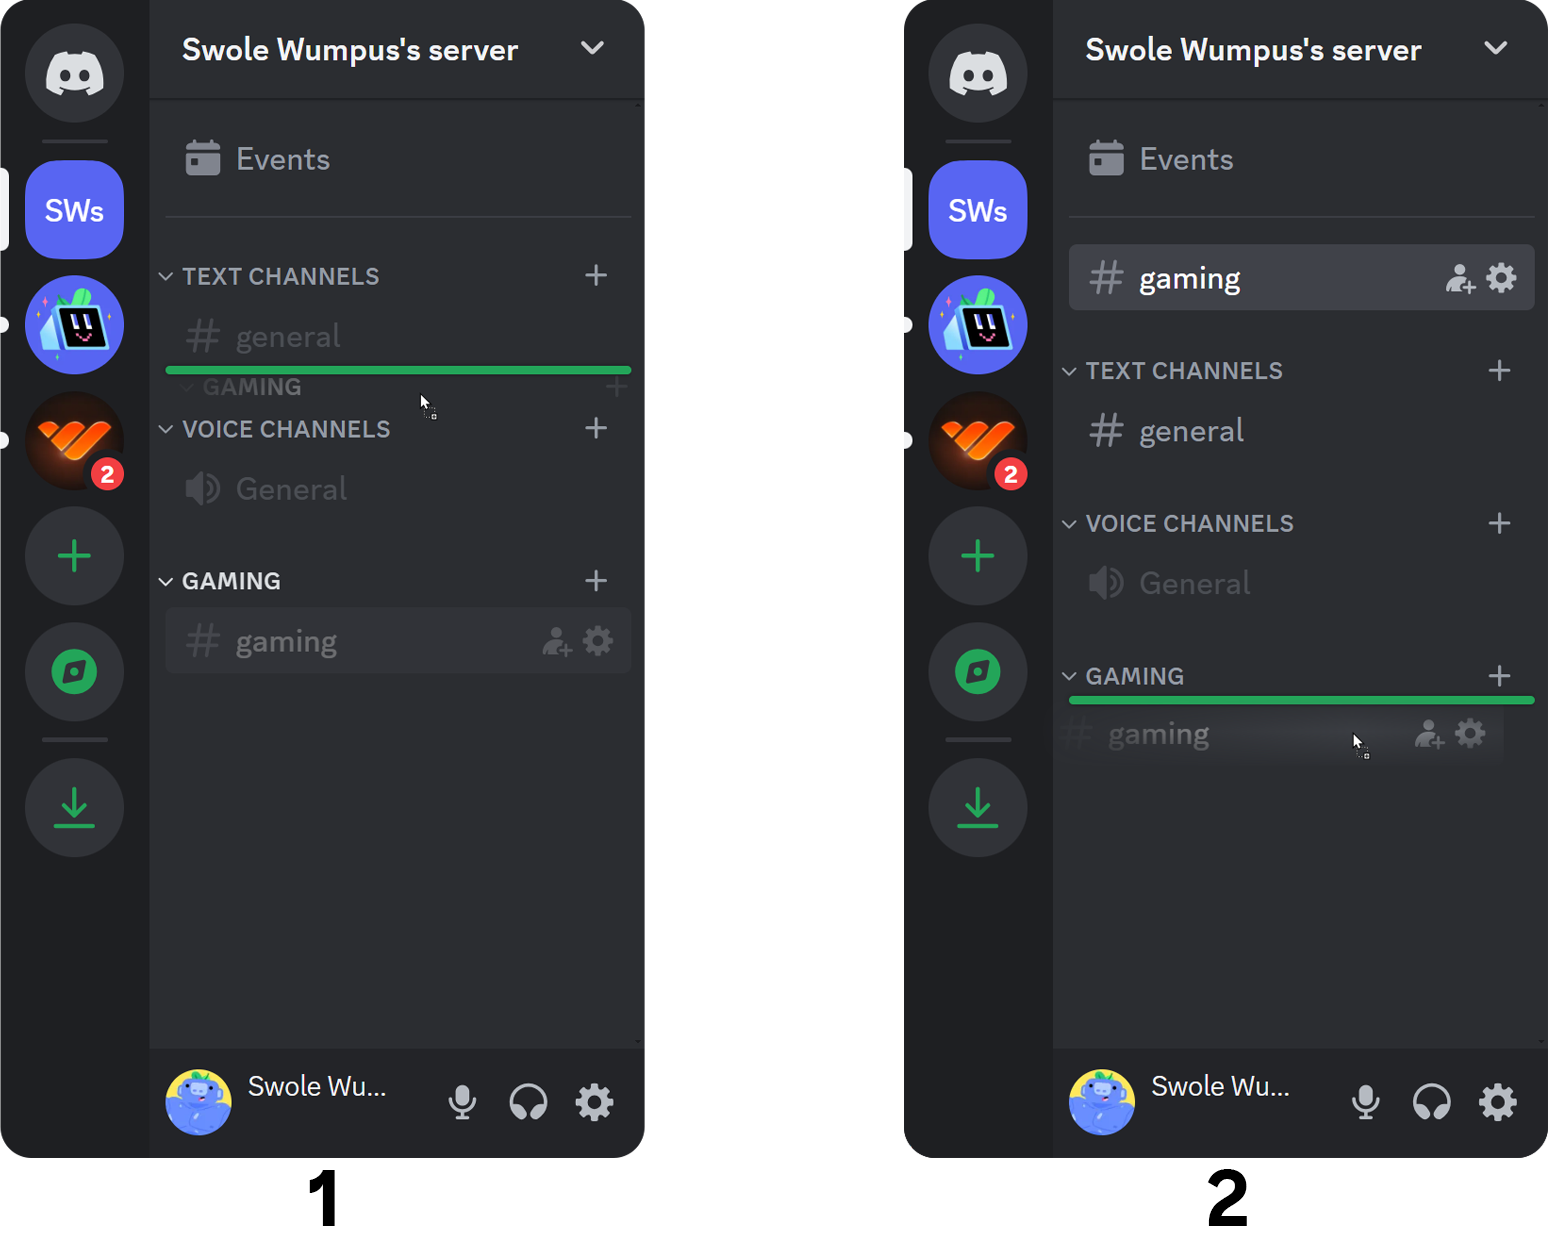
Now, let's say that you want to move your channels in and out of categories or reorder them. Here's how you can do it:
- If you want to move a channel, click and drag it wherever you want your channel to be. You'll see a green line as an indicator of the new position
- Moving categories work the same; click and drag the category
Remember that having organized channels and categories is one of the most crucial parts of a great server.
Creating Discord roles and setting their permissions on Desktop
You will need, as we mentioned in the server outline section. To create roles on the desktop, you should:
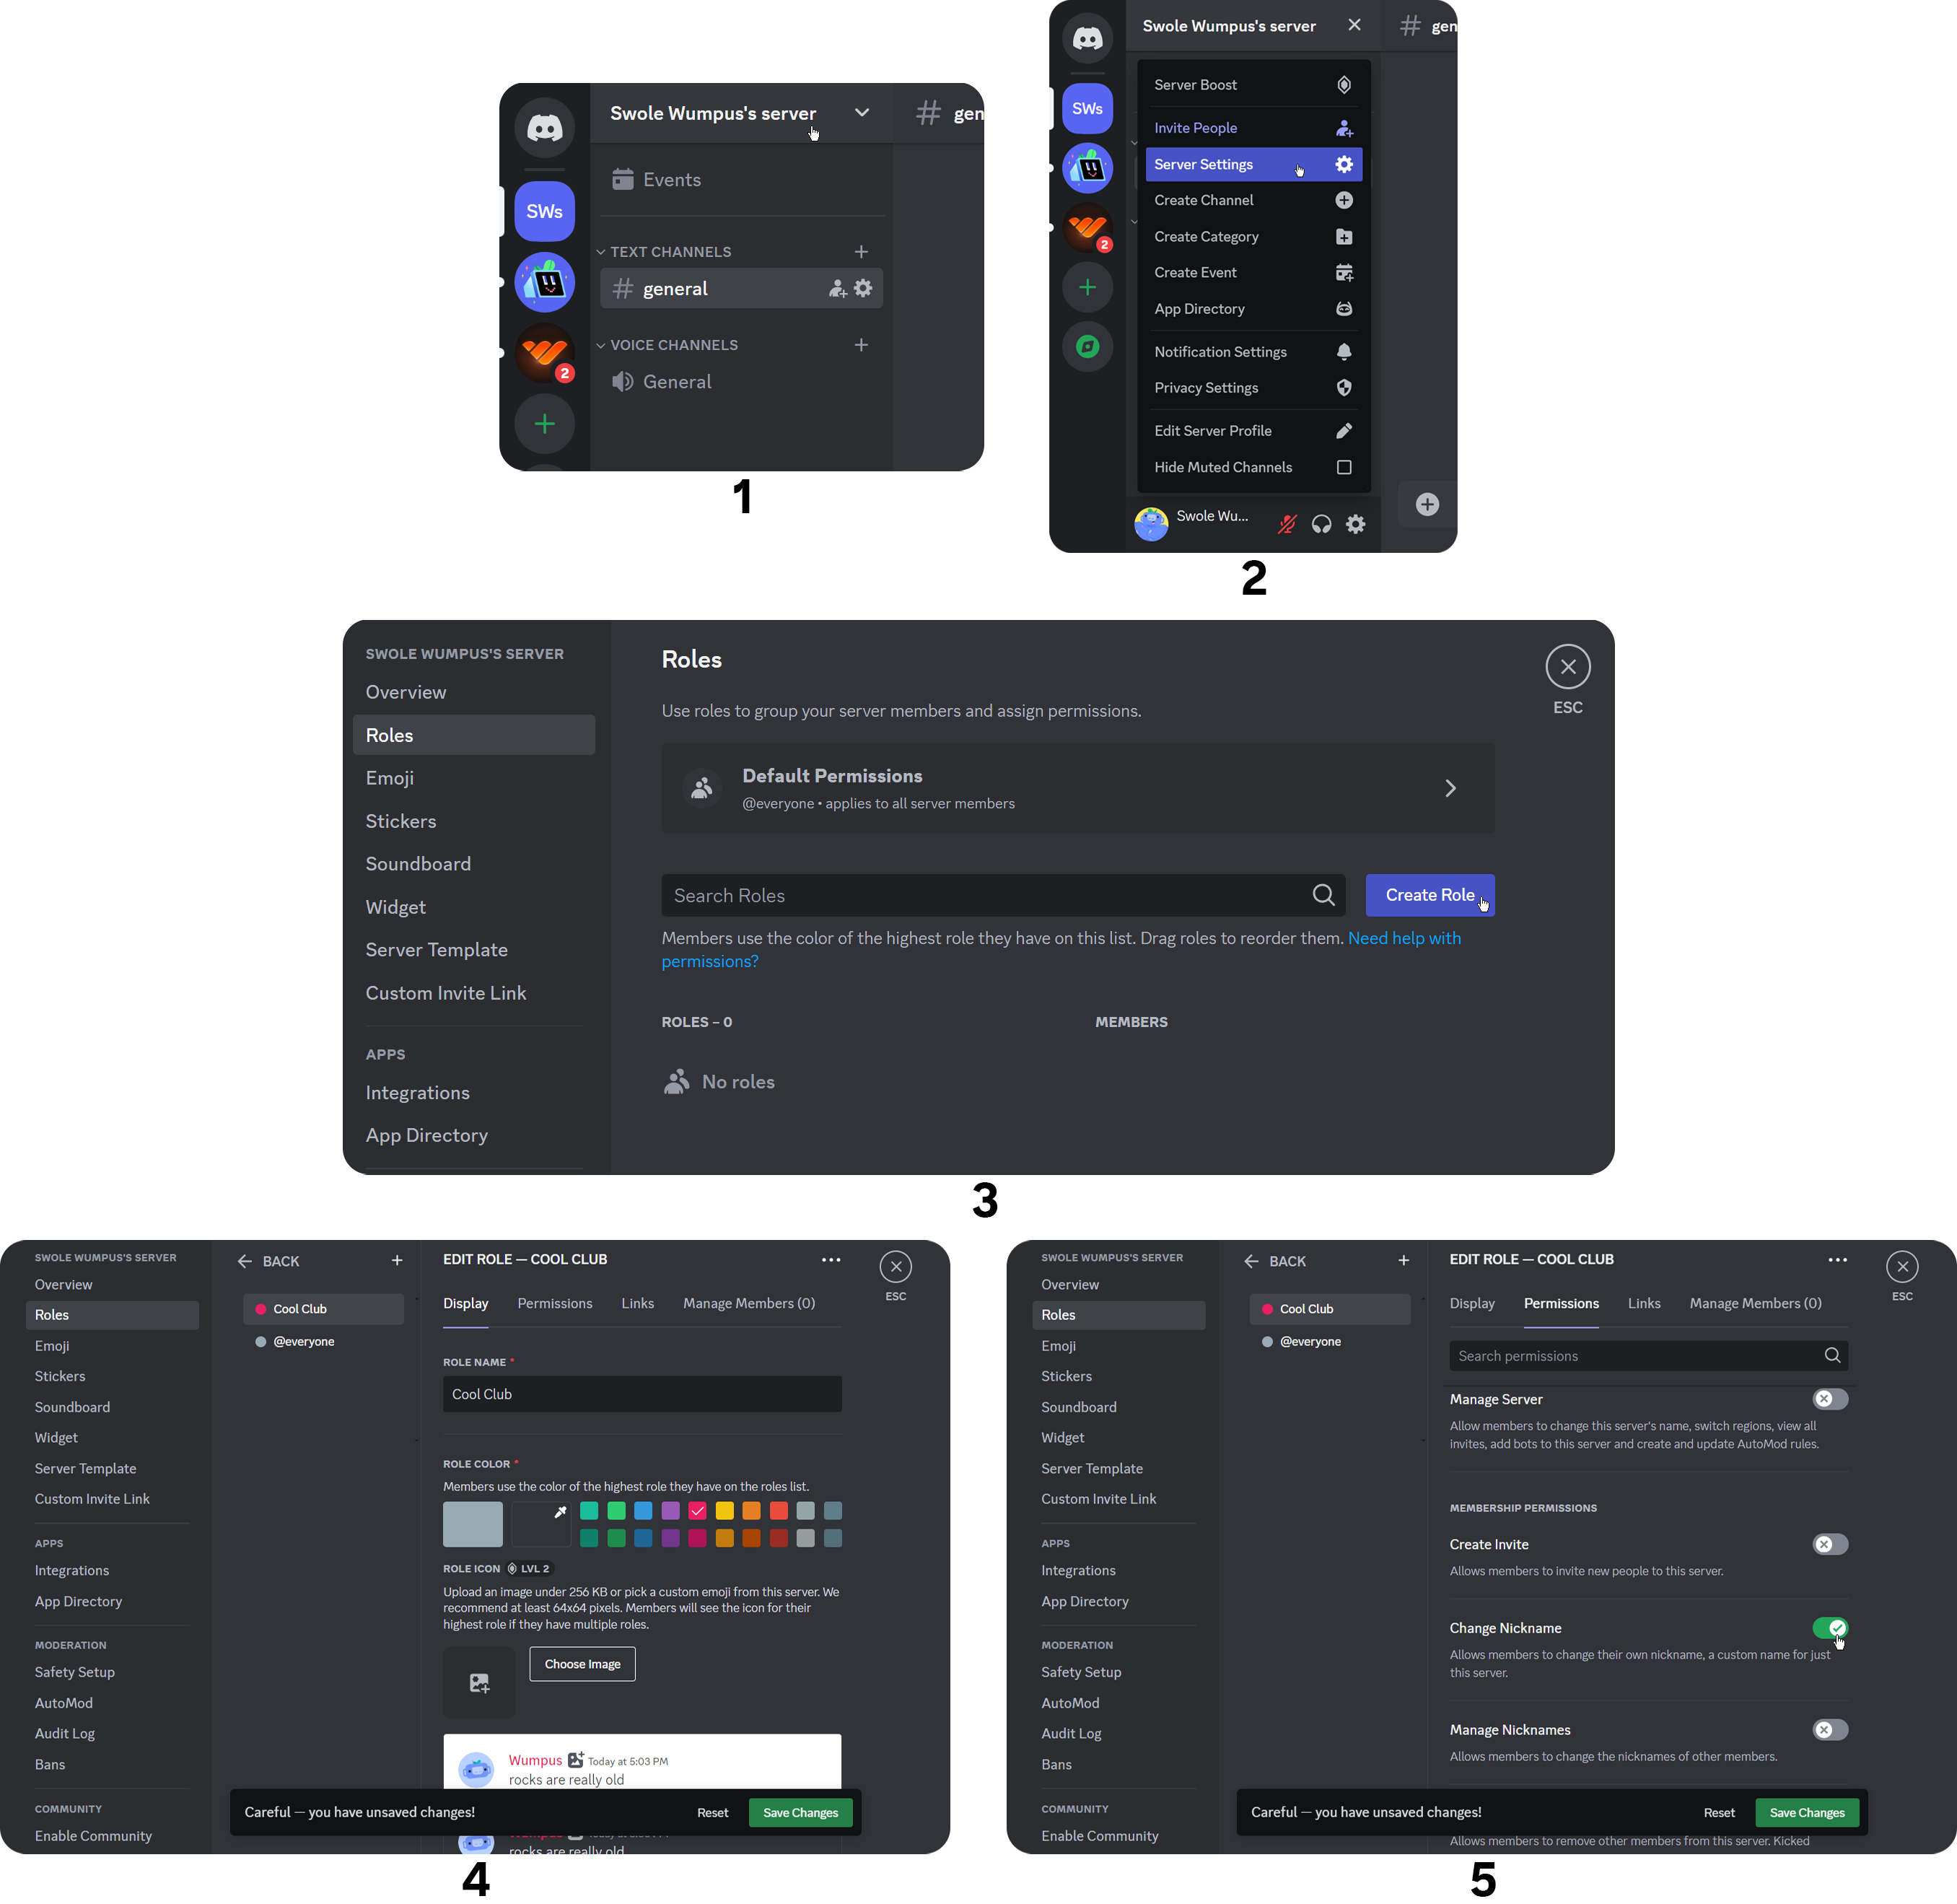
- Click the server name at the top of the channel list
- Select "Server Settings" from the menu
- Navigate to the "Roles" section of the server settings and click the "Create Role" button
- Give your role an interesting name and select a color for it
- If you want to change the default permissions of the role, navigate to the "Permissions" tab of the role, turn on/off the permissions, and click the "Save Changes" when you're done to create the role
Creating Discord channels and categories on iOS
Now, if you're using Discord on iOS, here's how you create your Discord channels and categories:
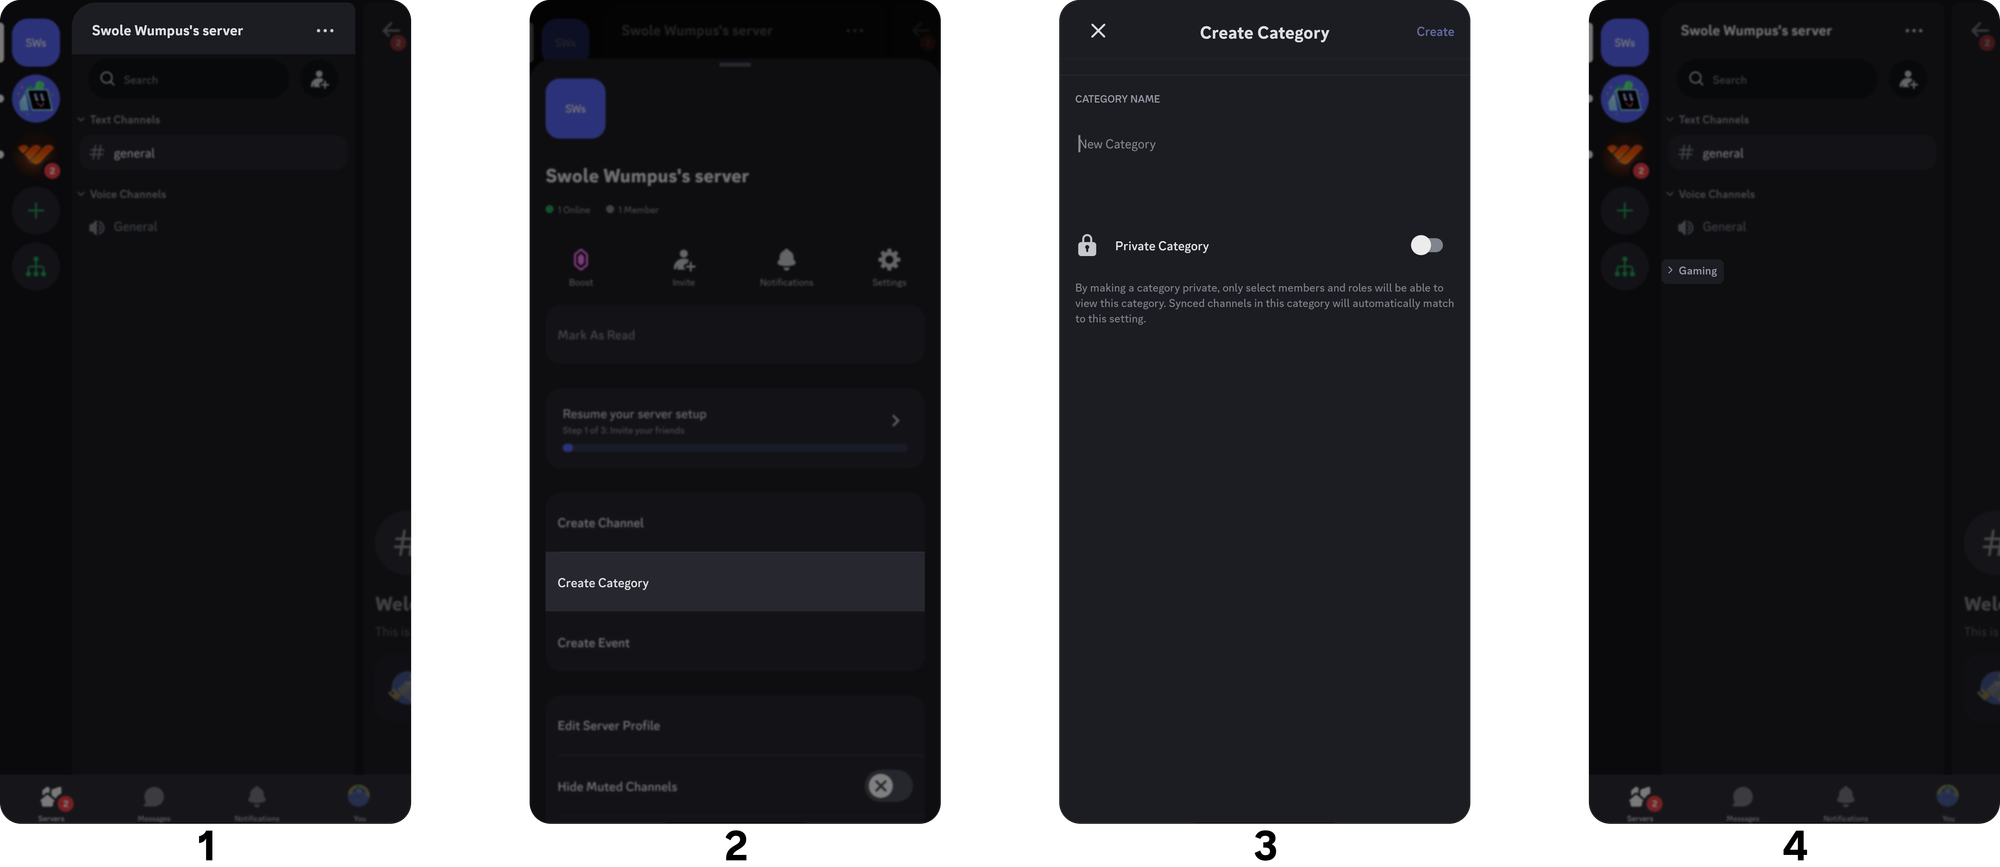
- Press the server name at the top of the channel list
- Press the "Create Category" button
- Give your category a relevant name in the screen that pops up, and press the "Create" button at the top right
You just created your first category!
Creating channels is almost the same as creating categories:
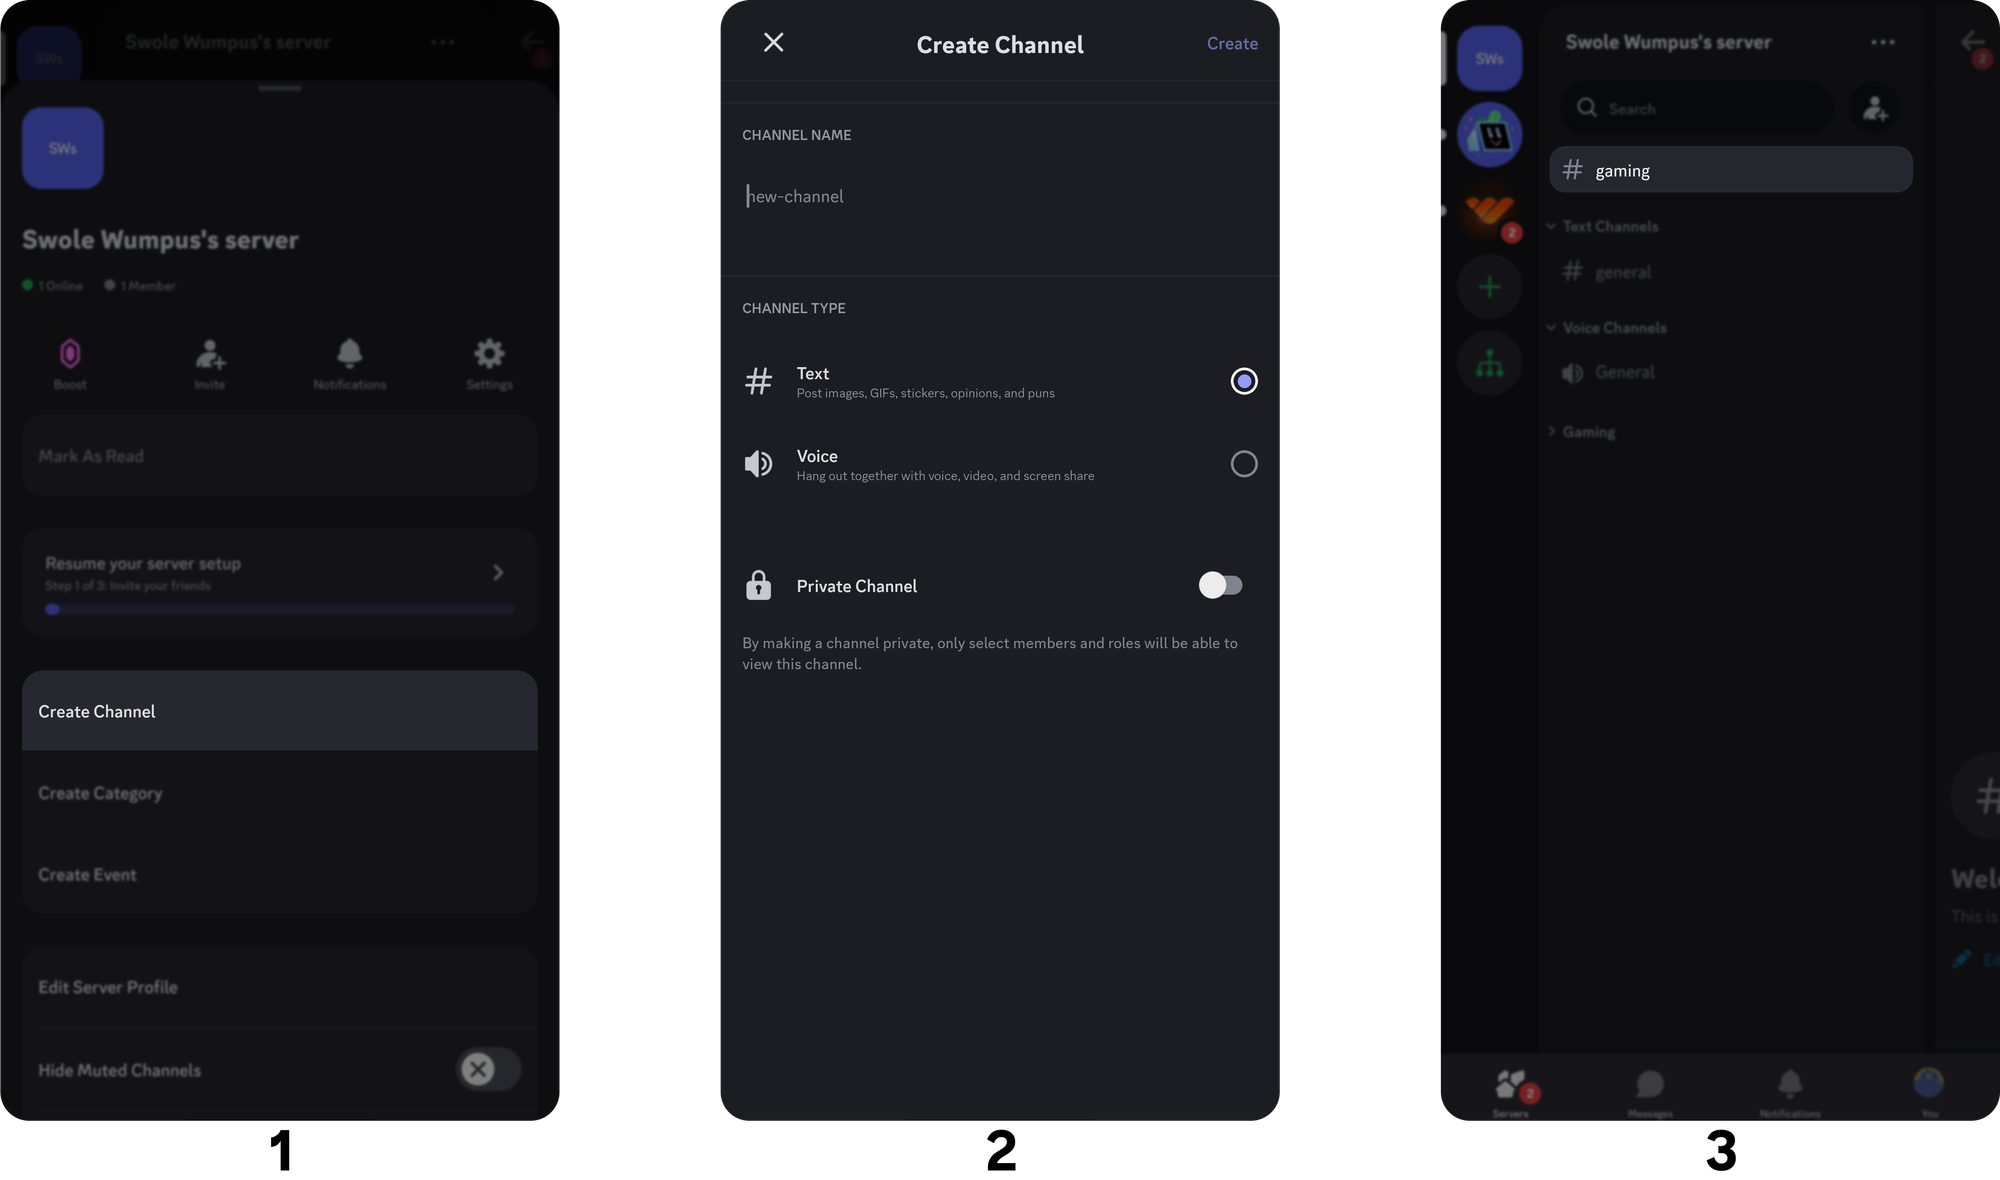
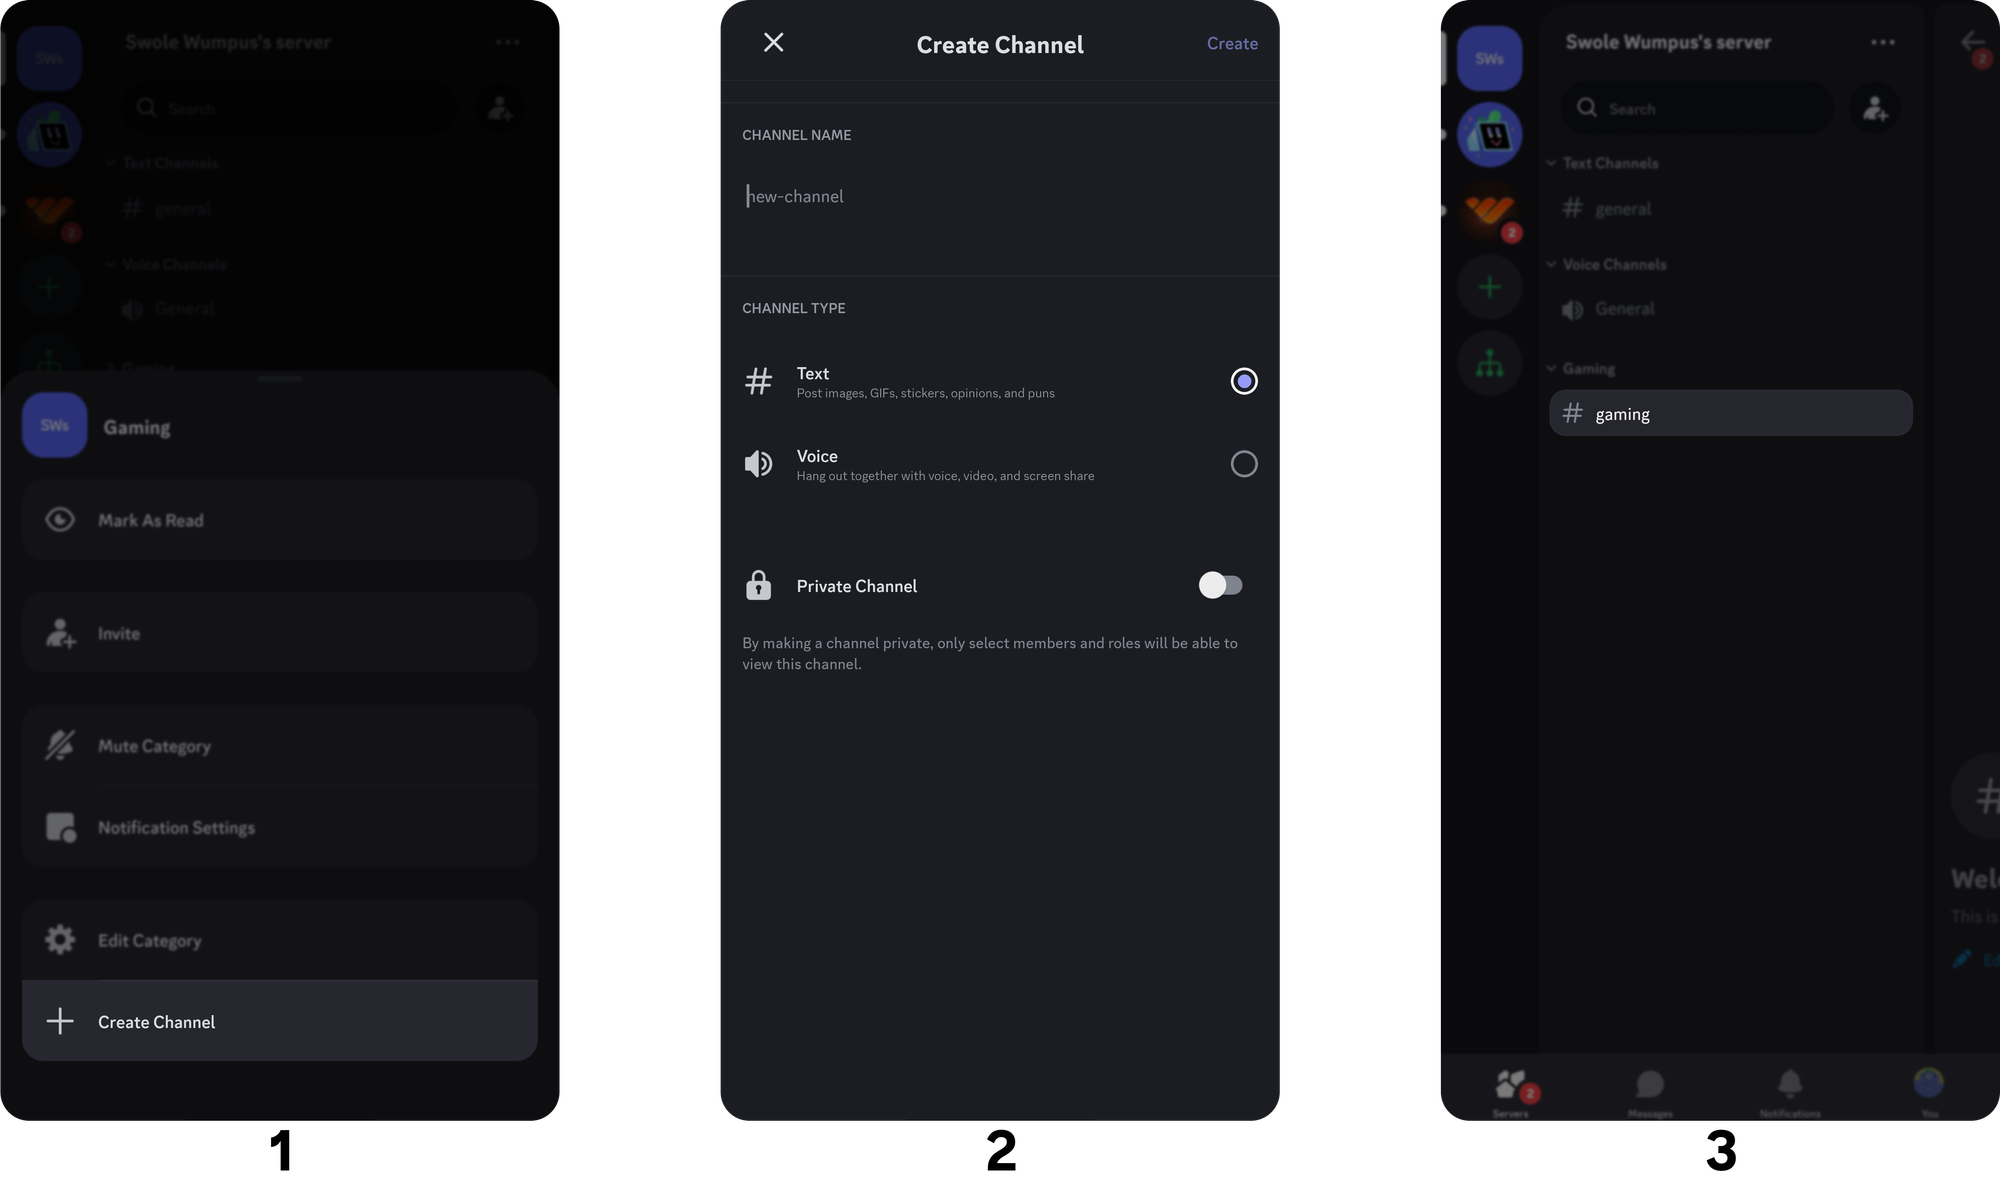
- Press the server name at the top of the channel list
- Press the "Create Channel" button
- Set a channel name, pick the channel type (Text or Voice), and press the "Create" button at the top right
There you go. Your channel is ready! Remember that creating channels this way will make your latest channel appear at the top of your list.
To create channels inside categories, we follow a similar approach:
- Press and hold the category; this will make a pop-up appear
- Press the "Create Channel" button in the pop-up
- Set a channel name, pick the channel type (Text or Voice), and press the "Create" button at the top right
Your new channel is now inside the category. This way of creating channels will prevent you from dealing with organizing the channels under the categories.

Still, if you want to move channels in and out of categories, you can follow the steps:
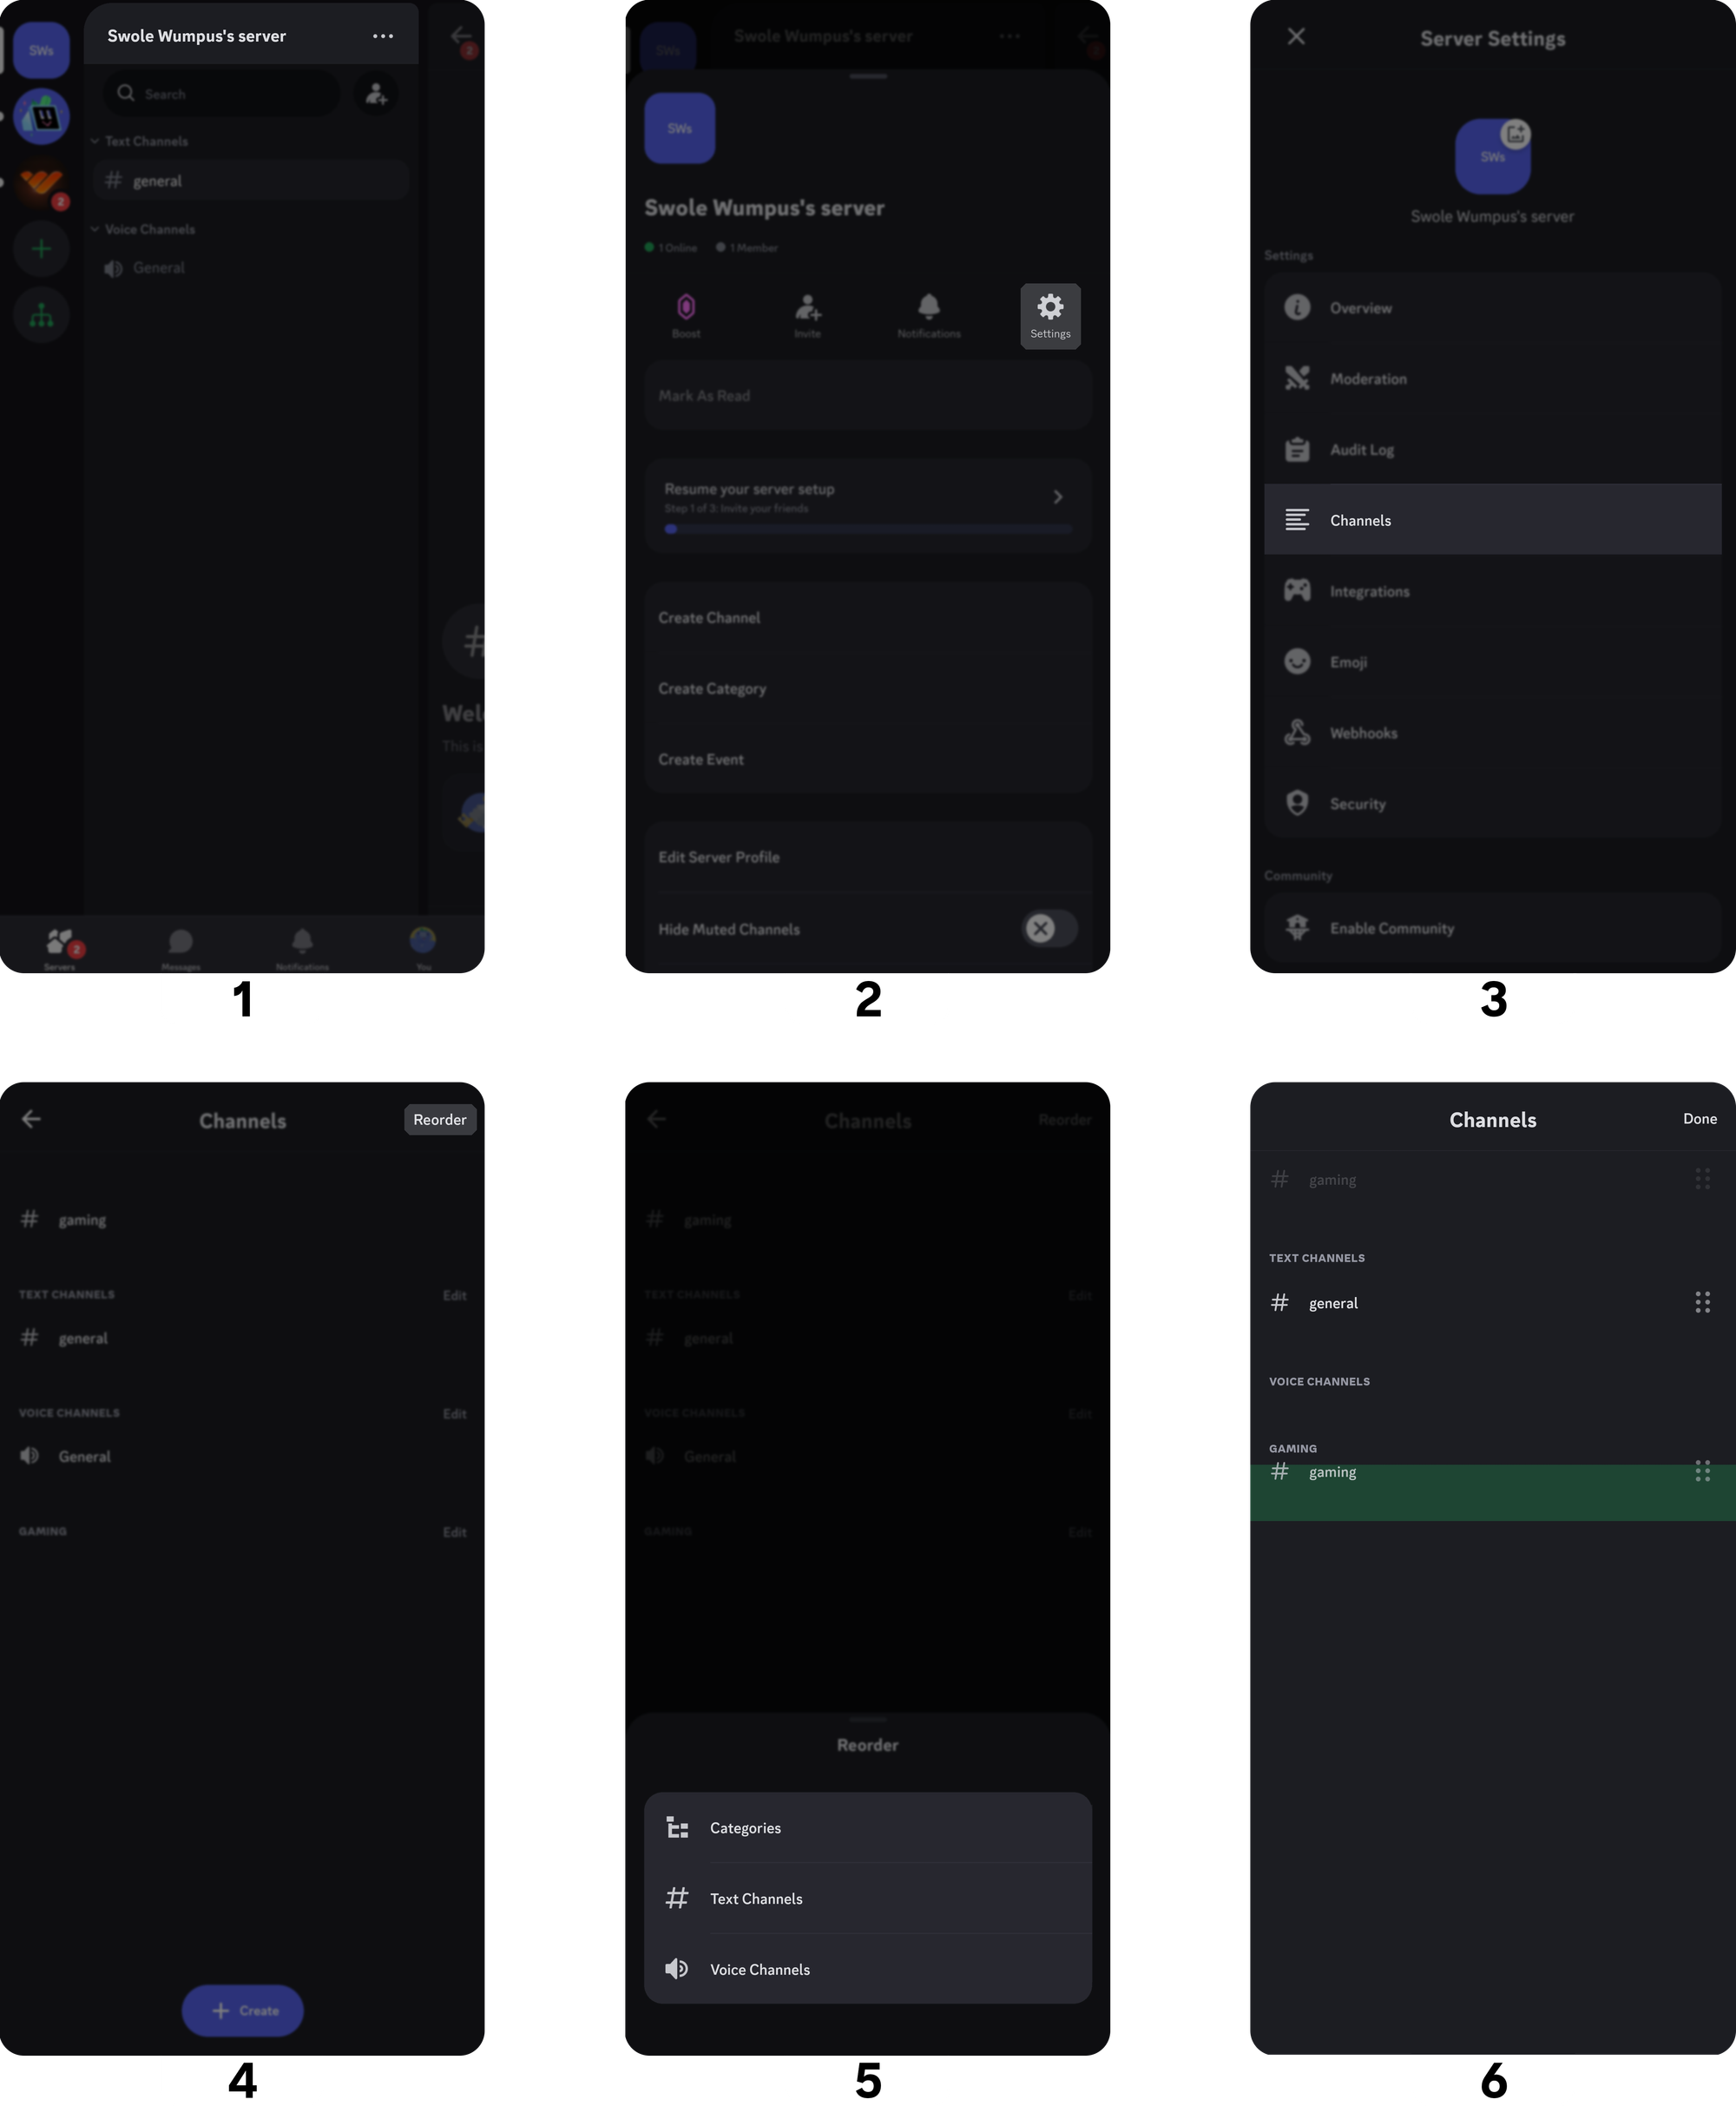
- Press the server name at the top of your channel list
- In the screen that pops up, press the "Settings" button
- Press the "Channels" button in your Server Settings
- You'll see your categories and channels in this section. Press the "Reorder" button at the top right
- In the screen that pops up, select the type of item you want to move
- You will again see your categories and channels, but there are six dots to the right of them now. When you press and hold the type of item you selected in step 5, you can start moving them in and out of categories or reorder them. Once you're done, press the "Done" button at the top right
Creating roles and setting their permissions on iOS
Creating Discord roles is a very streamlined process. To create them, follow these steps:
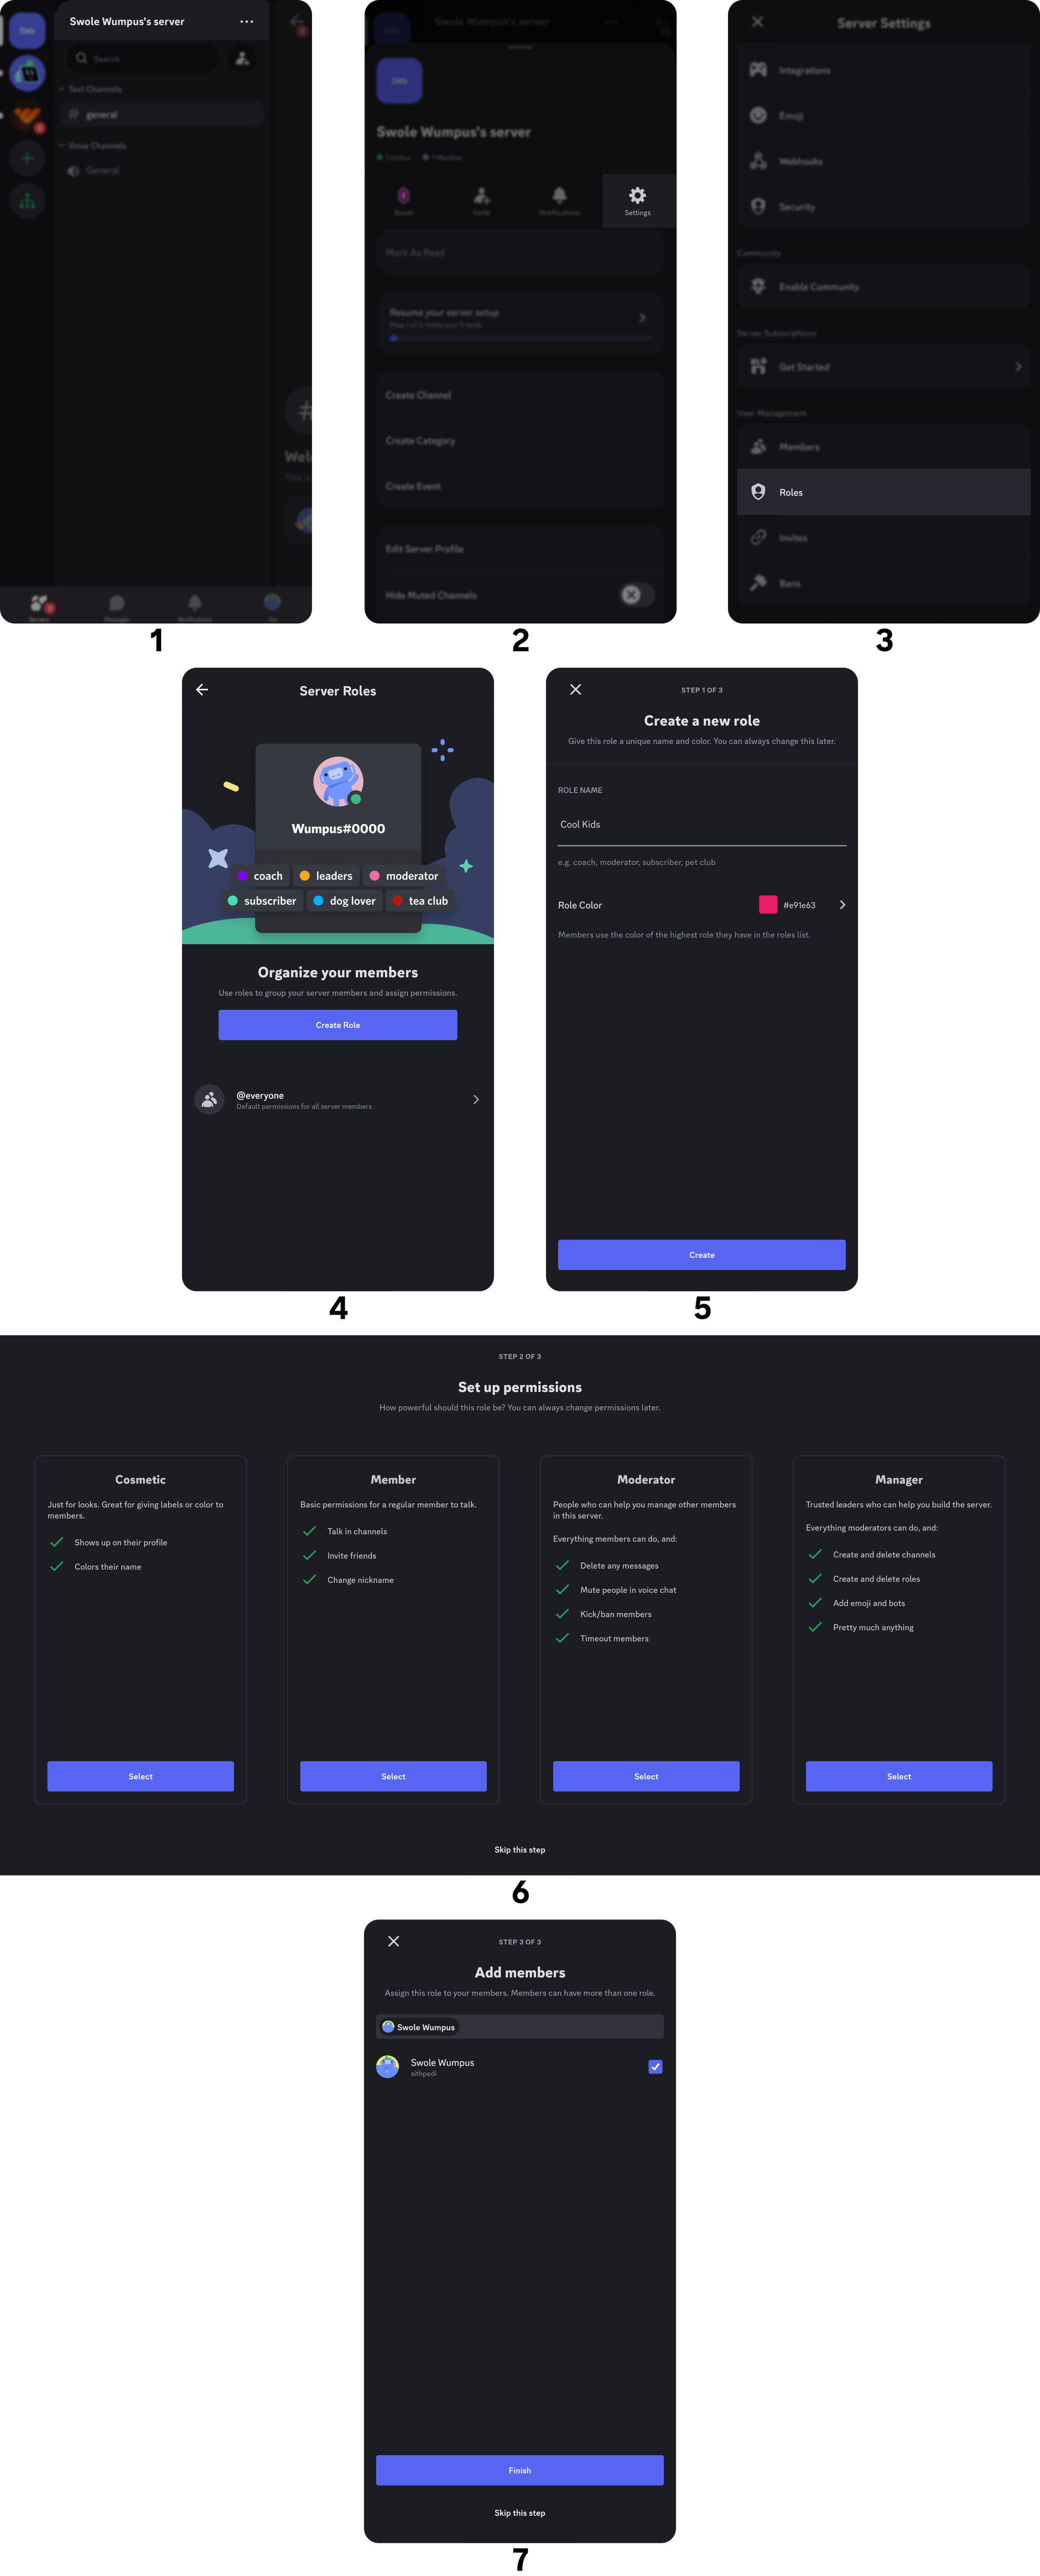
- Press the server name at the top of the channel list
- Press "Settings" in the window that appears
- Scroll down and press "Roles"
- Start creating the role by pressing the "Create Role" button. If you already created one, you won't see that button but rather a plus icon (+) at the top right of the Server Roles screen
- Once the "Create Role" button is pressed, the "Create a new role" screen will appear. You can set a custom name and a custom color. The role's color will determine the username color of the users that have it. Press the "Create" button to move to the next step
- Selecting a preset of permissions makes it easy to set them rather than manually turning on and off
- After selecting the permission preset, you'll be greeted with the "Add members" screen, where you can assign the role to the members
There you go! You just created your first role and assigned it to your members!

Creating channels and categories on Android
With the category and channel outline of your server in mind, you can create categories by:
- Press the server name at the top of the channel list
- Press the "Create Category" button
- Give your category a cool name in the screen that pops up, and press the "Create" button at the top right
You just created your first category!

Creating channels is almost the same as creating categories:
- Press the server name at the top of the channel list
- Press the "Create Channel" button
- Set a channel name, pick the channel type (Text or Voice), and press the "Create" button at the top right
Your channel is ready! Remember that creating channels with this method will make your channel appear at the top of your list.

To create channels inside categories, we follow a similar approach:
- Press and hold the category; this will make a pop-up appear
- Press the "Create Channel" button in the pop-up
- Set a channel name, pick the channel type (Text or Voice), and press the "Create" button at the top right
Your new channel is inside the category; great! This way of creating channels will prevent you from dealing with organizing the channels under the categories.
Still, if you want to move channels in and out of categories, you can follow the steps:
- Press the server name at the top of your channel list
- In the screen that pops up, press the "Settings" button
- Press the "Channels" button in your Server Settings
- You'll see your categories and channels in this section. Press the "Reorder" button at the top right
- In the screen that pops up, select the type of item you want to move
- You will again see your categories and channels, but there are six dots to the right of them now. When you press and hold the type of item you selected in step 5, you can start moving them in and out of categories or reorder them. Once you're done, press the "Done" button at the top right

Creating roles and setting their permissions on Android
Here's how to create roles and permissions on Android.
- Press the server name at the top of the channel list
- Press "Settings" in the window that appears
- Scroll down and press "Roles"
- Start creating the role by pressing the "Create Role" button. If you already created one, you won't see that button but rather a plus icon (+) at the top right of the Server Roles screen
- Once the "Create Role" button is pressed, the "Create a new role" screen will appear. You can set a custom name and a custom color. The role's color will determine the username color of the users that have it. Press the "Create" button to move to the next step
- Selecting a preset of permissions makes it easy to set them rather than manually turning on and off
- After selecting the permission preset, you'll be greeted with the "Add members" screen, where you can assign the role to the members
You just created your first role and assigned it to your members!
How to invite people to your Discord server
After creating an outline and setting up your server, it's time to start inviting people to your community. You need an invite link for people to join your server. Getting one is easy:
If you're on a desktop, you can create an invite by following the steps below:
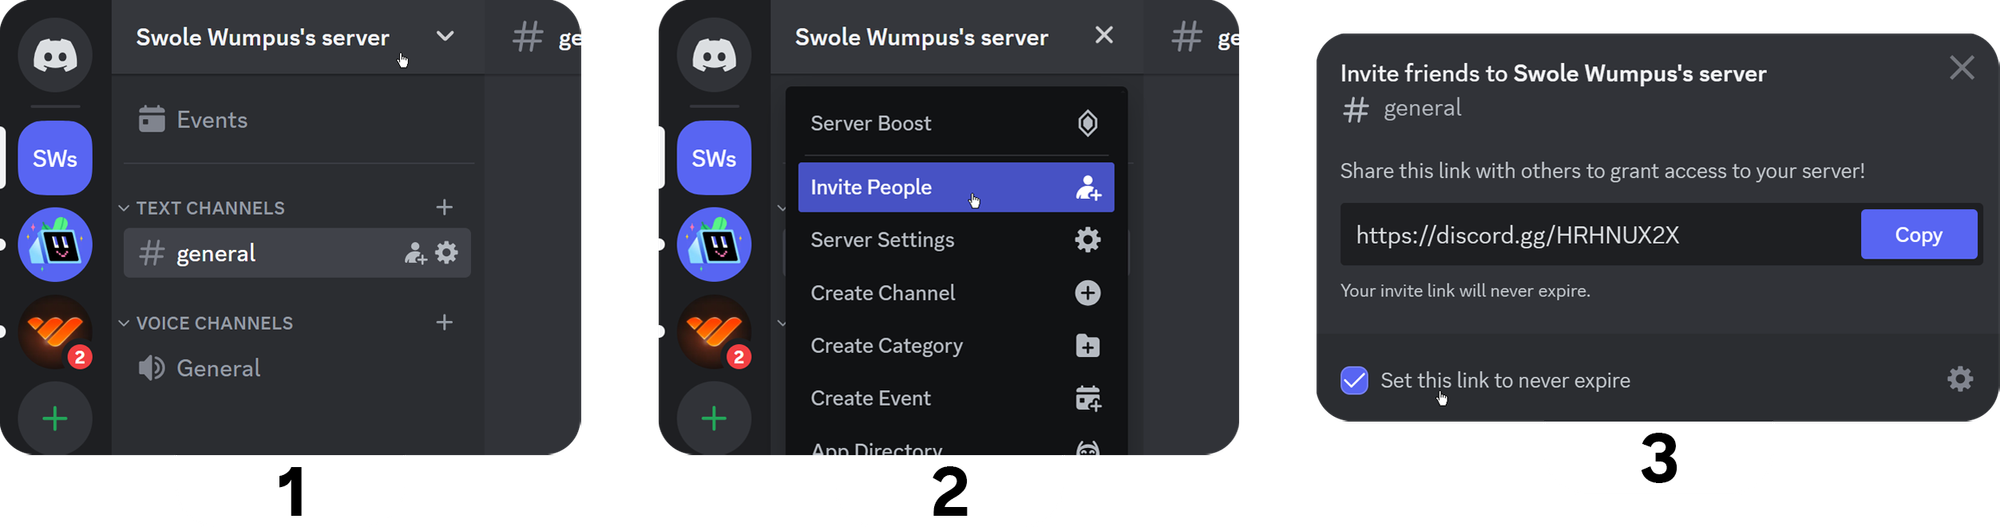
- Click the server name at the top of your channel list
- Click the "Invite People" button
- You will see your invite on the screen that pops up. If you want your invite link to have unlimited uses and no expiry date, be sure to check the "Set this link to never expire" checkbox. You can then copy and share this link with people!
Creating an invite link through iOS and Android is a bit different, but the flow is the same:
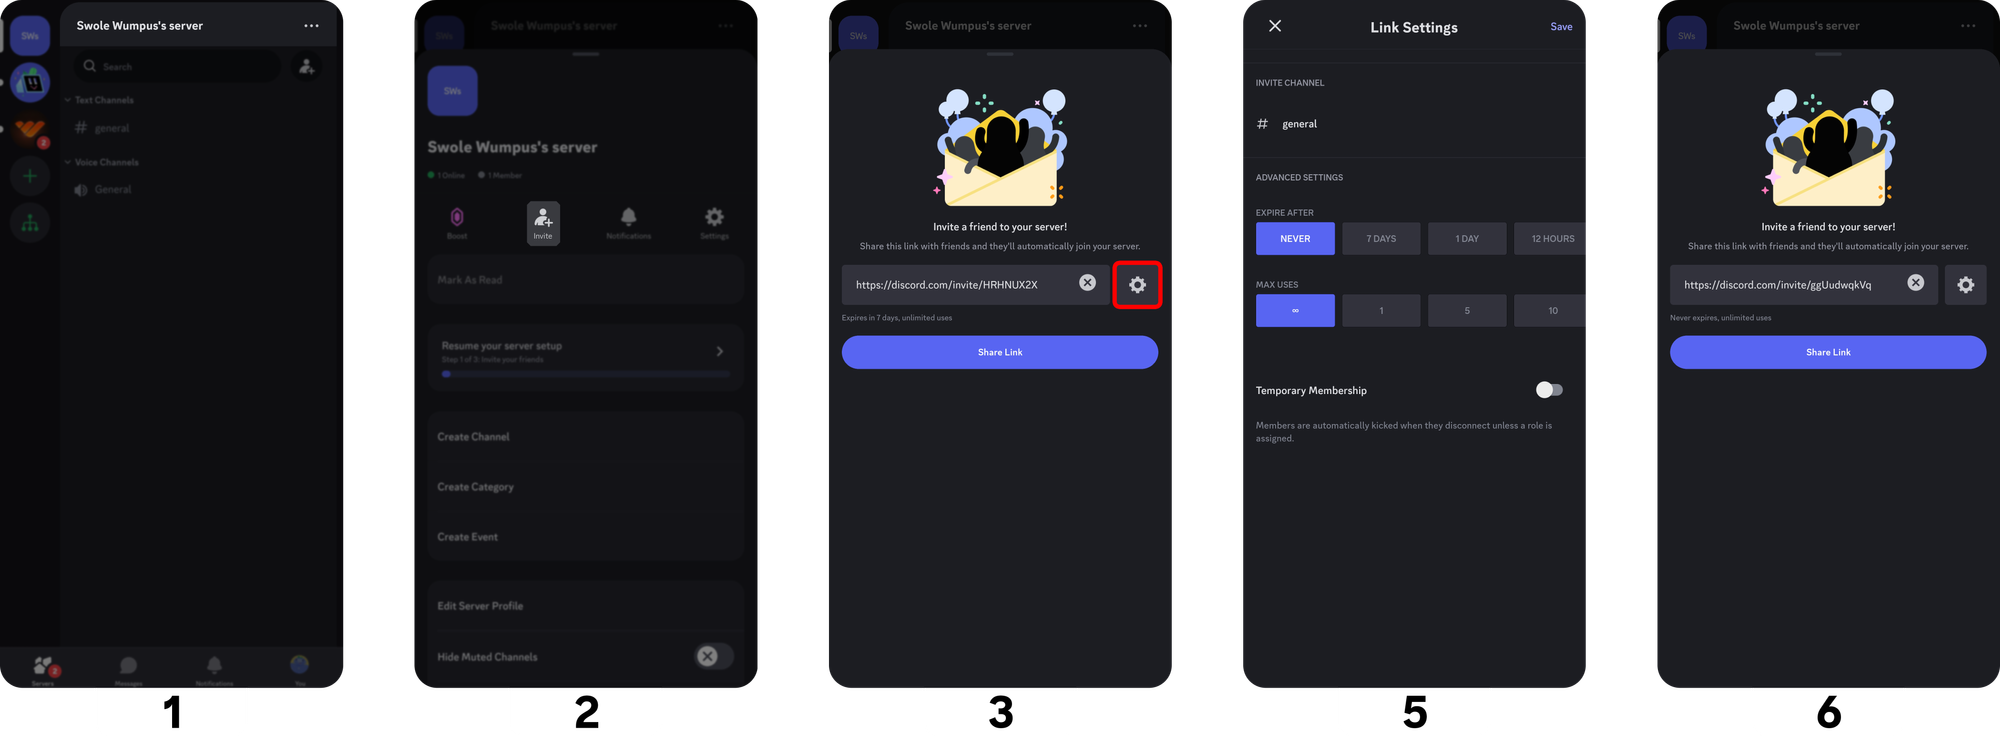
- Press the server name at the top of your channel list
- Press the "Invite" button
- To make sure your invite link is set to never expire, press the cogwheel icon next to the link
- Set the link to never expire and press "Save" at the top right. You can then copy and share this link with people!
Now that you have an invite link, it's time to start sharing it. You can begin with your acquaintances. After that, you might:
- Use server directories - these platforms list public servers and allow users to join them by providing a link. Examples:
- Disboard.org
- DiscordServers.com
- Discadia.com
- Discord.me
- Discords.com
- or social media - You can create a social media account and market your server! It's one of the best ways to reach your target audience.
Create an income with your Discord server
Creating your Discord server is just the beginning. Keep working on your online group and soon you can have a thriving community - one that people will be willing to pay for.
Selling paid access to your server has never been easier! In under 10 minutes, you can sign up to Whop.com, promote your server, and monetize it - listing your server will gain you members and income.
Over 4 million memberships have been sold on Whop, and you can play a part as well - sign up and start selling with Whop today!