Pinterest isn't dead—it's thriving! With over 530M active users and growing engagement, it's a powerful platform for selling digital products.
Key takeaways
- Pinterest functions as a visual search engine where users actively seek products, making pins discoverable for months or years.
- Drive sales by linking 40% of pins to freebies that build your email list and nurture potential buyers.
- Pinterest users spend 80% more monthly than other platform shoppers and don't cost you platform fees.
With TikTok and Instagram getting all the attention these days, you might wonder if anyone still uses Pinterest.
Well, according to Statista, Pinterest has over 578 million monthly active users. Plus, Pinterest racked up over 1 billion visits in December 2024, making it one of the most-visited websites online.
Clearly, Pinterest is far from dead.
This guide covers everything you need to know about selling digital products on Pinterest, from creating an effective content strategy to creating an optimized Pinterest profile to designing click-worthy pins that drive traffic to your product pages.
Why should I sell on Pinterest?
Pinterest isn’t your average social platform. It has some of the most unique features that make it perfect for digital product sellers like you.
Let’s take a look:
Tap into huge traffic
Pinterest is the 16th largest social media platform in the world, with over 537 million monthly active users.
Unlike other social platforms, most of these users use Pinterest like a visual search engine. This means they’re actively searching for ideas, solutions, and products—just like they do on Google or YouTube. In fact, 36% of consumers prefer doing searches on Pinterest rather than Google.
But Pinterest isn't just an image platform anymore - video pins are watched nearly 1 billion times daily and users are 55% more likely to buy products with video pins.
Target a unique demographic
Pinterest has a strong female user base, with 70% of its users being women. Also, 36% of its users are in the U.S., with 29.6% of all users being aged 18–24. Gen Z usage grew by 18% this year.
These users engage most with content in the home decor, fashion and beauty, and food and recipe. Of course, there are so many other categories with super high engagement - even a niche topic like wedding and event planning gets over 9 billion searched annually.
If your digital products cater to this demographic and niches, then investing in a Pinterest marketing strategy will help you to maximize your digital product sales.
Reach ready-to-buy shoppers
When you look at social platforms like Instagram and TikTok, most users are passively scrolling through their feeds and only consuming content.
Meanwhile, more than 50% of users see Pinterest as a shopping platform. They go there to find and save products they want to buy. And if they’re not ready to purchase right away, they save items to their boards for later.
Pinterest users also tend to spend more than shoppers on other platforms. On average, they spend 80% more per month and have a 40% bigger basket size.
As a seller, this means placing your products in front of potential buyers, leading to higher conversions. Using rich pins and tagging products will allow you to access additional features and direct your customers directly from the pin to your website.
Best part? Pinterest doesn't even take a cut.
Keep your content evergreen
One of Pinterest’s biggest advantages is how long content stays relevant.
Compared to platforms like Instagram, Facebook, and X (formerly Twitter), where posts “die” after 24–48 hours (aka disappear into the void), pins can continue appearing in search results and feeds for months or even years after they’re published.
This means your pins will keep working in the background for a long time, driving consistent traffic, leads, and sales your way.
Drive traffic to external platforms
Many social platforms are designed to keep users on the platform, endlessly consuming content… but not Pinterest.
Pinterest is designed to direct users elsewhere on the web.
In other words, every pin you publish can be linked to a website, product page, blog post, or even a newsletter signup form, making it easy for users to join your sales funnel (and later convert to buyers) or just purchase your products right away.
Pro tip: Raed our guide to learn more about how you can make money with Pinterest.
How to create an optimized Pinterest business profile
Creating a Pinterest account is super easy and straightforward.
Best of all, it's completely free—whether you're signing up for a personal or business account (which you'll need as a seller).
Follow these simple steps to get started right away:
Step 1: Sign up for a Pinterest business account
To promote and sell digital products on Pinterest, you'll need a Pinterest business account.
If you already have a personal Pinterest account, you have two options:
- Convert it to a business account if it’s still a blank slate or aligns with your brand.
- Create a new business account (recommended) if your personal account is filled with unrelated pins that don’t match what you plan to sell.
Unlike a personal account, a business account gives you access to analytics, paid ads, and other tools that help you track performance and grow your reach.
So to create a new Pinterest business account, go to business.pinterest.com.

Enter your email, password, and birthdate. Then, click Create account.

Describe your business by choosing one of the listed options and click Next.

Enter your business name, country, and website. If you don’t have a website, tick the “I don’t have a website” checkbox, and click Next.

Tell Pinterest what your business goals are and the focus of your brand, then click Done.

Step 2: Customize your profile
Now that your Pinterest business account is set up, it’s time to customize it.
A well-optimized profile helps both the Pinterest algorithm and users understand your brand and what you offer.
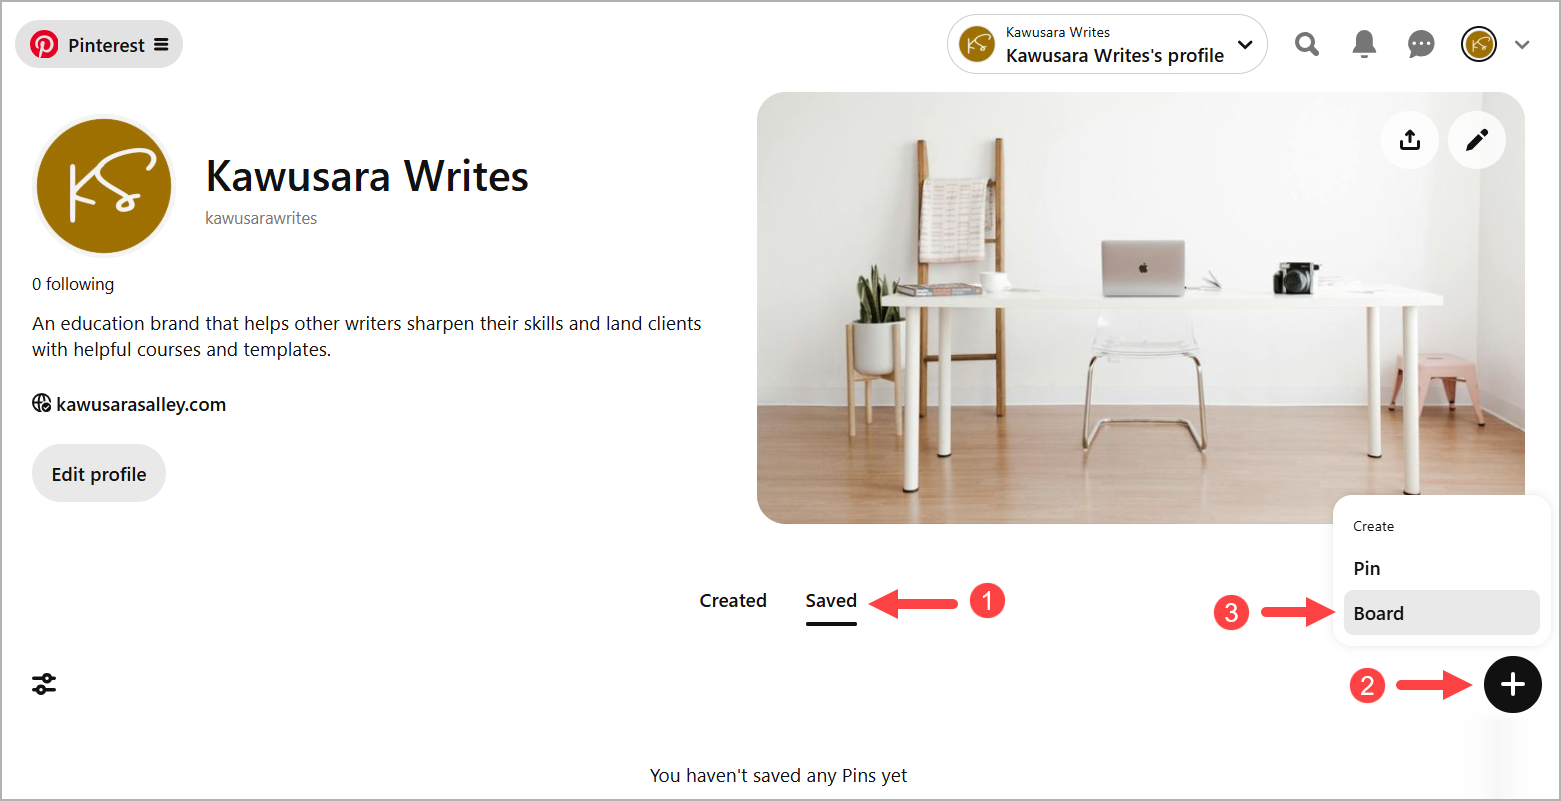
To get started, click your profile icon in the top right corner and go to Edit profile.

Upload a photo, enter your name, about, website, and choose a username.
Your username becomes part of your custom Pinterest URL, making your profile accessible at pinterest.com/username.
When you're done, click Save to apply the changes.

Return to your homepage and click the plus button to add a cover image, which should be at least 800px X 450px. You can create a custom design with Canva.

Your profile should be looking more professional and polished now.
At this point, you can start creating boards and publishing pins to these boards.
But if you’re a website owner, there’s one last step to complete before moving forward—claiming your website on Pinterest.

Step 3: Claim your business website
If you own a website, claiming it on Pinterest comes with several benefits:
- Website pins are linked to your profile: Anytime someone pins an image from your website, Pinterest automatically attributes it to your profile, displaying your name and profile photo on the pin.
- Better analytics: Pinterest’s analytics shows which content users are pinning from your website, giving you a clearer overview of topics that drive the most engagement.
- Access to rich pins: Rich pins sync information from your website and update automatically if you make changes. You could create rich pins for blog articles, recipe posts, and product pages.
So to claim your website, click the drop down arrow beside your profile photo and go to Settings.
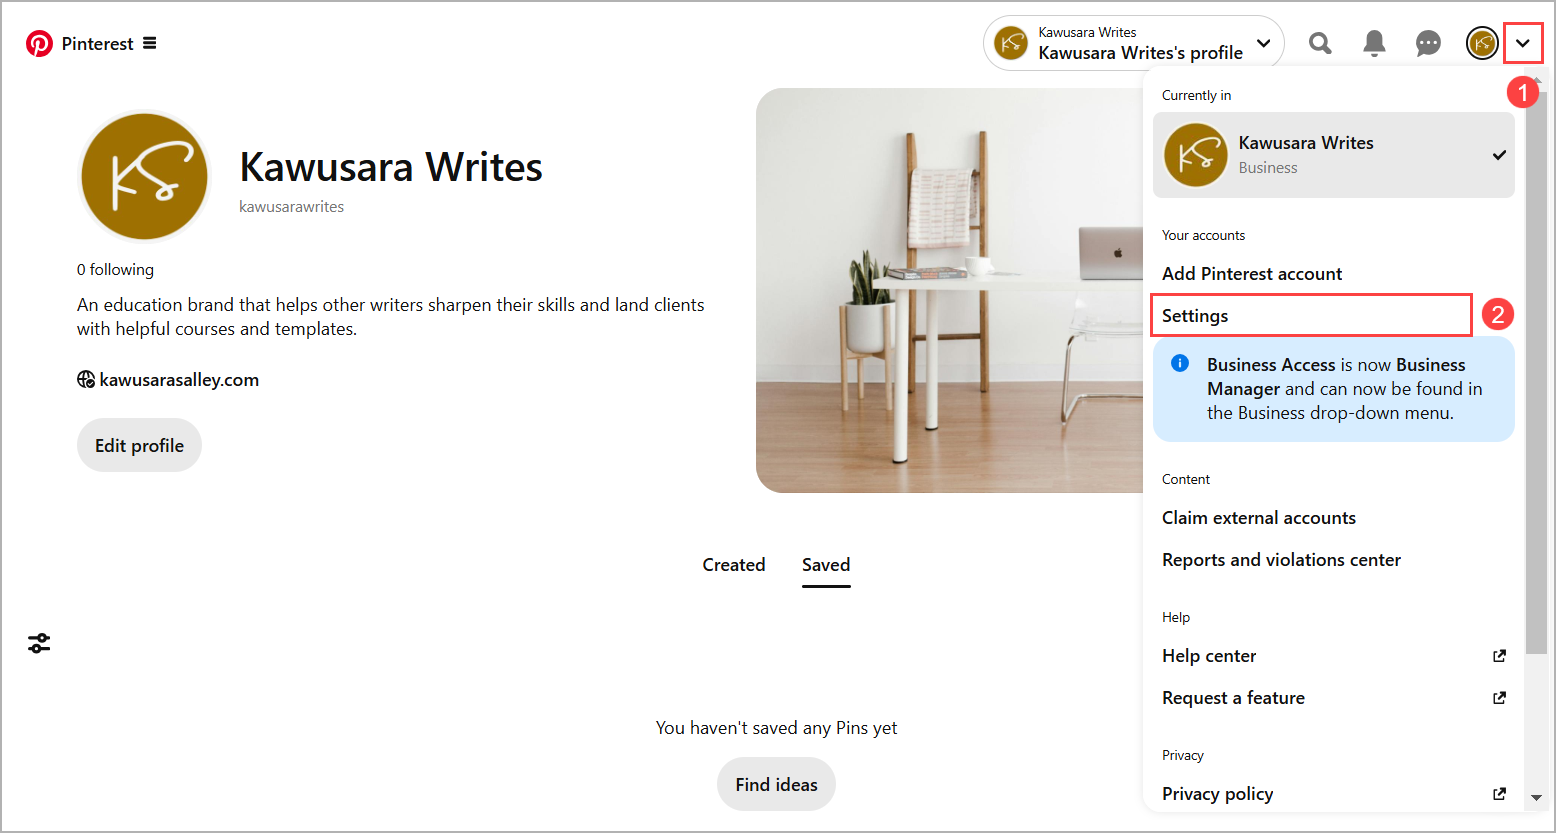
Go to the Claimed accounts tab and click Claim beside Websites.
If you need guidance, use the Learn More link to get step-by-step instructions on how you can claim your website.

5 strategies to sell digital products on Pinterest
To make the the most of your Pinterest marketing and sales efforts, here are five key strategies to follow:
Plan a content strategy
A content strategy is key to selling digital products on Pinterest.
Since Pinterest is designed to drive traffic to external pages, every pin should lead to a relevant page, whether that’s a product page, freebie, or long-form content.
Here’s a breakdown of the content mix that works best, especially for beginners:
1. Product pages (10% of your pins)
Create dedicated landing pages for each digital product you want to promote on Pinterest.
When building these pages, be sure to:
- Add product photos
- Include detailed product descriptions
- Clearly list what’s included in the product
- Feature testimonials from happy customers
If you’re just starting out, platforms like Etsy and Whop make it easy to host and showcase your digital products.

However, avoid making every single pin a direct promotion.
Stick to 5–10% of your pins linking to product pages to avoid overwhelming your audience with sales.
2. Freebie pages (40% of your pins)
People love freebies, and Pinterest users are no exception.
Offering a free guide, checklist, planner, or other valuable resource is an excellent way to capture potential customers’ names and email addresses.
When they sign up for your freebie, they enter their name and email, which grows your mailing list.
From there, you can build a relationship with them by providing valuable content. This boosts the know-like-trust factor with your audience and increases their chances of purchasing from you in the future.
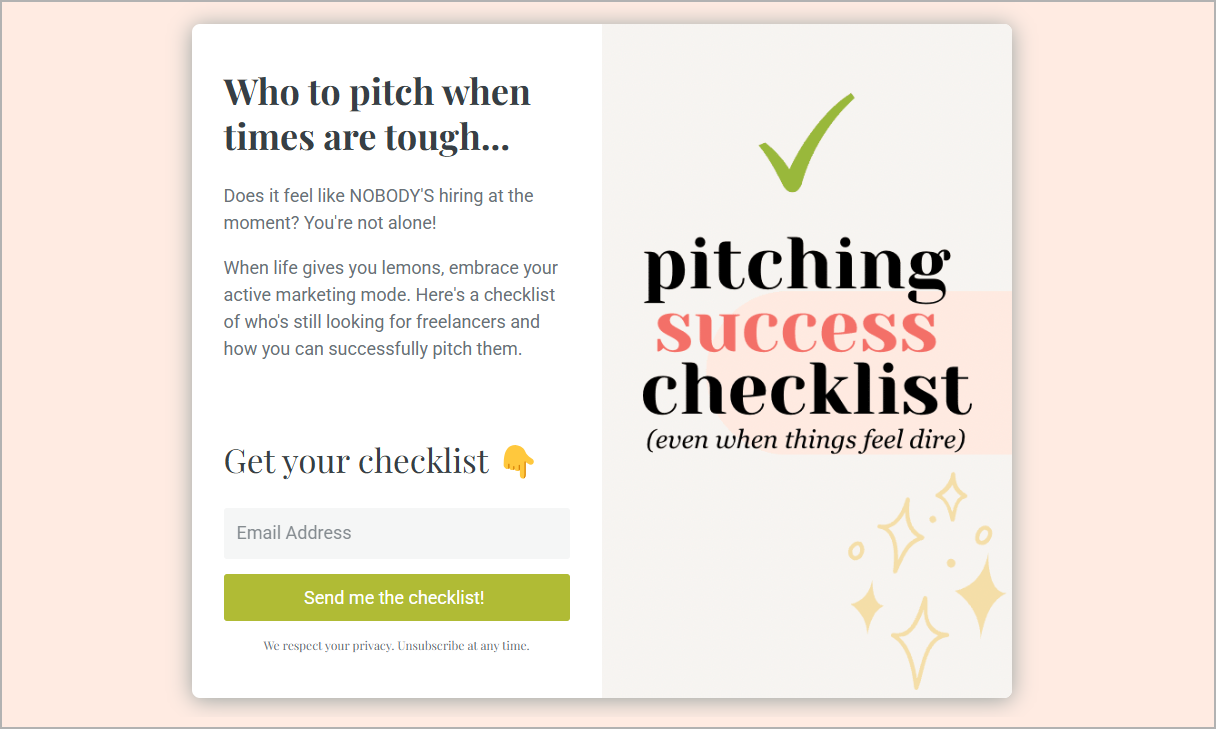
Here’s an example of a simple landing page designed by Lizzie Davey, founder of Freelance Magic:
If you haven’t started building an email list yet, this is the perfect time to do so.
Email marketing software like MailerLite, Kit (formerly ConvertKit), and Flodesk make it easy to create sign-up forms, distribute freebies, and manage your mailing list, especially for content creators and solopreneurs on a budget.
3. Long-form content (50% of your pins)
To keep your audience engaged, most of your Pinterest pins should link to long-form content that educates, inspires, or solves a problem.
Examples include:
- Blog posts (1,000–2,000 words)
- Podcast episodes (30–60 minutes)
- YouTube videos (10–30 minutes)
Each piece of long-form content should tie back to a freebie.
Podcast and YouTube descriptions are great places to include links to freebies.
And if you publish a blog post, you can link to a freebie within the text or use a popup form.

Besides a popup form, you may also use an embedded form to collect emails in exchange for freebies.
Like the example below, you can make use of your blog post’s sidebar to directly promote your digital products as well.

Create attractive pins
Now that you have places to direct your Pinterest traffic, it’s time to create pins that get clicks.
1. Repurpose existing content into multiple pins
Every piece of content you’ve created—product pages, freebies, and long-form content—can serve as the basis for multiple pins.
For instance, if you have a long-form blog post, you could create multiple pins that highlight:
- The title of the blog post
- Key takeaways shared
- Quotes and statistics
- A list of resources and tools

2. Use the right pin formats and dimensions
Pinterest favors vertical pins with a 2:3 aspect ratio, typically 1000 x 1500 pixels. These pins look best on mobile devices, where most Pinterest users browse.
With that in mind, experiment with different pin types to see which resonates most with your audience:
- Static pins: Regular static images with a title, description, and link.
- Video pins: Short video clips that auto-play in users’ feeds.
- Carousel pins: Multi-image pins that users can swipe through.
- Rich pins: Pins that sync extra details from your website, like product stock, pricing, and ratings.

3. Design eye-catching pins
Remember, Pinterest is a visual platform, so your pins need to grab a user’s attention and encourage them to click.
So here’s how to design pins that stand out and drive clicks:
- High-quality images: Use clear, high-resolution images that are visually appealing and relevant to your content.
- Text overlays: Large, bold, and legible fonts help users instantly read and understand what your pin is about. Also, keep your message simple and straight to the point.
- Branded elements: Consistent branding makes your pins easy to recognize. So add your logo, website, and brand colors to strengthen brand recognition.
- Contrast: Ensure texts stand out against the background for easy readability. Dark text on a light background (or vice versa) works best.
- Use white space: Avoid overcrowding your pins with too much text or elements—keep it clean and organized.
- Call to Action (CTA): Encourage engagement with CTAs like “Download for free” or “Shop now” for pins promoting your freebies and paid products.
4. Use design tools to simplify the process
Graphic design tools like Canva help you create eye-catching pins, even if you have no design skills.
There are thousands of templates to choose from. Plus, you can easily customize these templates with your preferred fonts, colors, images, and graphics to build brand consistency across all your pins.

5. Give video pins a try
We've touched upon the engagement metrics of video pins before - they gather 1 billion views daily. So you might want to give them a try and break free of the idea of Pinterest being an image-only platform.
The ideal video pin length is 6 to 15 seconds and they should be vertical. Don't use long hooks or boring intros, they should clearly display the products. Using captions is also a bonus - some users may not have the sound on.
Optimize pins for better reach
As we’ve mentioned earlier, Pinterest is more than just a visual platform—it’s also a search engine. This means that Pinterest’s algorithm uses keywords to help people find relevant content.
So if you want your digital products to reach the right audience, your pins need to be optimized with the right keywords.
1. Find the right keywords
Keyword research helps you figure out what your target audience is actively searching for.
The easiest way to do this is by using Pinterest’s search bar. Start typing a broad keyword related to your product or content, and Pinterest will suggest other keywords that are very popular among Pinterest users.

After searching for a specific keyword, Pinterest also suggests related keywords in colorful boxes at the top of search results.
You can click on any of the suggestions to get additional keyword ideas from their search results pages.

Another way to get these keywords is to go to Pinterest trends (pinterest.trends.com).
This page helps you identify what’s popular in your niche and see if any rising trends align with your digital products.

2. Where to use keywords
There are three main areas to use the list of keywords you’ve gathered.
The goal is to incorporate them as naturally as possible, so your pins remain engaging and easy to read while also helping Pinterest show your content to the right people.
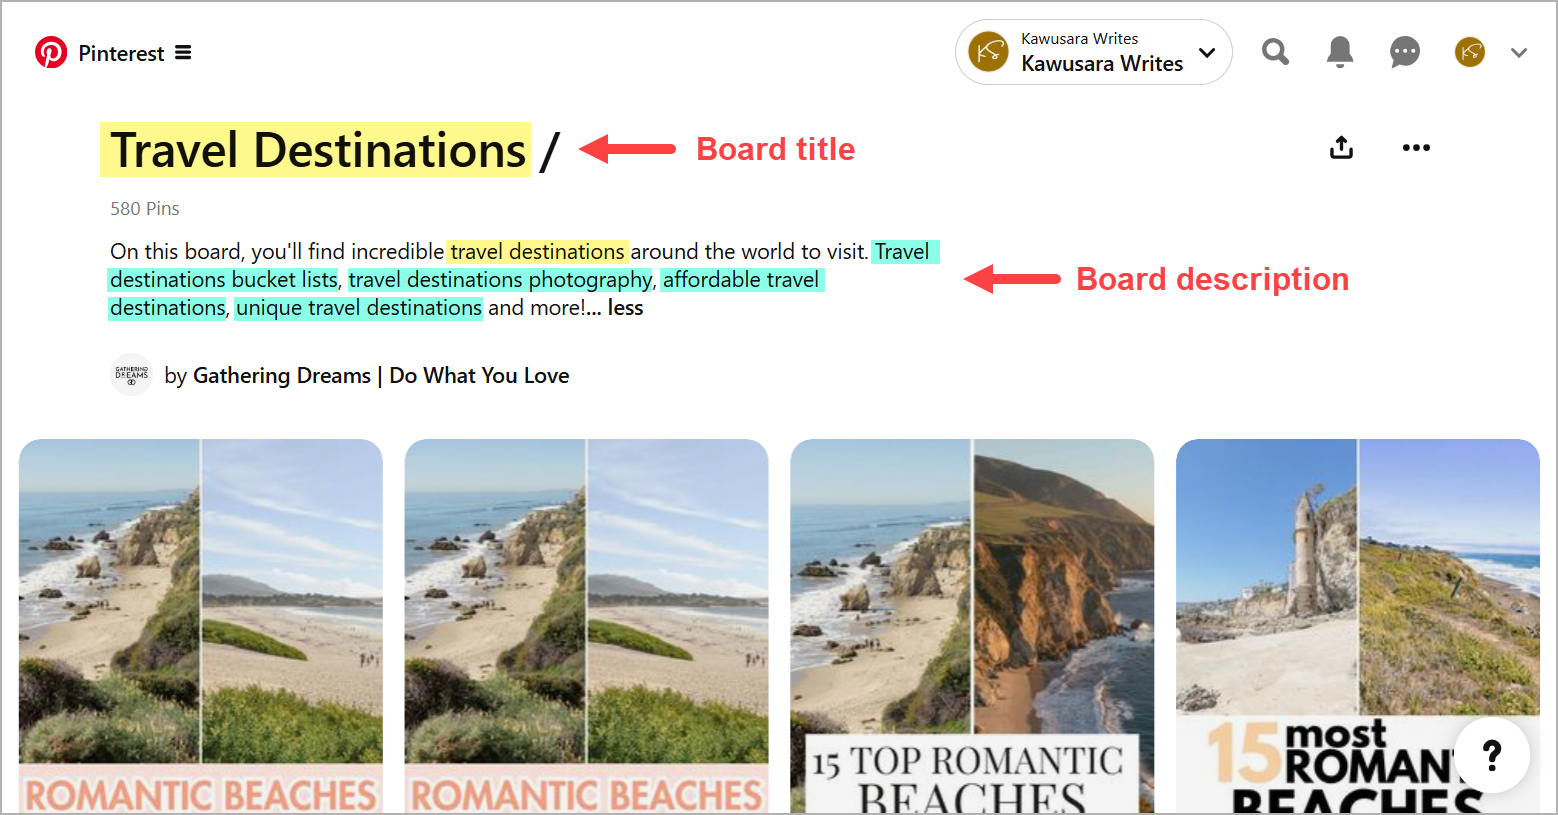
Profile bio: Briefly describe who you are and what you do using your most important keywords. This reinforces your account’s focus to both Pinterest and potential followers.

Board titles and descriptions: Name your boards with clear, keyword-rich titles and descriptions.
It helps Pinterest understand and get a better context of the pins added to these boards and also helps users who land on your profile to easily navigate your content.

Pin titles and descriptions: Naturally incorporate your primary keyword into your pin titles, then add any relevant secondary keywords in the description.
Publish pins to boards
Now that your pins are ready, the next step is publishing them to Pinterest boards.
1. Set up boards
Think of boards like folders—each one should focus on a specific category related to your business.
For example, if you’re in the travel niche, you might create boards like Best travel destinations, Luxury getaways, and Packing hacks.
Before adding your own pins, fill new boards with about 10 to 20 high-ranking pins from others in your niche. This helps Pinterest recognize the board’s topic and improves the visibility of your pins in search results.
2. Pin consistently
Publishing more pins means you boost the chances of your content appearing in search results. Also, Pinterest rewards regular activity, so it’s important to post new pins consistently.
Instead of pinning in bursts and disappearing, aim for a steady posting schedule. Start with 1 pin per day or 3 pins per week, choose a schedule that you can maintain long-term.
To help you stay consistent, consider batching your pins and scheduling them using Pinterest’s built-in scheduling feature or a social scheduling tool of your choice.

Track content performance
Pinterest provides built-in analytics that show how your pins are performing over time. You can filter these results over specific time ranges, pin formats, age groups, and more.
As a digital product seller, some of the key metrics to keep an eye on are:
- Impressions: The number of times your pins appear in someone’s feed or search results.
- Pin clicks: The number of clicks your pins get from user feeds and search results.
- Outbound clicks: The number of users who click through to your website or landing page.
- Saves: How often people save your pins to their own boards.
Check your Pinterest analytics regularly to see which pins are driving the most engagement. If certain pins consistently perform well, create more content like them—whether it’s using similar designs, topics, or keywords.
Of course, these aren't the only metrics you can get from Pinterest. You can use the Pinterest Tag on your website to track sales, sign-ups, downloads, and more. By combining it with Google Analytics and UTM tags, you can follow users from the pin to the purchase.
Pro tip: The Google Analytics and UTM tagging allows you to see the checkout and email sign-up details.
Tips to drive higher conversions and sales from Pinterest
Here are some tips to keep in mind as you work on driving traffic and sales from your Pinterest profile:
1. Engage with other Pinterest creators
Follow about 10 accounts in your niche each day for about a month to build up your profile.
Not everyone will follow back, but that’s okay. The goal is to show Pinterest that you’re active and improve your visibility.
In addition to following these accounts, stay consistent with liking and saving pins from these creators, especially if your account is new.
Here’s how to find relevant accounts to follow:
- Search for a broad term in your niche (for example, travel).
- Click the Filters button.
- Select Profiles.
- Hit Apply.

You can also find (or create) group boards and collaborate with other creators to boost your account's growth. Of course, you should keep in mind to stay within your niche.
2. Analyze similar creators in your niche
Pick the top 5-10 well-known accounts in your field and see who they follow, what pins they save, and how they arrange their boards.
Notice the keywords and hashtags they use. Since they’ve already figured out what works, you can adapt some of their ideas for your own pins and boards.
3. Leverage Pinterest ads
Pinterest ads (aka Promoted pins) help you reach a wider audience and drive more sales for your digital products. They have three types: traffic, conversion, and shopping.
Instead of creating pins for these ads from scratch, you can identify your high-converting organic pins and turn them into promoted pins to maximize engagement.
Pinterest ads can be effective even with a low budget. So start small and increase your spending as you see positive results - focusing on the pins that organically perform well will increase your chances of having a successful campaign.
Host and sell your digital products with Whop
When you consistently apply these strategies and tips, it’s only a matter of time before you start seeing results. If you’re starting a new account, expect to invest at least three to four months of consistent pinning before gaining steady traction.
To help you streamline your digital product sales, check out Whop.
Whop is an all-in-one platform for hosting and selling various digital products and services, including ebooks, courses, events, coaching, software, and community access. You can bundle multiple products into one package and offer them at a premium price—either as a one-time purchase or a recurring subscription.
You can set up your whop in just 10 minutes, with no monthly or listing fees— Whop's fees start at just 2.7% + $0.30 per sale.
Pinterest FAQs
Here are some frequently asked questions about Pinterest:
Do you need a website to sell on Pinterest?
No, you don’t need a website to sell on Pinterest. If you sell on platforms like Etsy or Whop, you can link your Pinterest pins directly to your product pages on these sites.
How much does it cost to have a Pinterest business account?
A Pinterest business account is completely free, just like a personal account. You only pay if you choose to run Pinterest ads.
Can you really make money with Pinterest?
Pinterest doesn’t pay creators directly, but it’s a powerful tool for driving traffic and sales. It works especially well if your audience is mostly U.S.-based women and your niche is popular, such as beauty, fashion, fitness, home decor, DIY, or travel.
How to make your pins go viral?
Design eye-catching pins with bold colors, clear text, and engaging images. Plus, optimize each pin for search by adding relevant keywords to its title and description.
How often should you post on Pinterest?
Post as often as you can maintain consistently. A good starting point is one pin per day or three per week.