All you need to know about Discord bots, including why you should use them, how they work, how to add bots to your server and how to create your own Discord bot!
Key takeaways
- Discord bots automate moderation, boost engagement, and help manage servers more efficiently than manual efforts alone.
- Adding bots requires Administrator or Manage Server permissions, and you should only grant bots the minimum permissions they need.
- Bots are controlled through slash commands or text prefix commands, with most offering a help command to explain their features.
Discord is the biggest social media app of all time, and it’s only growing every day! The free communication app is best described as a virtual club, and within this club there are servers dedicated to specific topics. These servers can be focused on anything from celebrity fan groups, to software development, to plant care, and everything in between. Discord users join servers on topics that interest them, and there are some servers with millions of users. As such, managing a Discord server is no easy feat, and so many server owners use bots. Discord bots and automations can help with every aspect of Discord, including moderation and engagement.
In this article we will take a closer look at what Discord bots are, why they are so widely used, and how you can add bots to your Discord server.
What is a Discord bot?
A Discord bot is software that automates everyday tasks and more at Discord. Discord bots are primarily used for server management and to create engagement within the server.
Everyone can code a Discord bot for free and optionally publish the bot to the public.
Discord bots usually work with "commands," messages that users type into the chat. Others might lack commands but instead do background work, like tracking insights and automatic moderation.
Almost all servers utilize some kind of bot in their workflow, and they can be the deciding factor between an average and a great server. Some servers are solely created to interact with bots, like TYKHE: Bridge of Unity and Rumble Royale. Hundreds of thousands of bots are available to use in Discord, with 5.700+ accessible directly from the App Directory.
Why use bots in Discord?
Discord bots are great for moderation and engagement, so if you want to grow your server while ensuring the quality and safety of your members, then you should consider using a bot. Bots can verify a user is a human and not another bot, remove offensive content, direct users to answers with commands, and even run games on a server. Let’s take a closer look at what Discord bots can do for your server.
Discord moderation with Bots
There are several common managerial actions in Discord, such as:
- Adding/Removing roles: Organization in the Discord server relies on roles. Roles will define a user's permissions and access to channels
- Banning: Banning is the same in Discord as everywhere else. When a user gets banned, they are removed from the server and unable to re-join
- Kicking: Like banning, kicking will remove users from the server, but kicked users can re-join servers
- Timing out/Muting: Users can be disallowed from sending messages in channels and/or connecting to voice channels. While "muting" is the common term for this action, "timeout" is the official term for it since Discord introduced the integrated "Timeout" function on December 20th, 2021
Most of the actions above require manual input from moderators. This can be time-consuming, and in large servers moderators may miss any spam or inappropriate content, but bots will pick up on this and take appropriate action. So, bots can help reduce the load for moderators, automate processes, and keep logs. Plus, depending on the bot's functionality, bots can do much more than this.
Discord engagement with Bots
Engagement is one of the most crucial things to keep a server alive and active. If your server is not active and engaging, members will leave and your Discord server will gain a bad reputation. After all of that hard work, you may have to start again from scratch!
Not to worry - hundreds of thousands of bots solely focus on increasing engagement within servers, and 1854 of them can be directly accessed from the App Directory. Bots can increase engagement with either very simple functions like mentioning (sending a notification) members when the chat is slow, or organizing fully-fledged interactive games like Gartic or even just idle RPGs.
Some of the most popular engagement bots are
- Truth or Dare
- Bloxlink
- GarticBOT
- EPIC RPG
- VirtualFisher
Using bots in Discord
Now that you understand why Discord bots are so widely used, let’s take a look at how you can add bots to your Discord server.
How to enable bots in Discord
Enabling bots in Discord, more commonly called "adding bots," is a very easy process. The only thing you need is the bot's invite link. You can get the invite link from external bot directories like Top.gg and DiscordBotList.com, the bot's user profiles, or App Directory, the integrated bot directory of Discord.
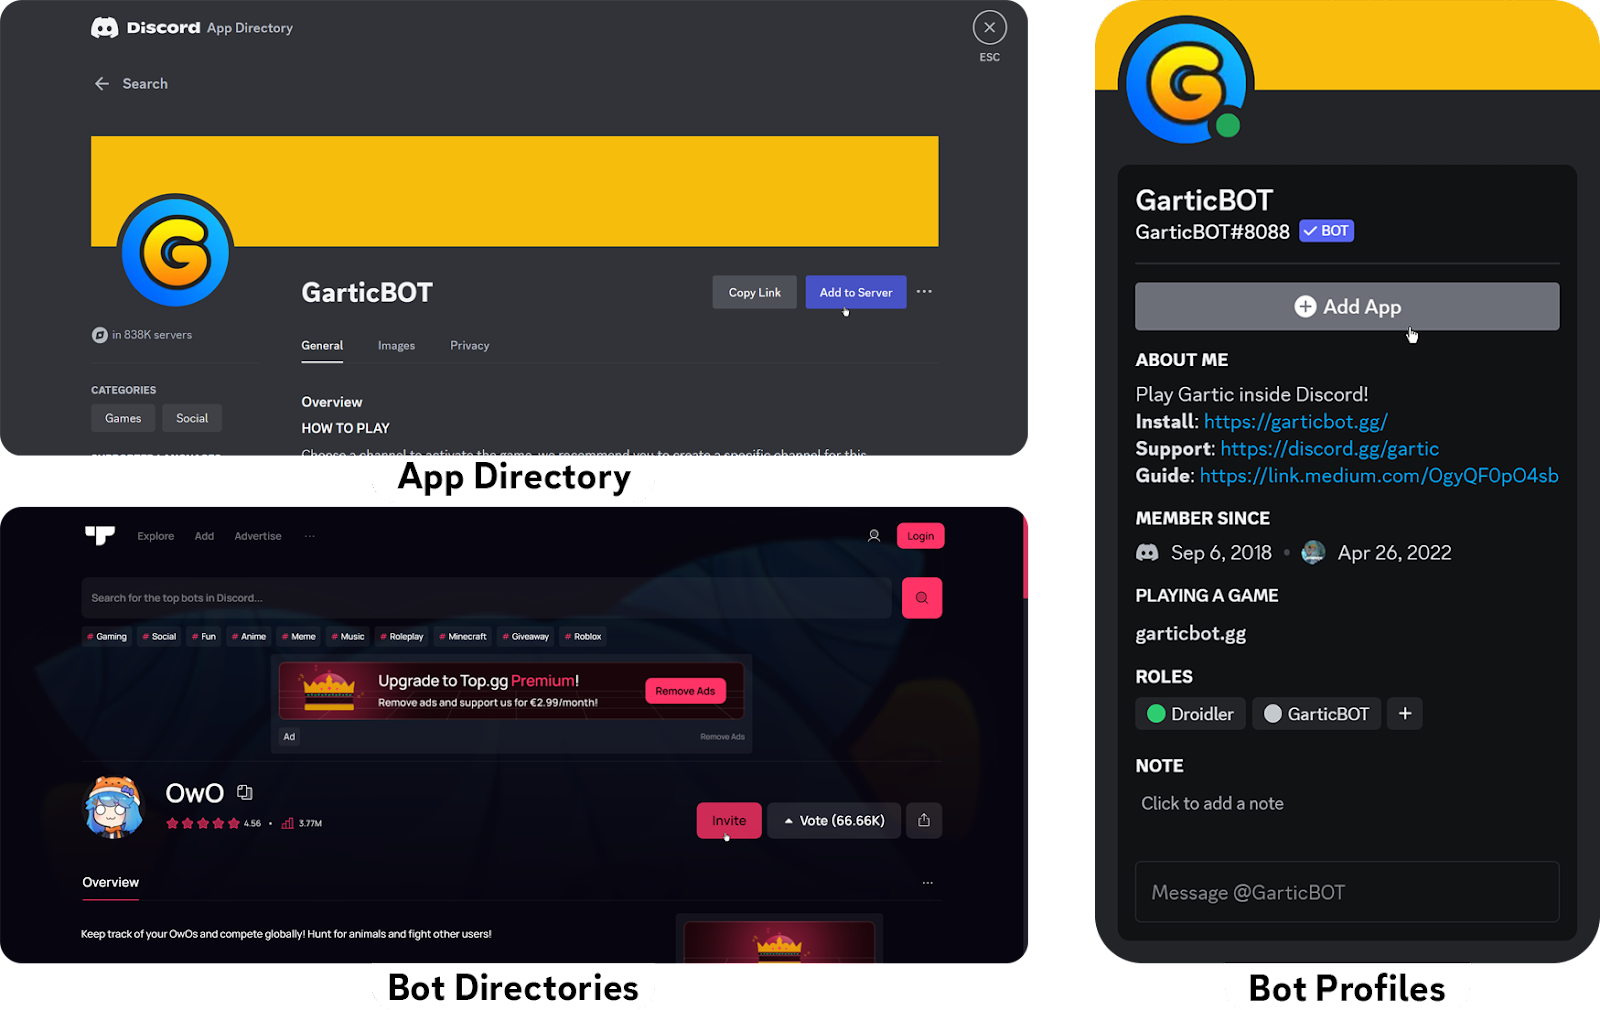
While external bot directories list the most number of Discord bots, the safest way to invite bots is the integrated App Directory, which you can access via the server settings.
Not all users can invite bots to your server. The user needs either the "Administrator" or the "Manage Server" permission to perform that action. Suppose you're the creator of the server. In that case, you can invite the bot regardless since you automatically have all the permissions enabled. You should give other users, like moderators, the permission needed to invite bots. Let's take a look at how to do that on desktop and mobile:
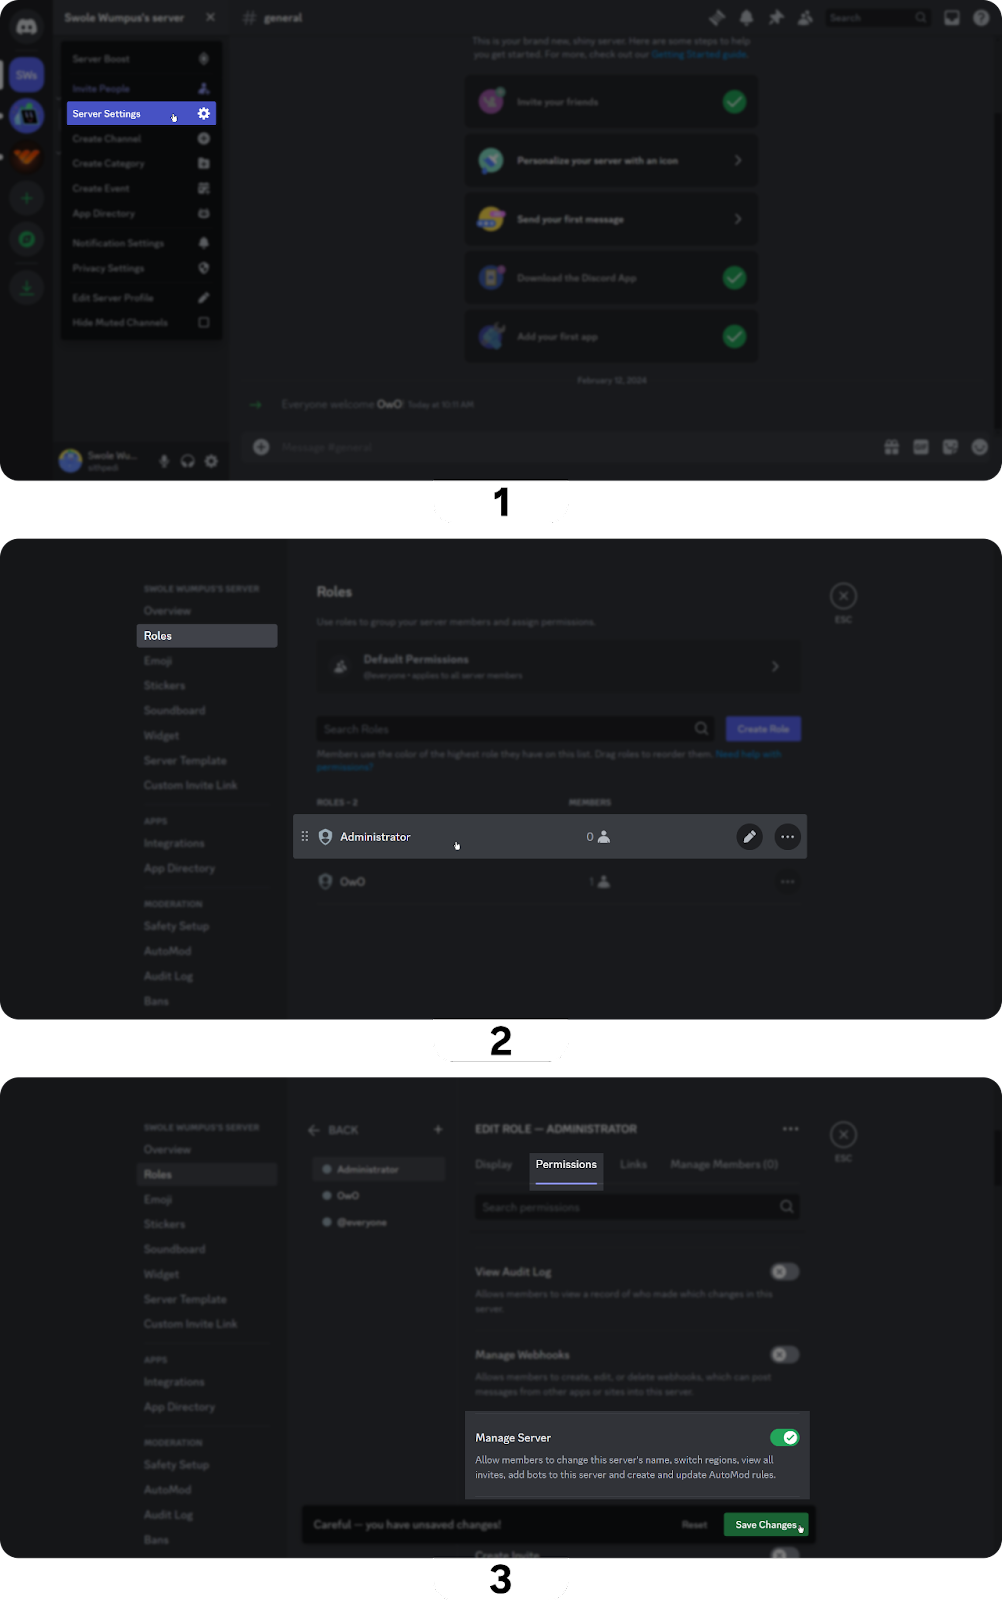
Editing role permissions on desktop
To edit the permissions of a role on the desktop:
- Open the server menu by clicking the server name at the top of the channel list and select "Server Settings"
- Navigate to the "Roles" tab and click on the role you want to edit
- Navigate to the "Permissions" tab of the role, turn on or off the permission, and click the "Save Changes" button when you're done
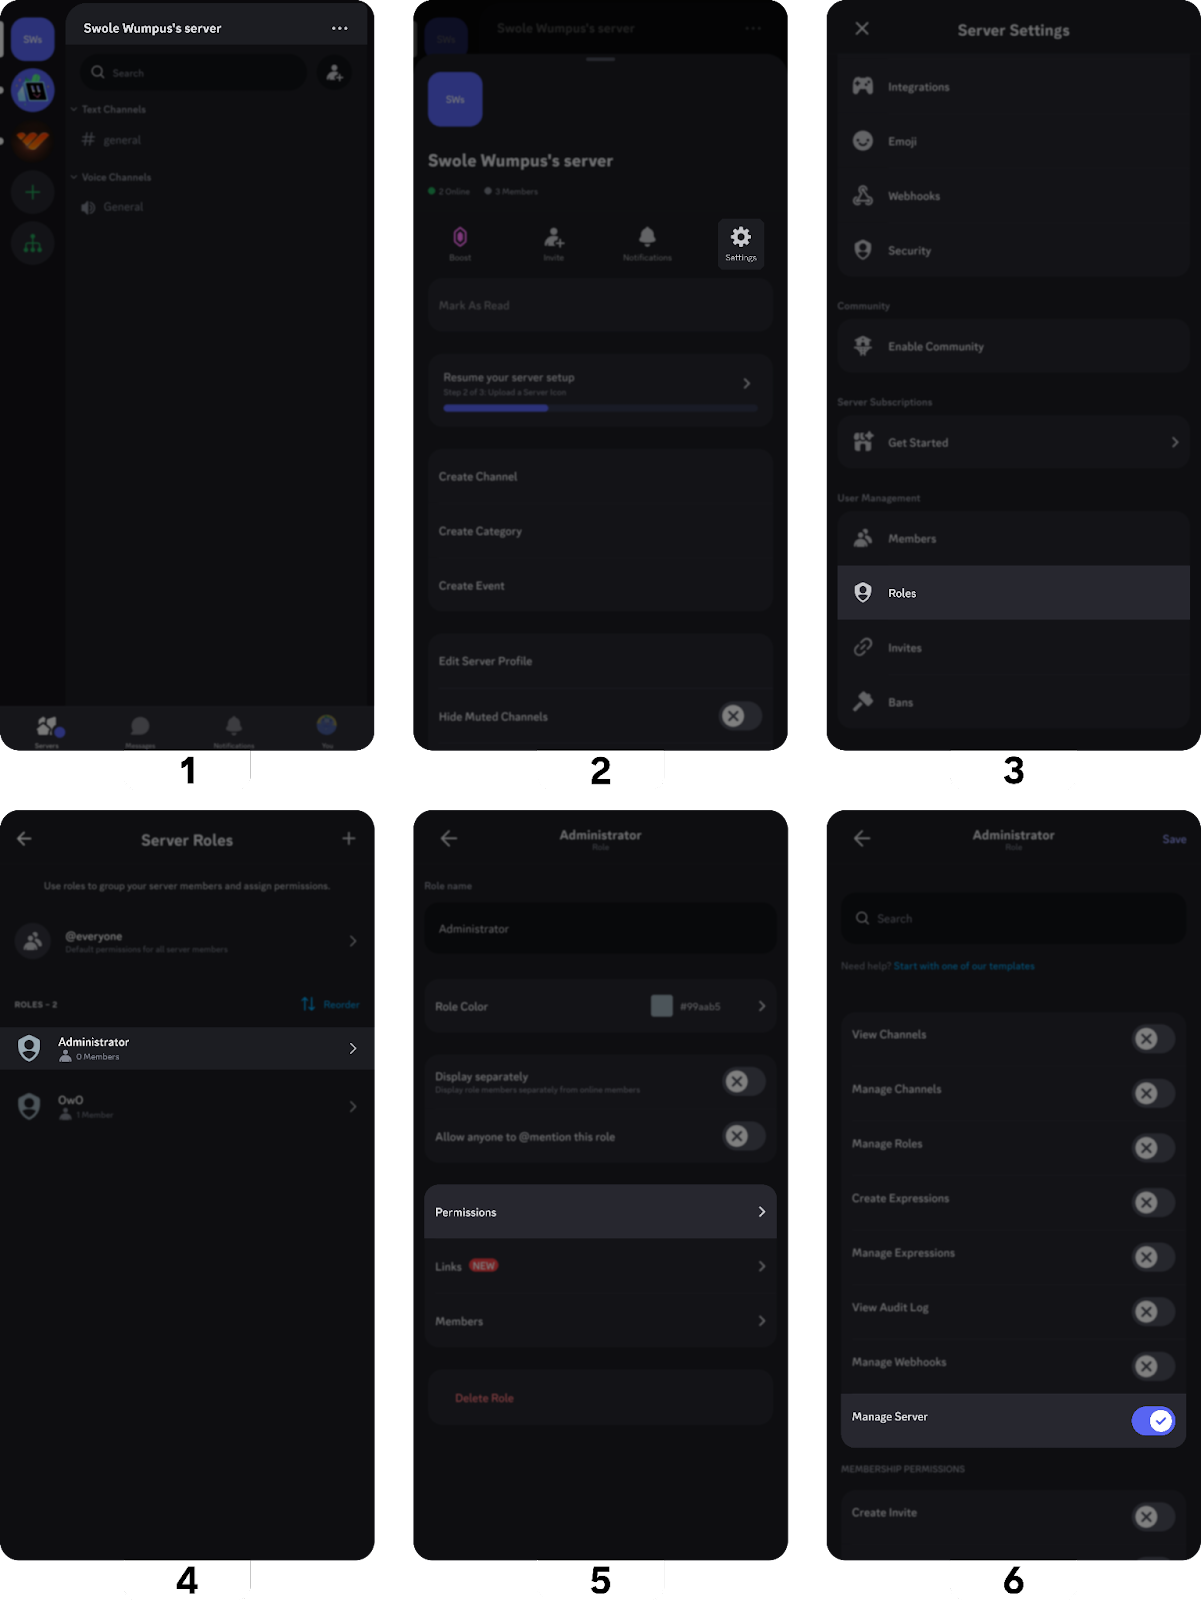
Editing role permissions on mobile
The process of editing permissions on mobile is similar to desktop:
- Press the server name at the top of the channel list
- Press the "Settings" in the server menu that pops up
- Scroll down and press the "Roles" tab
- Select the role you want to edit the permissions of
- Select the "Permissions" tab in the role menu
- Turn on or off the permission and click the "Save" button at the top right
How to invite bots to a Discord server
Once you have the invite link of the bot that you want to integrate, it's time to add it to your server. Here's a step-by-step on adding a bot to your server:
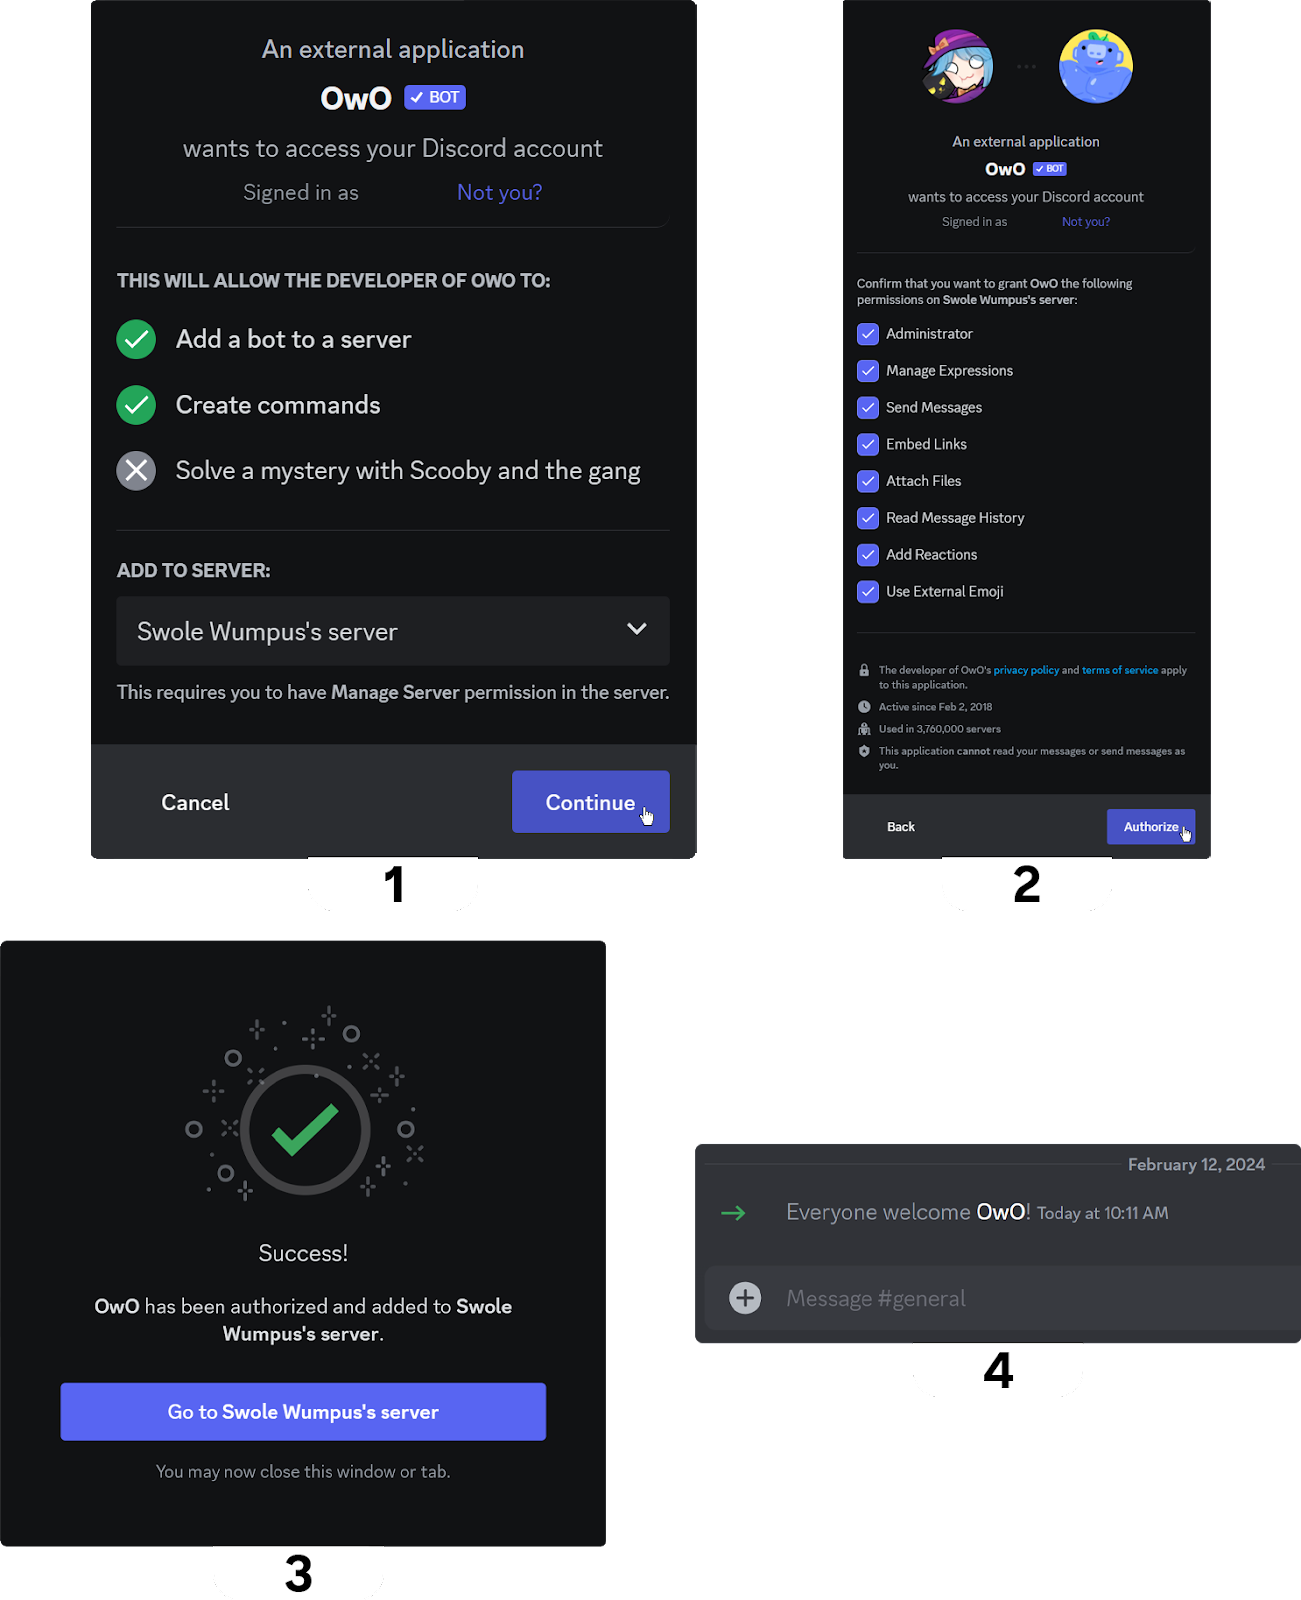
- When you click the invite link, you'll see an invite splash. If you click the invite link inside the Discord app, the splash might greet you inside the app; if not, you'll be directed to your default browser. In the invite splash, you will see the bot's access request.
In the access request of an external application, you will always see what the application request is, like "Adding a bot to a server." Some bots might request access to "Adding you to other servers," which you might not want. After selecting the server to which you would like to add the bot to, click the "Continue" button on the bottom right - The next screen will display all the permissions that the bot requests. You can turn any of them off at your will, but this may prevent the bot from working correctly since some actions need those permissions. The bot will have its own role upon joining the server, and that role will have all the permissions you checked in this step.
Best practice is to try out the bot or look at its documentation to see its functionalities so you don't give the bot unnecessary permissions. For example, if a bot's only purpose (or the only way you'll use it) is to send messages to a channel, it doesn't need the "Administrator" and "Manage Server" permissions. Those (and some others) are dangerous permissions to grant. After you're done with adjusting the permissions, click the "Authorize" button at the bottom right - Great! You just added the bot to your server! You can either click the "Go to Server" button in the middle or just close the window/tab
Once the bot joins your server, you'll be able to see it in the members tab, or you'll receive a message in your system messages channel, which can be set in the "Overview" section of the server settings.
How to safely add a bot to your Discord server
You should always take precautions when adding a bot to your Discord server. Since bots are automated machines, you might only see a small part of what they are capable of. So, you should always know the bot and how it works before inviting it to your server. Here are some things to look out for:
- Only use official invite links. Some popular bots might have malevolent impersonators, so always make sure that you invite them either through the App Directory or their official website
- Don't grant dangerous permissions. Most Discord bots are not ill-intended, and they won't harm you or your server. But you know, safety comes first! You should understand what each permission does and grant only the ones the bot needs. Per the example in the "How to Invite Bots to a Discord Server" section, you shouldn't grant "Administrator" or "Ban members" permissions to a bot whose only purpose is to reply with "Pong!" every time someone texts "Ping"
- Some bots have internal settings, such as which users/roles can use certain commands. If the bot has elevated permissions like "Ban members" or "Mention @everyone, @here, and All Roles," make sure to set it right so that a regular user won't be able to ban your moderator
- Don't overcrowd your server with bots. Having a hundred bots on your server won't slow it down or harm it in any way, but it will make your organization harder to manage
Interacting with bots in Discord channels
So now you have bots in your Discord server - but how do you get them to work?
Almost all bots can be interacted with via "commands." Commands, as Discord users call them, are text messages that are sent in channels to which bots respond. Some bots lack commands since they do solely background work, such as banning certain users. Most bots that work with commands have "Help" commands, which explains the bot's functionality. Commands can be basic text messages (also known as "prefix commands") or what's called a "slash command." To use a slash command, write the command name with a slash (/) at the start. The example below shows a basic command, "owo help," on the left and a slash command, "help" on the right.
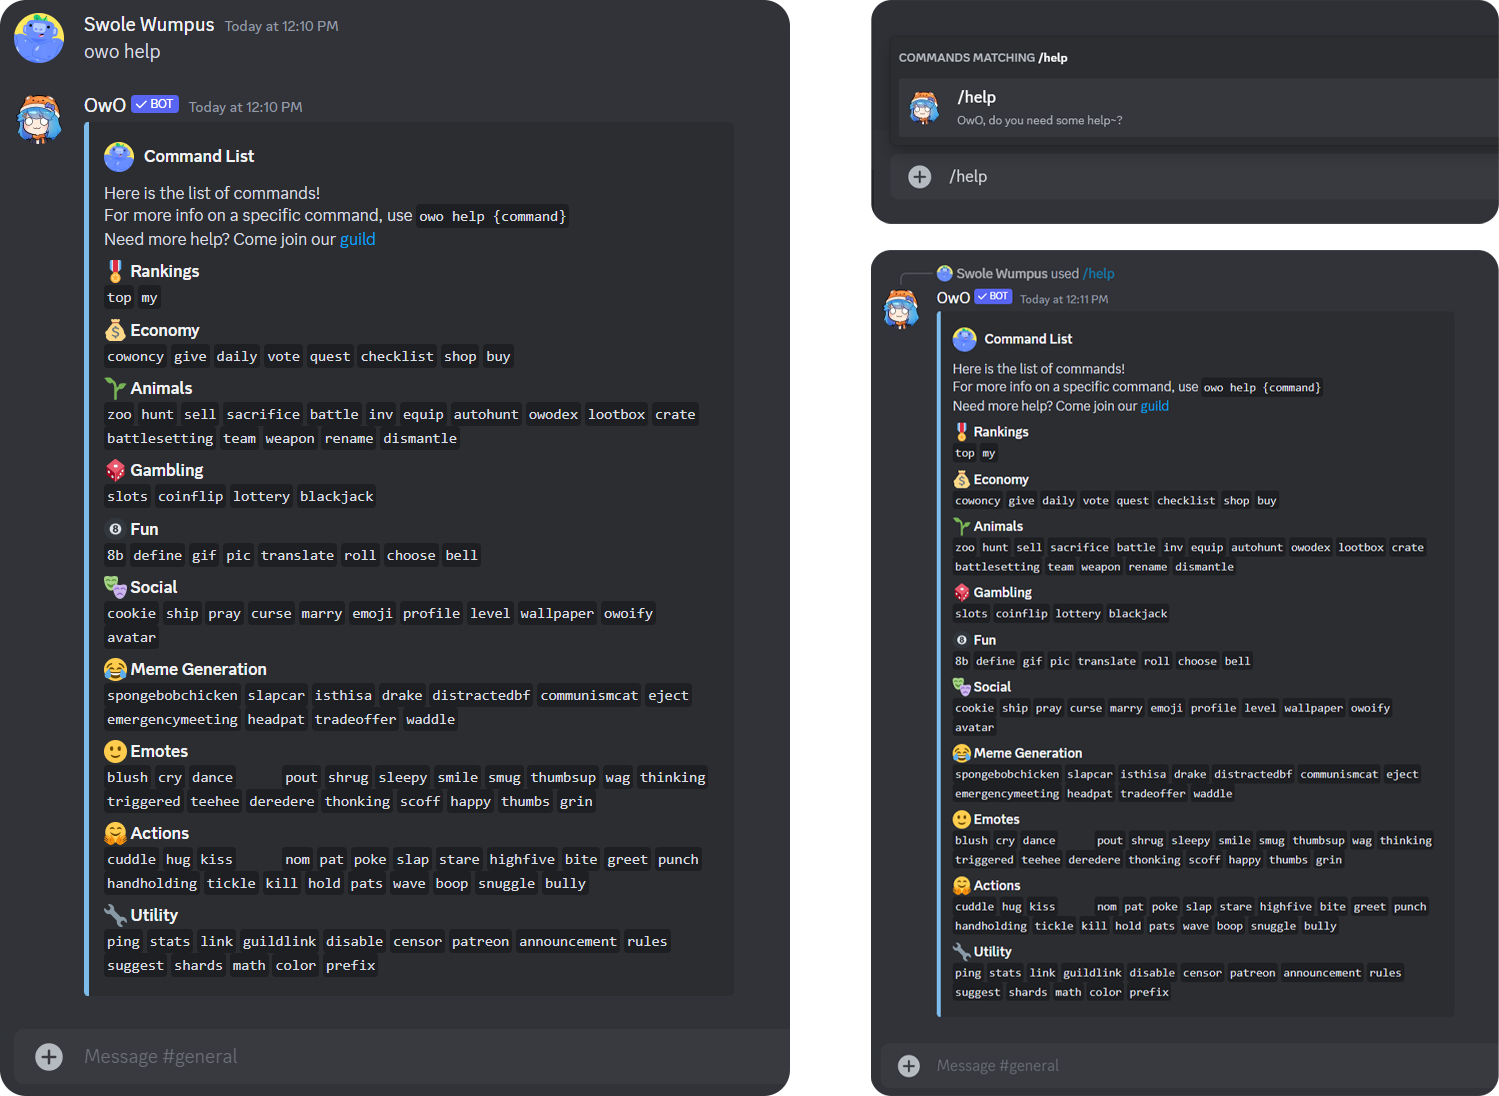
Slash commands were introduced in March 2021. Previously, all bots used text message commands, but nowadays, most bots work with slash commands. To see the available slash commands of a bot, you can type a slash (/) into the chat, and you'll notice a list of all available slash commands in the server - even if there is more than one bot, you'll see them all.
How to remove a bot from a Discord server
You might want to remove a bot from your server for any reason - you simply might not use it anymore, or you just want it gone. It's very easy to do; just kick them! Here's how to do that:
Removing bots from your server on desktop
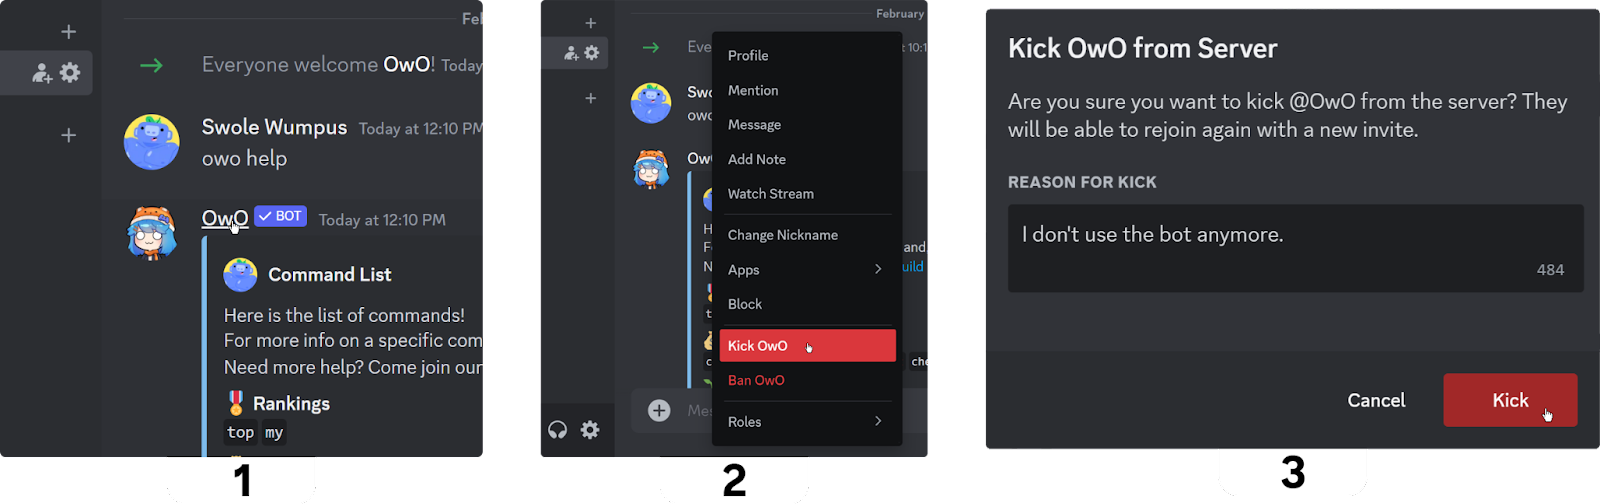
- Right-click on the bot's profile icon or username
- Click the "Kick [Bot Name]" button
- Enter a reason for the action (optional) and click the red "Kick" button
The bot is gone!
Removing bots from your server on mobile
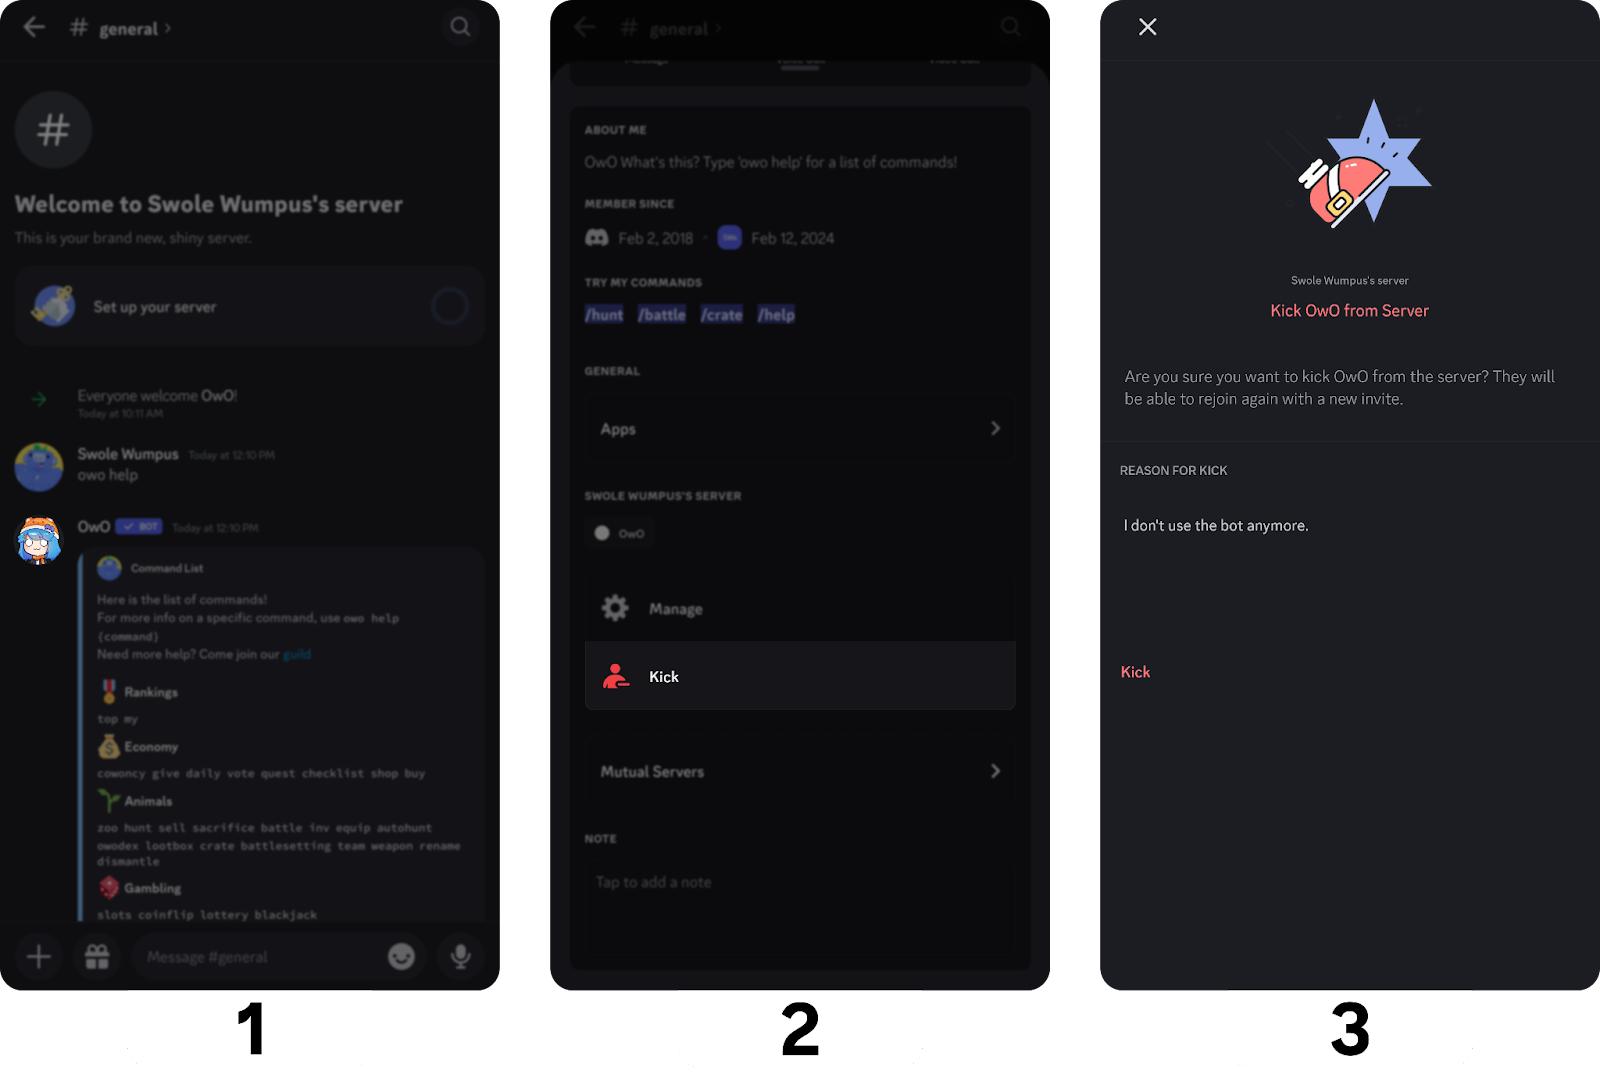
- Press on the user icon of the bot to open the user profile
- Scroll down on the profile and press the "Kick" button
- Enter a reason for the action (optional) and press the red "Kick" text at the bottom
You just removed the bot!
The best Discord bots
There are many great bots, and some are more popular than others due to being older, offering unique functions, having customization options, etc. Here are some great bot examples that are incredibly popular in the Discord community:
- Arcane - Leveling and moderation-focused multi-purpose bot
- Dank Memer - Text-based gaming/engagement bot
- Dyno - Moderation-focused multi-purpose bot
- Mudae - Gaming/engagement-focused card collection bot
- OwO - Text-based gaming/engagement bot
- YAGPDB - Highly customizable all-purpose bot
How to code your own Discord bot
Everyone can create their own Discord bot for free! Let's take a look at creating a simple Discord bot with two basic functions; responding with "Pong!" when a user sends a "Ping" message, and displaying the bot's ping with a slash command.
Step one: Create an application on the Discord developer portal
To connect your code to a valid Discord bot, first create the bot profile on the Discord Developer Portal. Here's a step-by-step explanation of how to do that:
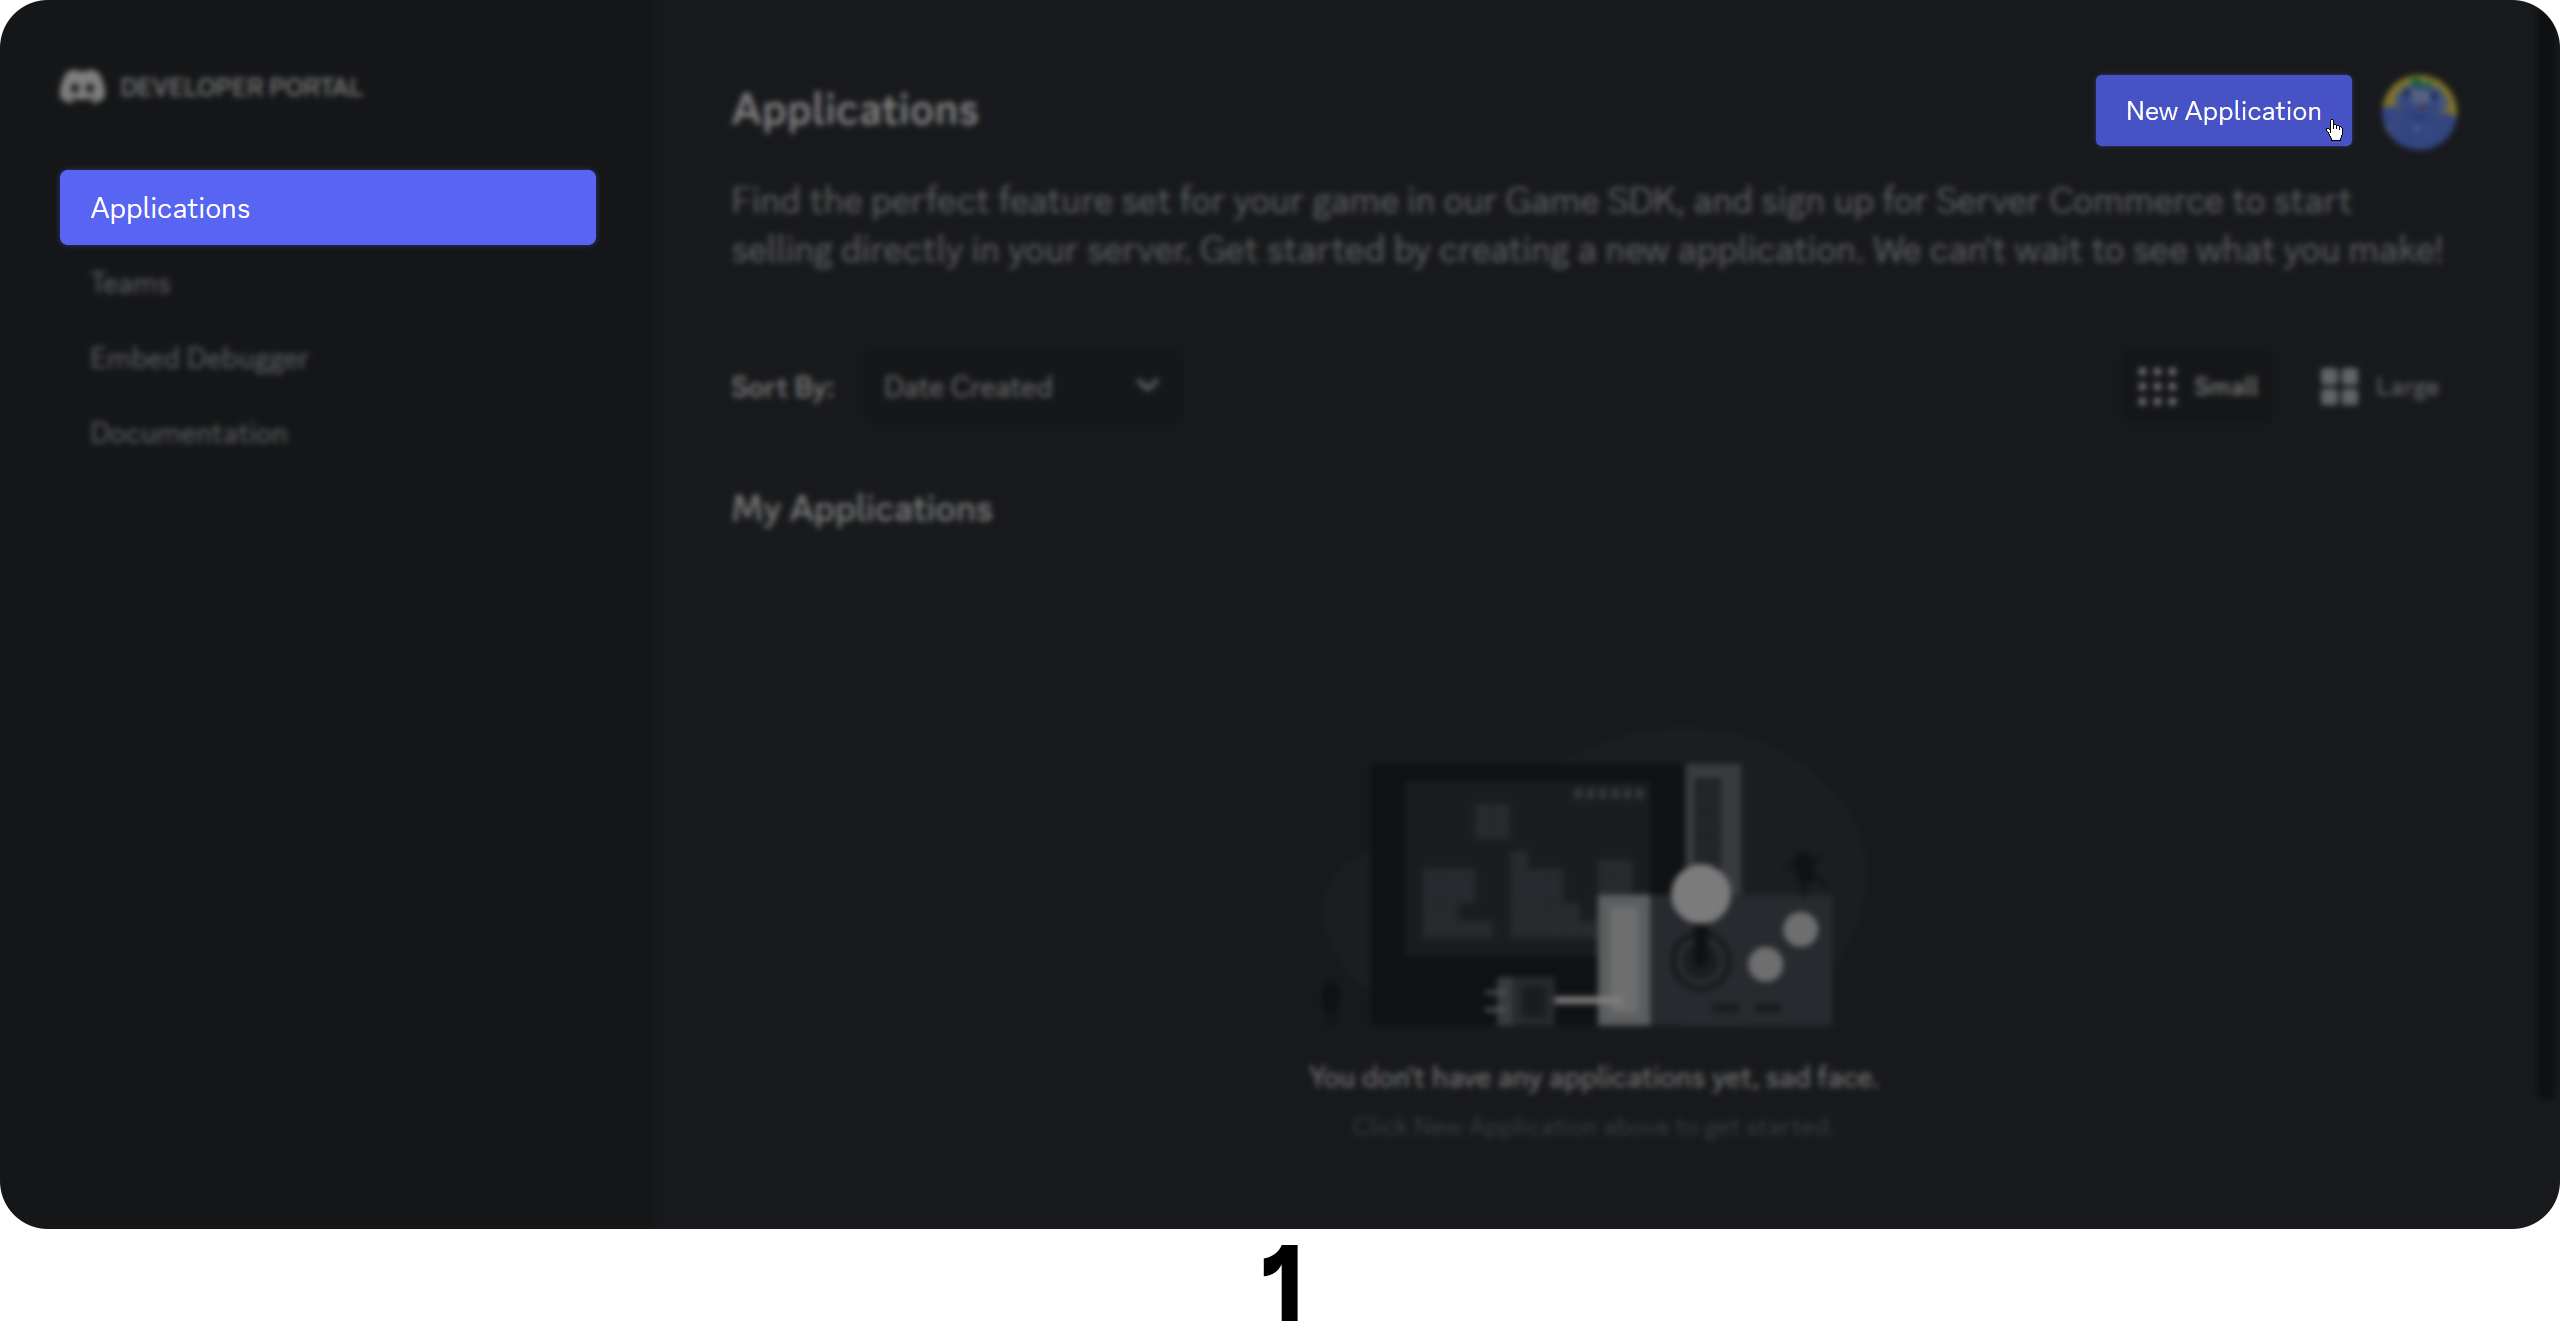
- Open the Discord Developer Portal, navigate to the "Applications" tab, and click the "New Application" button on the top right
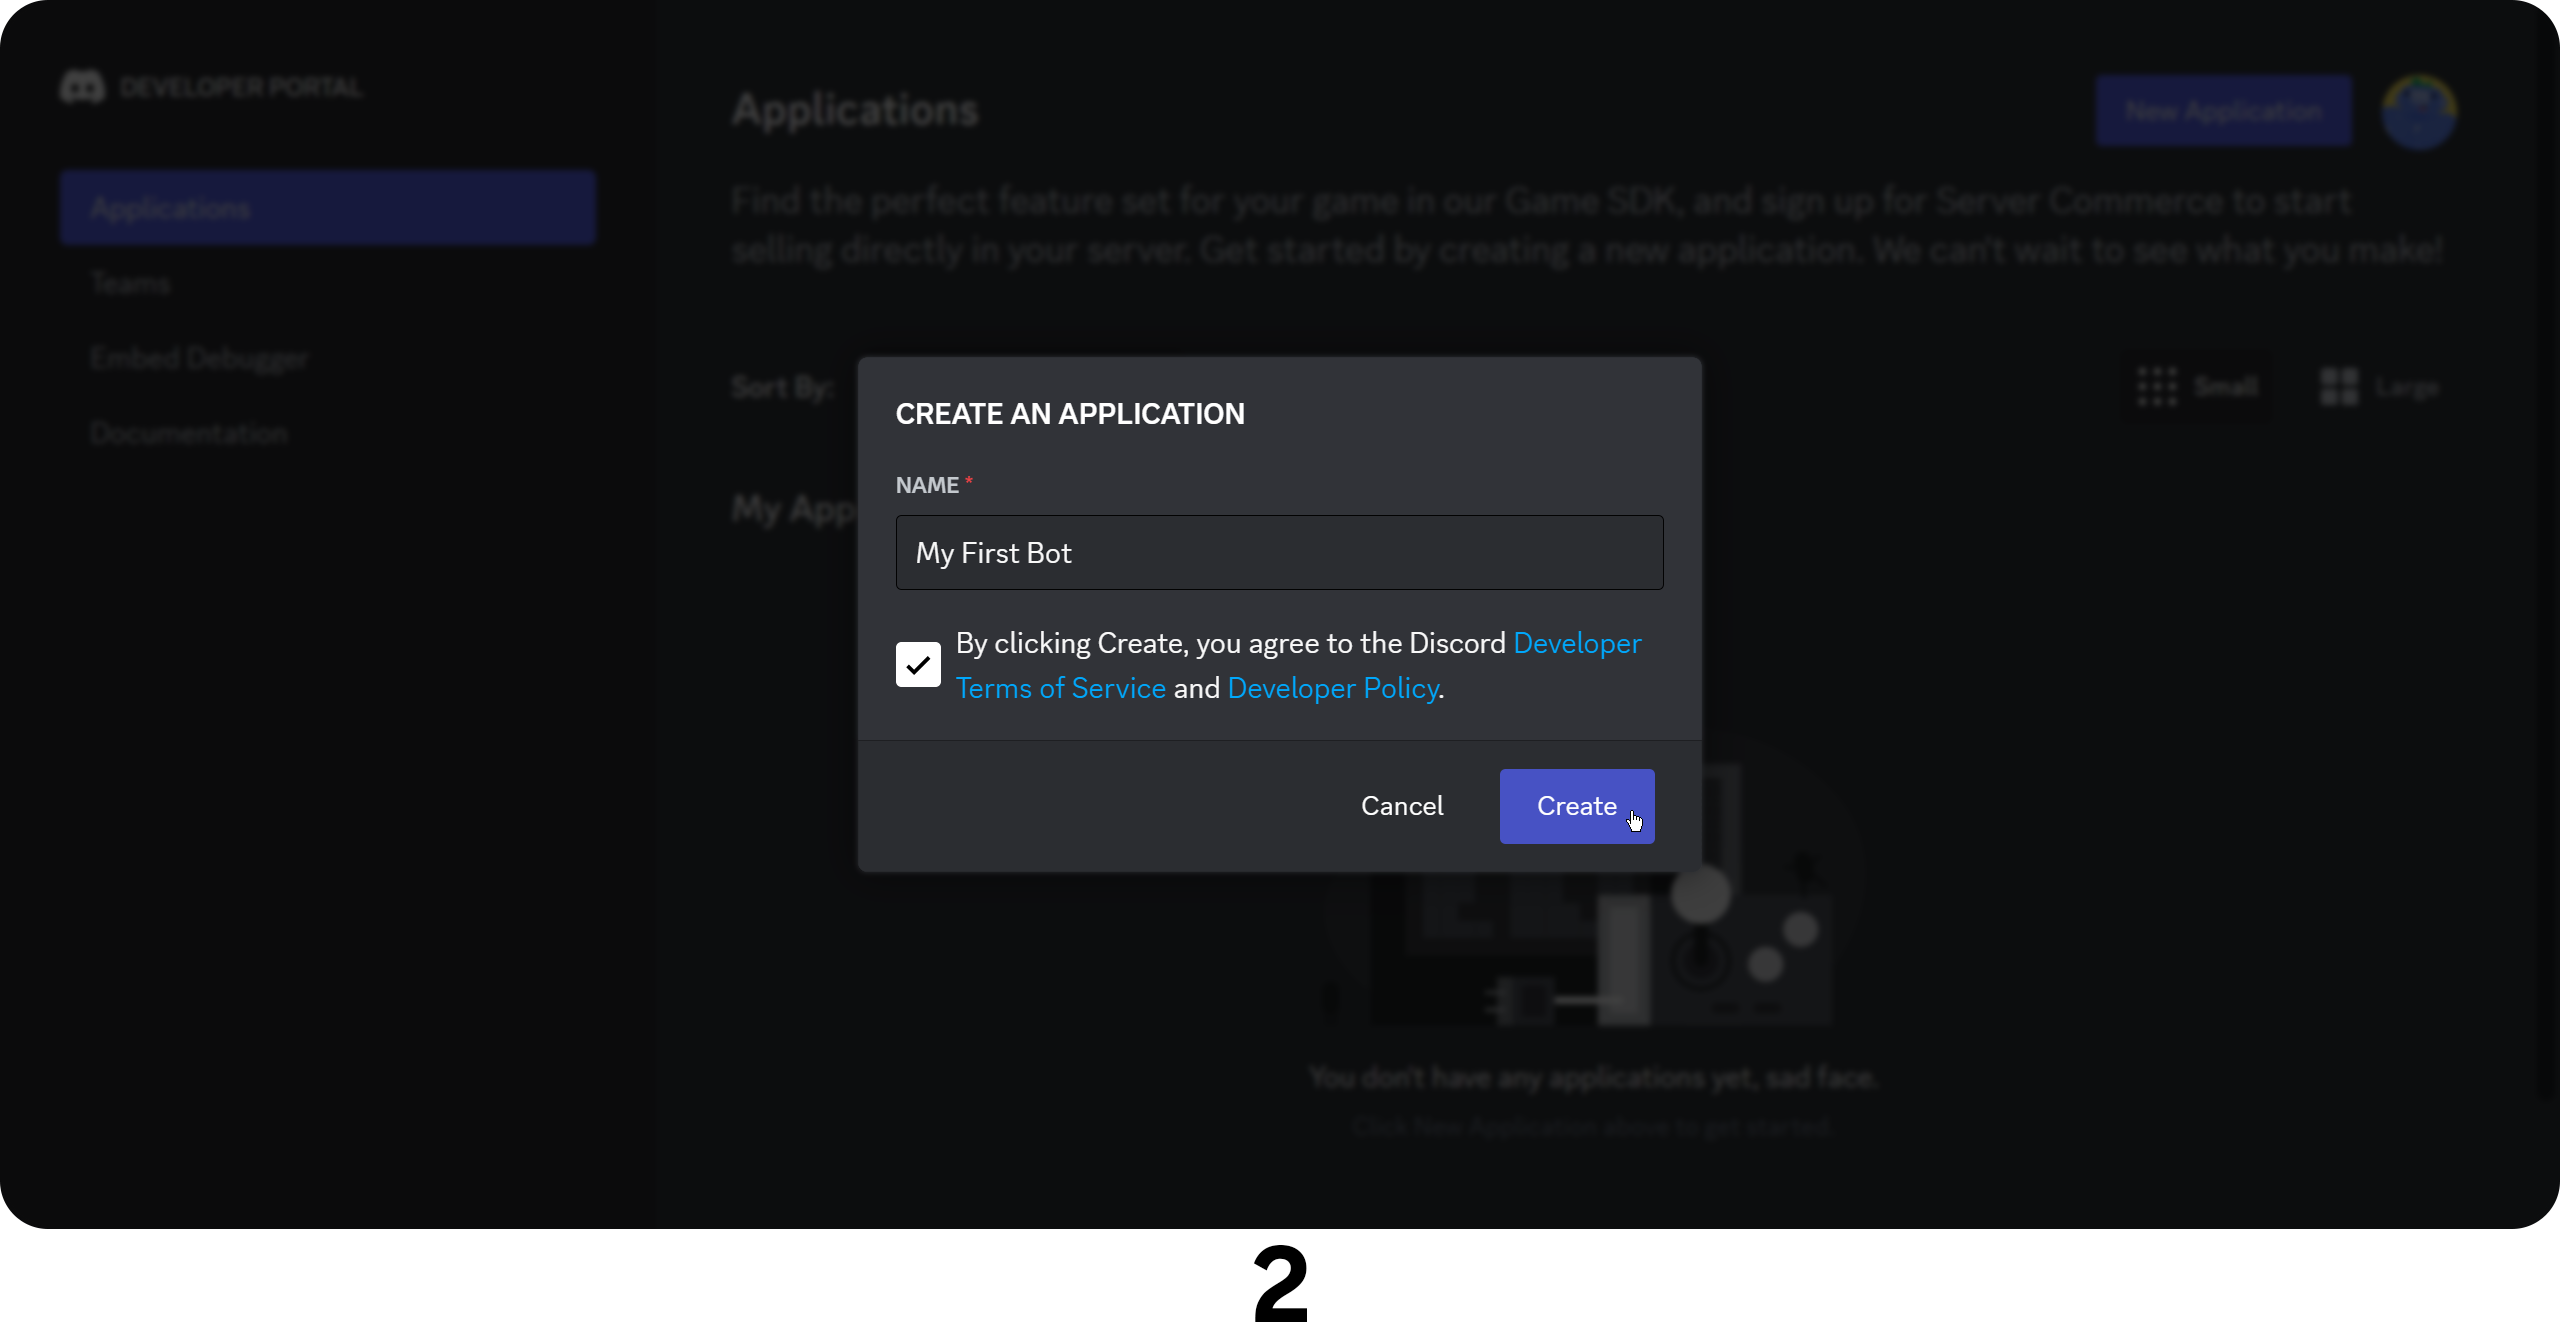
- Give your application a name, check the Discord Developer Terms of Service and Developer Policy confirmation (we recommend you read them first), and click the "Create" button
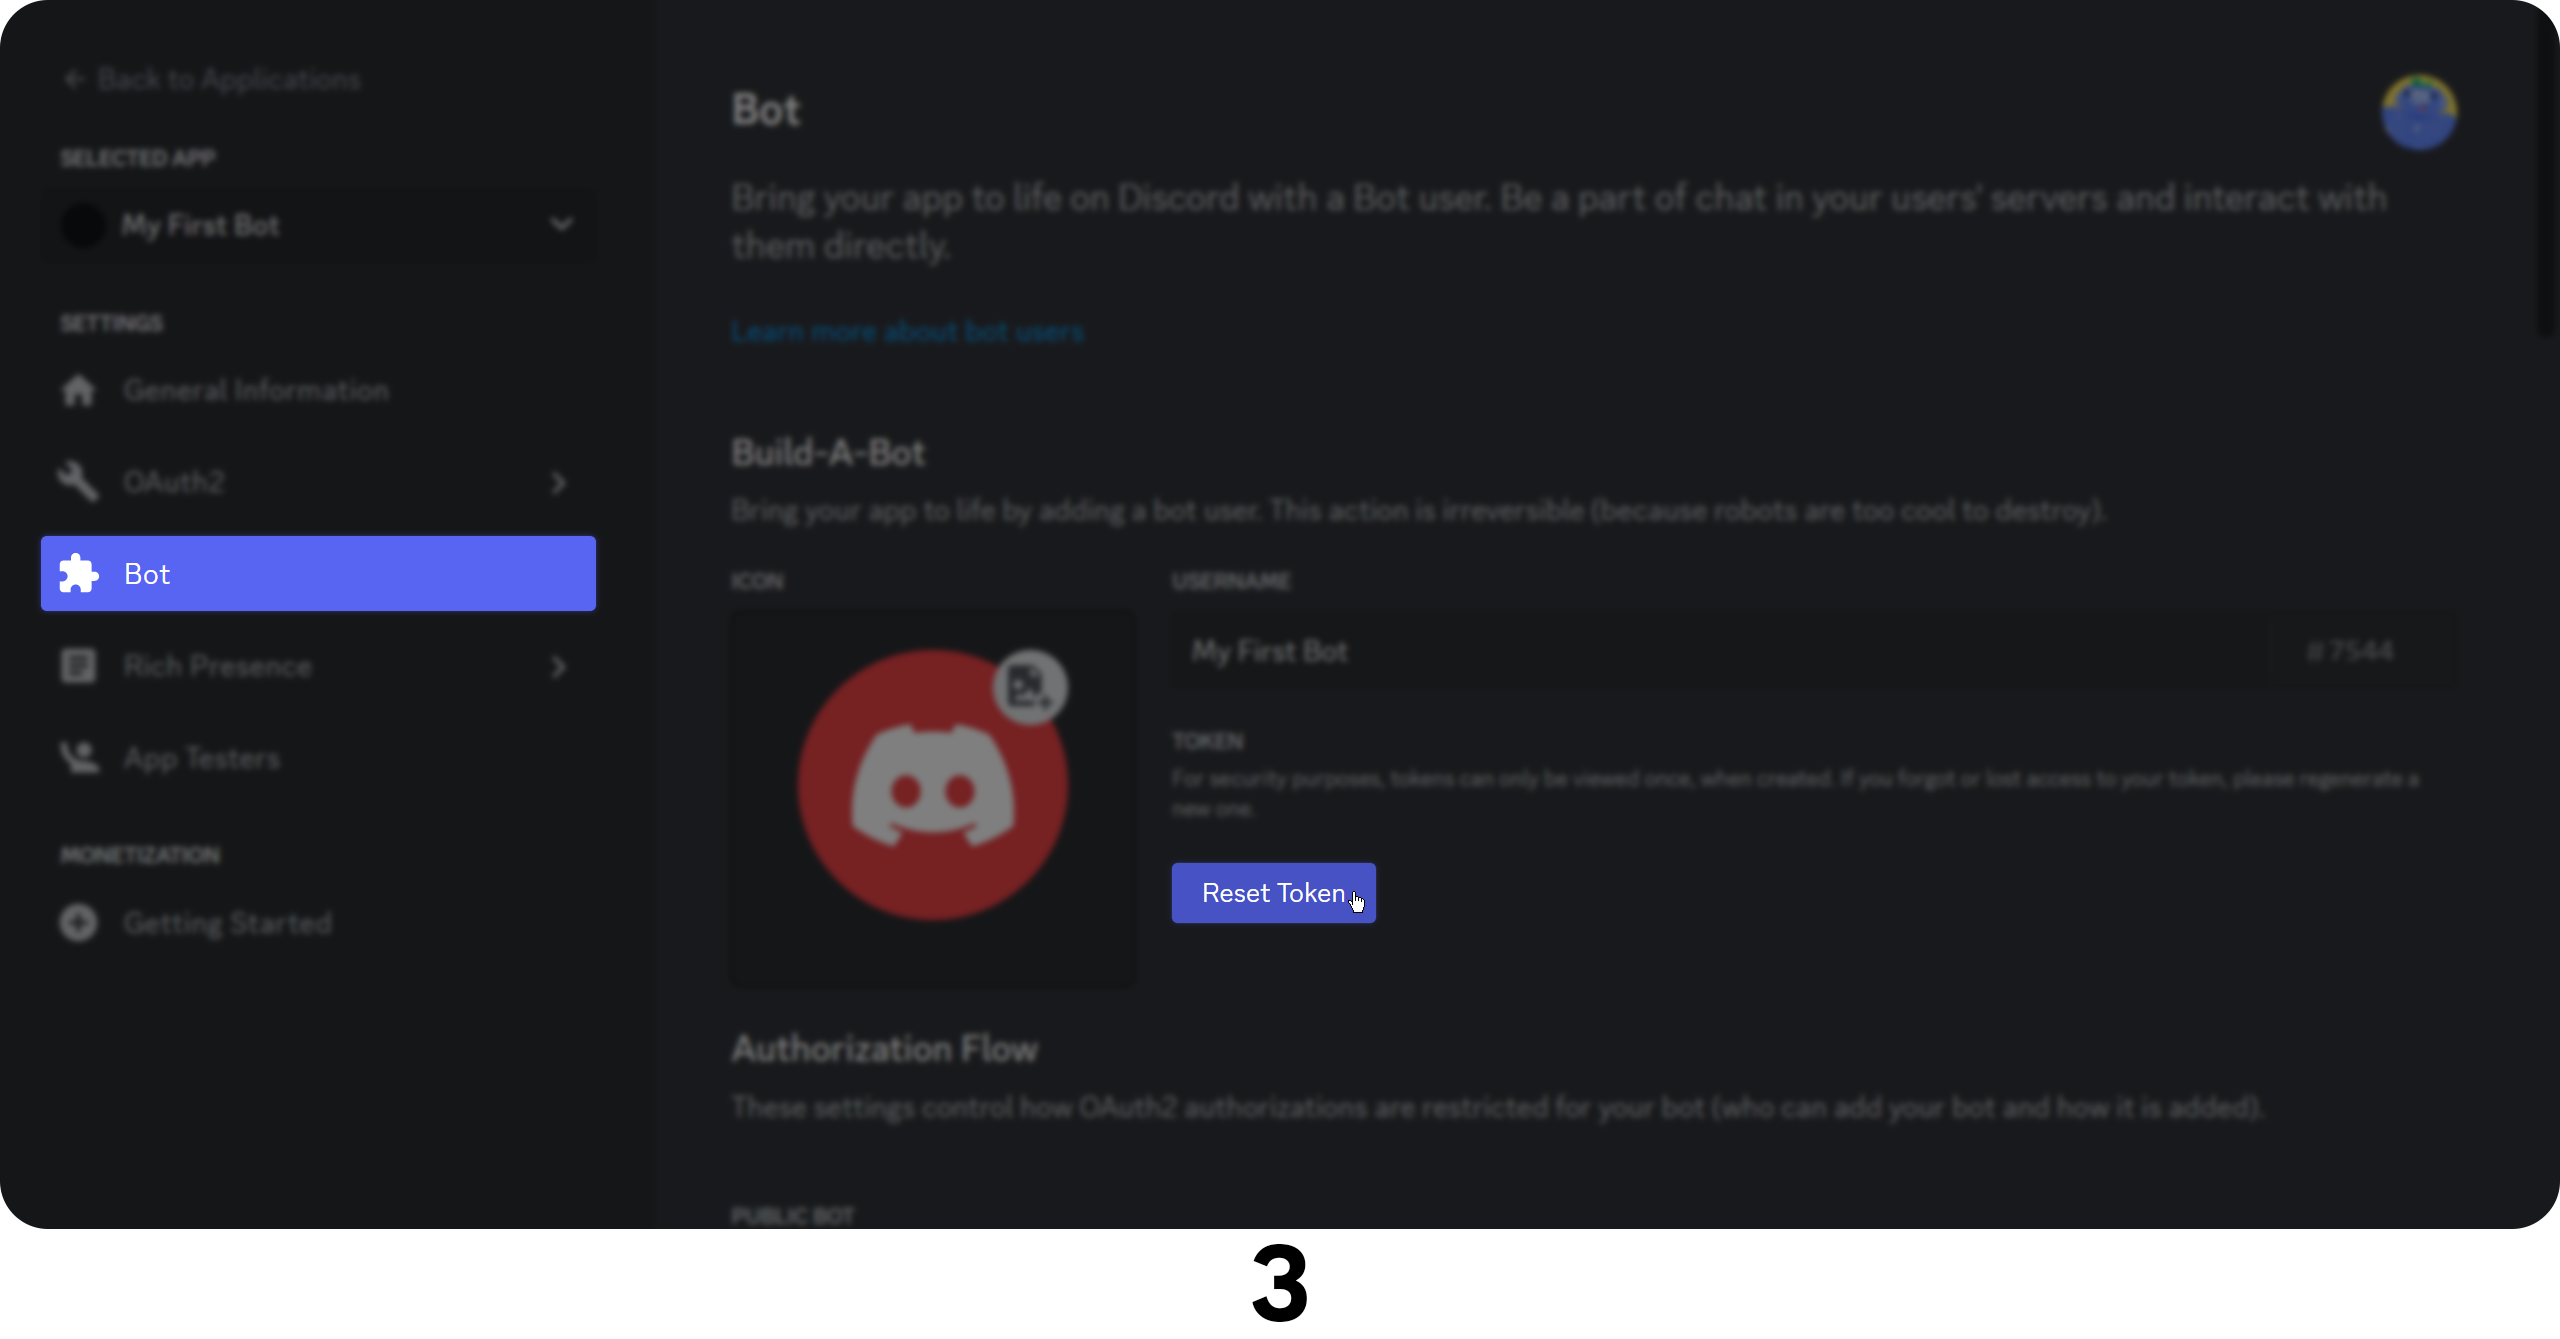
- Your bot is created! Now, you will get the bot's token, which will connect your code to the bot. To get it, navigate to the "Bot" tab and click the "Reset Token" button
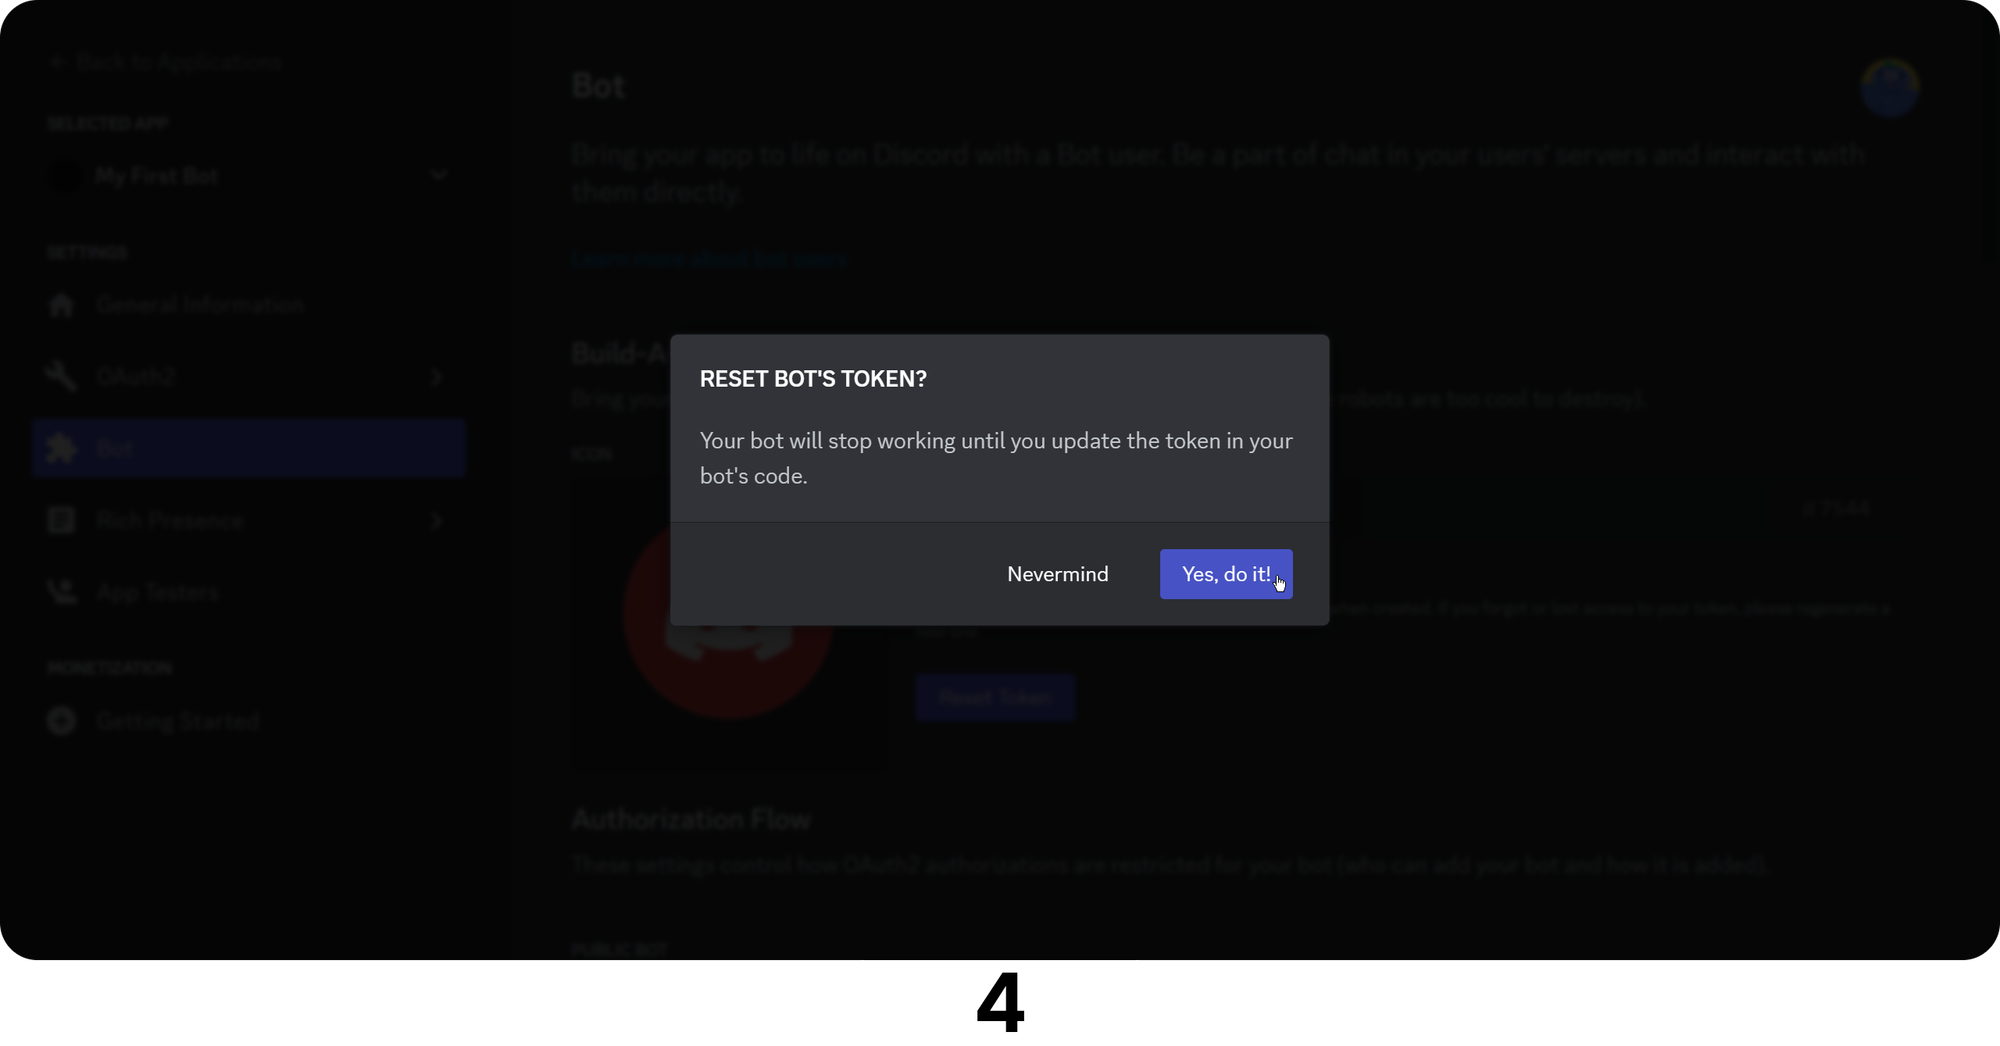
- Confirm the action by clicking "Yes, do it!"
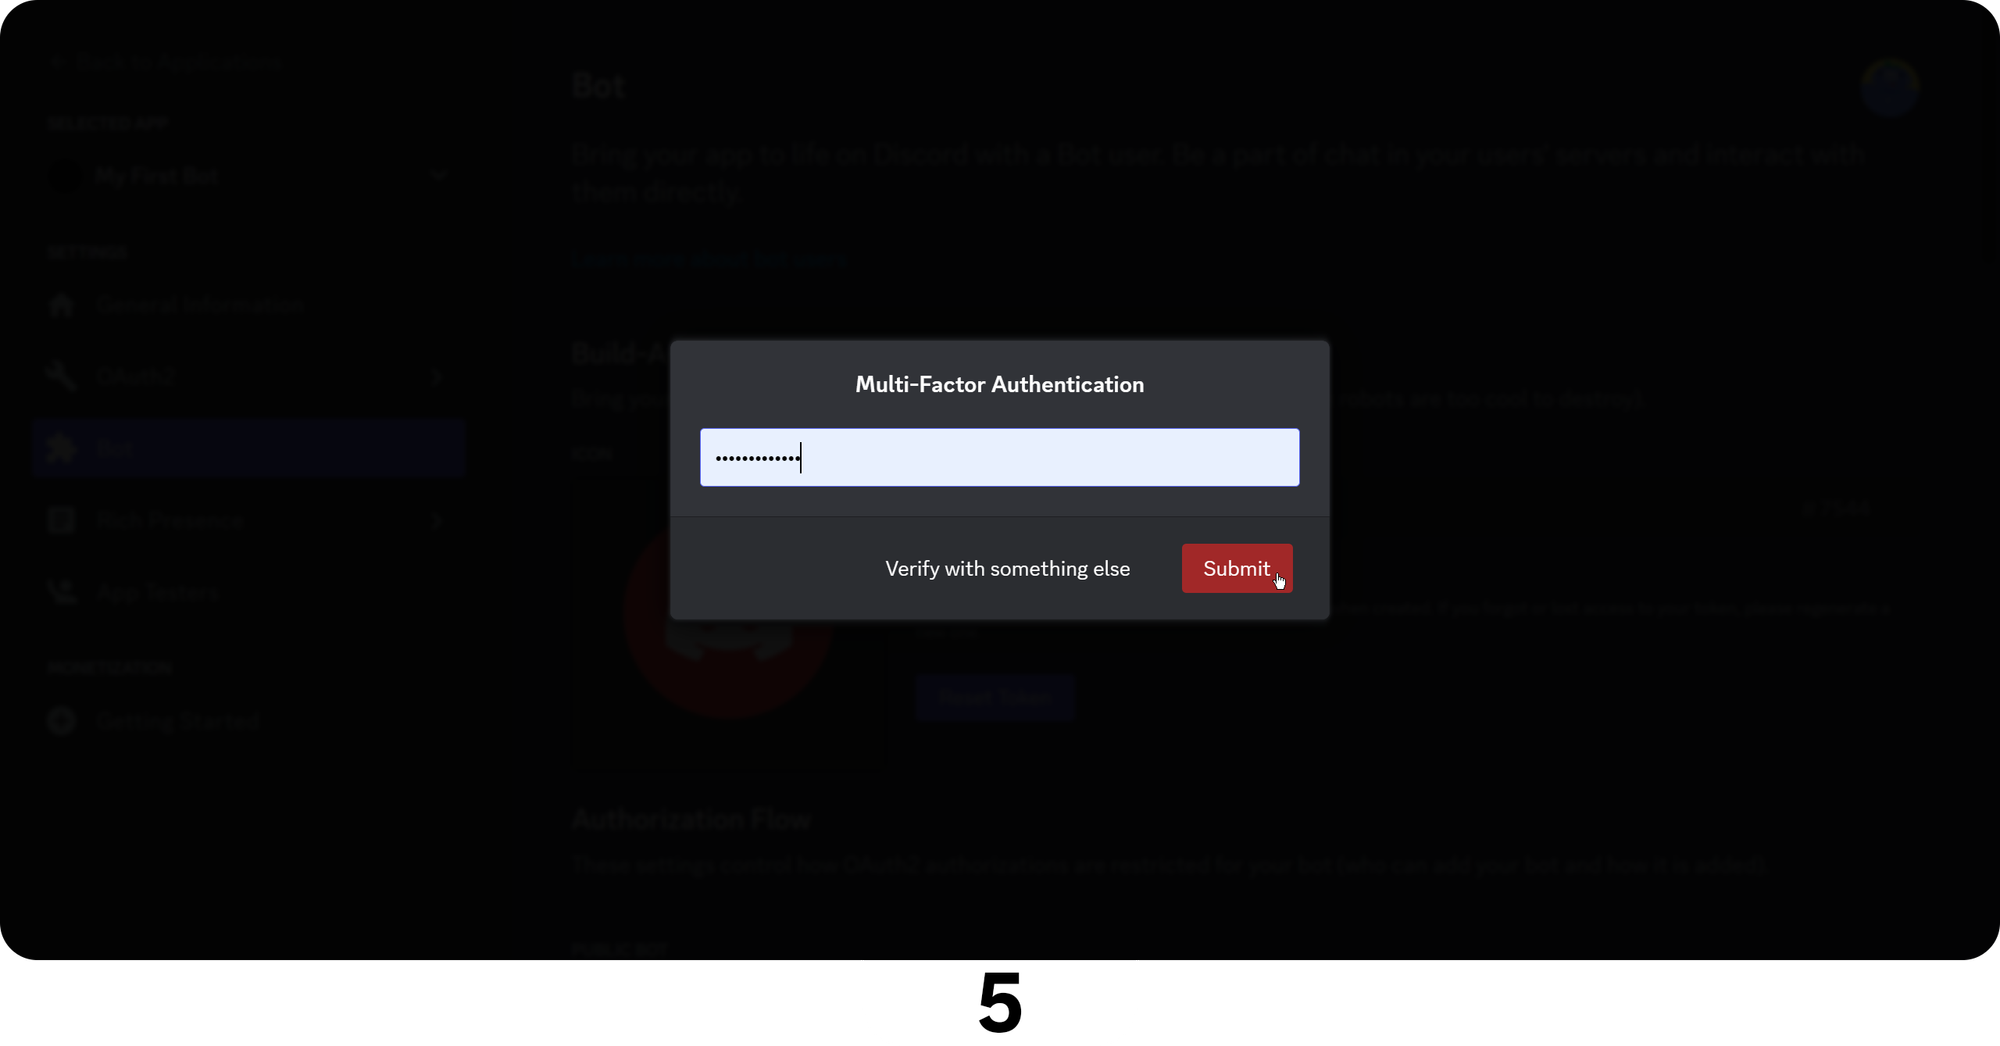
- Enter your password and click the "Submit" button to proceed
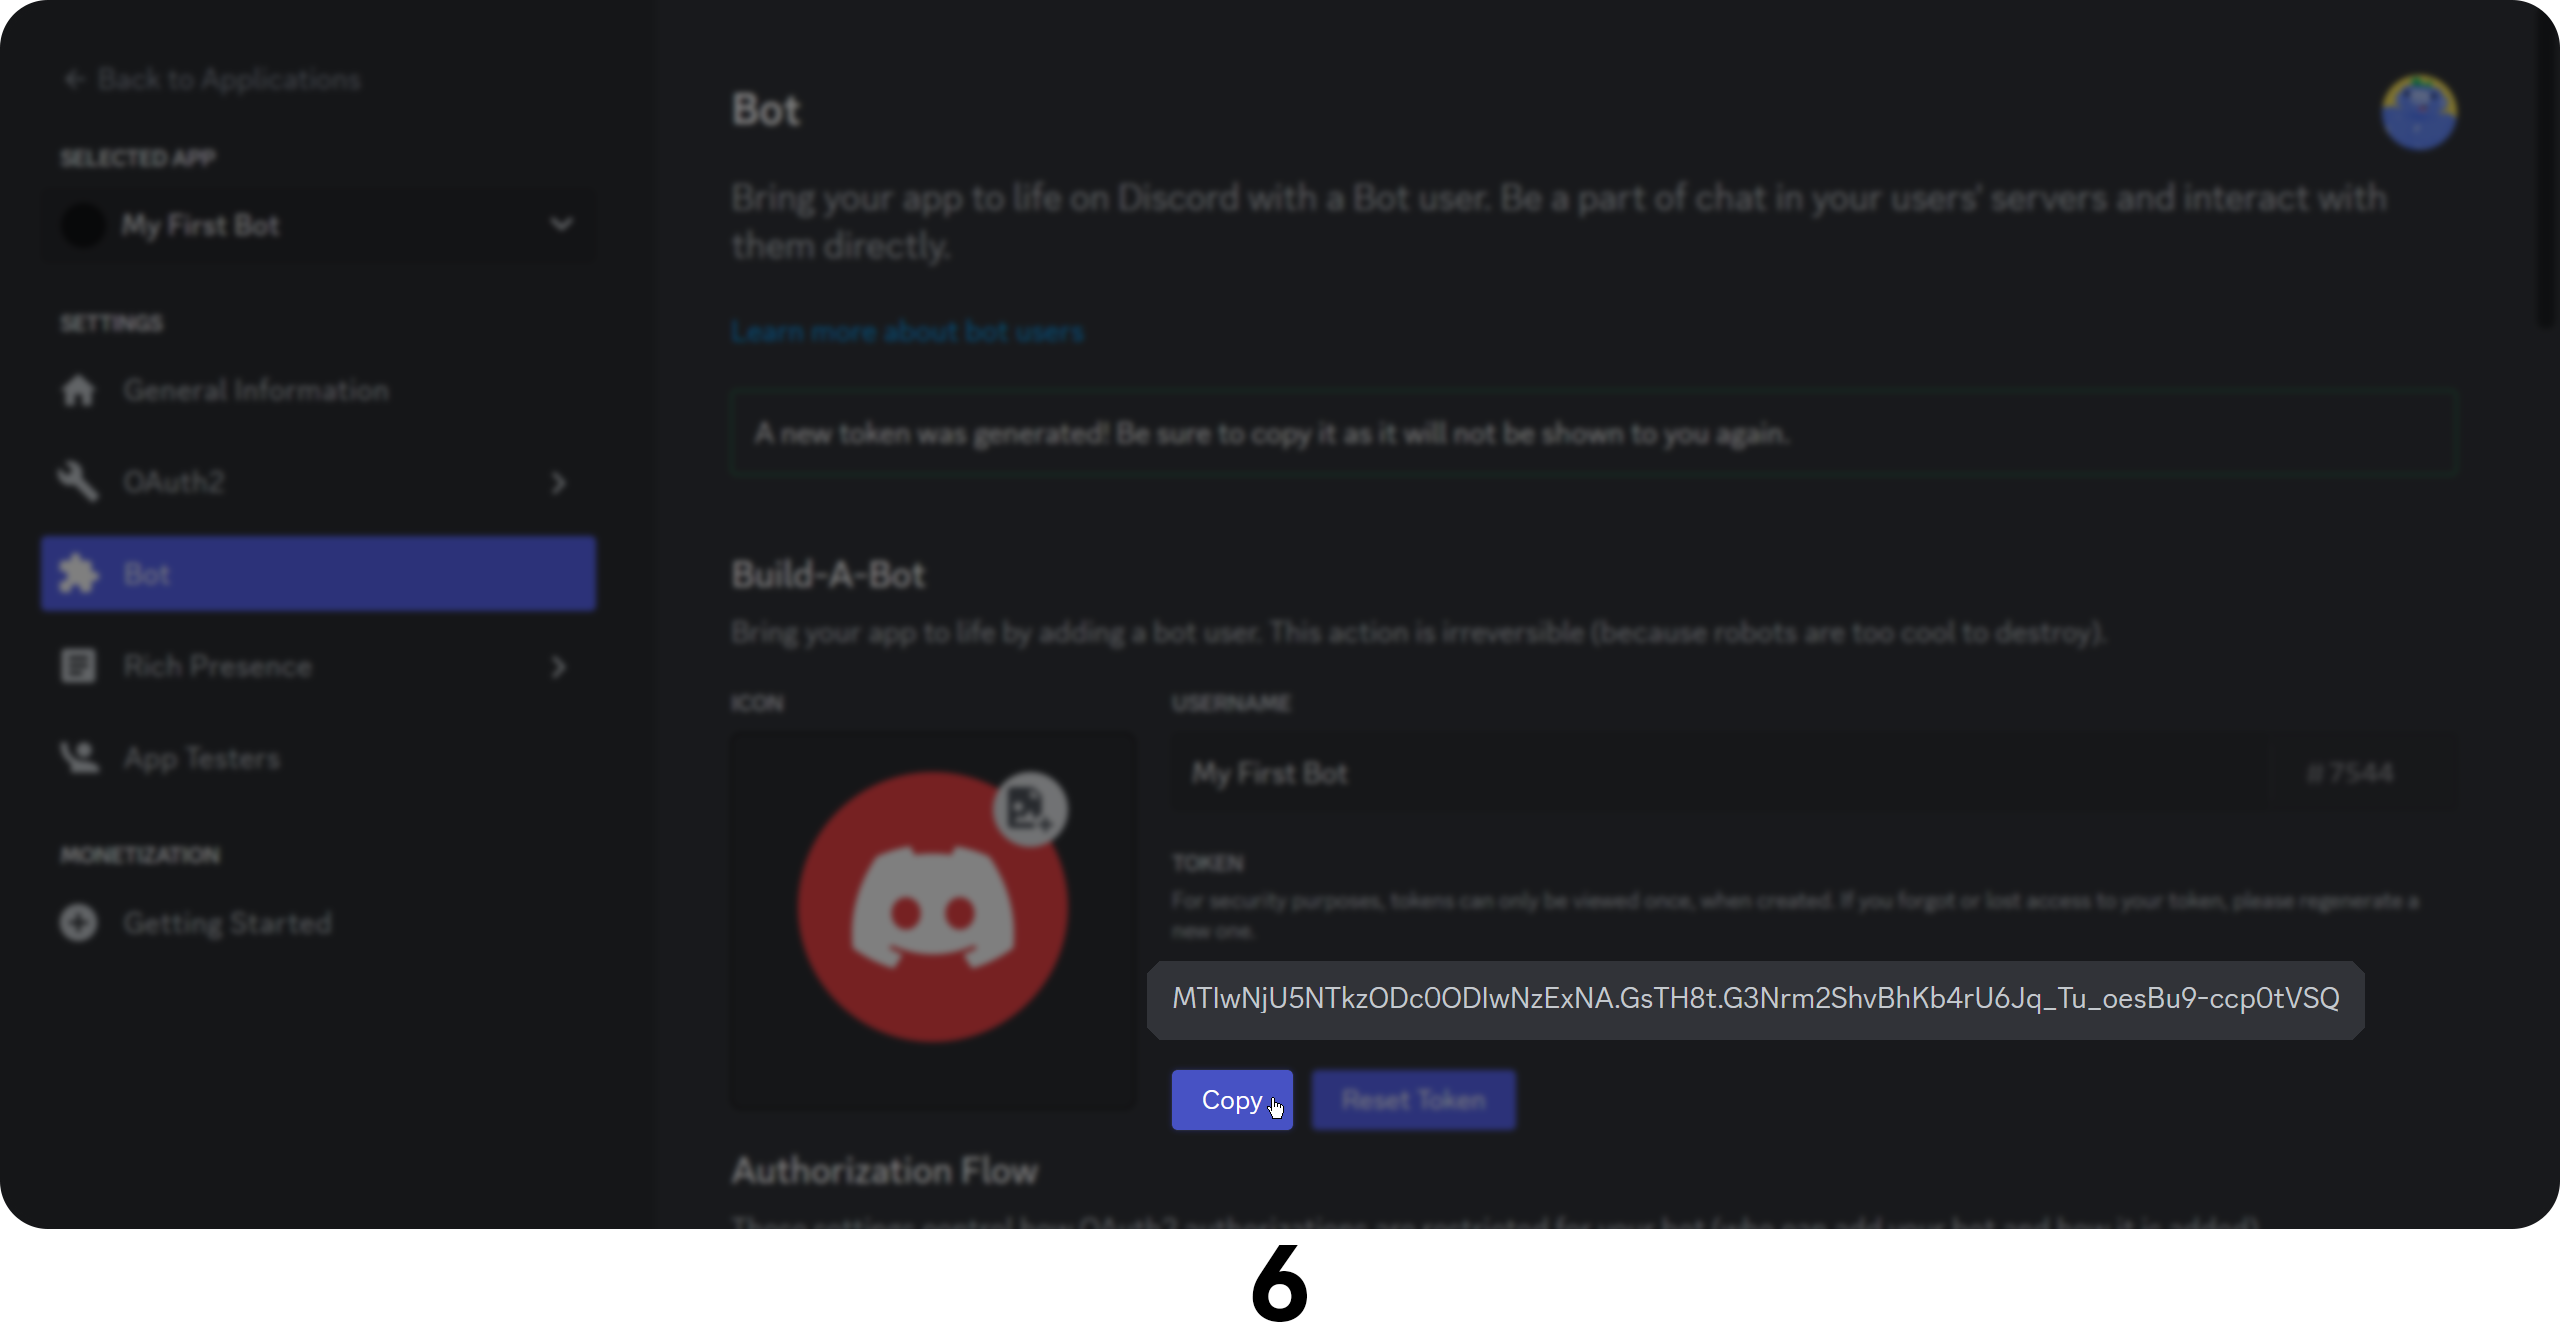
- You can now see the bot's token. Take note of it because we will need it once we start coding. Also, do not share the bot's token, no matter what! Once a person has the token, they have full access to the bot
- As an additional step, if you don't want anyone else to be able to invite your bot to their server, scroll down on the "Bot" tab, uncheck the "Public Bot" option, and click the "Save Changes" button
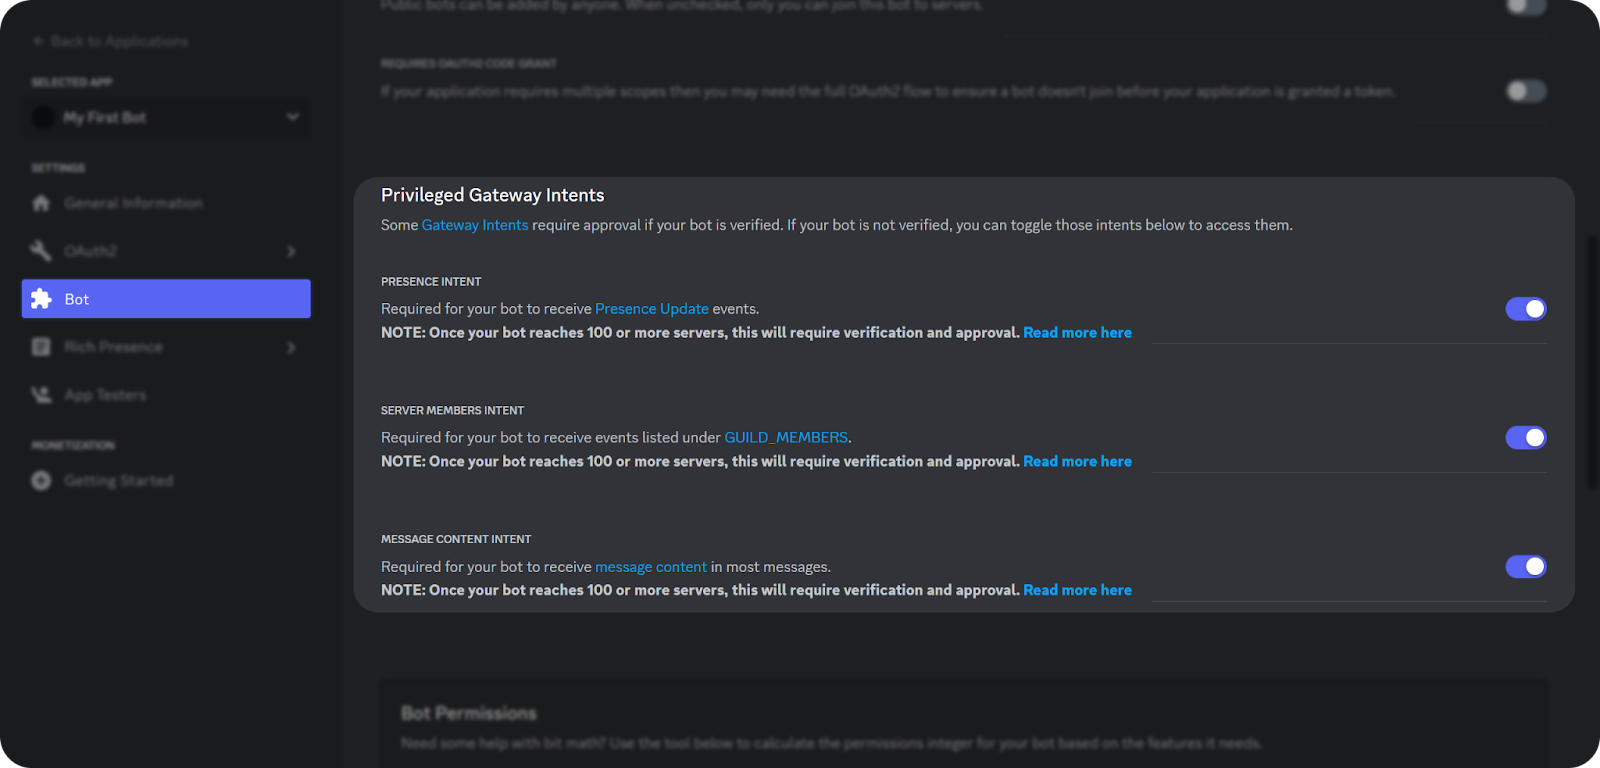
Step two: Enable intents
Your bot will need to access specific data like message contents, member information, and presences. For your bot to be able to access them, you need to enable Privileged Gateway Intents. Gateway intents will help your bot with processing, especially if you're working with a large number of items. To make sure you won't come across any issues in the future, enable the intents by navigating to the "Bot" tab of the developer portal and enabling "Presence Intent," "Server Members Intent," and "Message Content Intent."
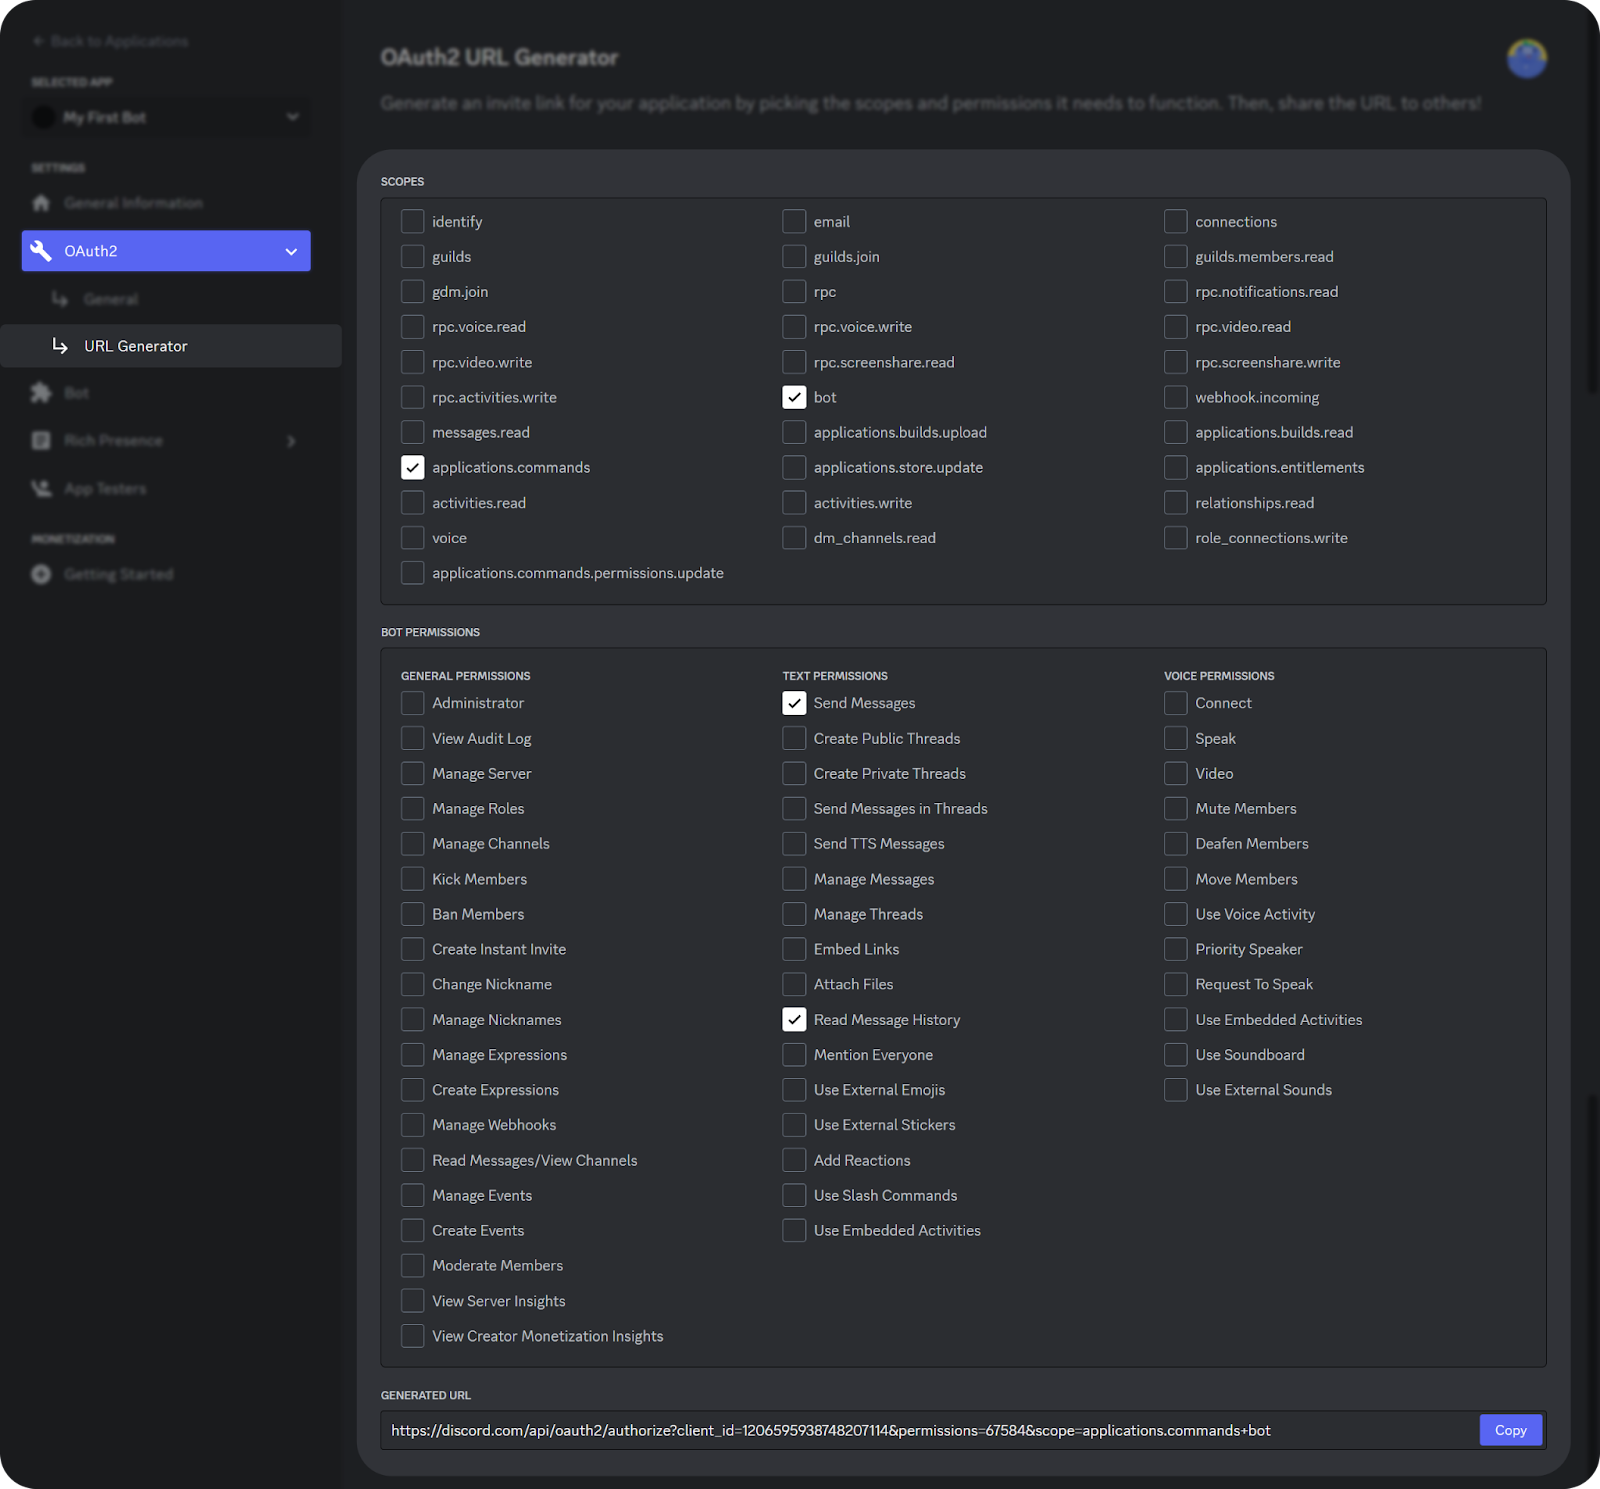
Step three: Invite the bot
We mentioned that you need invite links to add bots to your server, and getting one for your bot is easy! Just head to the "URL Generator" tab (Under "OAuth2") and check the boxes you see in the image below. As you check them, you'll see that a link at the bottom of the page will change. That's your invite link! After everything is done, copy the link, paste it into your browser, and complete the invite process.
Step four: Code the bot
Our example will be a basic auto-respond bot written in Python (if you don't have Python on your PC, you can download it here. When a user sends a "Ping" message, the bot will respond with "Pong!" You can also see what each function does in the comments in the code. You should create a .py file (which you can do with a basic text editor) with the contents below. We're going to assume your file name is "bot.py."
# Import required libraries
import discord
from discord.ext import commands
from discord import Interaction

# Assign a prefix to the bot and enable all intents
client = commands.Bot(command_prefix=".", intents = discord.Intents.all())

# Run the bot and sync the commands
@client.event
async def on_ready():
    await client.tree.sync()
    print(f"Logged in as {client.user.name}")

# Define the ping command to display the latency
@client.tree.command(name="ping", description="This command will display the latency of the bot.")
async def ping(interaction: Interaction):
    bot_latency = round(client.latency * 1000)
    await interaction.response.send_message(f"Pong! My latency is `{bot_latency}ms`!")

# Define the token and run the bot. Don't forget to replace the your_token_here part with your actual token
client.run("your_token_here")
Step five: Run the bot
There are multiple Python libraries for Discord bots, but we used the most popular one, discord.py. To run your bot, you should have the discord.py downloaded. To do that, you need to run the command below in your terminal:
- for Windows: py -3 -m pip install -U discord.py
- for macOS: python3 -m pip install -U discord.py
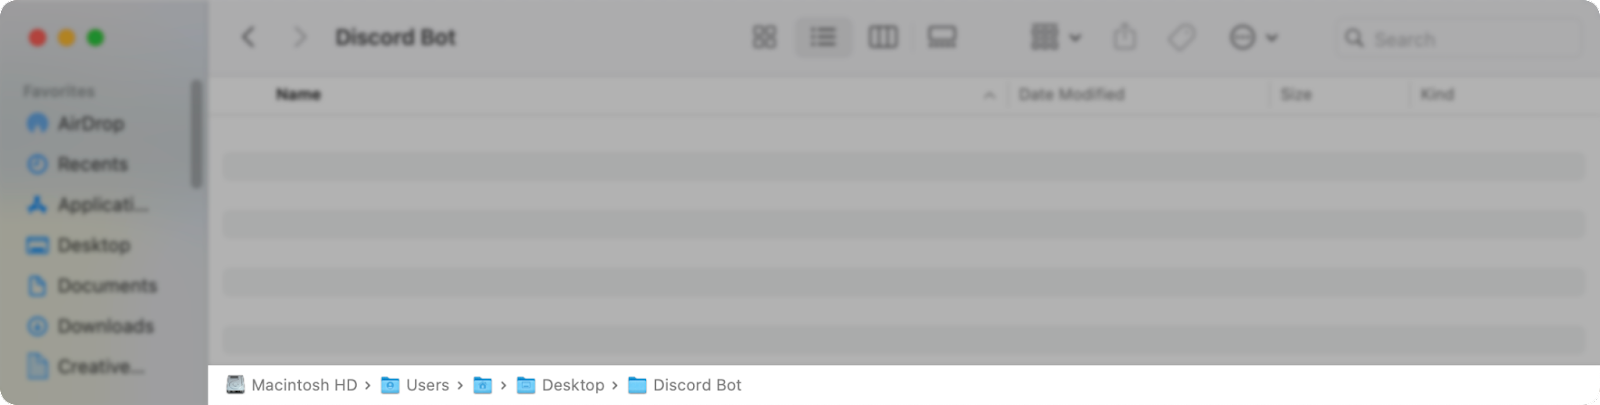
After downloading discord.py, you can now run your bot! Head to the directory where the .py file is and open a terminal. A quick way to open a terminal in the focused directory is to:
- Windows: Open the folder in Windows Explorer, click the path bar, write "cmd" and press enter

- MacOS: Control-click on the folder in the path bar and click "Open in Terminal." If you don't see the path bar, do View > Show Path Bar
Once you're inside the terminal, use the run command to run your bot:
- for Windows: py bot.py
- for macOS: python3 bot.py
Once you do, you'll see that your bot will become online. Per our code, you'll see a "Logged in as [BotName]" message in your terminal, which means your bot is now online and running!
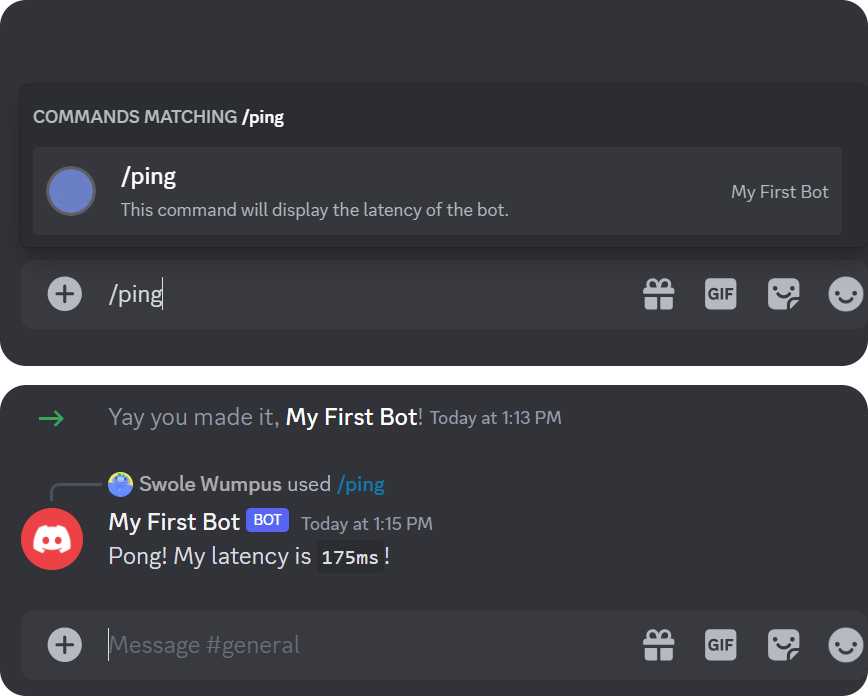
Step six: Test the bot
The final step! Let's try out the ping command and see if our bot works. Since we're using slash commands, let's type "/ping" and see if the command is recognized by Discord. If you don't see the command popup above the message box once you write down the code, you might want to refresh your client (CTRL +R.) The bot will respond once we send the code (by pressing enter)!
Whop Discord bot
If you are a seller on Whop, you'll be glad to know that Whop has its own Discord bot! If your product has a Discord app installed, you'll need to invite the Whop Bot to your servers for the app to work properly. Once you've invited it, you can configure the bot for multiple functions like assigning roles to your customers, utilizing webhooks, and organizing raffles.
The setup and interactions of the Whop bot is done via the Whop Dashboard instead of commands. Thus, you won't be able to see or use commands once you invite the Whop Bot to your server. The Whop Dashboard provides a centralized platform for all bot-related actions. You don't have to worry about remembering specific commands or digging through multiple menus to find what you're looking for!
Sell access to your Discord community with Whop!
Generating an income with your server has never been easier. Whop will help you promote and monetize your server while assisting you with every step along the way!
👉 With Whop's hassle-free system, signing up and beginning your journey takes less than 10 minutes. Whether you're a new business owner or a seasoned entrepreneur, Whop provides the tools you need to streamline your operation. Start selling on Whop today!