Automated Messages are a great way to establish contact with your members. Learn how to use this brand-new feature in this guide.
Key takeaways
- Automated welcome and exit messages boost member retention and provide valuable feedback on why users leave.
- New lead automation captures visitors who browse 45+ seconds without purchasing, helping convert interested prospects.
- Personalization variables like {recipient_name} make automated messages feel personal and increase member engagement.
Automated Messages, as its name suggests, is a feature that allows you to send messages to the members of your whop when they join or leave.
Welcoming users when they join your whop is a common thing to do. It increases member retention and establishes communication between you and the member.
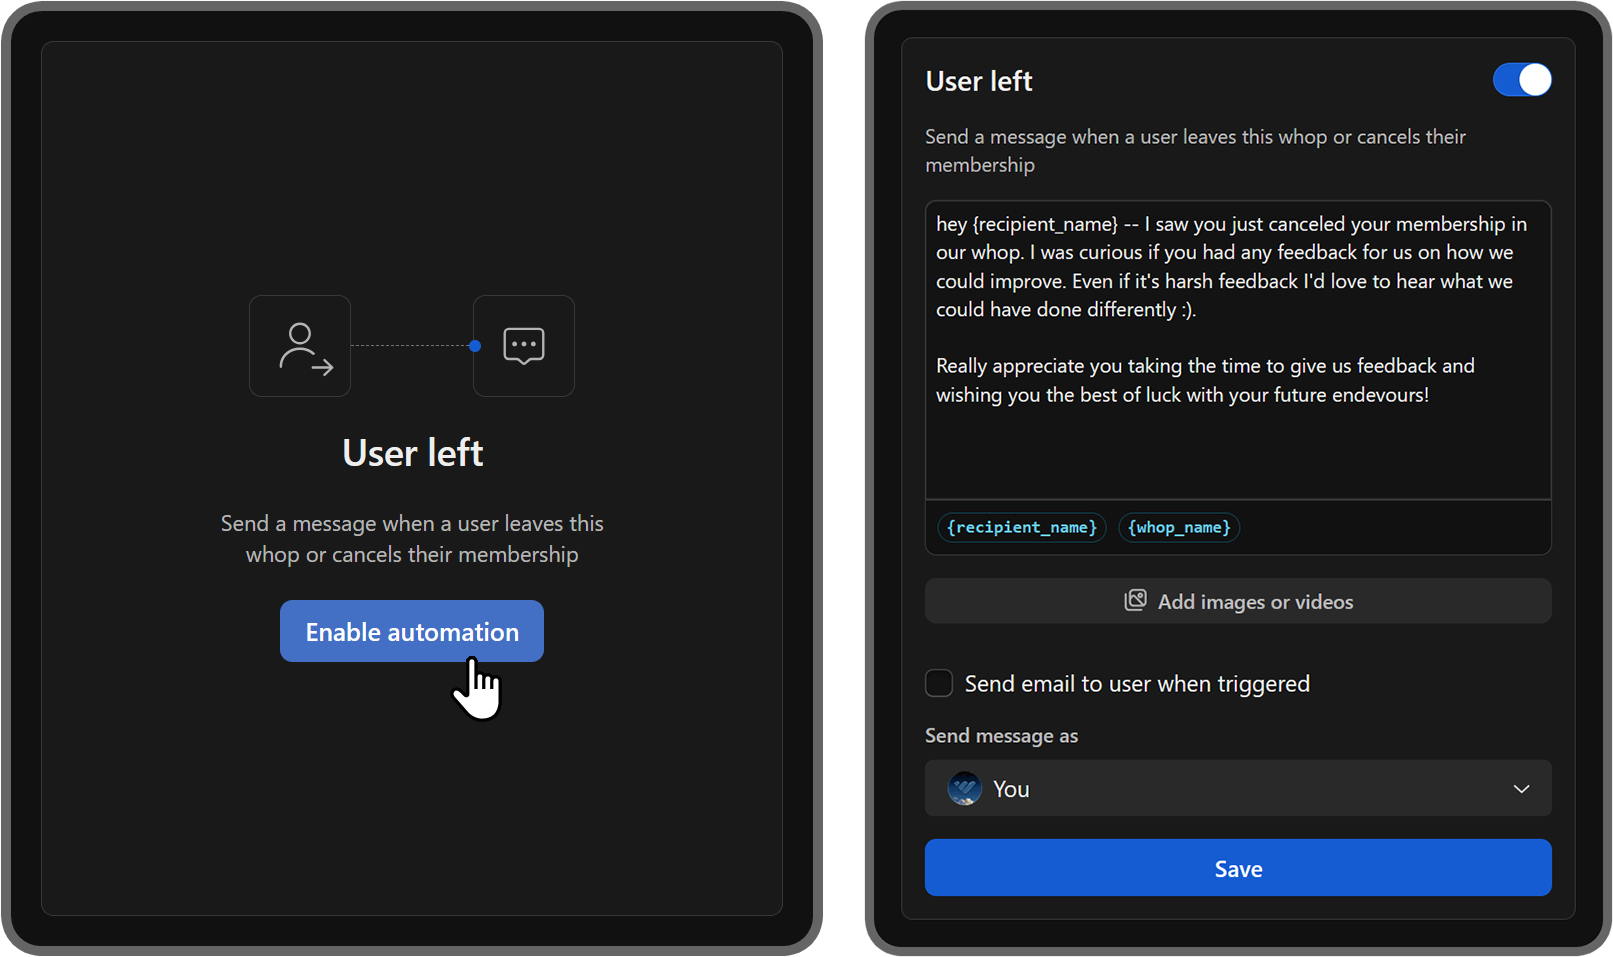
Sending them messages when they leave your whop, on the other hand, is a great way to get feedback and bid farewell to the user. It is one of the most important feedback types you can get since the user will be able to point out the very thing that made them leave – allowing you to improve your whop.
Tip: Another great way of gathering feedback from your members is the Suggestions App.
Establishing contact will make your members feel like they’re being seen. This is important for the user to feel connected to your whop so that they can be a permanent customer of yours.
How to turn on Automated Messages for your whop
Turning on the Automated Messages feature for your whop is really easy, and you can do it on both your desktop and mobile apps. Let’s start with the desktop.
Turning on Automated Messages on desktop
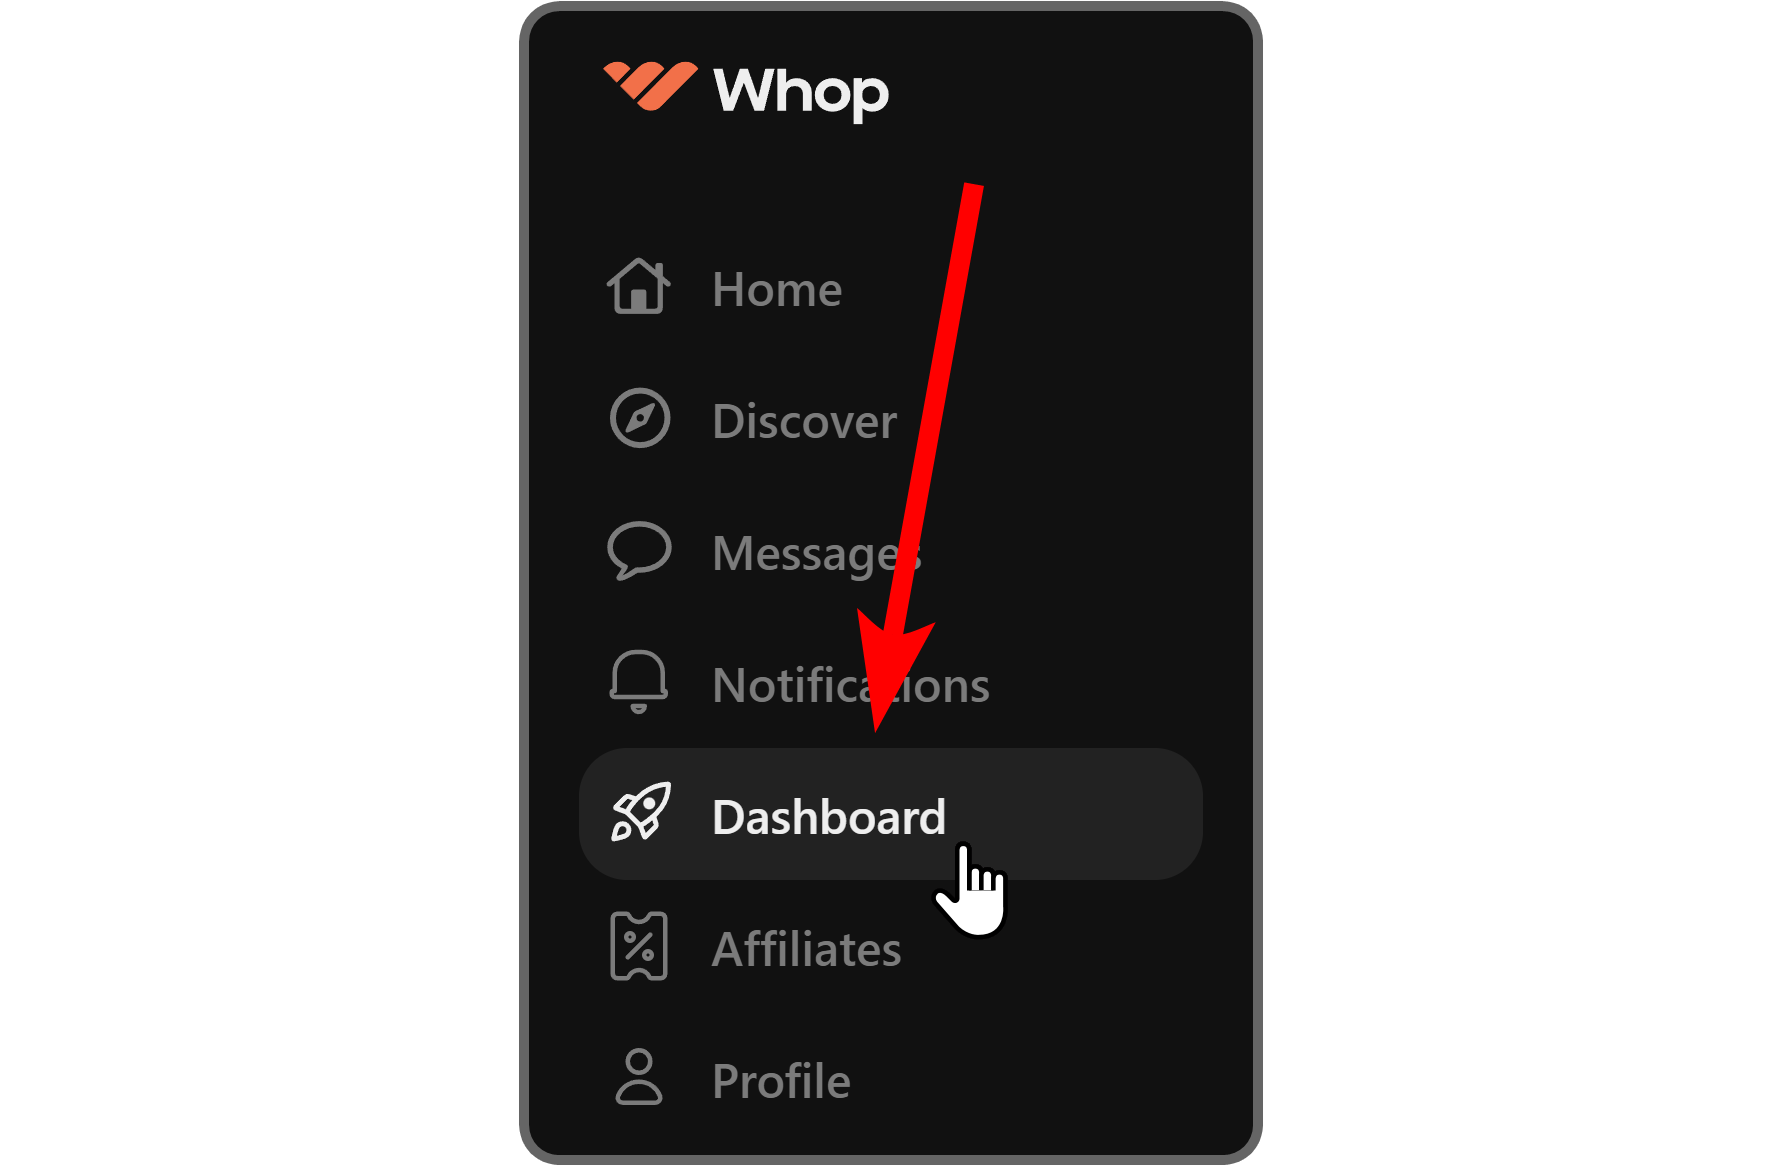
To turn on the Automated Messages on the desktop, the first thing you’re going to do is click on the Dashboard button on the left side of your screen.
This is going to take you to the dashboard where you can access all of the advanced settings of your whop.

In the dashboard, you’re going to see the sections and their categories at the left of your screen. There, you can access the users, promo codes, payouts, team settings, and more.
Let’s click on the Messages section button under the Marketing category to see the message automation settings.
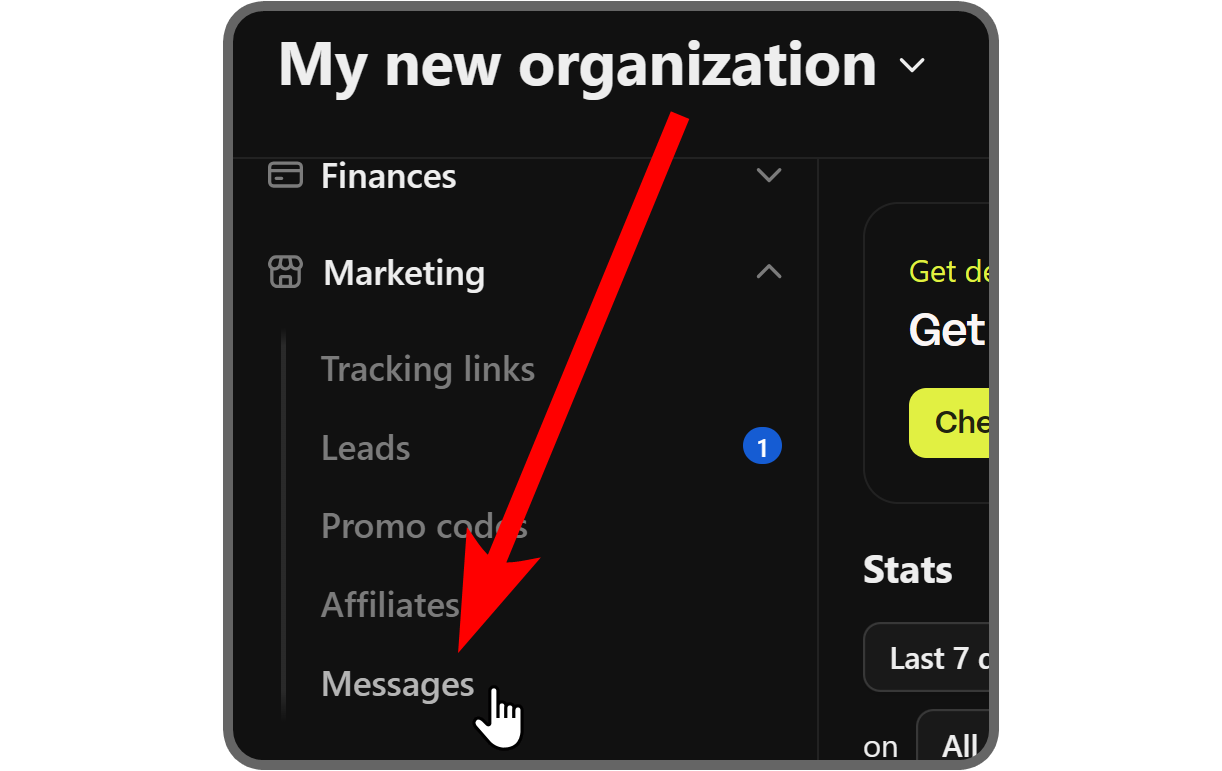
In the messages tab of your dashboard, you’re going to see four things: the whop you’re editing at the top left, the User joined card, the User left card, and the New lead card.
This is where you set up your message automations.
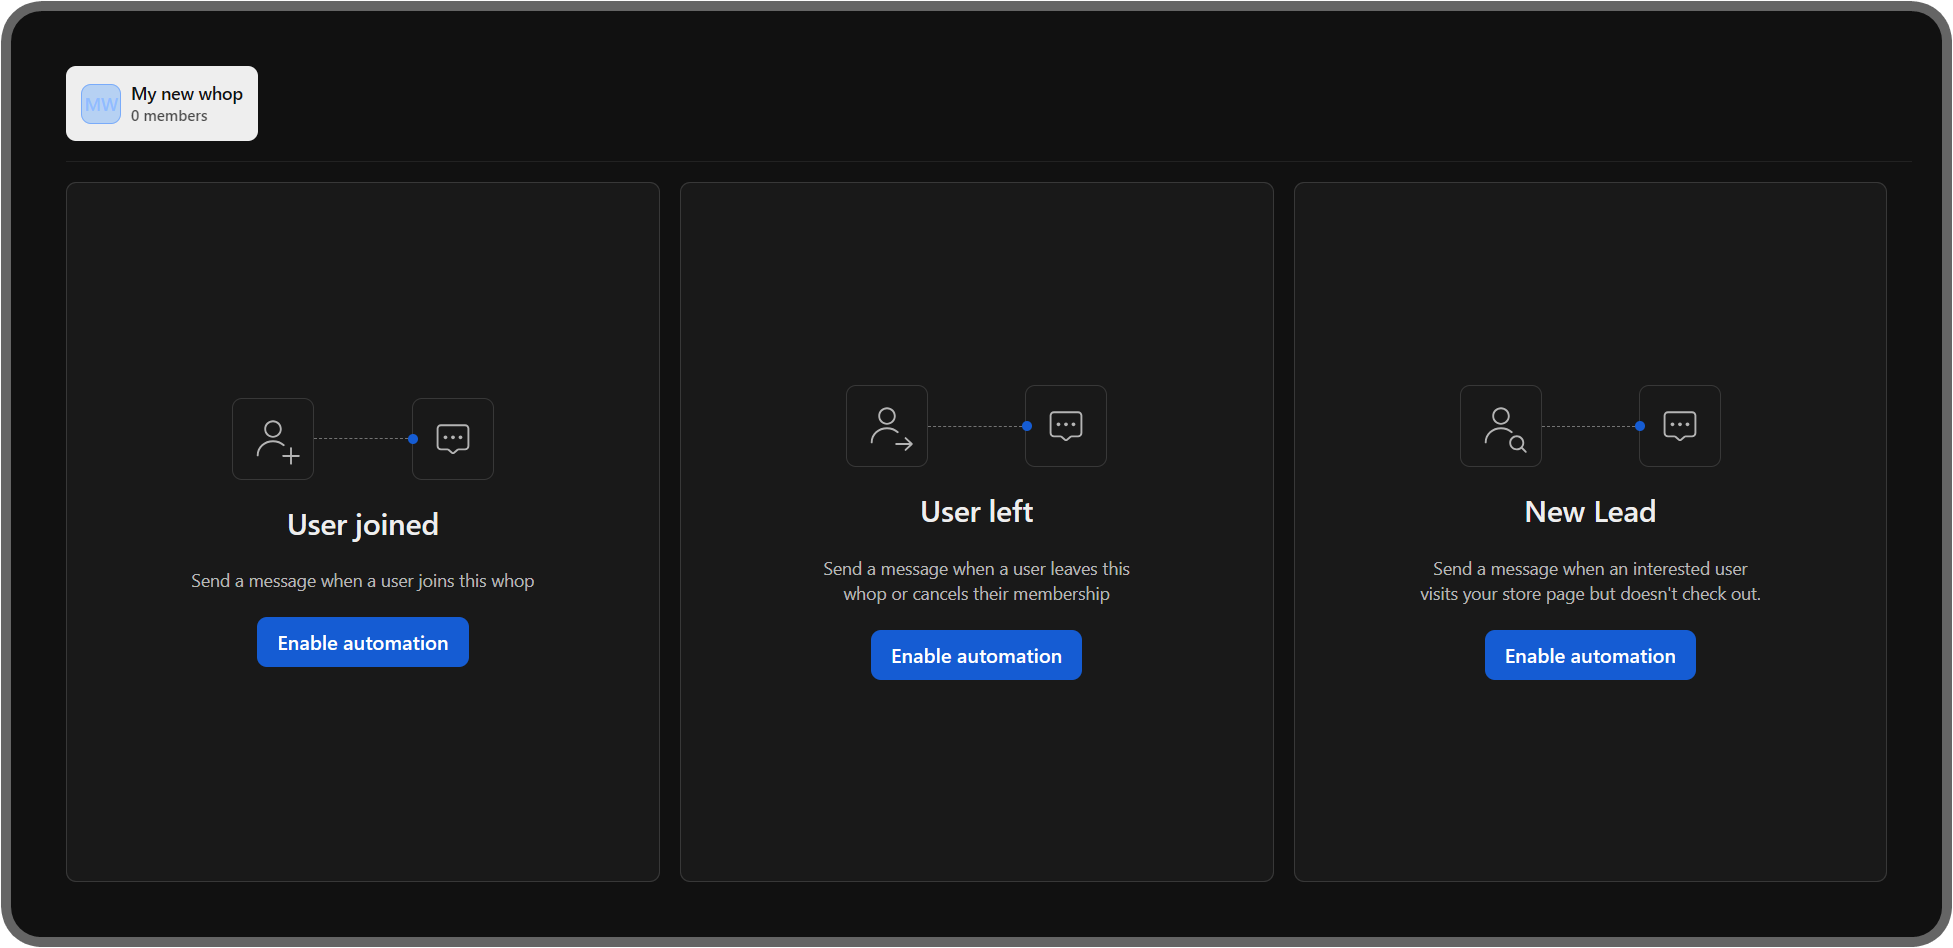
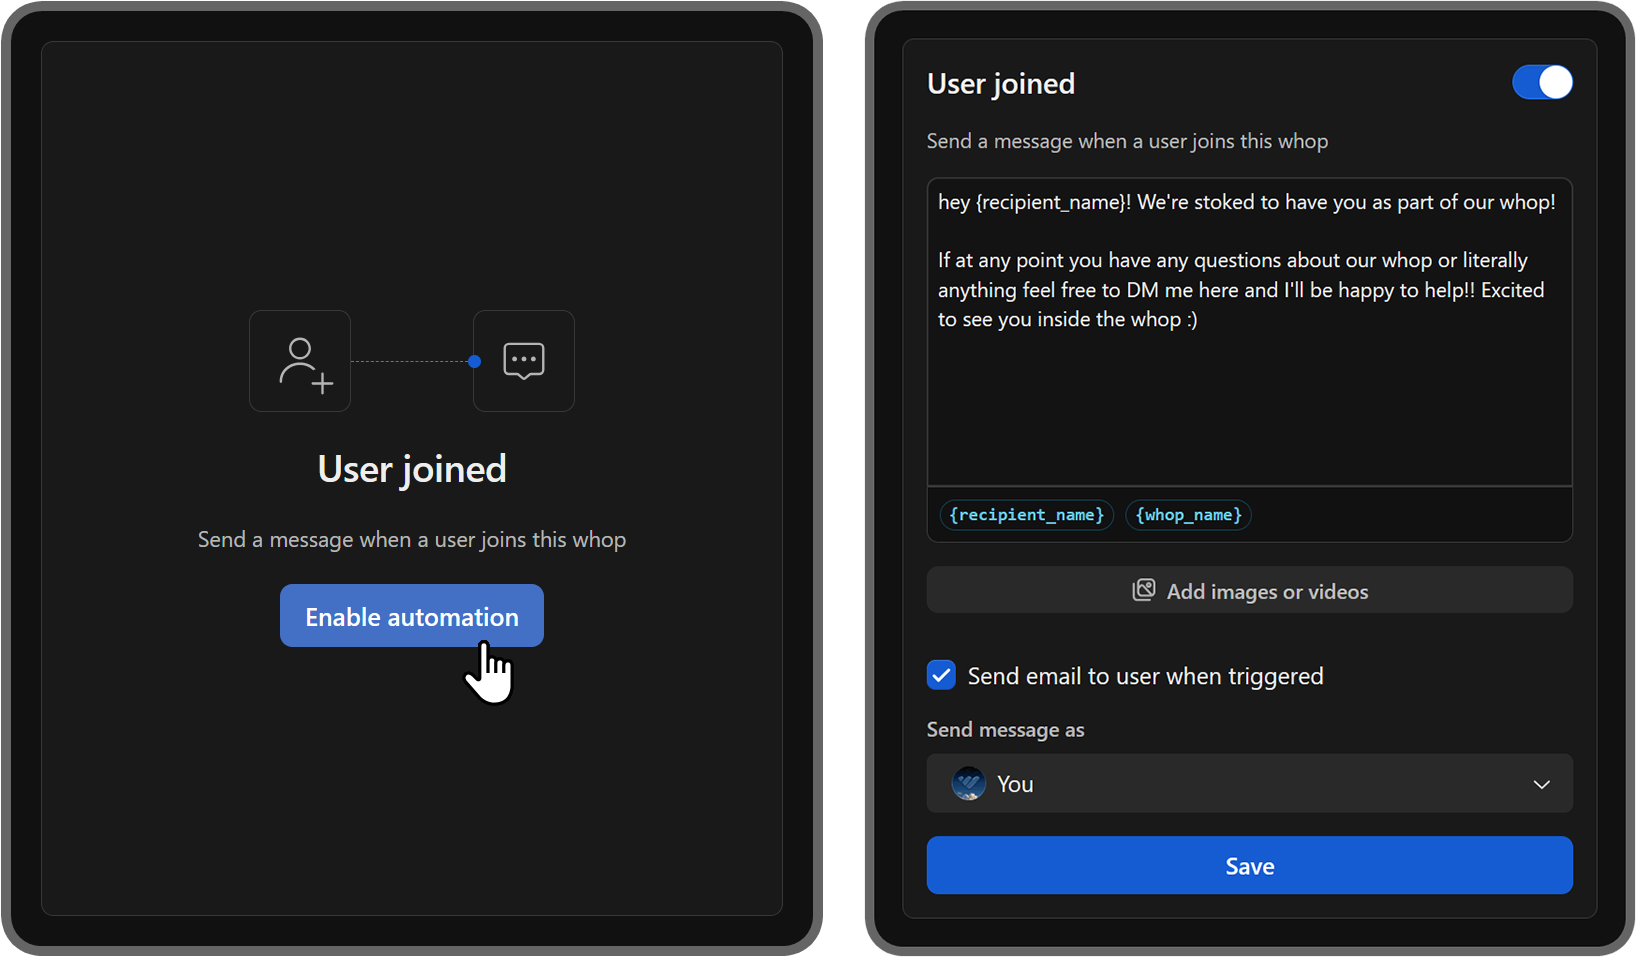
Let’s set up the User joined message automation first. After clicking on the Enable automation button on the card, the card will change into a form with six elements:
- The on/off button at the top right in case you want to disable the automation.
- The input field will be the message the feature sends when a member joins.
- The variables you can use in your message. These allow you to customize the message by automatically changing the variable to its respective content. For example, if you include {receipent_name} in your message, it will be changed to the actual name of the recipient when sent.
- Add images or videos button allows you to add files to your message but it’s currently only available for the Whop mobile app.
- The Send email to user when triggered checkbox will determine if you want the user to get an email about this message or not.
- The Send message as dropdown menu allows you to select a user from your whop staff, which the message will be sent as.
When you first enable the automation, it will have pre-determined content. After you’re done customizing it, click the Save button to save the automation.
Now, when people join your whop, they’re going to get messages from you automatically.
Clicking on the Enable automation button on the User left automation is going to display a form that’s exactly the same as the User joined form. Again, after you’re done customizing it, click Save to save the automation.
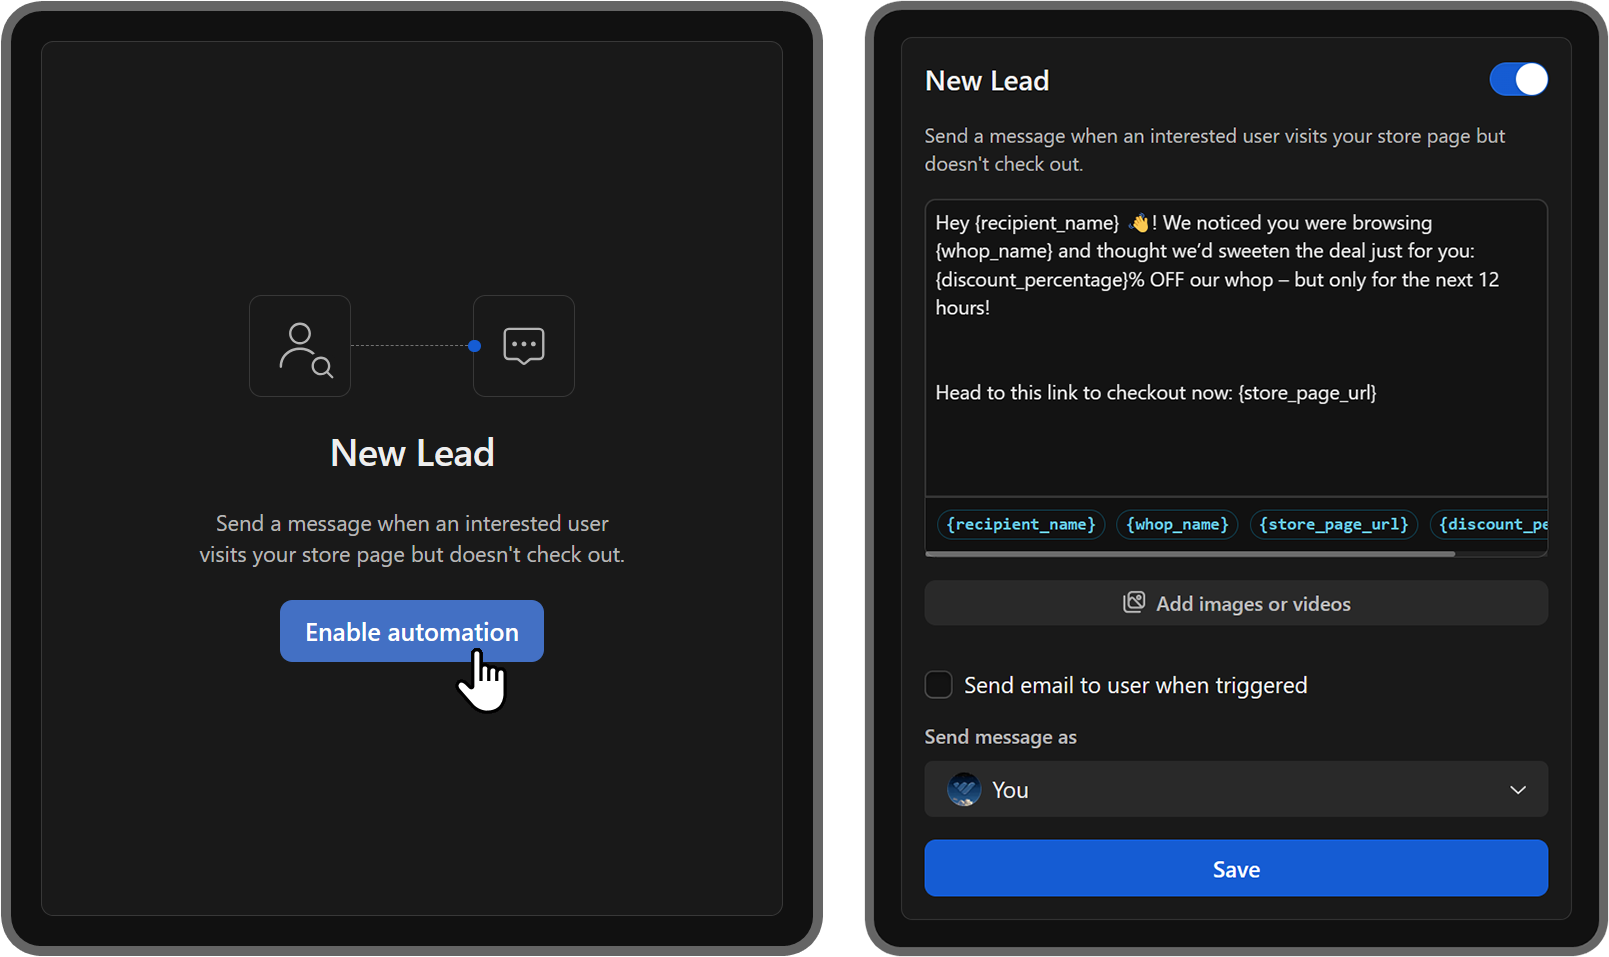
Just like others, clicking the Enable automation button of the New lead automation is going to enable the automated message and display its settings.
You can use variables, add images or videos, send email to user when triggered, and choose who to send the message as in the New lead automation as well.
The New lead automation will be triggered when a user visits your store page but doesn't buy access to your whop. In order to utilize this feature to its fullest, we're going to take a look at how you can use the Leads feature to generate leads in the next section.
How to use the Leads feature
To use the new Leads feature, you have to go to your dashboard first. You can do this by clicking on the Dashboard button on your navigation bar.
In the dashboard, click the Leads section button under the Marketing category to see the leads page of your dashboard.
Normally, you'd see a list of all the leads whop generated for you, but since you haven't set up the feature yet, you're going to be prompted to enable the popup promotion feature for your whop.
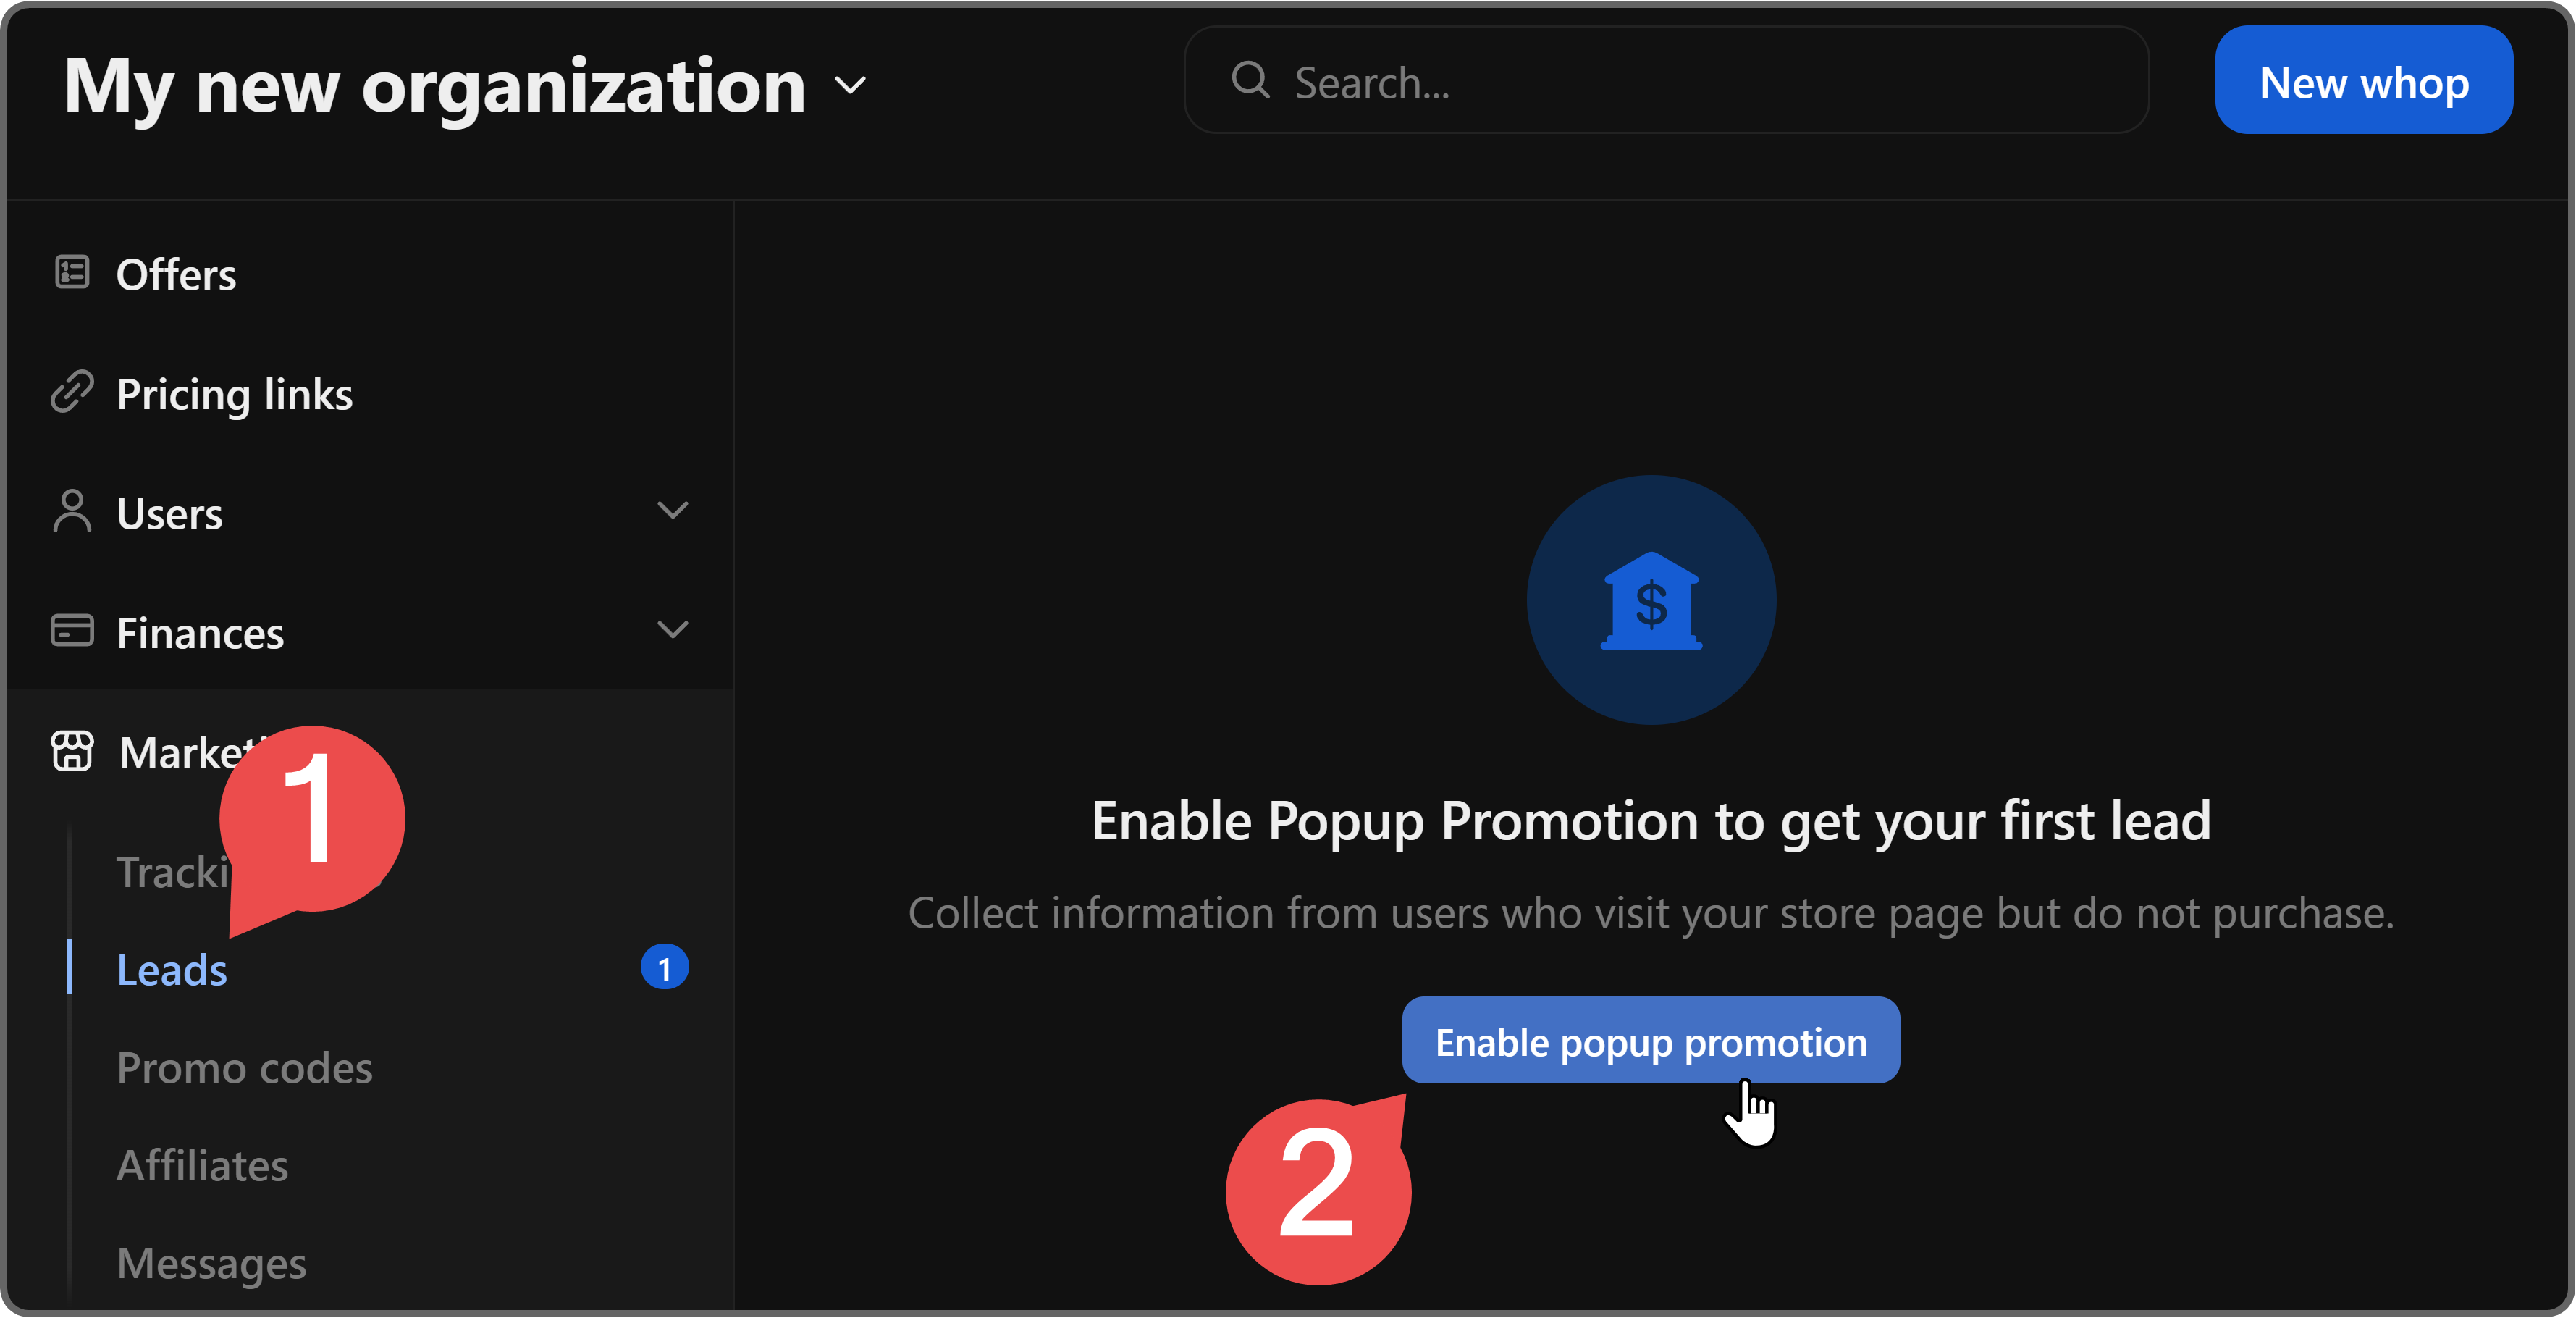
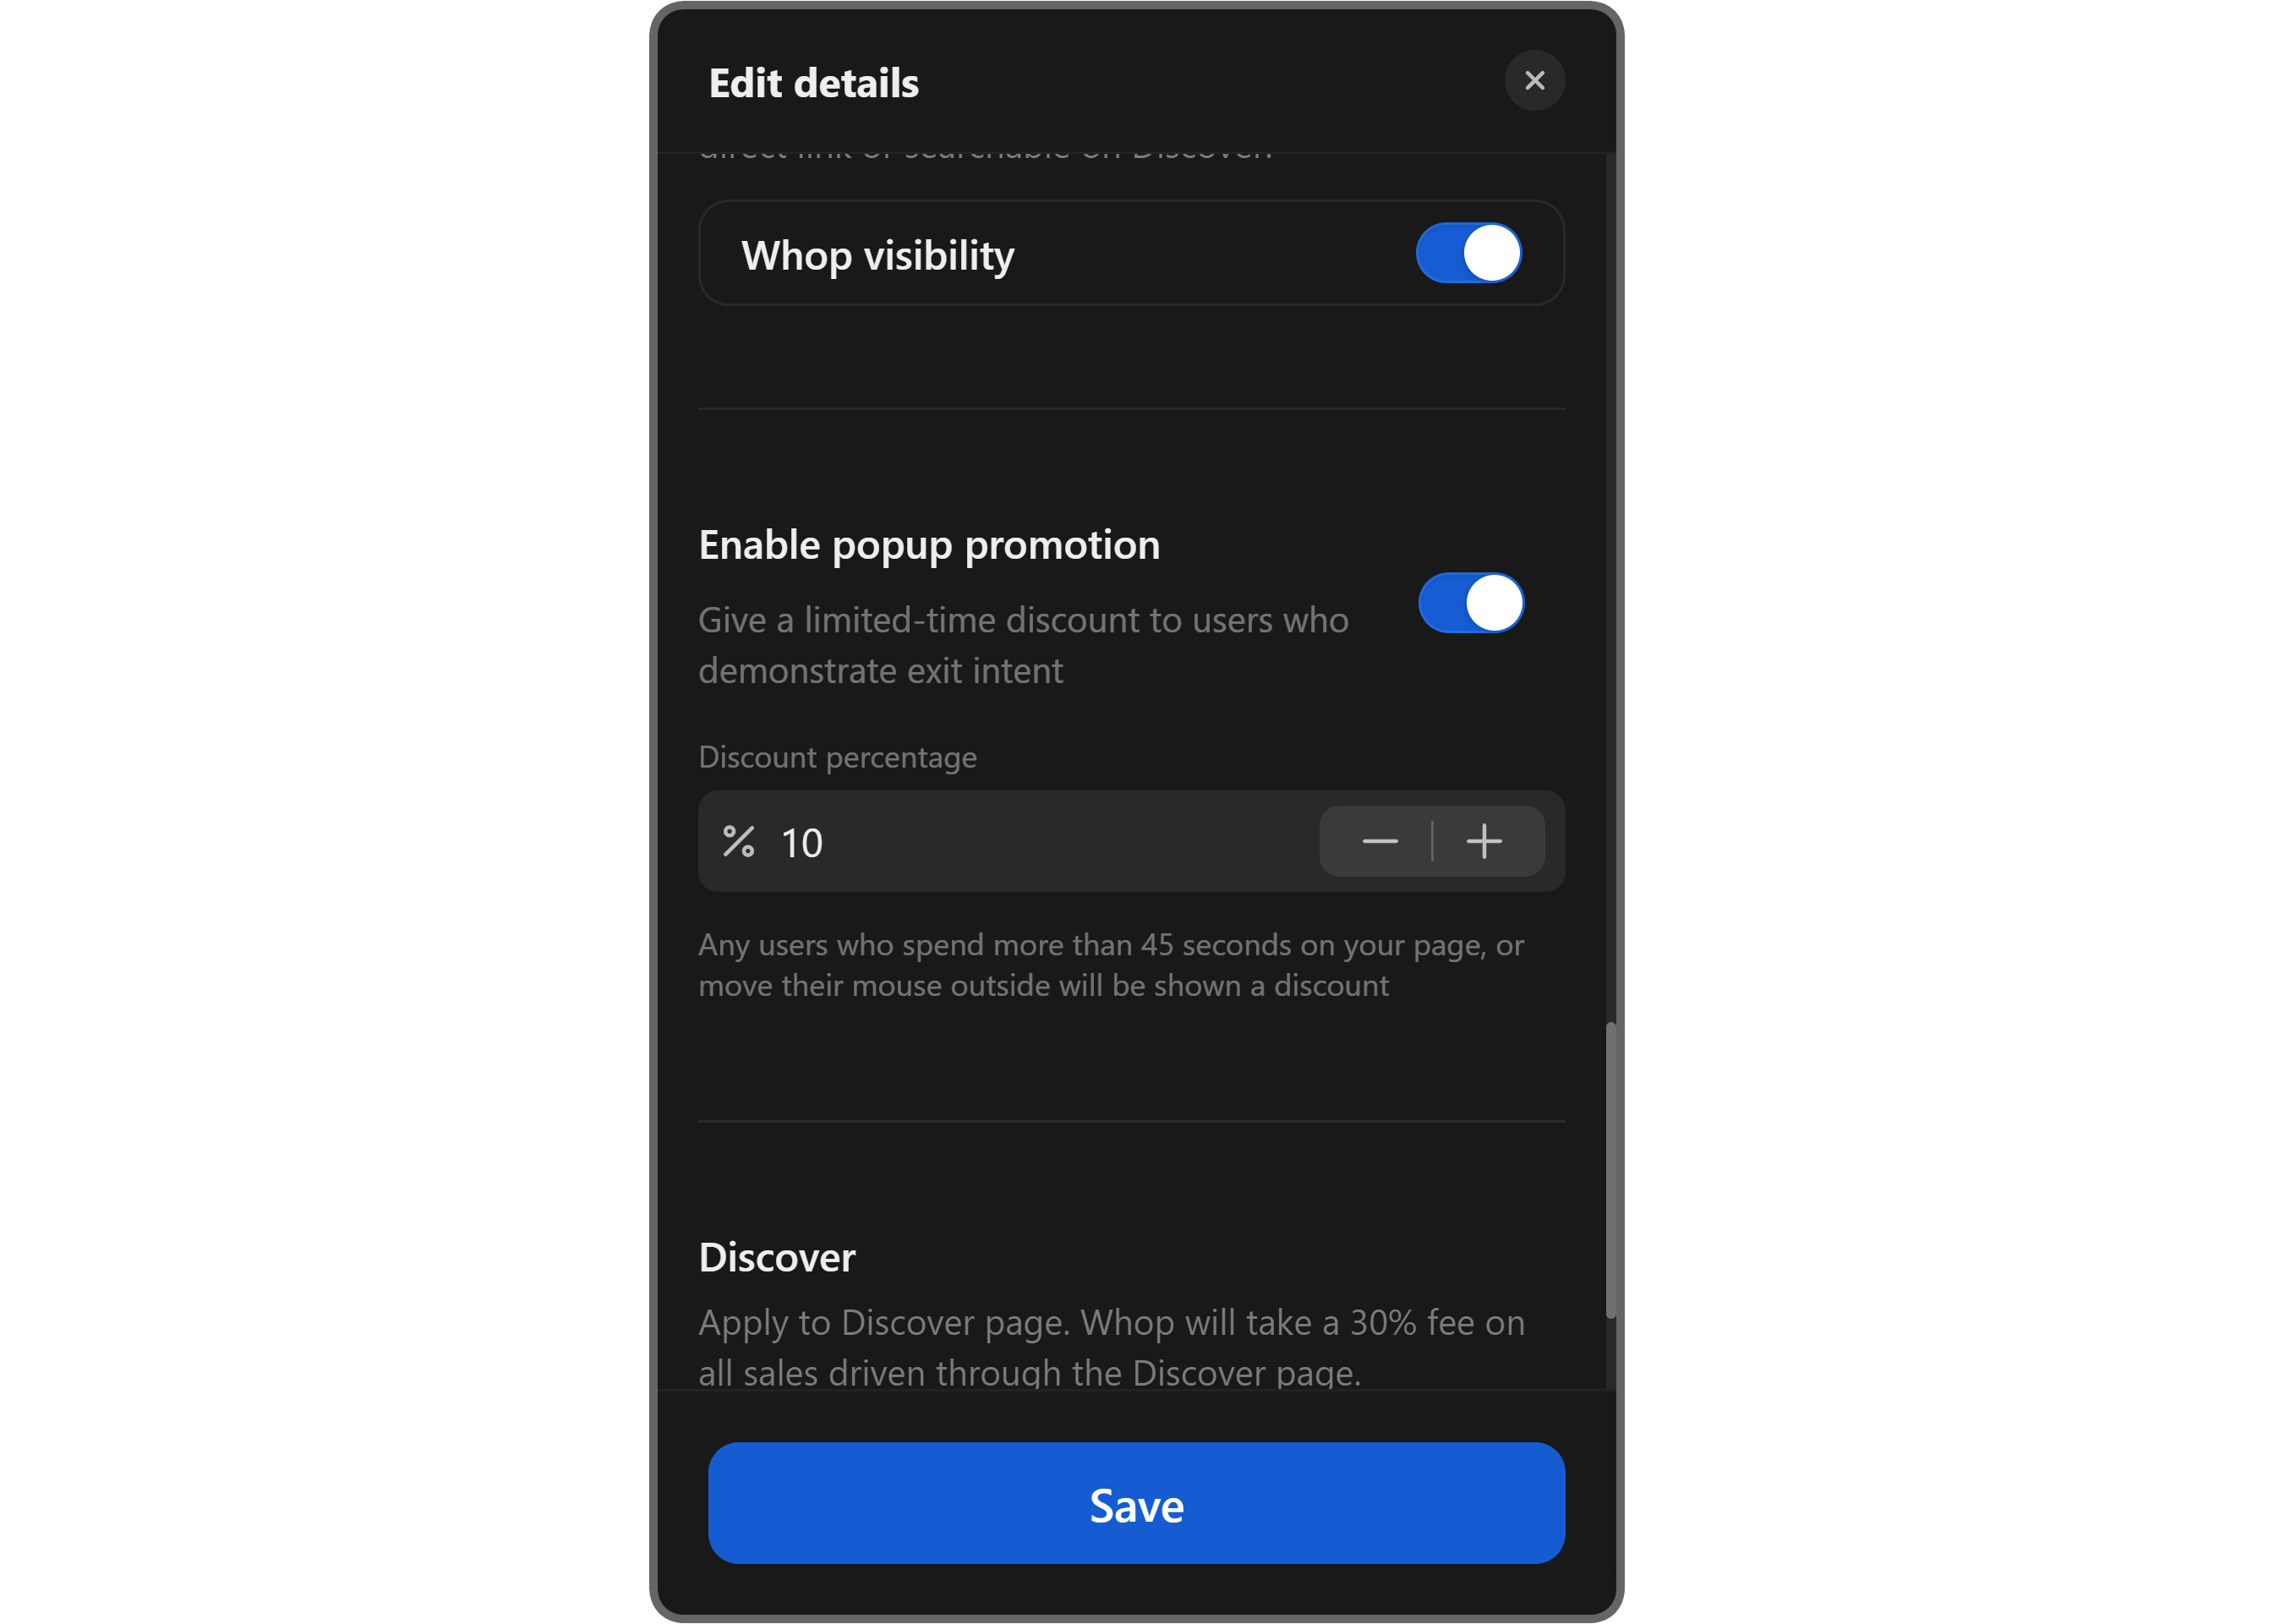
Clicking the Enable popup promotion button will direct you to your whop's store page and open the Edit details popup where you can adjust certain settings of your whop.
In the popup, enable the Enable popup promotion option and you'll see the Discount percentage field being displayed below it. There, you can adjust the discount you want to offer to users who have shown intent but didn't buy access to your whop.
After making changes in the popup, make sure to click the Save button to publish your changes.
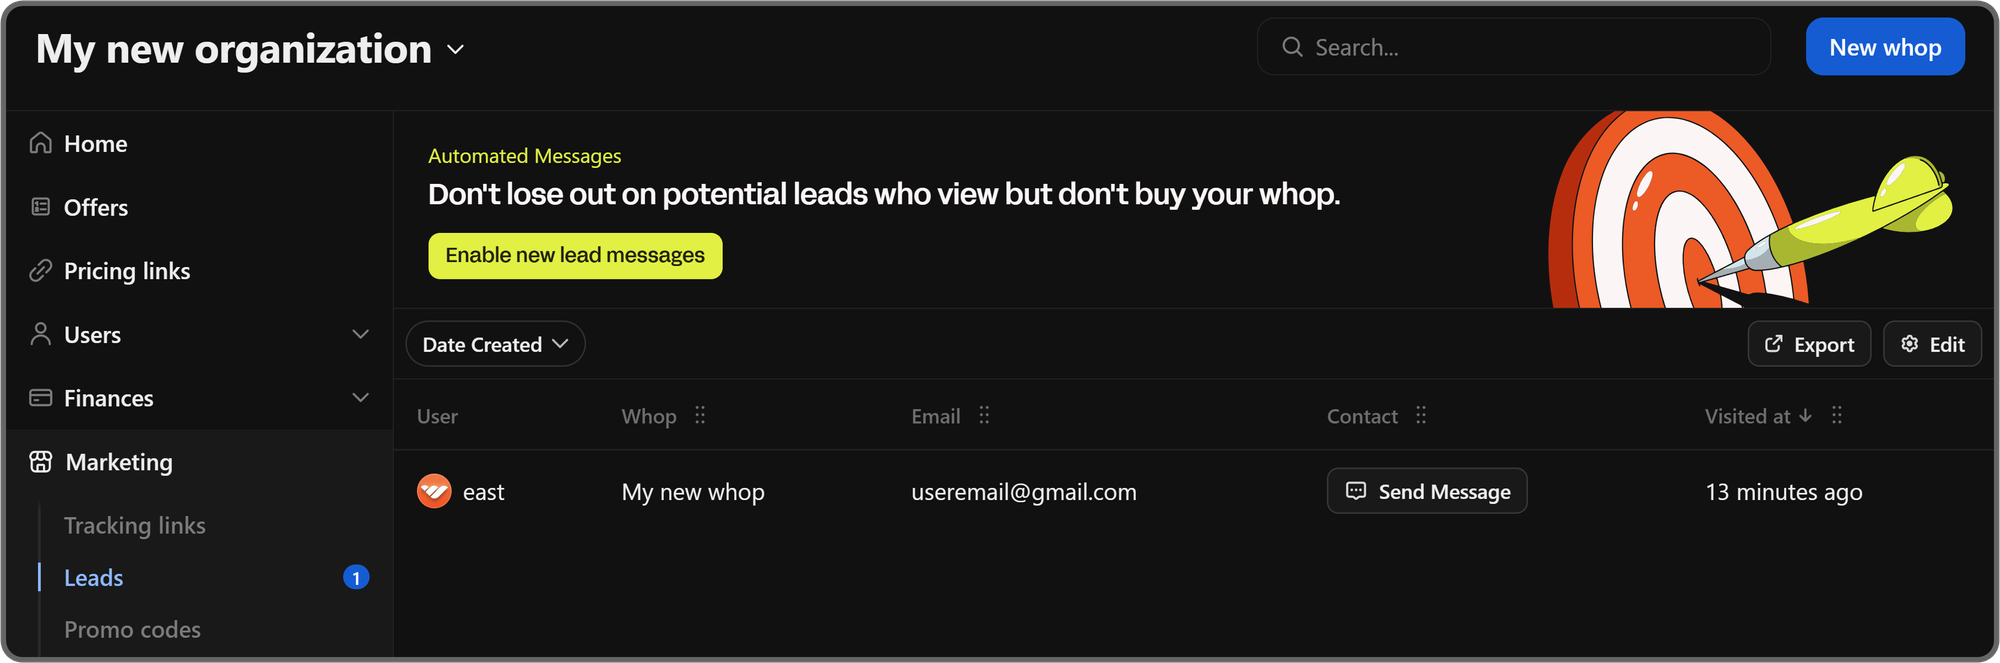
Once you're all done, you'll be able to see a list of users who have visited your store page and stayed there for more than 45 seconds or moved their mouse outside. In other words, your leads.
Here, you can see the users' usernames, email addresses, a Send message button, and when they visited your store page. If you've enabled the New lead automated message, they're also going to get a message as well.
Turning on Automated Messages on mobile
Turning on Automated Messages on the Whop mobile app is just as easy as doing so on desktop.
First, let’s press the Dashboard button at the bottom left of your screen. This is going to take you to your creator dashboard. There, you’re going to see your whops at the top of your screen – make sure you’re viewing the one you want to create automated messages on.
Then, scroll down a bit on the dashboard until you see the Messages section and the Automated Messages below it.
Let’s press on the Automated Messages card to go to its settings.

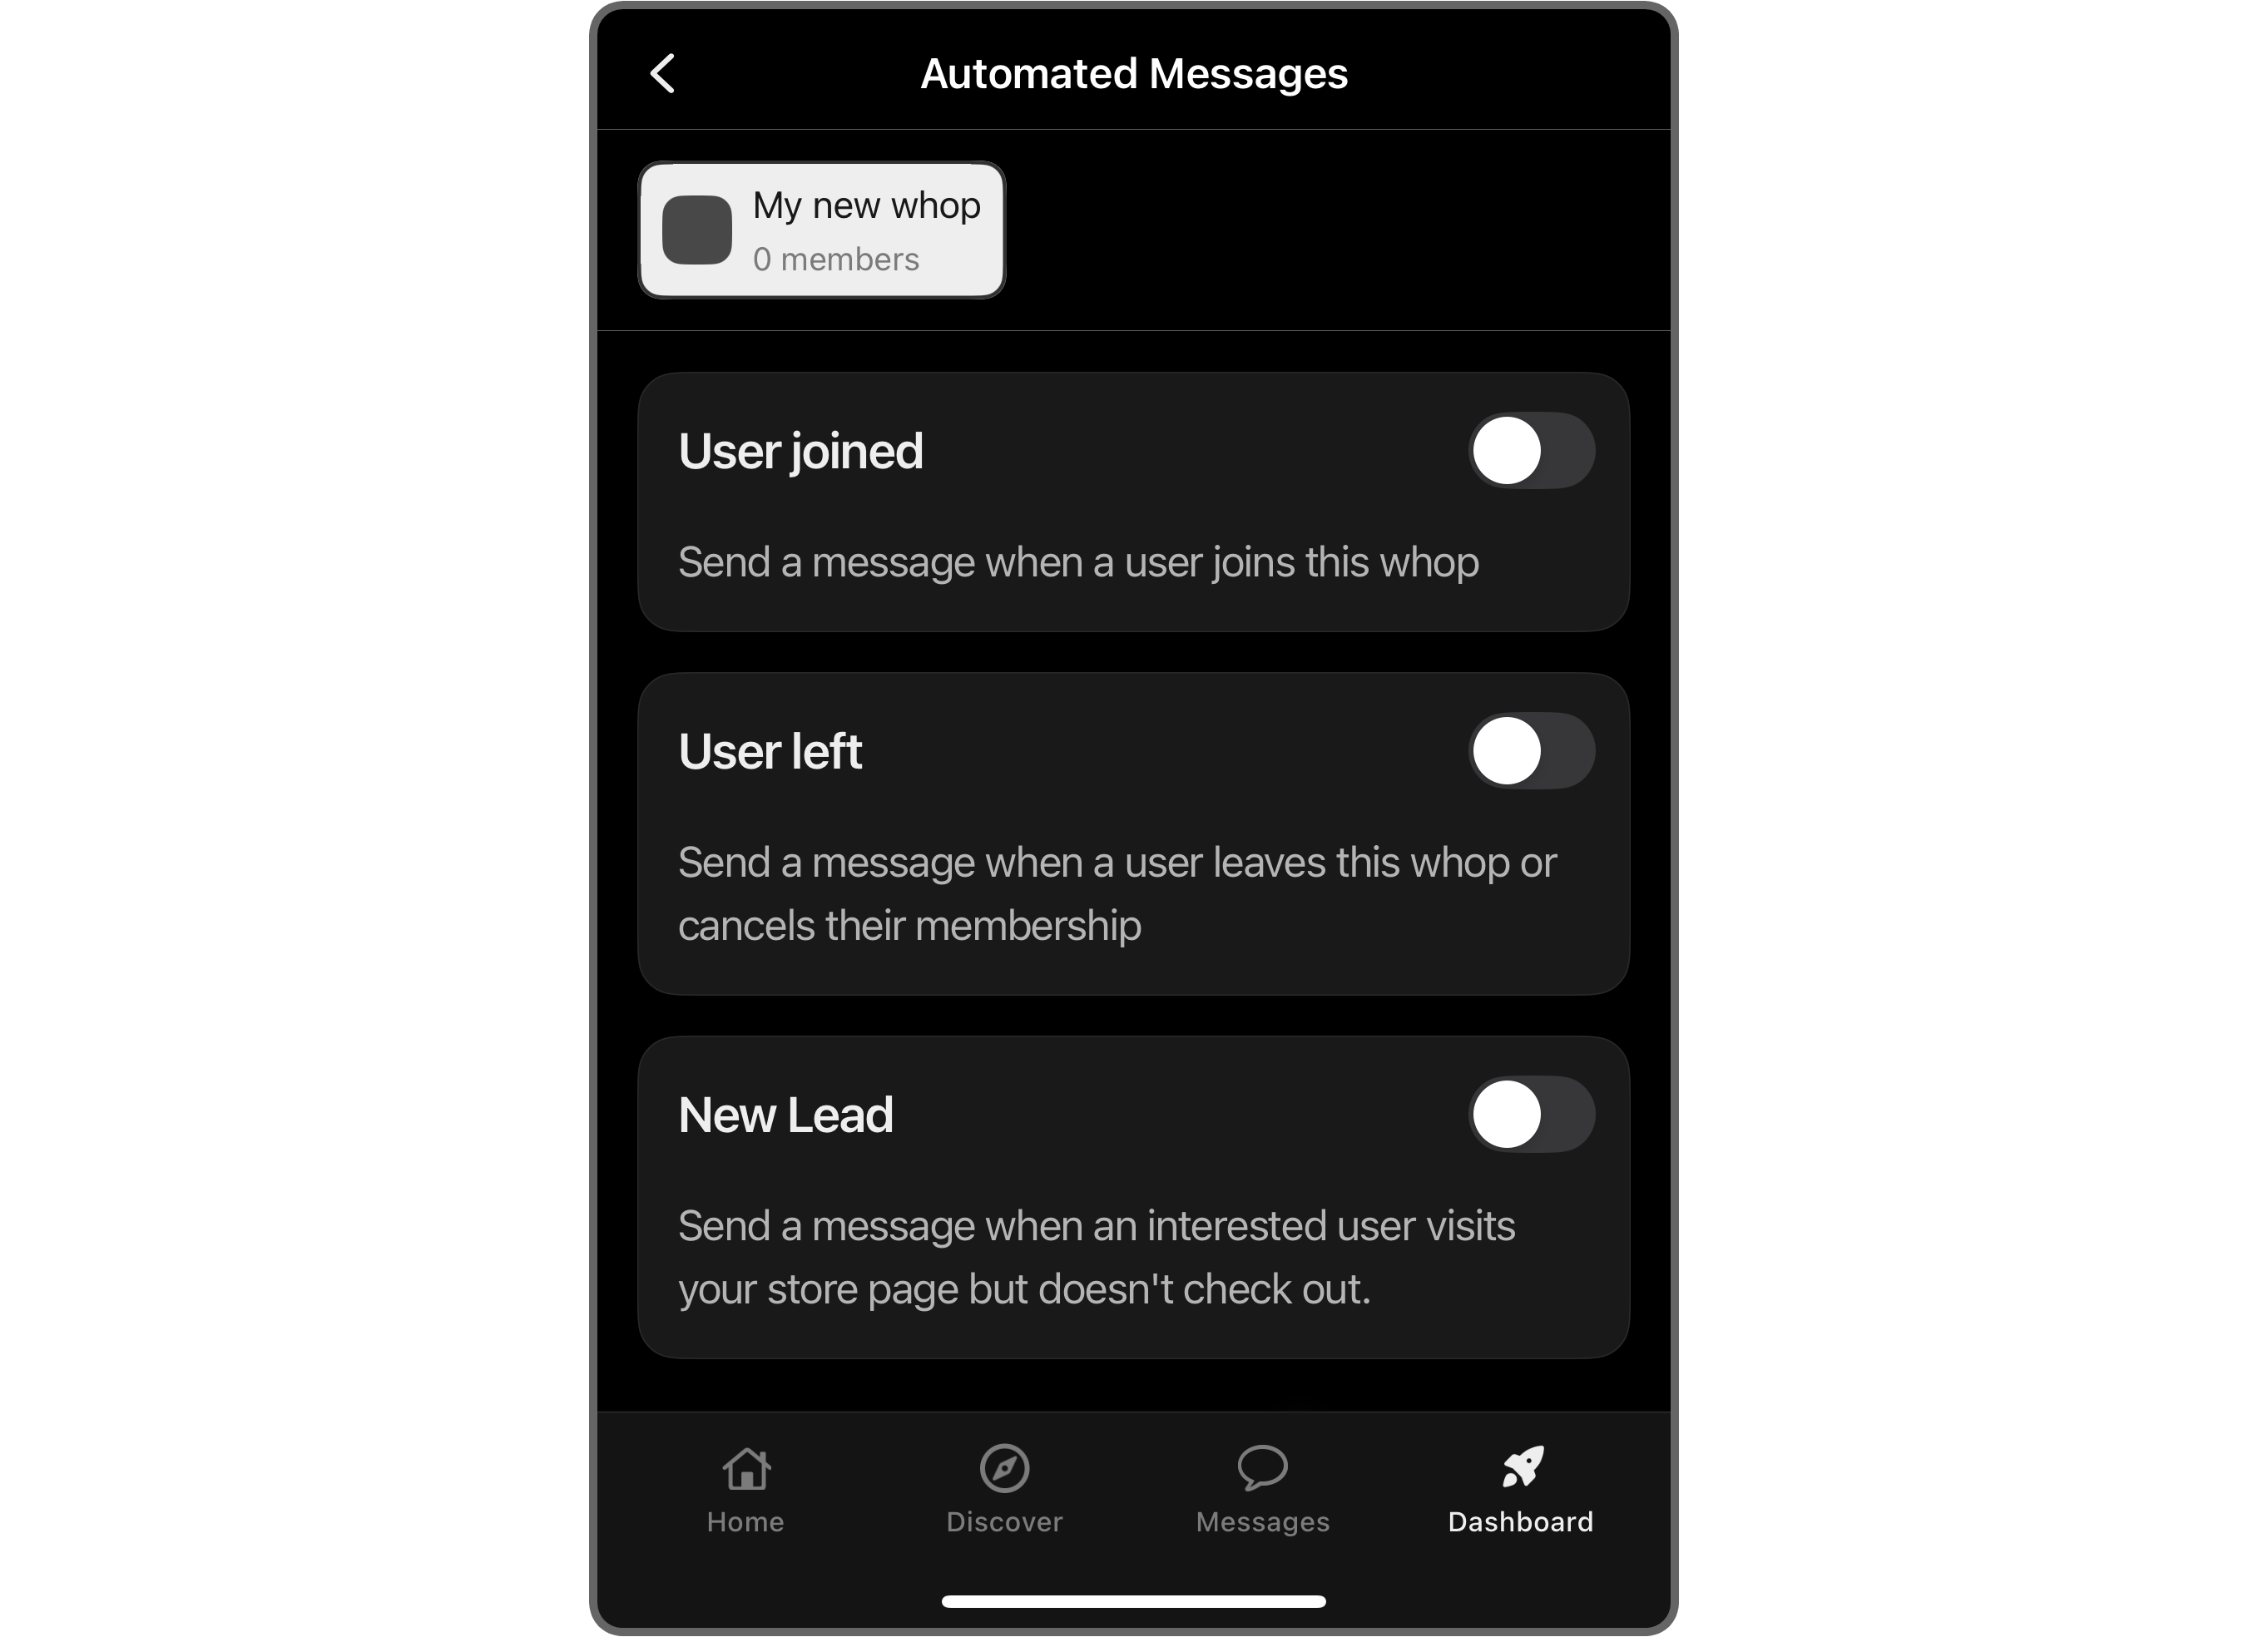
After pressing the Automated Messages card, you’ll be taken to its page where you’ll see three things: the whop you’re adjusting the settings of at the top of your screen, the user joined, the user left, and the new lead message cards below it.
Let’s press their toggle buttons to enable the features.
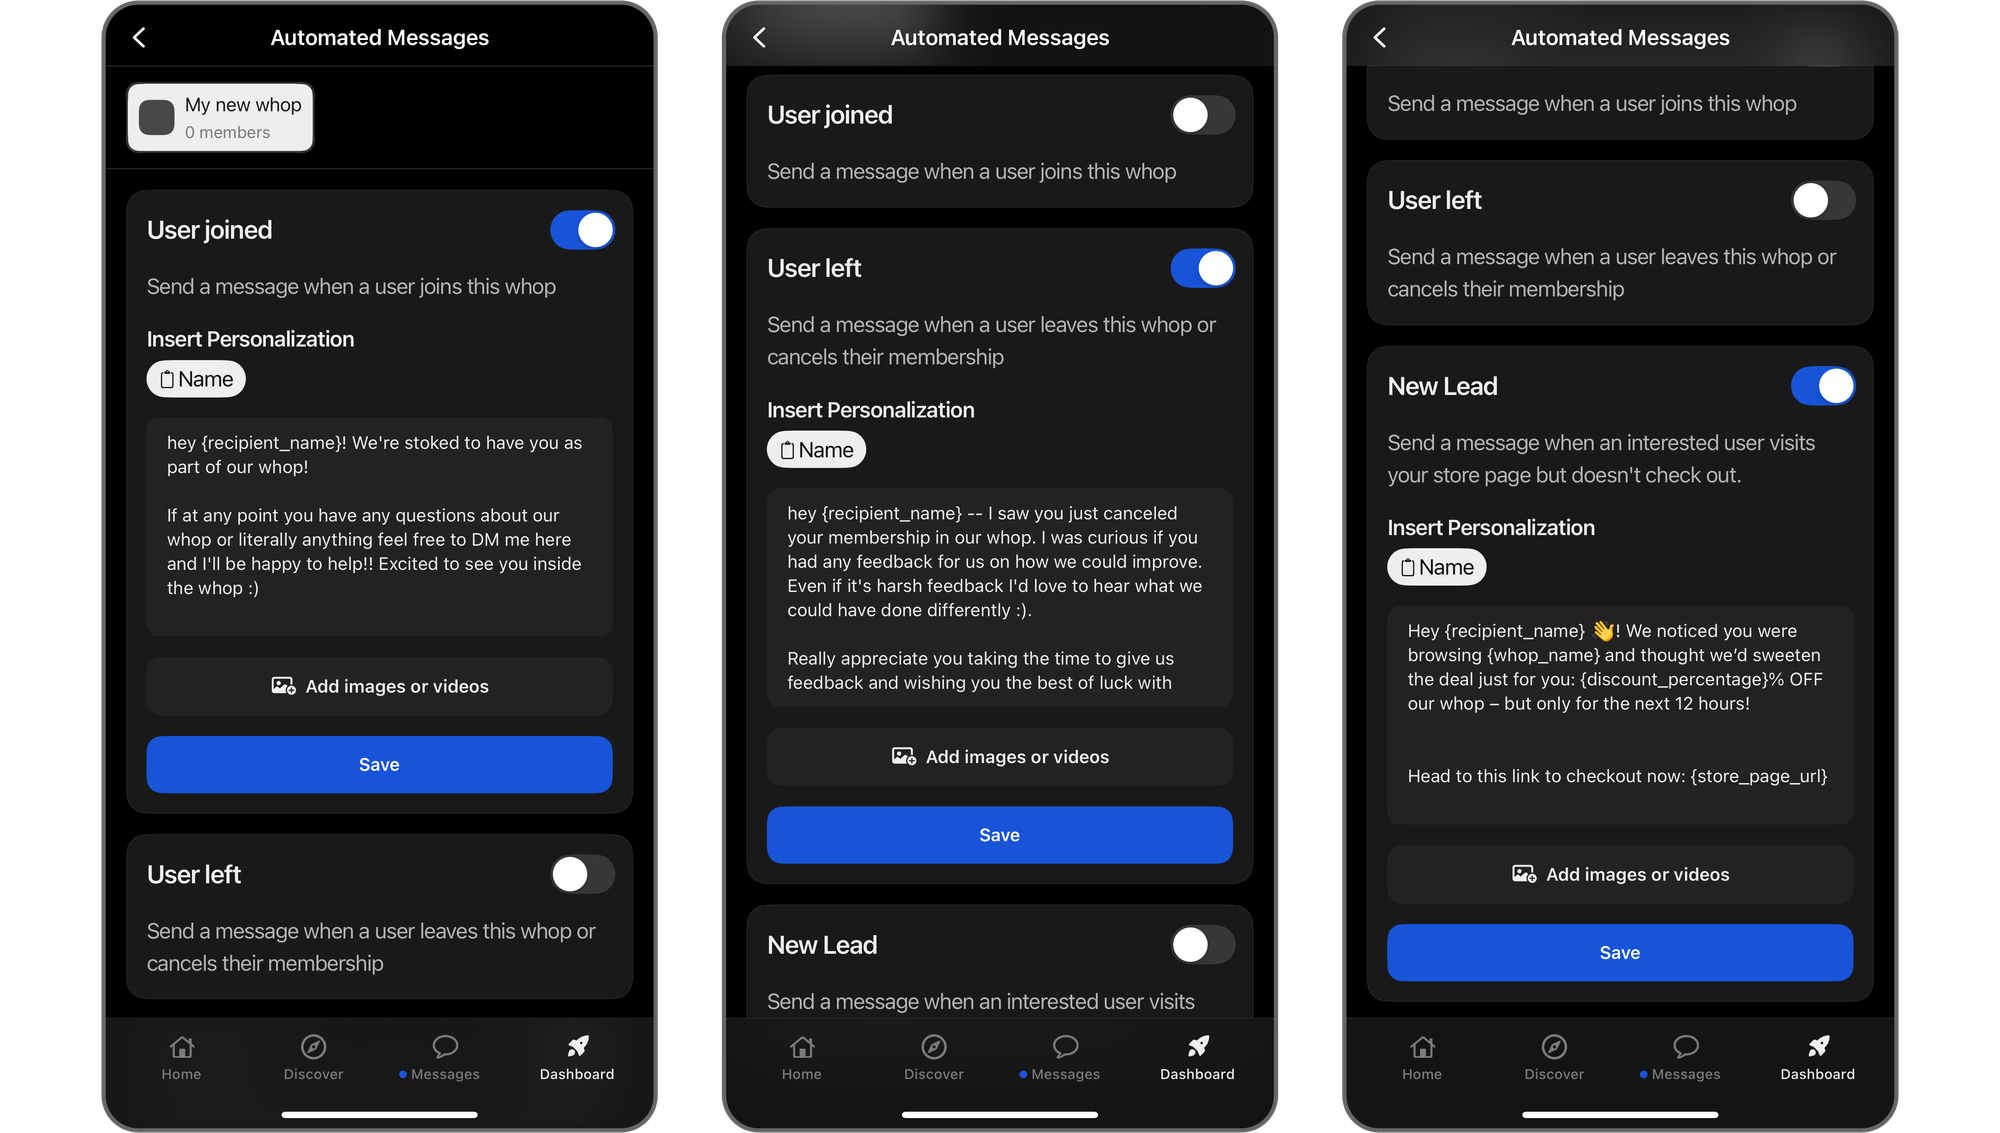
After enabling the features, you’re going to see four things for both (user joined and left):
- The enabled toggle button which you can press again to disable.
- The “Insert Personalization” field where you can use variables to customize your messages (like “Name” which will be replaced by the recipient’s name).
- The actual message itself.
- The Add images or videos button which, as its name suggests, allows you to attach files to the message.
After you’re done customizing the form, press the Save button to save the changes to your automated messages.
From now on, all users who join or leave your whop or visit your store page and leave without making a purchase will get personalized messages from you, automatically.
Learn more about whop management
Now you know how you can enable the automated message features for your whops – great job. If you want to learn more about whop management and improve your product, check out our official blog to be up to date on all Whop features and tutorials.
If you don’t have a whop yet, now is the best time to create one and start generating an income. Our guide on creating your own whop will help you set one up in under 3 minutes – join us today.