There are many reasons you might want to remove a sound from your server’s soundboard. Since it’s not possible to change the sound itself after uploading, let’s take a look at how you can remove a sound from your server’s soundboard.
Key takeaways
- You need Manage Expressions permission to delete sounds and Create Expressions permission to upload new ones.
- Deleted soundboard sounds cannot be recovered, so always backup important files before removing them.
- Soundboard slots range from 8 to 48 depending on server boost level, requiring strategic sound management.
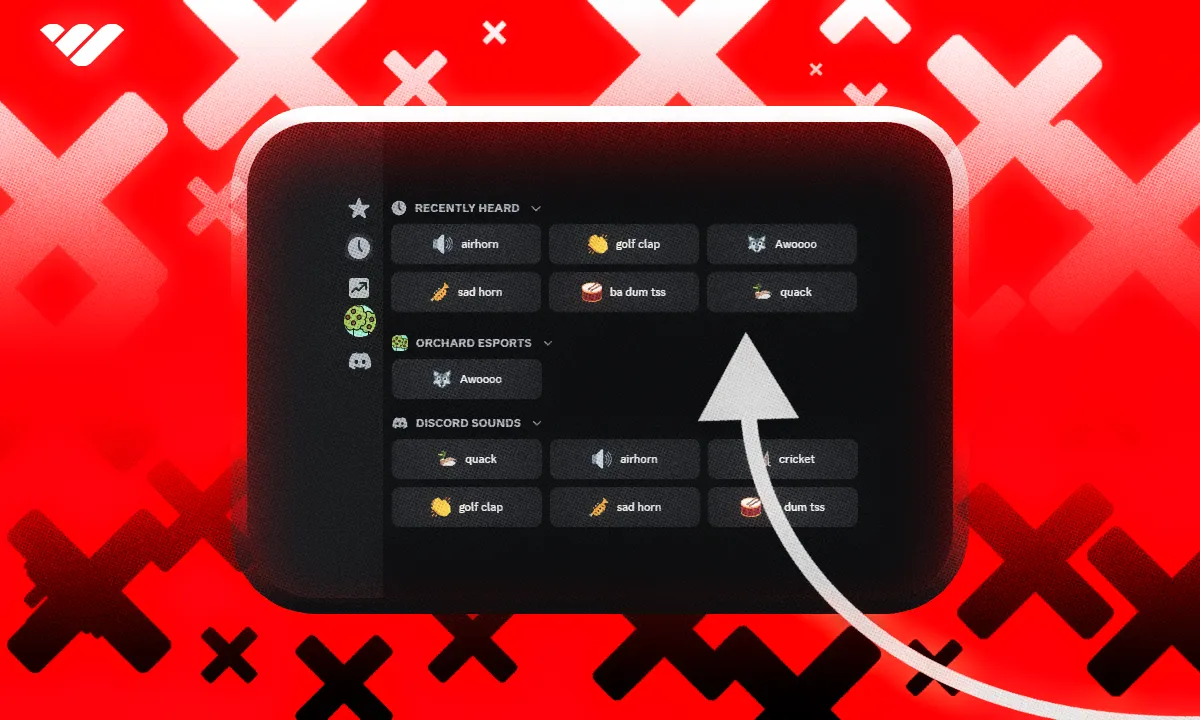
You might’ve heard the term “soundboard” before – especially if you’re a gamer or listen to radio stations. While gamers think of digital soundboards, radio stations have actual devices called soundboards.
However, they both follow the same logic. There are a bunch of buttons, each assigned a different sound, and pressing on those buttons plays that sound effect.
Think of the sound effects people play to annoy their friends in Call of Duty lobbies or the air horn sound effects in radio shows - they’re all done using a soundboard.
Discord created the soundboard feature in April 2023, which, as its name suggests, allows people to use a soundboard that can be filled with custom sounds from servers. People can play these soundboard sounds as much as they want, but they can’t control the volume of it – everyone has their own volume setting - we’re looking at you, the friend who spams Discord notification sound effects all the time.
Every single Discord server has at least 8 soundboard slots that they can use for custom sounds. When your server reaches seven boosts and unlocks the level 1, the slot count bumps up to 24, 36 with level 2, and 48 with level 3.
There are many reasons you might want to delete one of your Discord soundboard sounds – maybe you filled your slots and want to replace some, or you don’t like a sound you’ve uploaded anymore. Since it’s not possible to change the sound itself after uploading, let’s take a look at how you can remove a sound from your server’s soundboard.
How to remove Discord soundboard sounds you don't want anymore
Removing a sound from your server’s soundboard is an incredibly simple process. Before jumping in, we want to make sure that you have the Manage Expressions permission first. This allows users to edit and remove expressions on Discord, such as emojis, stickers, and sounds. If you’re planning to upload a new sound after removing a current one, you’re also going to need the Create Expressions permission, which allows you to upload expressions to your server.
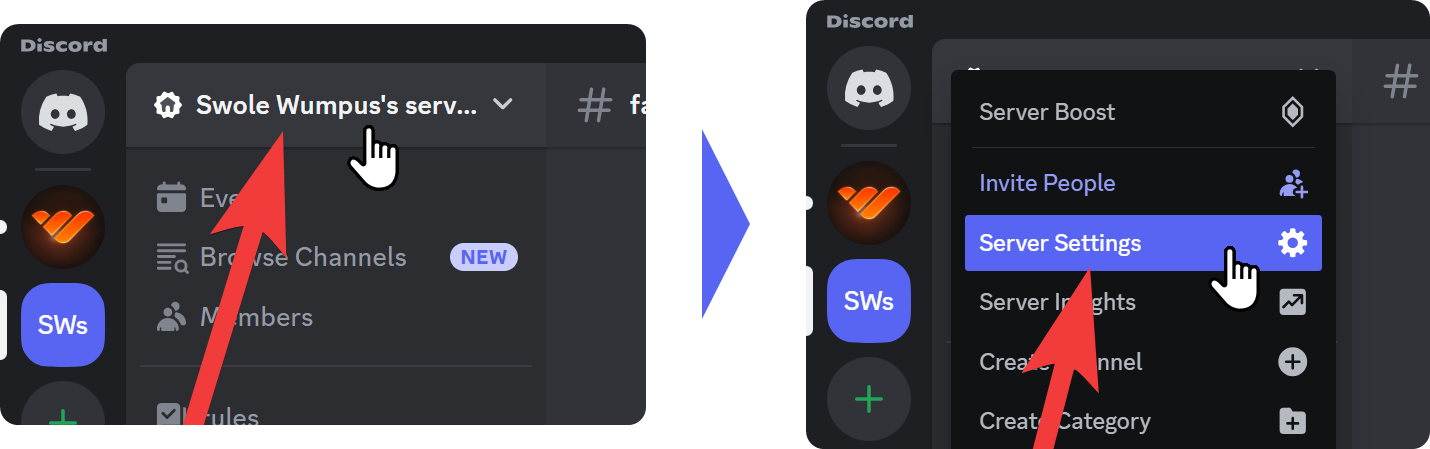
First, click on the server name at the top of your channel list to open up the server context menu. There, click on the Server Settings button to navigate to your server settings, where we’re going to find the Soundboard section.

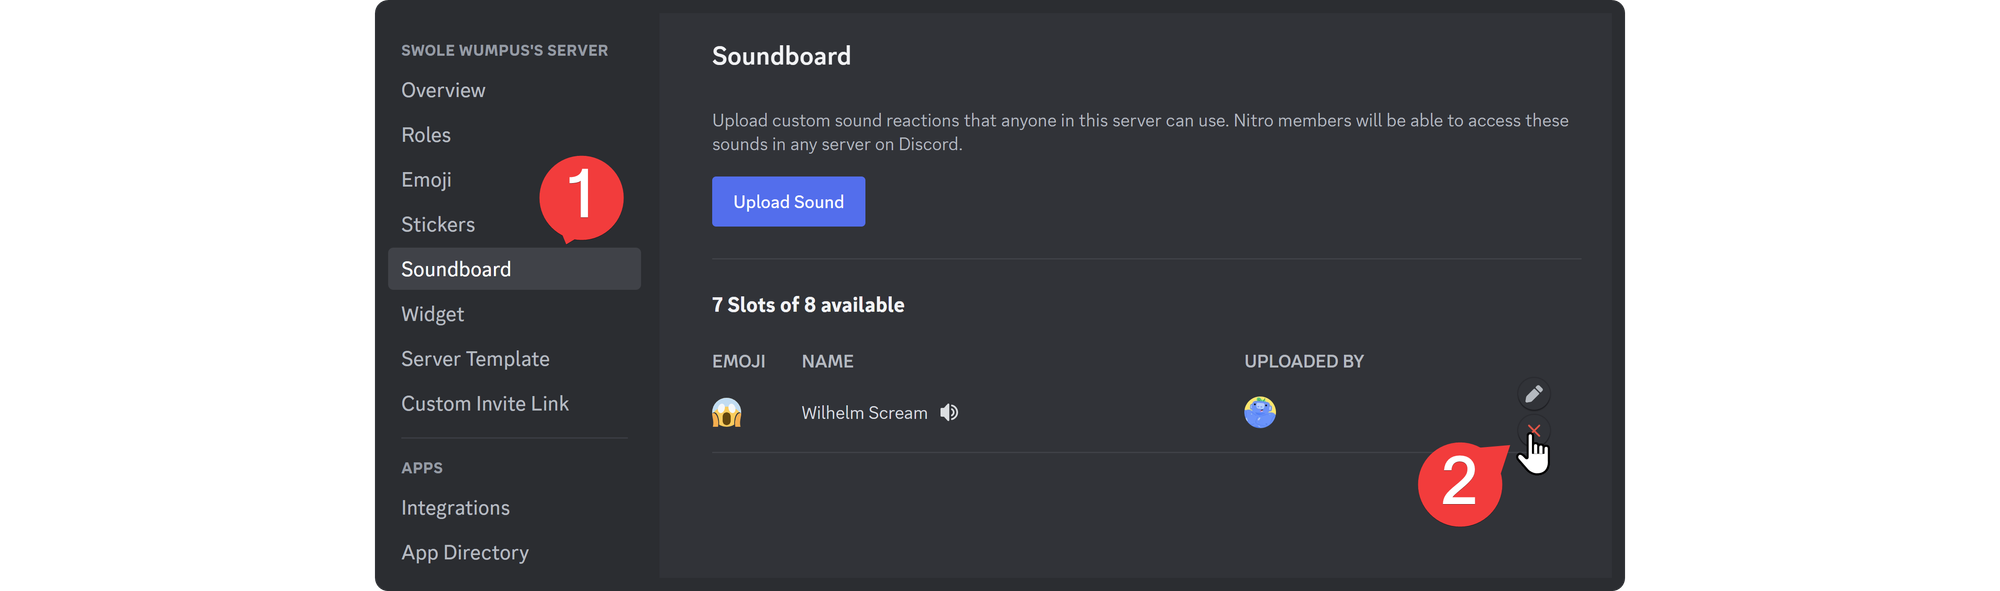
Once you’re viewing the server settings, let’s click on the Soundboard button on the left side of your screen.
There, you’re going to see the Upload Sound button, which you can use to upload new sounds and a list of all sounds you’ve added to your server.
When you hover over a sound in that list, you’re going to see the Edit (pencil icon) and Remove (X) buttons appearing to the right of it.
Clicking on the Remove button (X) will display a confirmation window and remove the sound from your server once you confirm.
- Tip: There’s no way to undo a deletion, so make sure you have a backup of the sound you want to remove before actually removing it.
How to add sounds to your Discord Soundboard
Now, let’s remember how to add sounds to your soundboard, whether you’re looking to fill out the slots you've saved by removing existing sounds or replacing one with a new sound. As we’ve mentioned, you need to Create Expressions permission to upload new sounds to your server. If you’re the server owner, you have all permissions by default.
The first step in uploading sounds to your server is navigating into the settings of your server. To do this, click on the server name at the top of your channel list to open up the server context menu. Then, click on the Server Settings button.
Once you’re in your server settings, click on the Soundboard button in the list on the left. This is going to take you to the Soundboard section of your server settings. There, you can find all the sounds that are currently on your server – if you haven’t uploaded any, you’ll see the “No Sounds” screen and the Upload Sound button at the bottom of your screen. Let’s click on it to proceed.
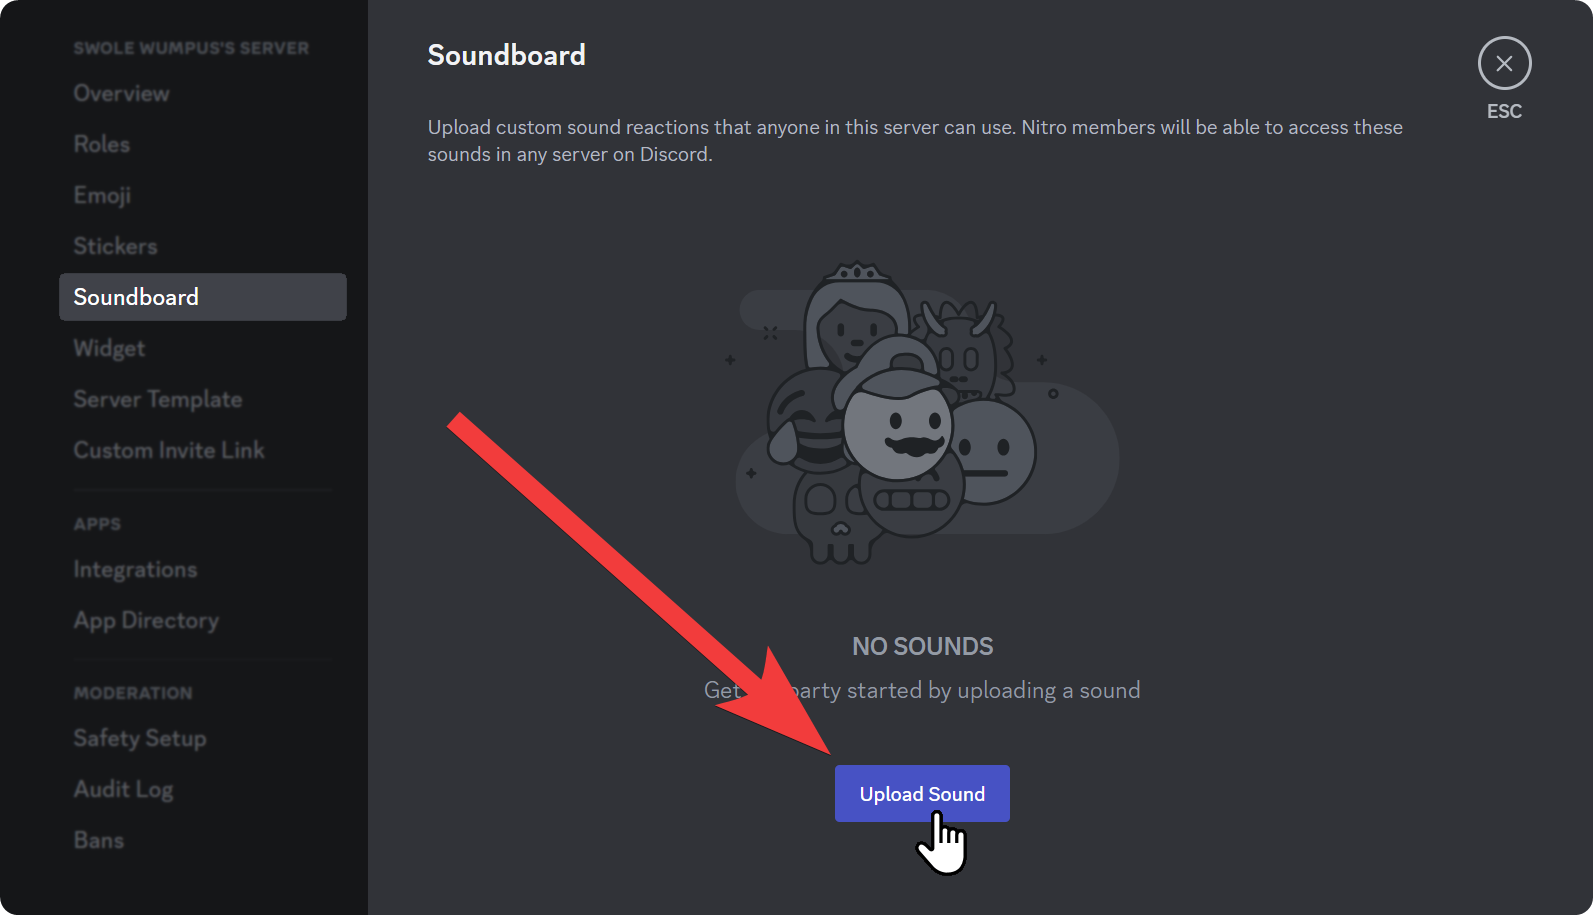
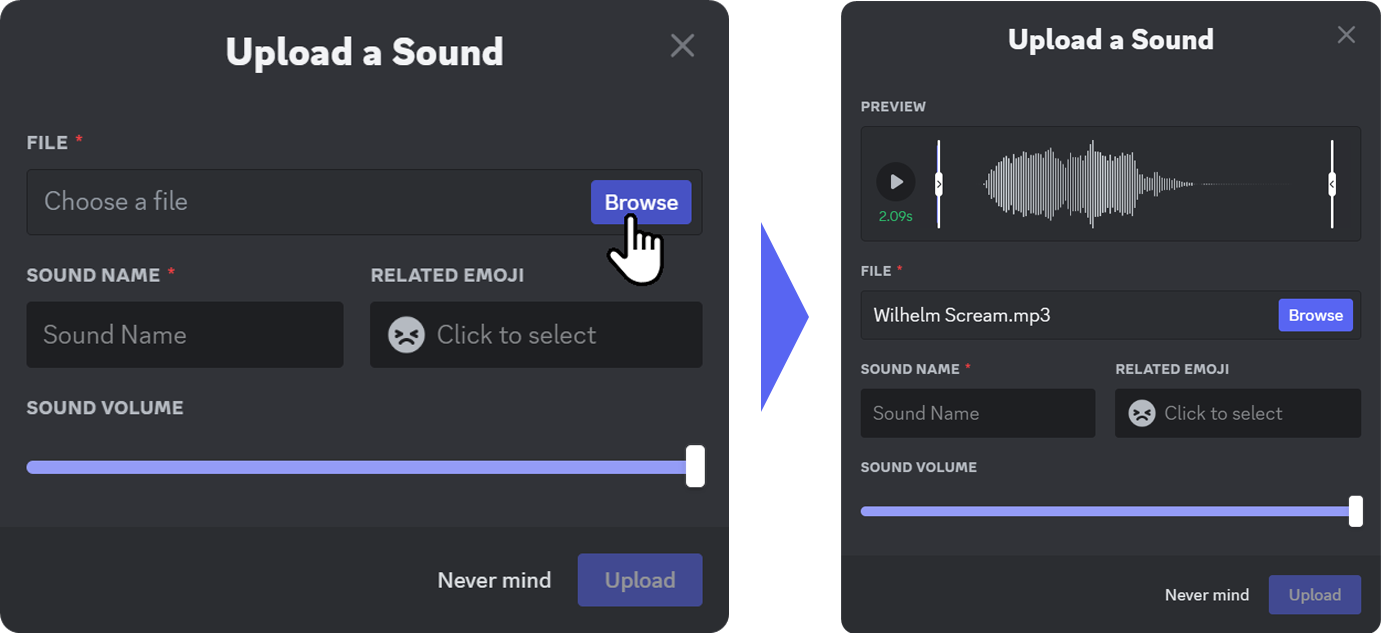
Once you click on the Upload Sound button, you’re going to see the “Upload a Sound” popup on your screen. There are four things you can do in this modal, so let’s examine each:
- File: This is the section where you select the audio file you want to use for your soundboard. The Browse button to the right will open the file selection dialogue. Once you select a file, the sound itself will be displayed under a new section called Preview.
- Preview: This is the section where you can preview your sound – listen to it, crop it, etc. Remember that soundboard sounds are capped at 5 seconds – if the file you’ve selected exceeds this limit, you’re going to see the little green second indicator turning red. You can crop the file to fit 5 seconds using the handlebars on each side of the preview.
- Sound Name: This is the section where you’re going to input a name for your sound. This should be really short, ideally 1 to 2 words, and should be able to let the user know what the sound is about.
- Related Emoji: This is the section where you can select an emoji for your sound. While not required, adding emojis to the sounds might give the user a better cue about the sound itself – it also looks cool.
- Sound Volume: This is the section where you adjust the default volume of the sound. If the audio file you’ve uploaded is too loud or has the potential to be disturbing if spammed with high volume, you can lower it using the bar in this section.
Once you’re done with all your settings, click on the Upload button (which will enable after you select a file and sound name) at the bottom right of the modal to finish the uploading sound process.
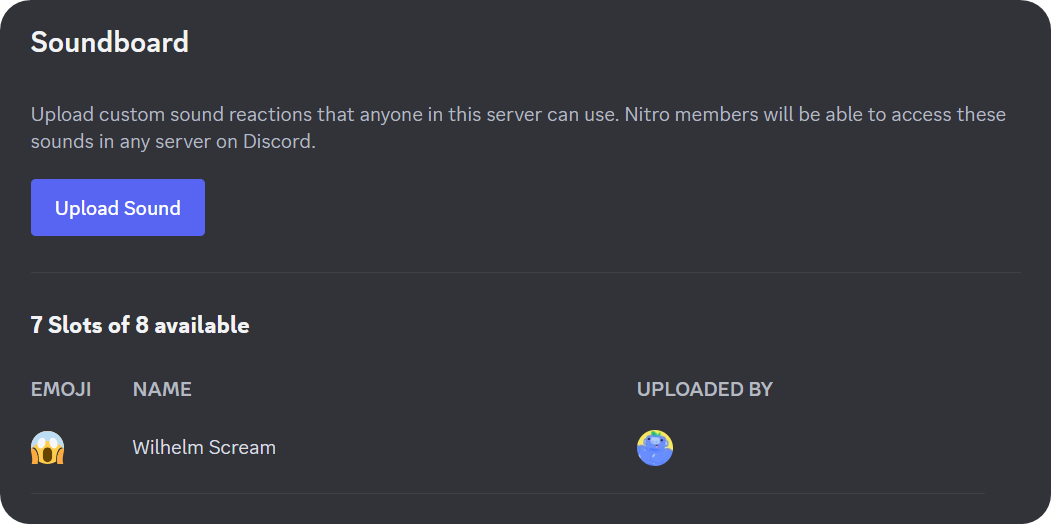
After you’re done adding the sound to your server, you can see it listed under the Soundboard section of your server settings.
Enhance your Discord server with Whop
Whop has been helping thousands of Discord server owners to take their next step in transforming their server into a premium space where people enjoy being in – it can help you too. Since you’re here, learning more about Discord, we suggest you take a look at our Discord guides to become even more of an expert.
You should also consider monetizing your server with Whop – signing up to Whop and starting to monetize server/role access takes less than 10 minutes, and costs nothing.