Everything you need to know about creating, scheduling, editing and deleting events in Discord.
Key takeaways
- Discord Scheduled Events help server admins boost community engagement through organized, recurring activities with automated notifications.
- Events require manual staff activation to start and won't begin automatically at the scheduled time.
- Create engaging events by adding compelling descriptions, eye-catching cover images, and setting recurring schedules to reduce admin workload.
Discord servers are designed to hold thousands or even millions of people, and as a server administrator, you’re required to keep members engaged so that your server can stay active. One of the best ways to engage a community is hosting events, and the best way to host events is to utilize the Scheduled Events feature.
In this article, we’ll examine Schedules Events, how they can help you, and how you can use them. We'll also include five great event ideas as a bonus. Let’s start!
What are Scheduled Events?
While it’s easy to confuse Scheduled Events with the actual events that take place in servers, they go hand in hand. Scheduled Events is a feature that was introduced in November 2021 that lets you share a few details about the event you’re setting, like its date and time, topic, location (voice channels, text channels, or somewhere else,) and frequency. After you set up the scheduled event and save it, your members will be able to see it and click “Interested” to get a notification once the event starts.
It’s a great way to organize events and give everyone the details they need to know. The option to set the event to recurring only makes your job easier, and the age-old organizing an event and announcing it by tagging @everyone method is long gone. Scheduled Events took its place, and it’s working great!
How Can Events Help Your Server
Managing a Discord server can be challenging. You have to engage your members, keep them on your server, prevent them from getting bored, introduce new faces to them, and more. While organizing events won’t solve all of your moderation problems, they’re a great solution to your engagement problems.
Even if you don’t have issues with community engagement, events are always useful to give a boost.
Now, let’s learn how to schedule an event.
How to Create Scheduled Events in Discord
Before starting, make sure you’re either the server owner or you have a role with the “Create Events” and “Manage Events” permissions. Without those permissions, you won’t be able to create or edit events. Let’s move on to the step-by-step tutorial of creating an event:
- Click the Events button at the top of your channel list. This will open the Events pop-up window. If you can’t see the button, you don’t have the necessary permissions.
- You’ll probably see that there are no events set up; that’s normal. Click the “Create Event” button to start the process.
- In the next window, you’ll see three steps: Location, Event Info, and Review.
In the Location step, you should select where your event is going to take place.
If you select a Voice Channel, you’ll be prompted to select a voice channel, easy!
If you select Somewhere Else, you’ll be prompted to enter a text, which could be a link, an address, or anything that will help your members understand where the event will take place.
If you have a Stage Channel set up in your server, you’ll also be able to select it as well.
Now, let’s click the Voice Channel option, which will open a dropdown menu of our voice channels, select our “General” channel from there, and click Next. - This is the most important step, the Event Info. Here, you will select the topic (title) of your event; so make sure it’s an engaging topic.
After that, select the start date and the start time. The timing you see is local to you, and everyone else will see it in their own timezone. So, for example, if you’re in New York and you select 4 PM, your friend who’s in Tokyo will see 5 AM.
Let’s move on to the next option, the event frequency. You can select a frequency for this event in the dropdown menu. This won’t create other events but rather reschedule them once the event ends. There are only two optional sections in this window: description and cover image. Don't skip this part. Enter a good description for your event, and tell your members how the event is going to take place, what you’re going to do, and how they can join the event. Remember that there’s a 1000-character limit.
And lastly, the cover image. Adding a cover image to your event will make it much more eye-catching, so don’t forget to add one. The recommended image size of Discord event banners is at least 800x320 pixels and the file size can be up to 10 MB. After selecting the cover image, click Next to process to the final step. - In the final step, Review, you can see an overview of your event. Does it look good? If so, click “Create Event” to finalize the process. If not, you can always click the “Back” text at the bottom left of the event window and adjust your event.
- After clicking the “Create Event” button, Discord will automatically send you a link, which you can share with your friends. The link has an embedded message attached, which has an “Interested” button. Once clicked, the user will become “Interested” in the event and will receive a notification once it starts.
You can always click the “Events” button at the top of your channel list to see, adjust, and cancel your events.
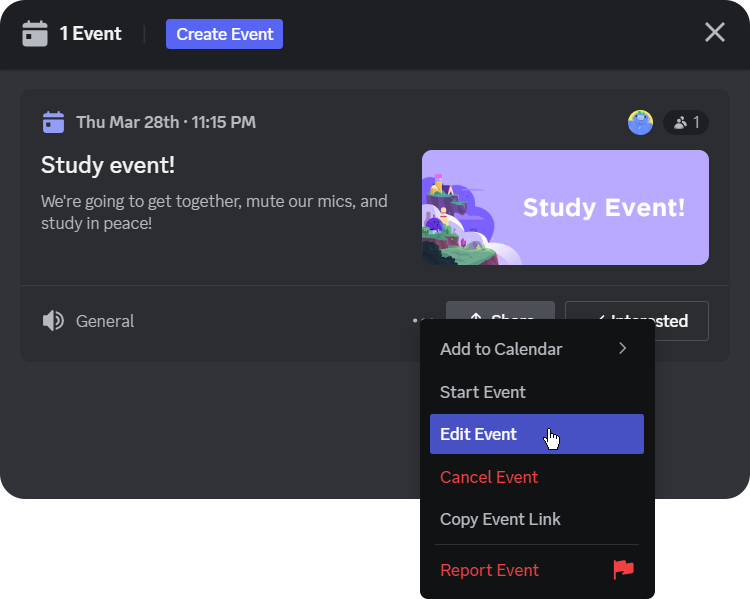
How to Edit Discord Events
You might want to adjust any part of an event for any reason, and it’s really easy to do. Let’s walk you through the steps:
- In the event window, click the three-dot icon to open the context menu.
- Click the Edit Event button.
It’s that easy! Once you click the Edit Event button, you’ll be directed to the Location step of the event creation process and can begin editing your event.
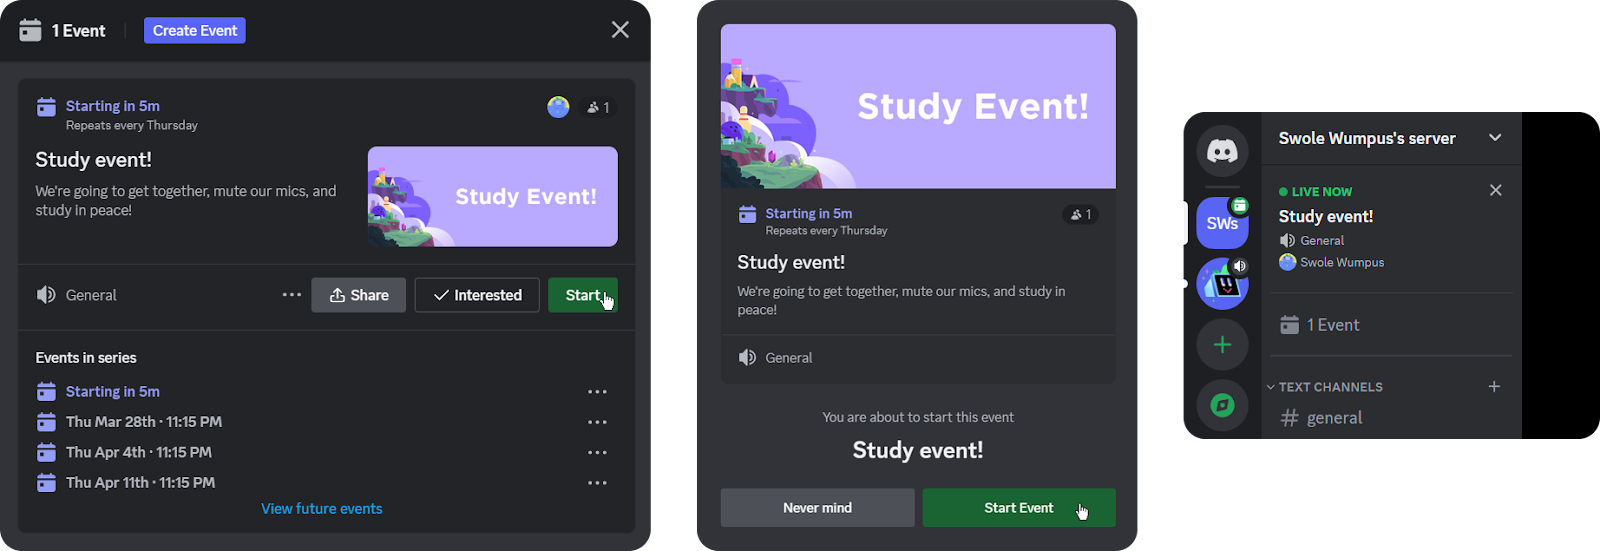
How to Start Discord Events
Events won’t start unless a staff member manually starts them - luckily doing so is really easy. Let’s take a look at how:
- In the event window, you’ll see a Start button. Clicking that will start the process, even if the event is not set to start. For example, if you set the event time to tomorrow, you can still force-start it by clicking the Start button.
- After clicking the Start button, you’ll see a confirmation window. Clicking the Start Event button will start the event immediately. This will send a notification to all members who clicked the Interested button.
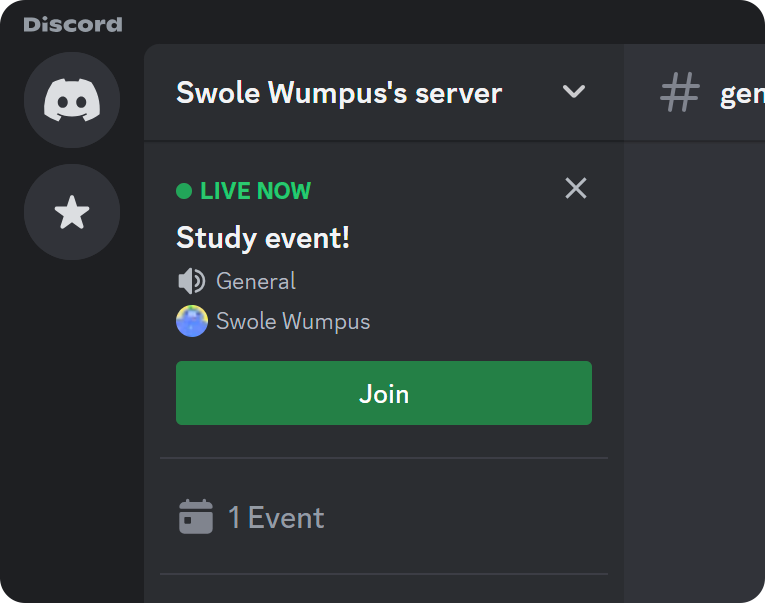
- You can see a new Live Now section indicating that the event has started.
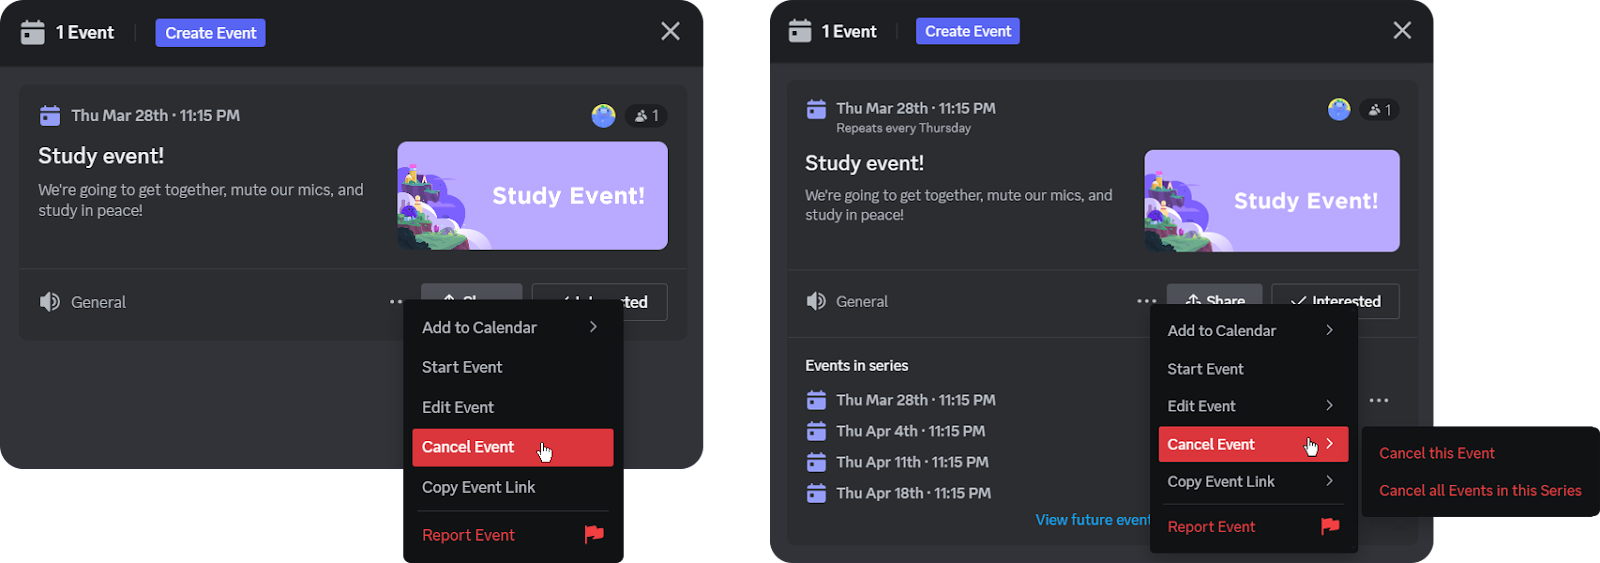
How to Cancel Discord Events
Canceling events is as easy as all other methods we touched upon. In the event window, click the three-dot icon to open the context menu. There, click the Cancel Event to cancel the event. If the event is a recurring one, you’ll have the option to cancel the next event or all of them.
How to Get Notified of Events in Discord
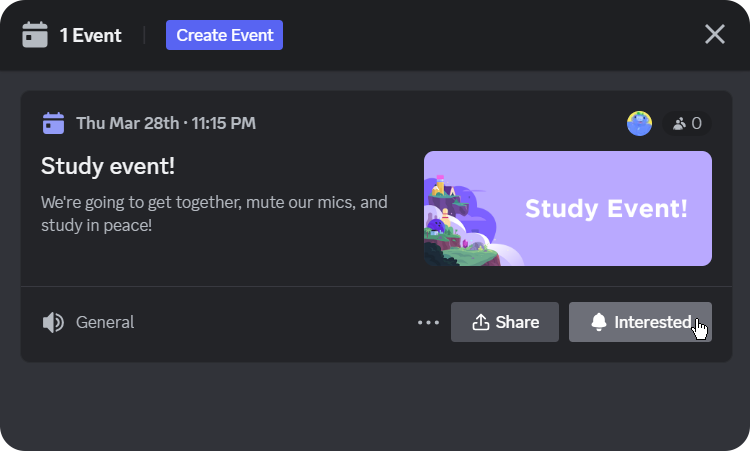
To get notified when an event starts, you have to be “Interested” in it. To do that, open the event window (you’ll see the event tab at the top of your channel list if there’s an available event) and click the “Interested” button at the bottom right. As indicated with the bell icon in the button, clicking this button will notify you when the event starts.
How to Join Ongoing Events
“Joining” an event can only happen for events that take place in voice/stage channels. If the event’s location is an external link, for example, you’ll have to read the event description to learn more about how to join it.
Before joining an event that takes place in a voice channel, you have to make sure there’s a live event going on. You can do so by checking your channel list. If you see a Live Now section about an event at the top of your channel list, there’s a live event happening. The section will also display which voice/stage channel the event is taking place in. Clicking the big green Join button will immediately make you join the voice/stage channel.
5 Fun Discord Event Ideas
There are countless events you can hold on Discord, and most of them fit all communities! You can host events yourself (such as a live trivia in the voice channel), by using bots (for games), or even a video game, like a camera-enabled D&D session with your members.
Here are five ideas of popular events that you can hold in discord:
- GarticBot - You might know Gartic.io, an amazing draw-and-guess game that you can play with your friends. Don’t worry if you’re not good at drawing - the worse the drawing is, the funnier the game! Gartic has a Discord bot that will let you play the game inside Discord; it’s a little different, though. You and your friends try to guess what the drawing is. Still, you can host an event where you play Gartic.io classic in a voice channel.
- Kahoot - Kahoot is a really fun trivia-based game and you can host an event with all your members in a voice channel whie streaming Kahoot. With Kahoot, you create your own quiz and members make their guesses from their own devices, with all players and their guesses reflected on the Kahoot leaderboard. It can help you drive up your engagement and get in touch with your members, which is always a good thing to do as a server administrator.
- Gaming Sessions - Most Discord users are gamers, so why not host a gaming session? We recommend you select a multiplayer game like Pummel Party or Quiplash.
- Q&A - Let’s say your server is about fish keeping and has many experts on the topic. You should host a Q&A with all of your members (preferably using a Stage Channel) where your members ask veteran fishkeepers questions about everything related to the practice.
- Study/Work Sessions - Studying or working with other people in silence can greatly boost your productivity. Let’s say your server consists of relatively young people. Try hosting a study event where everyone gathers in a voice channel, mutes their mic (you can force this by turning off the “Speak” permission in the channel), and studies! Bonus tip: Try using a music bot to spice the event up with some Lo-Fi beats.
Monetize Your Server With Whop
If you’re spending this much effort on hosting events to keep your community engaged, chances are you might want to monetize your server - and it’s never been easier. With the help of Whop, the leading Discord monetization platform, you can charge your members to join your server and start generating income today!
With Whop’s hassle-free platform, you can sign up and start selling in the blink of an eye.