Discord roles are an essential part of the community and server experience. Read this guide to understand what roles are, how they work, and how to implement roles in your Discord server.
Key takeaways
- Discord roles establish user hierarchy and control permissions, determining what actions members can perform and which channels they can access.
- Linked roles can automatically assign permissions when users meet specific requirements, like connecting external accounts such as Steam.
- Server staff can create, customize, and assign roles through server settings, with 47 unique permissions available for fine-tuned access control.
Discord servers can host a huge amount of users, with some servers (like Blox Fruits) having over 1.5 million members. With so many people in one place, it is important to know who can take what action in the community - that is where Discord roles come in.
Discord roles are one of the most essential parts of the app. They decide how your server and your members operate with the use of the “permissions” of the roles. Permissions allow or disallow your users to perform certain actions or access certain channels. They need to be created, adjusted, and assigned by the server staff.
Knowing how to work with roles is essential for every server staff member. In this guide, we’ll explain what roles are, how to create them on different platforms, and how to adjust their settings.
Let’s start by learning what roles are.
What are Discord roles?
Think of a real-life organization with a bunch of members. That organization needs a hierarchy to differentiate its members, such as the president, vice president, secretary, event coordinators, member coordinators, marketing team, and regular members. What separates them are their roles. Discord roles are the same; they differentiate members.
Discord roles are one of its highlights, and they play a significant part in organizing and running a successful server. Roles are mostly used to grant custom permissions to users. Since there are 47 unique permissions on Discord, roles come in handy when creating a user hierarchy, but you can also use roles for cosmetic, informational, or access permit reasons. Only members with the “Manage Roles” permission can create and edit roles.
There are two types of roles based on their availability: joinable roles and assigned roles. Joinable roles, like informational or cosmetic roles, can be selected by users themselves (via reaction roles or onboarding,) and assigned roles, like “Moderator” or “Event Organizer,” can only be assigned by staff.
Here's how you can create and assign roles for your members.
How to create and assign Discord roles

Discord servers don’t have pre-created roles, so you must create them yourself. Thankfully, it’s a very streamlined process. Let’s take a look at creating, editing, and assigning the roles on desktop, iOS, and Android.
Creating and assigning Discord roles on desktop
The first step in creating a role is to make sure that you have the “Manage Roles” permission. If you’re the server owner, you have all the permissions by default. If you don’t know if you have the “Manage Roles” permission or not, take a look at step two below. Now, let’s look at creating a role:
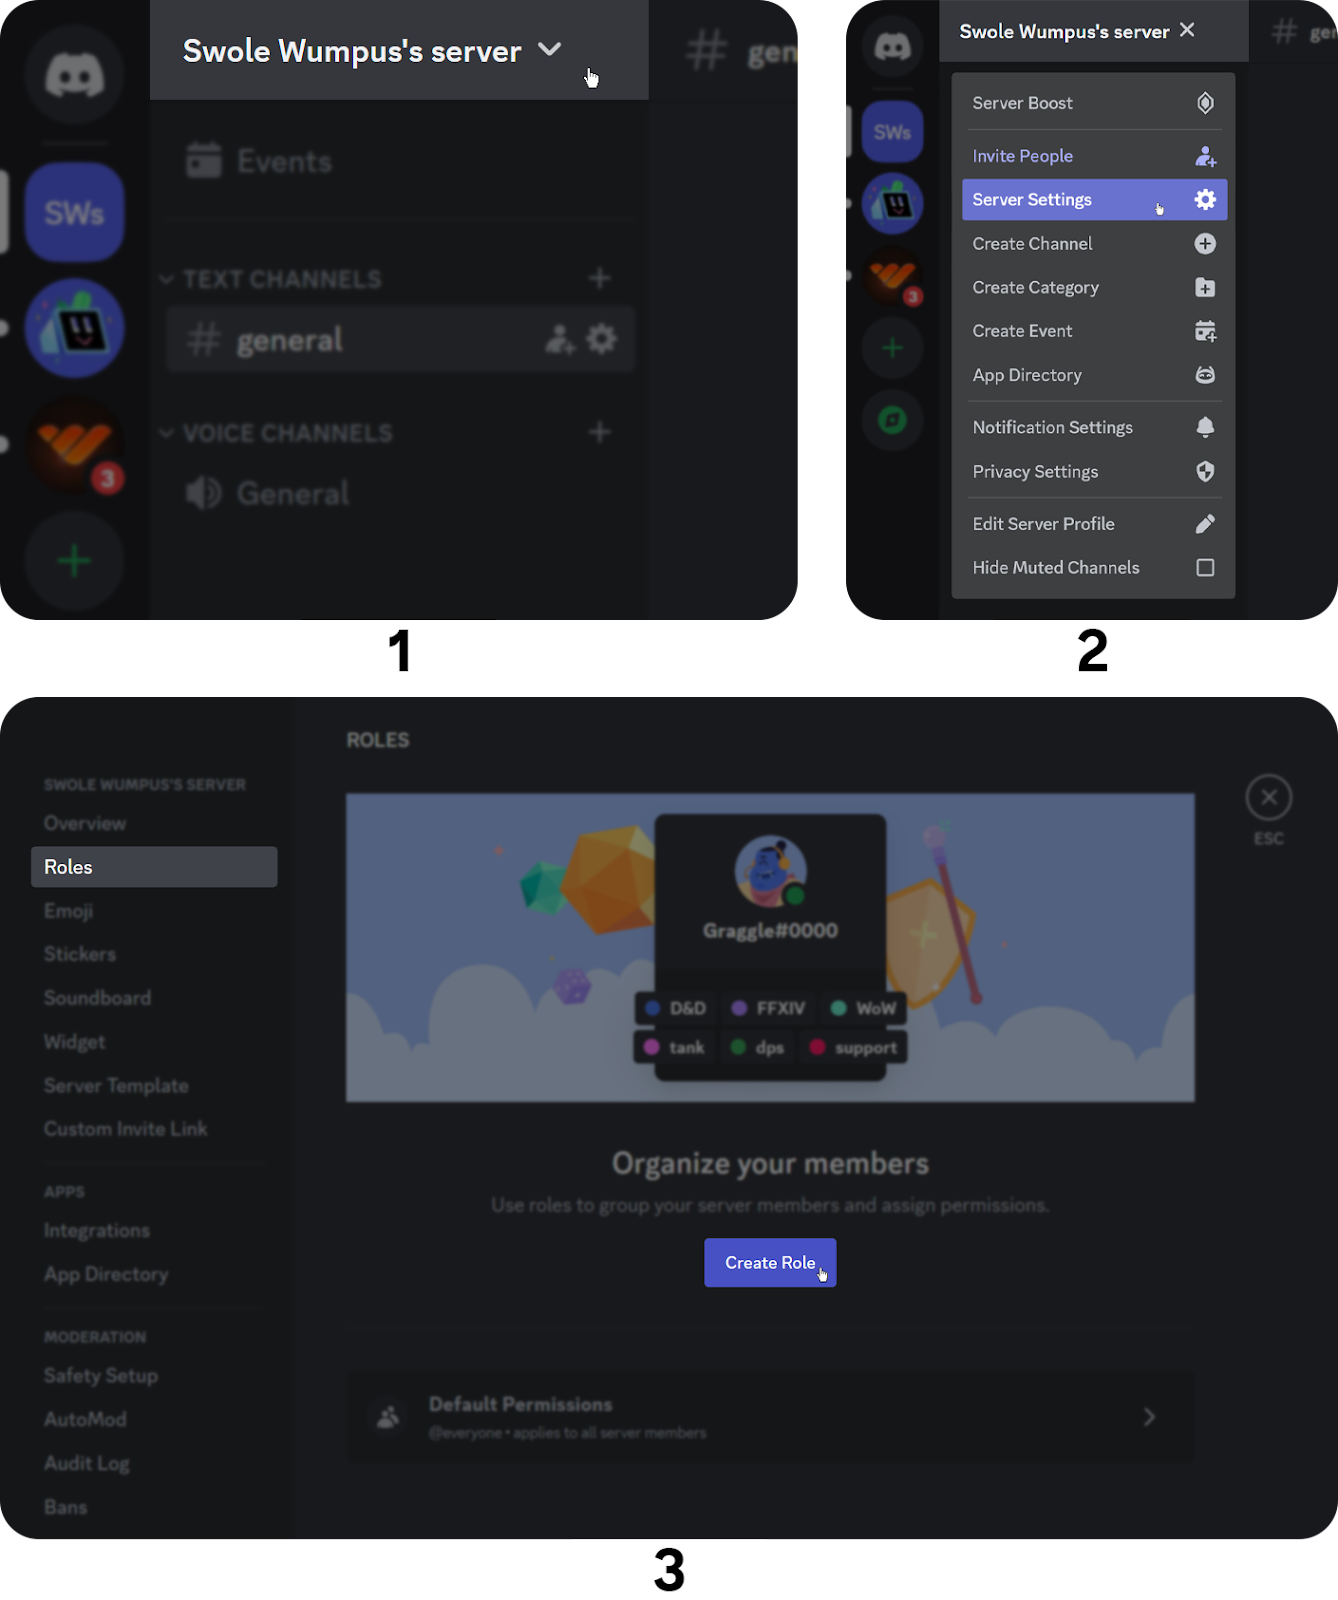
- Click on your server name at the top of your channel list. This will open the server menu list.
- Select the “Server Settings” option from the pop-up. This will open the server settings. If you can’t see the “Server Settings” option, you don’t have the “Manage Roles” permission that’s necessary for creating roles. Try switching to a server you created or asking the server owner to grant you permission. Be careful, though; asking for permissions can be a bannable offense on some servers.
- Navigate to the “Roles” section of your server settings and click the “Create Role” button.
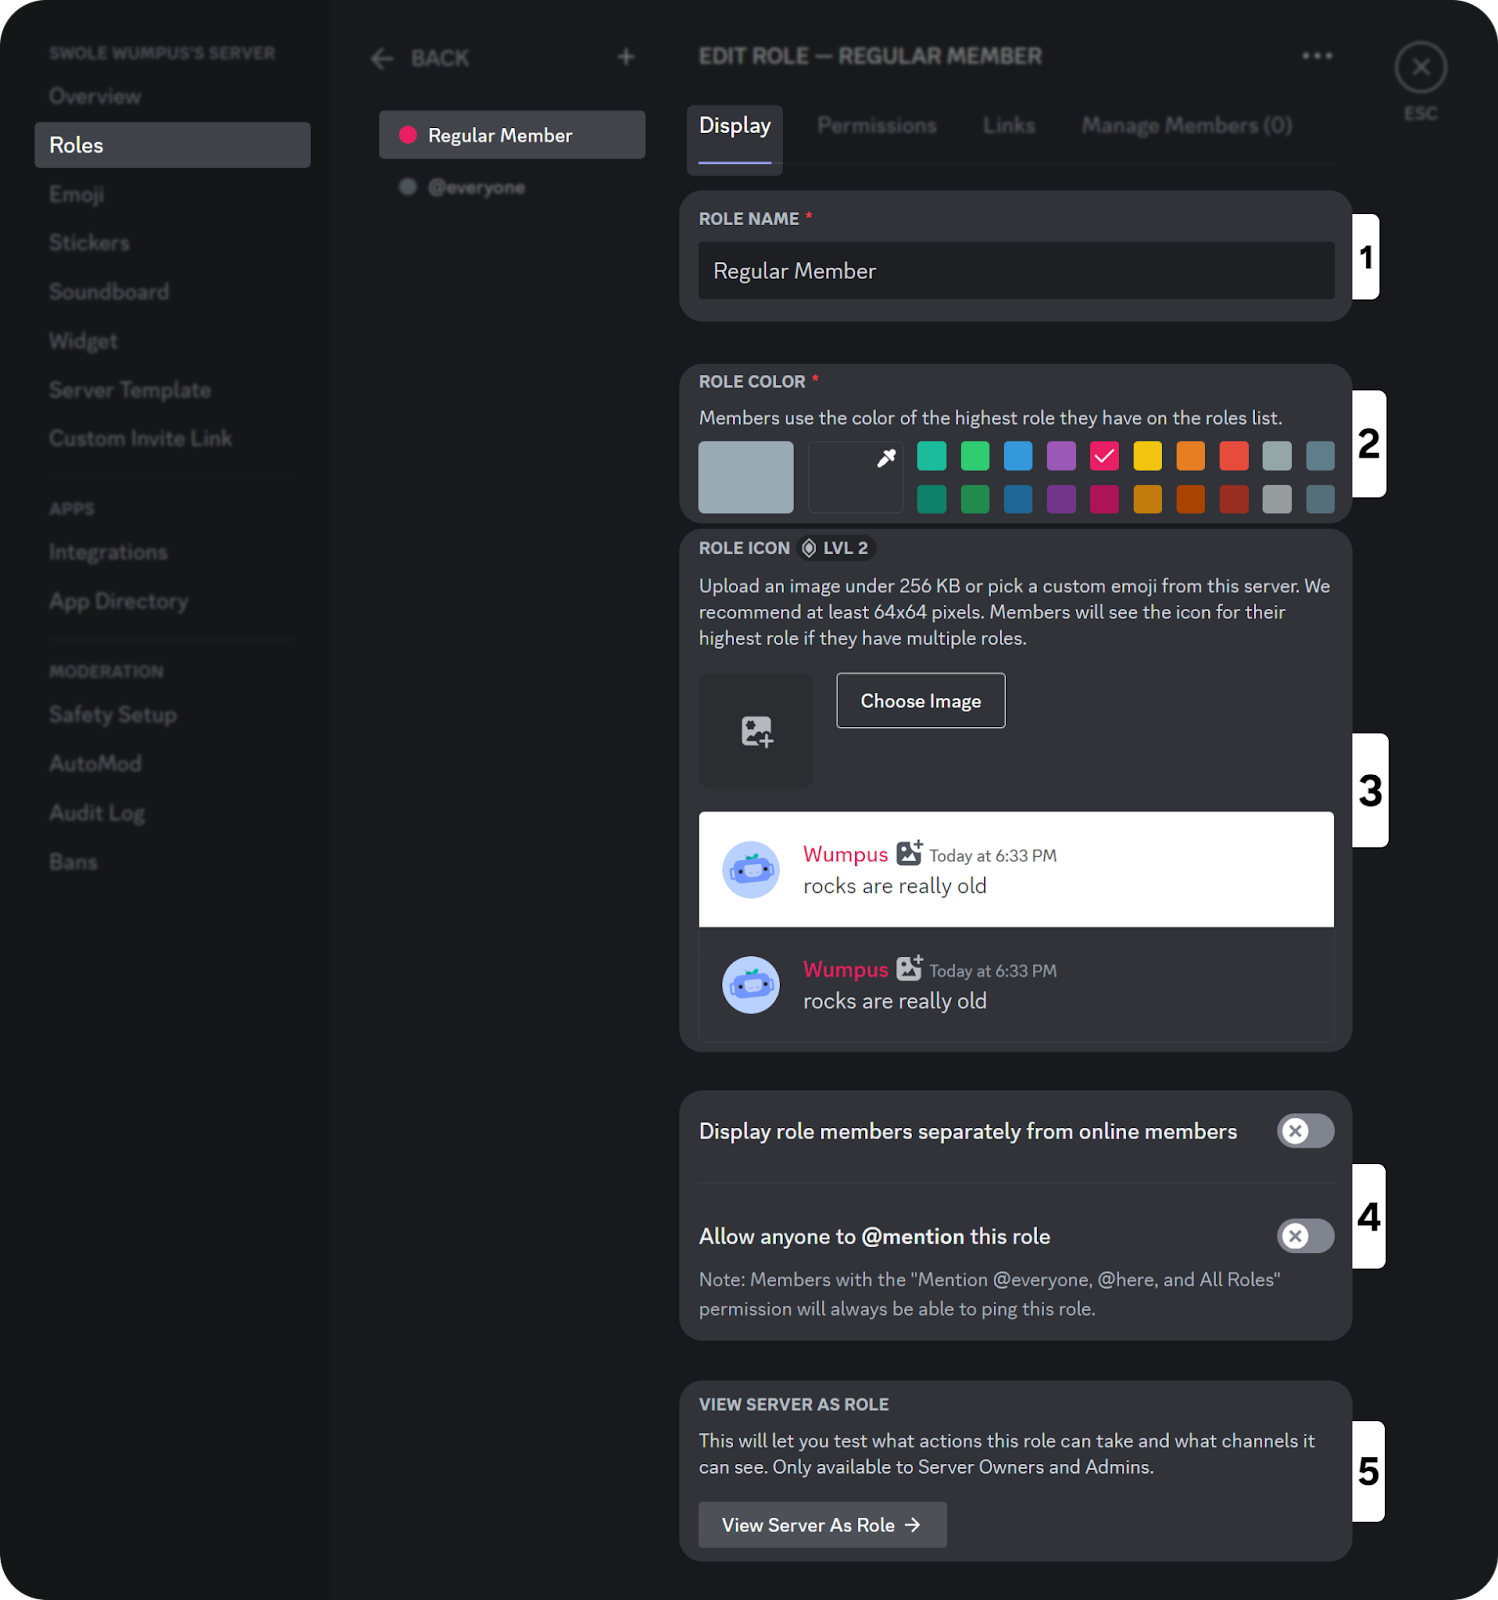
If you managed to click the “Create Role” button, then you have created the role! Now, let’s continue with editing the role. When you click the “Create Role” button, you’ll automatically see the screen in the image below. You’re still in the “Roles” section of your server settings. You can see all the roles listed to the right of the server settings sections, and once you click on one, you’ll see its settings on the right. Let’s go over each setting, starting with the “Display” tab:
- Role Name - This section allows you to adjust your role name. Role names can be as short as a single character and as long as 100 characters.
- Role Color - In this section, you can select a color for your role. Either select one of the pre-determined colors (which all look good in both dark and light-themed Discord) or select a custom color by clicking on the big dark slate grey box second from the left. This will change the user’s username color. The username color is determined by the topmost role of a user.
- Role Icon - This section allows you to pick a role icon. It can be an emoji or a custom image. A custom image should be smaller than 256 KB. Also, your server must have a Server Boost level of 2 to use this feature.
- Functional Settings - This section has two settings. When turned on, the first one displays the users that have the role separately from others, and the second one allows all users to mention the role. We don’t recommend you turn on this setting unless the role is a moderator role.
- View Server As Role - The button in this section will allow you to see your server through the eyes of someone who has the role you’re viewing.
We’re done with the main settings, so let’s move on to permissions!
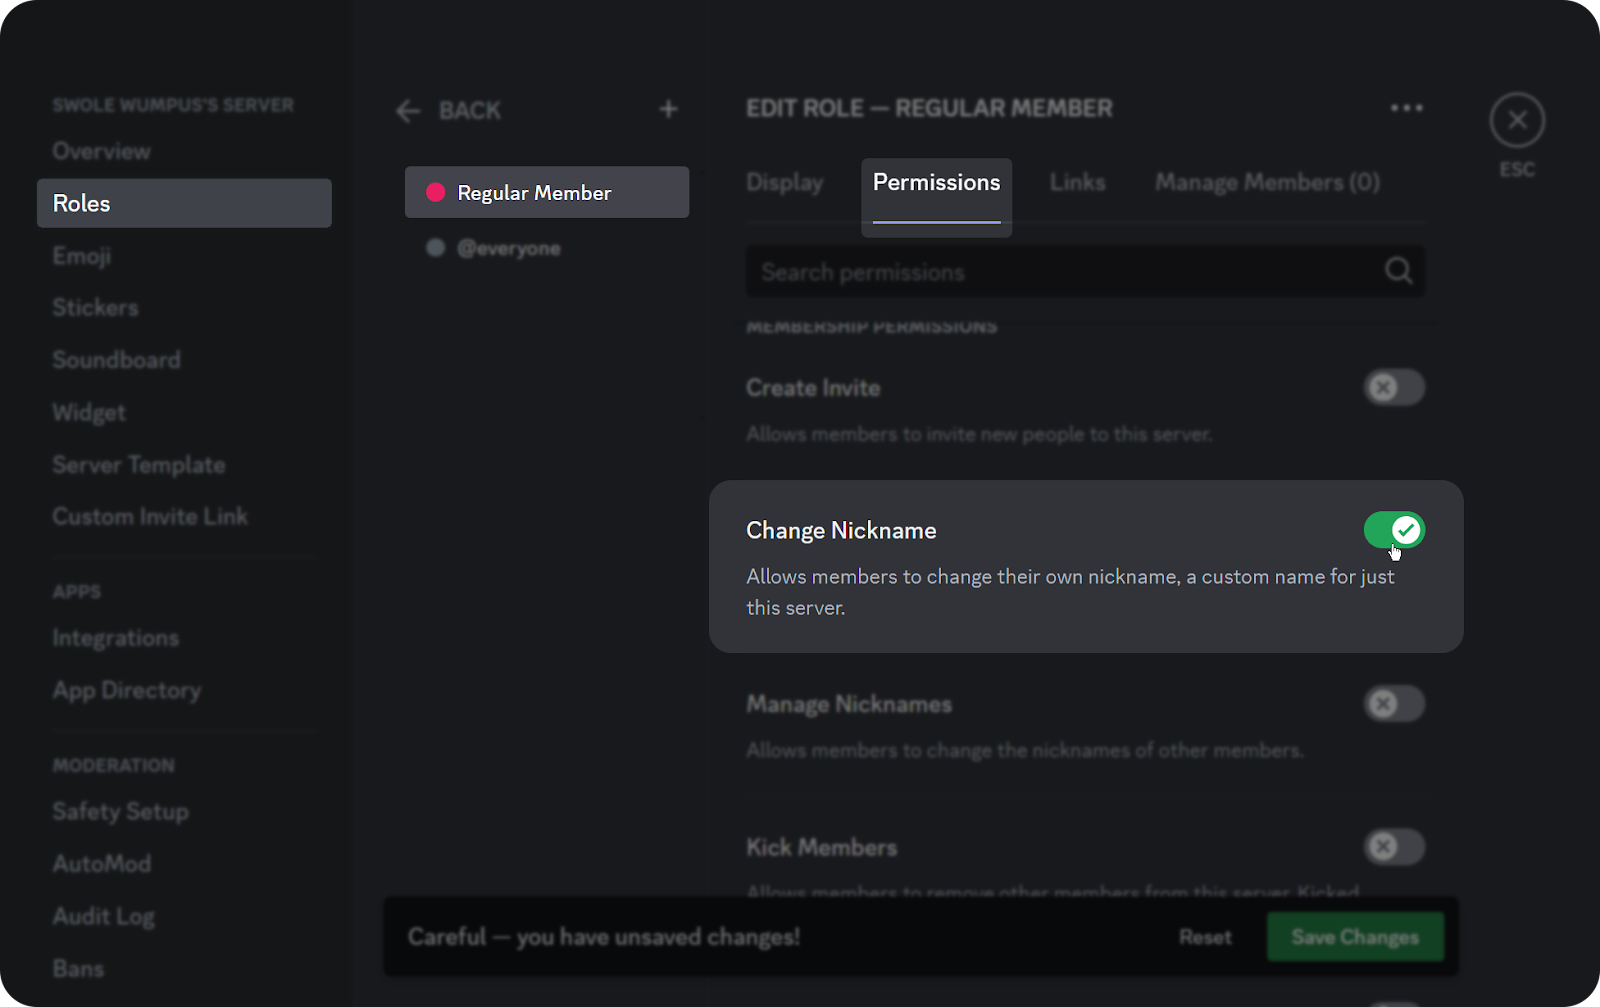
When you click the “Permissions” tab (right to the “Display” tab), you’ll see all the permissions listed. There, you can turn the permissions on and off.
Don’t forget that some permissions can be dangerous to grant (like Administrator, Manage Server, or Kick Members), so read the permission descriptions before granting any.
You can also see a “Links” tab. The Linked Role feature was introduced in December 2022 and lets server staff set up roles that are automatically given once a user fulfills the requirements - like linking your Steam account to your Discord. Let’s set one up!
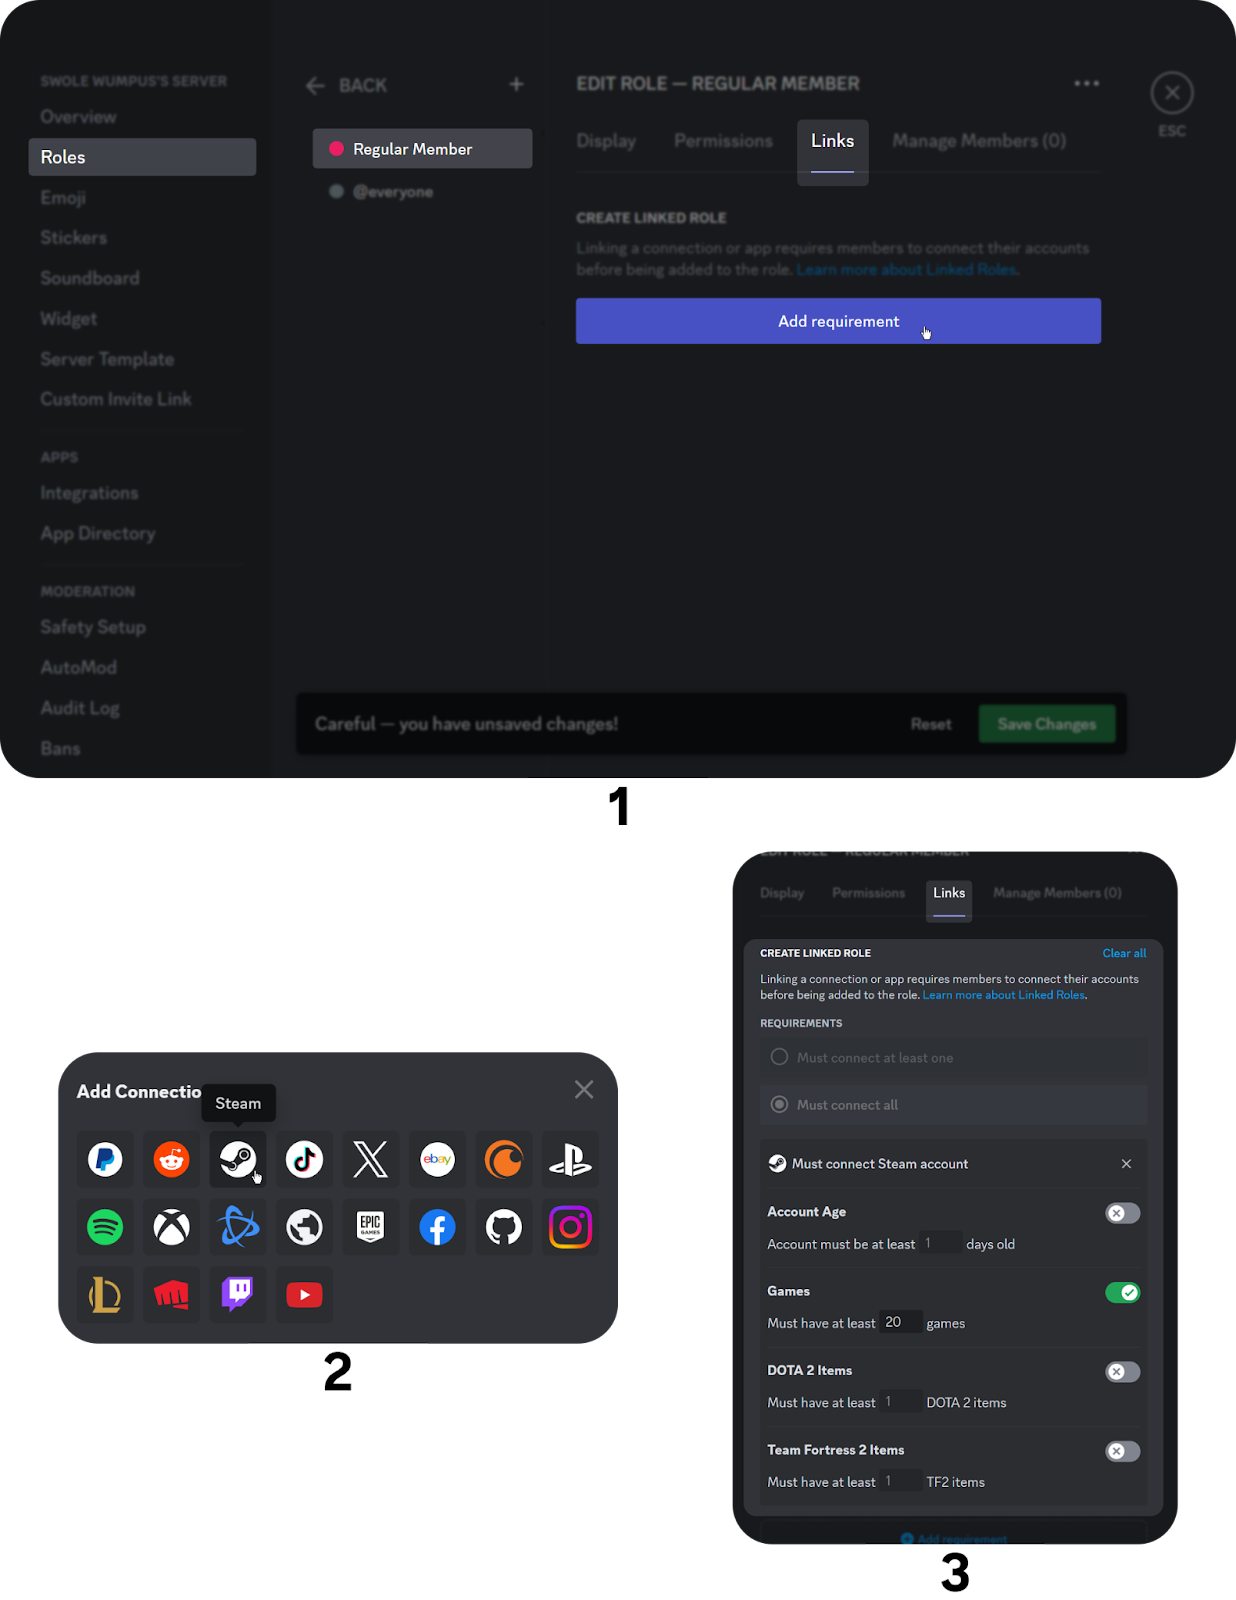
- Navigate to the “Links” tab and click “Add requirement”.
- In the pop-up that opens when you click “Add requirement,” select a connection type; we’ll select Steam as an example.
- Selecting one will display certain filters. There are four filters for Steam: Account age, Games, DotA 2 Items, and Team Fortress 2 Items. Let’s adjust Games to 20 so that if a member connects their Steam account to their Discord account and has more than 20 games, they automatically get the role.
Alright, our role is ready! There’s a single step left: assigning the role. There are numerous ways to assign roles, and we will take a look at the simplest and most common way, which is assigning through the user profile:
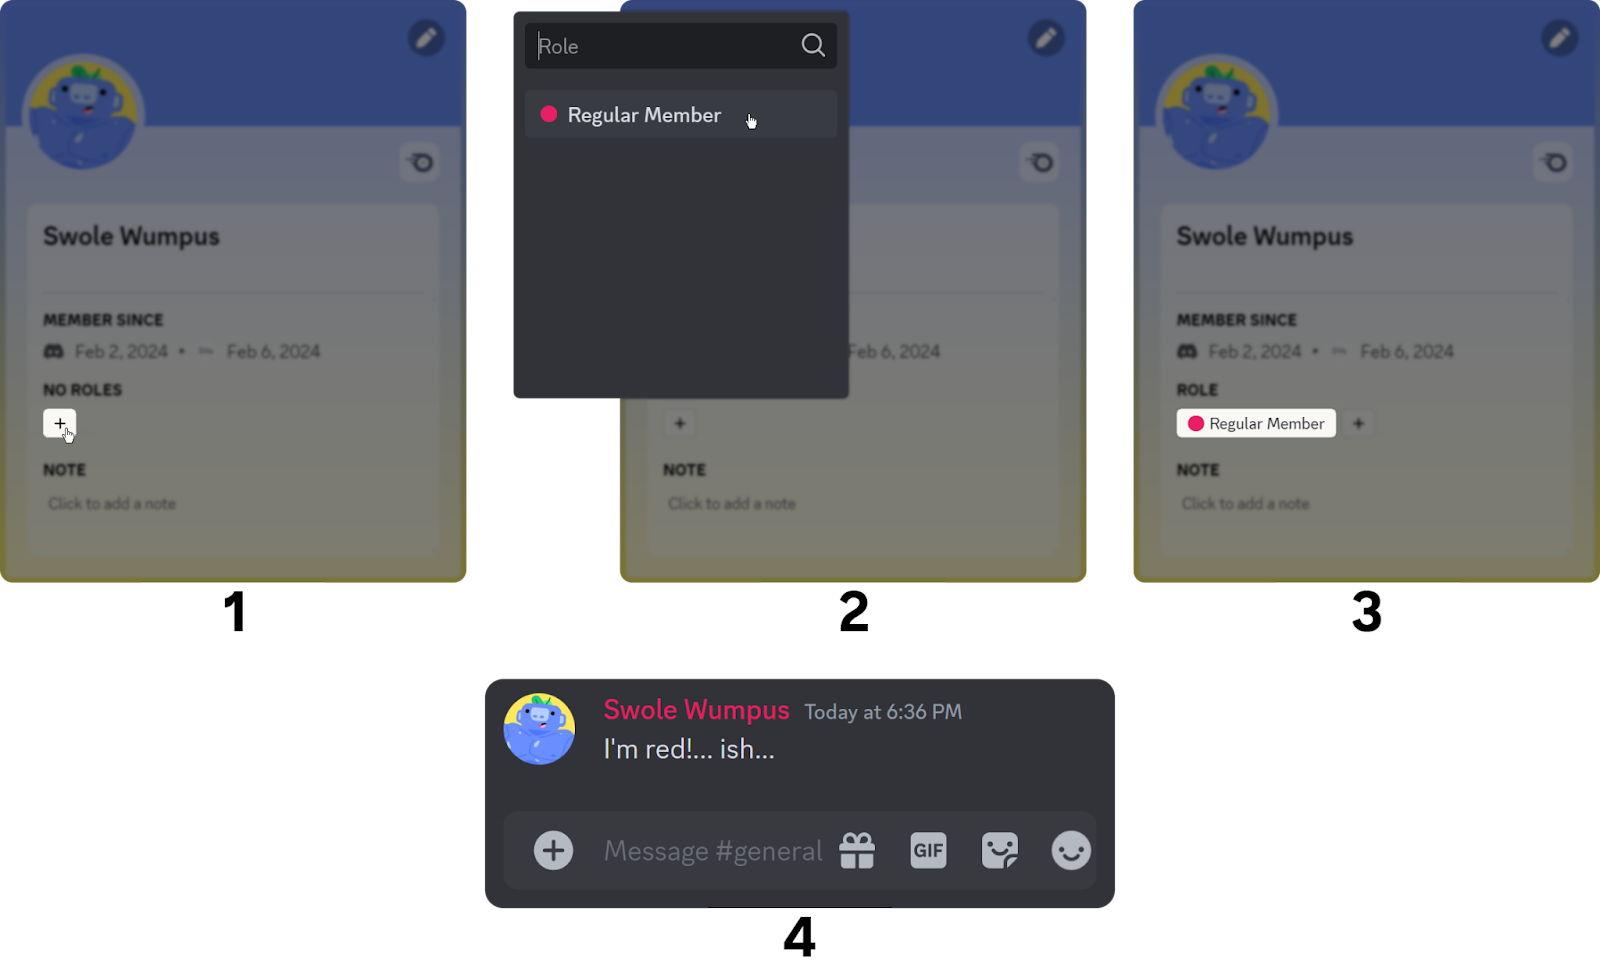
- Click on a user’s username or profile icon to open their profile, and click the plus icon under the “No Roles” section. This will open a pop-up menu displaying all the available roles.
- Click on a role to give the role to the user.
- Done! That’s it! The user now has the role.
- As you can see, the role has a reddish color, and since that’s the user's topmost role, the username is now that color.
Creating and assigning Discord roles on iOS
Creating and assigning roles on iOS is similar to doing so on a desktop. You need the same permission, “Manage Roles,” to create and assign them. Although the iOS process might look a bit complex at first look, it’s not! First, we have to navigate to the Roles section and create one:
- Press the server name at the top of your channel list; this will open the server menu.
- In the server menu, press the “Settings” (cogwheel icon) button to open the Server Settings.
- Scroll down a bit and press the “Roles” button to open the Server Roles section.
- Since we don’t have any roles yet, we can only see a “Create Role” button and the @everyone role, which all members have by default. Let’s press the “Create Role” to create our first role.

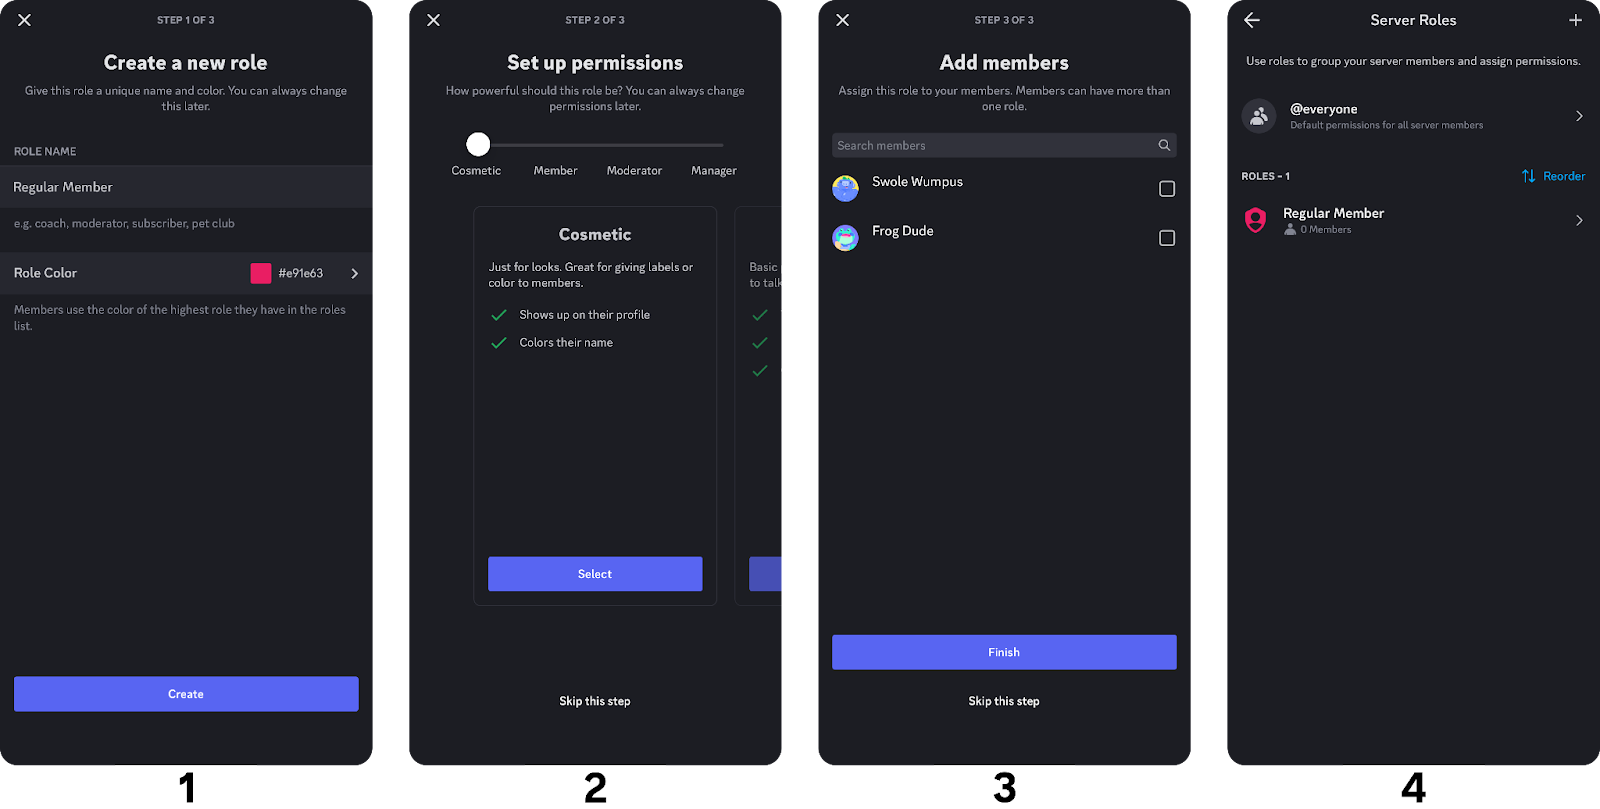
Pressing the “Create Role” button will make us go through the 3-step process of creating a role. Let’s see what the steps are:
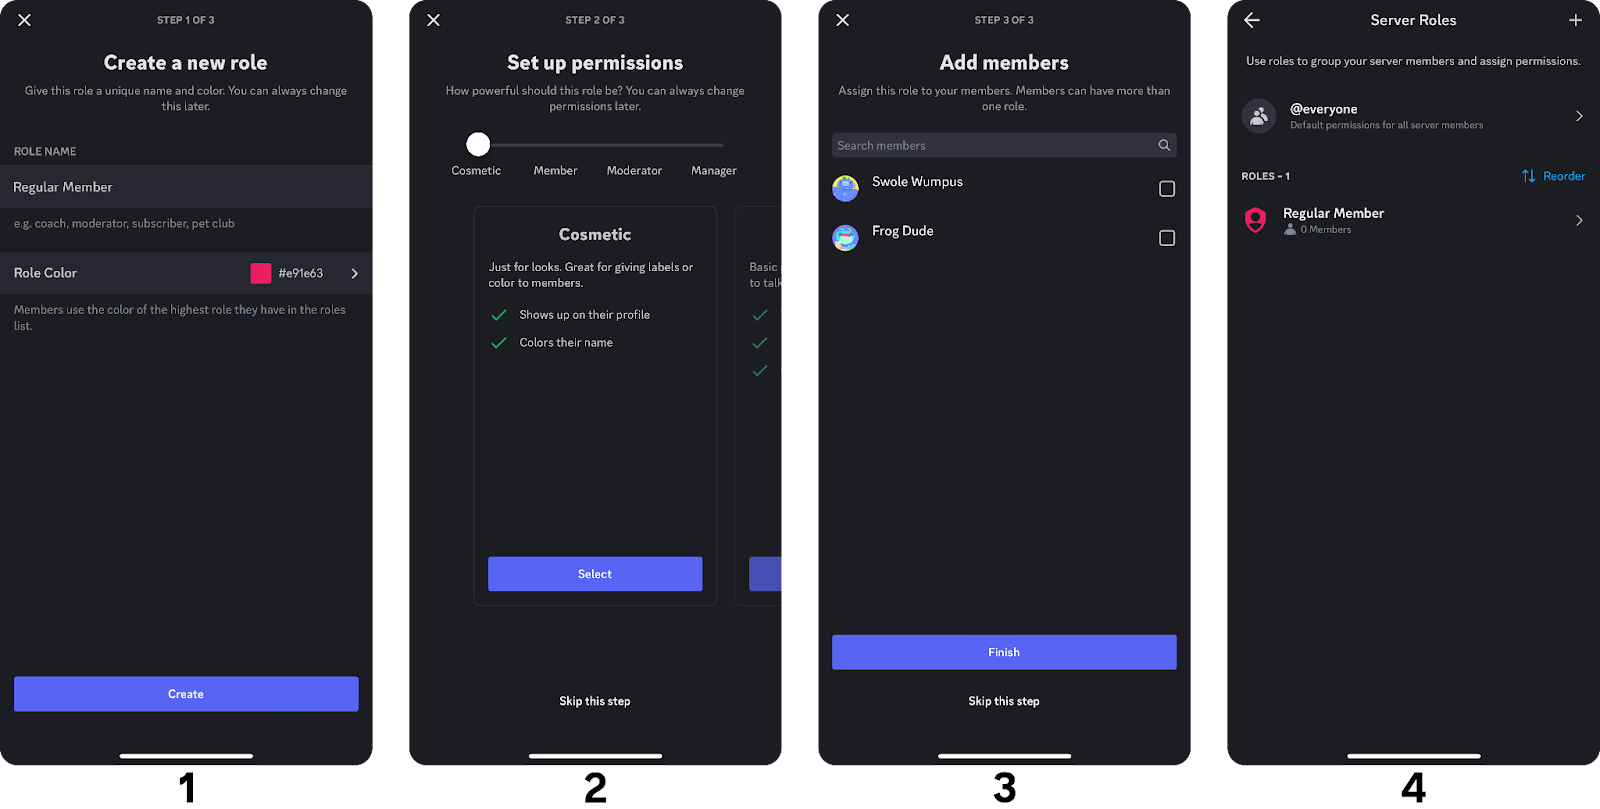
- In Step 1, you should give your role a cool name and select a color for it. You can change them later!
- In Step 2, Discord prompts you to select a permission template; there are four of them: Cosmetic, Member, Moderator, and Manager. This is a great feature that streamlines the role-creation process. You can select a permission template from this list or press the “Skip this step” text at the bottom to render the role permission-free. We’re going to do the latter because we want to set up each permission one by one.
- In Step 3, Discord prompts you to add members to your new role. This is an easy way to give the role to members. Once you’re done, press the “Finish” button.
- You can now see the Server Roles section again, but with the role this time!
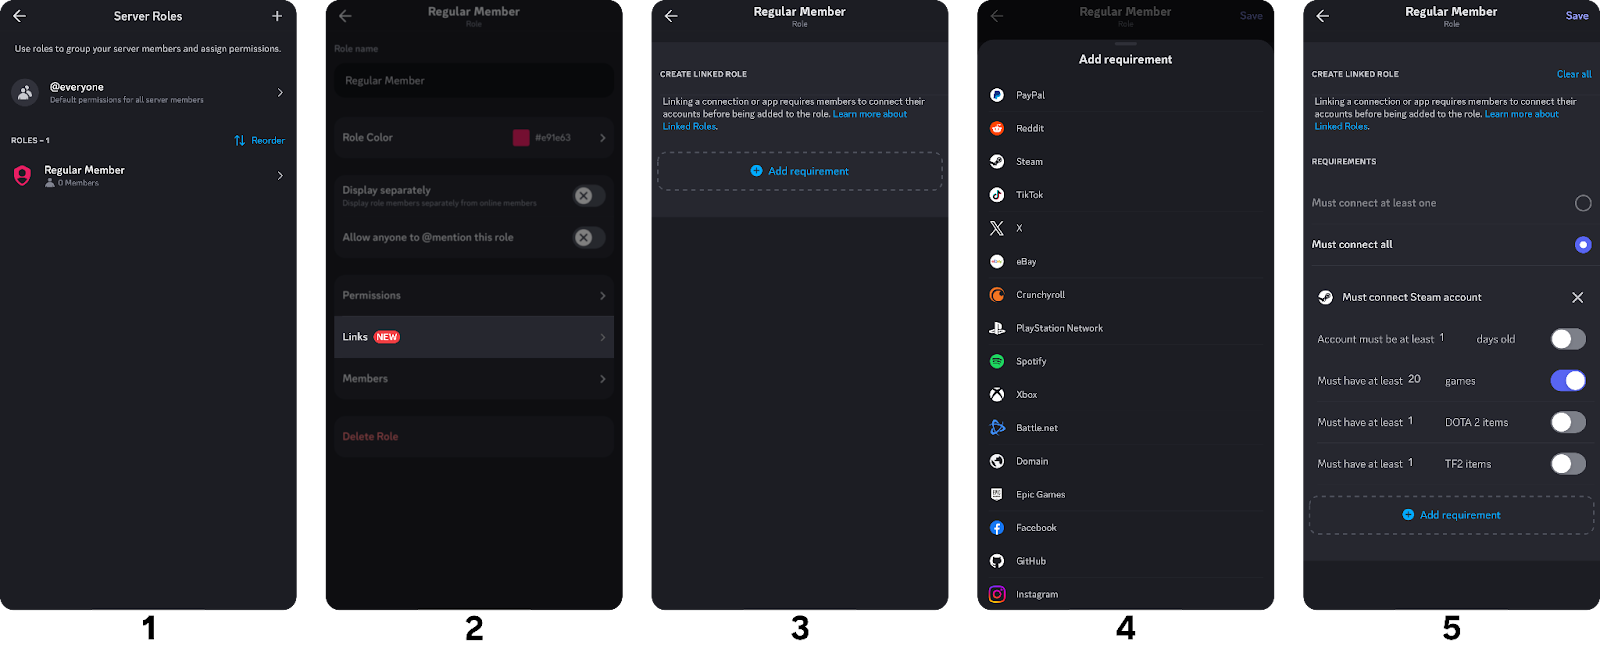
We created our first role, fantastic! Let's examine the role settings section before moving on to the permissions section. Click on the role while in the Server Roles section to open role settings. There, you can edit the role name, color, and some of its settings:
- Display separately - This setting will display members of your role separately from other roles, which is useful for differentiating roles.
- Allow anyone to @mention this role - This setting will allow all users to mention the role. We don’t recommend you turn this setting on unless the role is a moderator role.
- Permissions - This button will open the permission settings of the role.
- Links - This button will open the role settings linked to the role.
- Members - This button will display all the members of the role, and you can add/remove roles from there.
- Delete Role - This button will delete the role. Be careful!
Adjusting permissions for Discord roles on iOS
Now we know our way around the role settings let’s see how we can adjust the permissions for the role. To do that:
- Press the role you want to edit in the Server Roles section. This will open the role settings.
- Press the “Permissions” button on the role settings to open the permission list.
- Turn on or off the roles by pressing the toggles. Some permissions like Administrator, Manage Server, and Kick Members are dangerous permissions to grant; be careful! After you’re done, press the “Save” text at the top right.
Our permissions are ready! Now, let’s take a look at the linked roles feature. Linked roles is a powerful feature that allows you to set up roles that are automatically granted to users, given that they meet certain requirements. Let’s examine:
- Press on the role you want to edit. This will open the role settings screen.
- Press the “Links” button to open linked role settings.
- Since we don’t have any linked role requirements, we only see the “Add requirement” button, so let’s press it. This will display a pop-up listing all available requirements.
- We’ll select Steam as an example; feel free to test all of them out!
- Once you press Steam, you will see that there are requirements. We can toggle each requirement and adjust the parameters; we’ll turn on the “Must have at least X games” requirement and adjust the number to 20. So, if a user has their Steam account connected to their Discord account and they have at least 20 games in their Steam account, they will automatically get this role!

Don’t forget that turning the linked role feature on will prevent you from adding and removing roles to/from your members since the feature makes the role “automatic.” We have one last thing to go through, and that’s assigning the role! We mentioned that you can assign roles to your members through the “Members” section of your role settings, but we’ll follow a more common approach as an example:
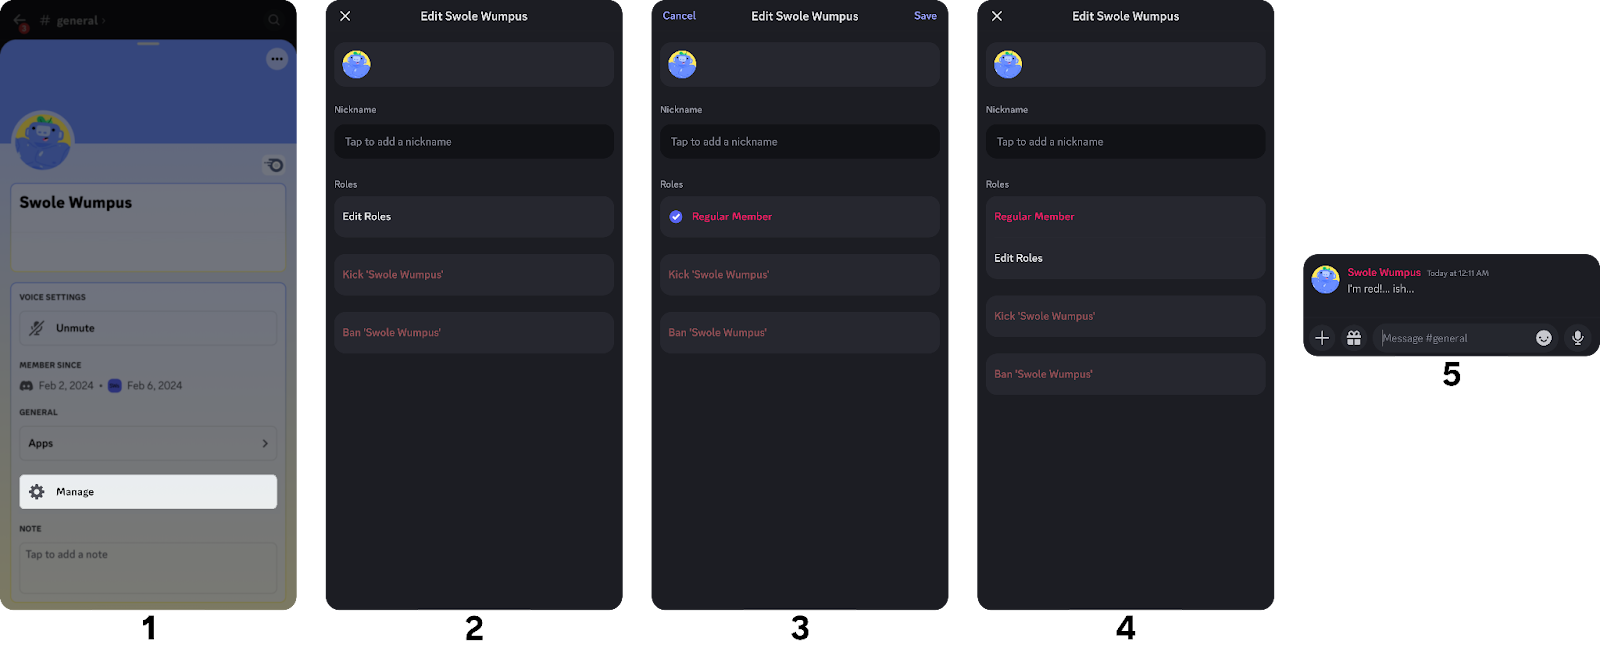
- Press on a user's profile icon to open their server profile. Click the “Manage” button to open the user settings.
- In the user settings, press the “Edit Roles” button. This will display all available roles.
- After selecting the role you want to add (or remove), you can press the “Save” text at the top right of your screen.
- Now, you can see the role you just assigned above the “Edit Roles” button.
- Check that out! Now that you’ve given the role to the user, their username is changed to the role’s color. Great job!

Creating and Assigning Discord Roles on Android
Creating and assigning roles in Android is very similar to the desktop process. You need the same permission, “Manage Roles,” to create and assign them. First, we have to navigate to the Roles section and create one:
- Press the server name at the top of your channel list; this will open the server menu.
- In the server menu, press the “Settings” (cogwheel icon) button to open the Server Settings.
- Scroll down a bit and press the “Roles” button to open the Server Roles section.
- Since we don’t have any roles yet, we can only see a “Create Role” button and the @everyone role, which all members have by default. Let’s press the “Create Role” to create our first role.

Pressing the “Create Role” button will make us go through the 3-step process of creating a role. It is as follows:
- In Step 1, you should give your role a cool name and select a color for it. You can change them later!
- In Step 2, Discord prompts you to select a permission template; there are four of them: Cosmetic, Member, Moderator, and Manager. This is a great feature that streamlines the role-creation process. You can select a permission template from this list or press the “Skip this step” text at the bottom to render the role permission-free. We’re going to do the latter because we want to set up each permission one by one.
- In Step 3, Discord prompts you to add members to your new role. This is an easy way to give the role to members. Once you’re done, press the “Finish” button.
- You can now see the Server Roles section again, but with the role this time!
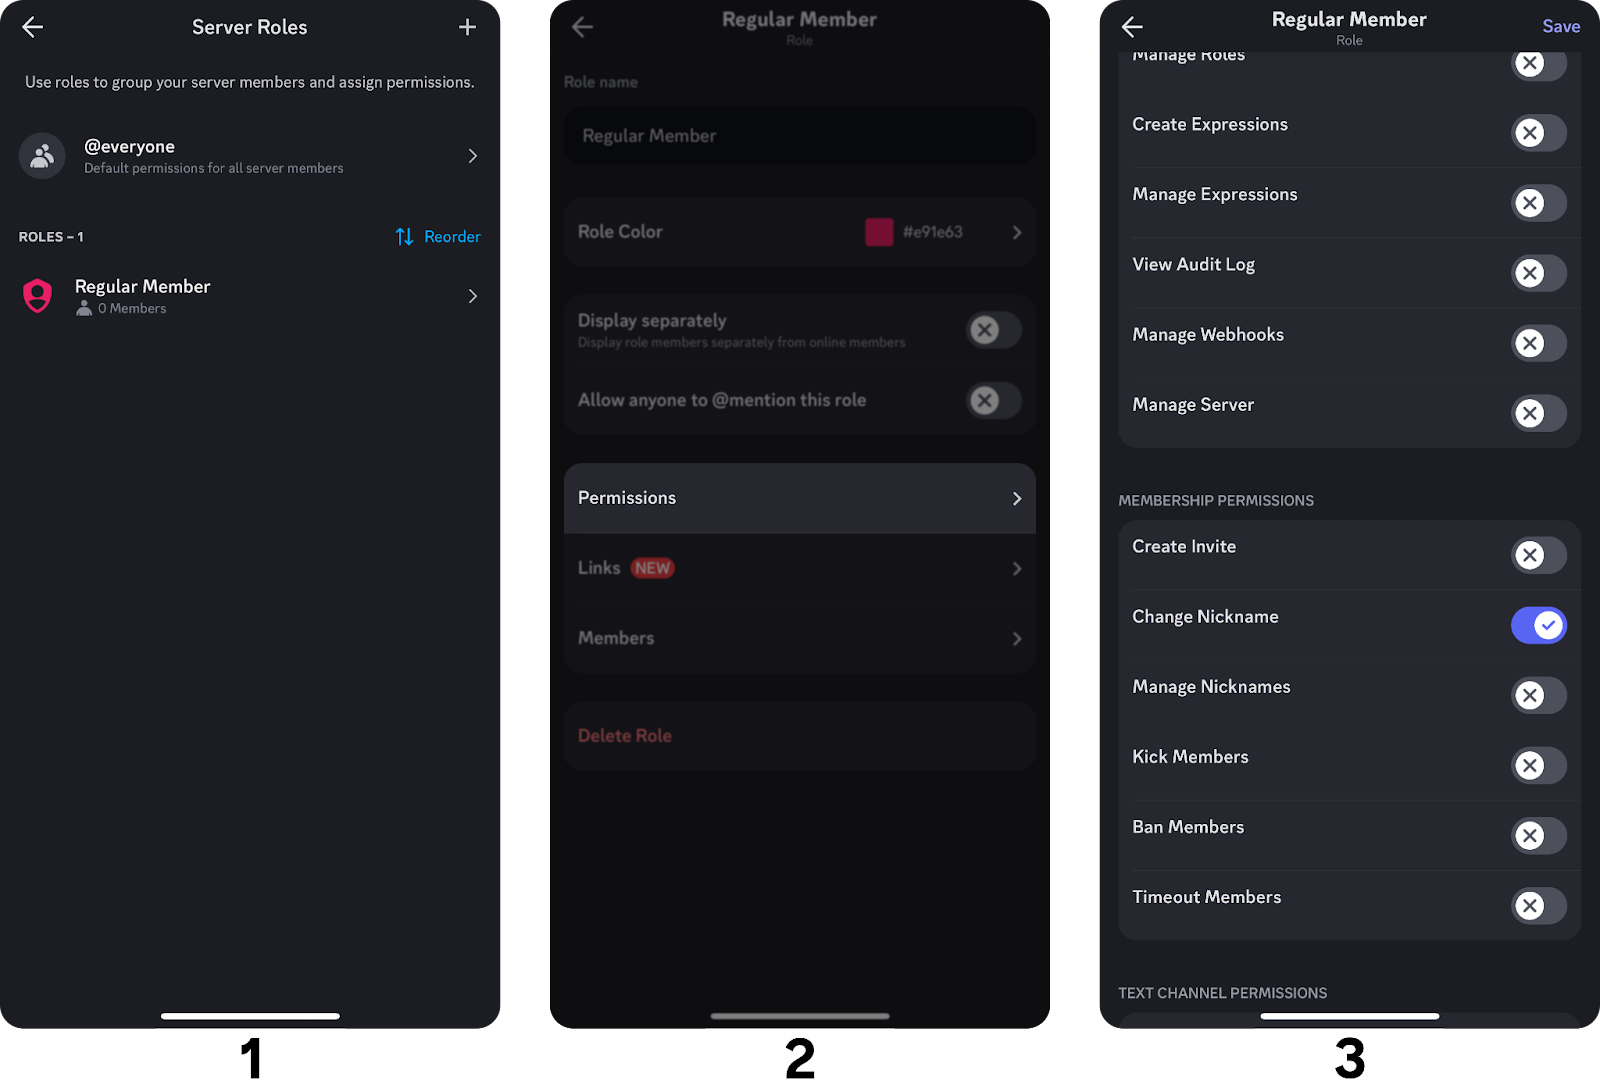
Your first role is now created. Now, let's examine the role settings section before moving on to the permissions section. Click on the role while in the Server Roles section to open role settings. There, you can edit the role name, color, and some of its settings:
- Display separately - This setting will display members of your role separately from other roles, which is useful for differentiating roles.
- Allow anyone to @mention this role - This setting will allow all users to mention the role. We don’t recommend you turn this setting on unless the role is a moderator role.
- Permissions - This button will open the permission settings of the role.
- Links - This button will open the role settings linked to the role.
- Members - This button will display all the members of the role, and you can add/remove roles from there.
- Delete Role - This button will delete the role. Be careful!
Adjusting permissions for Discord roles on Android
If you want to change the permissions for your roles, here's how you do that:
- Press the role you want to edit in the Server Roles section. This will open the role settings.
- Press the “Permissions” button on the role settings to open the permission list.
- Turn on or off the roles by pressing the toggles. Some permissions like Administrator, Manage Server, and Kick Members are dangerous permissions to grant; be careful! After you’re done, press the “Save” text at the top right.

Our permissions are ready! Now, let’s take a look at the linked roles feature. Linked roles is a powerful feature that allows you to set up roles that are automatically granted to users, given that they meet certain requirements. Let’s examine:
- Press on the role you want to edit. This will open the role settings screen.
- Press the “Links” button to open linked role settings.
- Since we don’t have any linked role requirements, we only see the “Add requirement” button, so let’s press it. This will display a pop-up listing all available requirements.
- We’ll select Steam as an example; feel free to test all of them out!
- Once you press Steam, you will see that there are requirements. We can toggle each requirement and adjust the parameters; we’ll turn on the “Must have at least X games” requirement and adjust the number to 20. So, if a user has their Steam account connected to their Discord account and they have at least 20 games in their Steam account, they will automatically get this role!
Don’t forget that turning the linked role feature on will prevent you from adding and removing roles to/from your members since the feature makes the role “automatic.” We have one last thing to go through, and that’s assigning the role! We mentioned that you can assign roles to your members through the “Members” section of your role settings, but we’ll follow a more common approach as an example:
- Press on a user's profile icon to open their server profile. Click the “Manage” button to open the user settings.
- In the user settings, press the “Edit Roles” button. This will display all available roles.
- After selecting the role you want to add (or remove), you can press the “Save” text at the top right of your screen.
- Now, you can see the role you just assigned above the “Edit Roles” button.
- Check that out! Now that you’ve given the role to the user, their username is changed to the role’s color.
Why create Discord roles? - Discord role ideas
Discord roles are one of the most important steps of setting up a server, and you’ll need to adjust them as your server grows. They are the backbone of user hierarchy, and they have a great role in organizing a server. Having a solid role system can be the deciding factor between an average and a great server. Let’s take a look at some examples:
- Informational roles
These roles can be used to display information about the user. Users can be given the option to choose them from reaction roles or member onboarding.
Examples: Pronouns, location, platform, interests - Access roles
These roles can determine which channels members can access.
Examples: Moderator (allows users to access the #staff channel and use moderation actions like kick, ban, or mute) Artist (allows users to send messages in the #art channel) Cool Club (allows the most active users to see a special channel), Bot Handler (allows users to adjust the bots) - Mentionable roles
These roles are expected to be mentioned. Not all users want to be mentioned every time you post an announcement, so give them the option to opt-out.
Examples: Announcements, giveaways, dead-chat pings, events - Premium roles
Often utilized in paid communities, premium roles allow users to access special channels tailored for them.
Examples: Subscriber, tiered roles (Tier 1 VIP, Tier 2 VIP, etc.) - Cosmetic roles
These roles are purely cosmetic and allow users to select their own colors or icons.
Examples: Red, blue, cyan - Level roles
Some servers utilize bots that have leveling systems. Users level up as they spend time on the server; this can encourage them to stay active.
Examples: Level 1, Level 5, Level 10, Level 15, etc.
The roles above are all optional, fun roles that serve to enhance your server experience but are not necessary for running a Discord community. However, there are some roles that almost every server has. They’re mostly used to differentiate users from each other and act as a foundation for user hierarchy.
Let’s take a look at them so you’ll have an idea of a basic role setup:
- Admin
Has the Administrator perm (which grants every single permission) and manages the server - Moderator
Has moderation permissions like Manage Roles, Manage Messages, Kick Members, Ban Members, Move Members, Timeout Members, Create Public/Private Threads, Manage Threads, Mute Members, and Deafen Members. - Trial-Mod
This role is the onboarding role for the Moderators. Before granting someone the Moderator role, thus creating a risk, making them a Trial-Mod can help you see if they deserve to be a Moderator or not. They have downgraded moderation permissions like Timeout Members, Mute Members, Deafen Members, and Manage Messages. - Experienced
This role is to award the most active users; after all, they’re what makes your server dead or active. Giving them a special role like this can encourage them to keep being active. - Regular
Having a Regular role that every member has can help you in setting up the channel permissions. Disallowing this role’s access on certain channels like #staff is easier than allowing every single staff role to see the channel. - Bots
All bots come with their own roles, and adjusting every single one of them can be time-consuming. Let’s say you created a channel and you need to allow every single bot to be able to send messages there. Instead of adding 20 roles and allowing all of them, you can just give a Bots role to all of your bots and allow that role.
Manage your Discord community With Whop
Roles open the door to many possibilities, from giving username colors to integrating external systems. Utilizing them in the right way will step up your server game. They’re not just for moderation or fun, though. You can generate an income with premium roles that determine access to certain parts or the entirety of your server - so if a user finds value in your content, they pay a subscription fee to become a paid member, receive a paid role, and access gated content.
Whop is a streamlined paid-access platform for Discord that can help you with every step along the way to generating an income. Signing up and starting selling access to your server takes less than 10 minutes. Sign up now and start earning.