Wondering how to share your screen on Discord? Learn how with this step-by-step guide from Whop.
Key takeaways
- Screen sharing on Discord requires joining a voice channel first, where you can share applications, full screens, or capture devices.
- Customize your stream by adjusting resolution and frame rate settings live, and save memorable moments using ALT + C clips.
- Screen sharing builds community engagement by letting server owners and members connect through shared gameplay and activities.
Screen sharing (aka streaming) on Discord is one of the most utilized features of the platform. Whether you want to watch videos with your friends, show them something on an app, or just stream your gameplay, screen sharing offers all the tools you need.
With more and more features getting introduced to screen sharing, it’s a feature every Discord user should know how to use. In this article, we’re going to teach you what it is, how it can be used on different platforms, and its internal features. By the end, you’ll be fully equipped to use the feature to its fullest.
Let’s dig in!
What is screen sharing (streaming)?
Screen sharing is an umbrella term for features that allow others to see your screen. TeamViewer, while its primary function is remote desktop access, is one of the first platforms to popularize the screen sharing feature. Screen sharing commonly refers to displaying your screen to someone else nowadays, compared to back then when it meant giving them access to your “screen.”
Some popular platforms like Skype, Zoom, and Discord have also adopted the feature, and it’s widely used among those platforms. In our case, Discord, screen sharing is used for streaming - a kind of screen sharing that focuses on games. Popularized by platforms like Twitch, streaming is a fun activity to do with your friends or even strangers! It’s guaranteed to see at least a few people streaming their gameplay when you join a gaming server.
Screen sharing is one of the most used and popular features of Discord, so, why should you screen share, and how can you do it?
Benefits of streaming
Streaming can have many benefits, depending on how you utilize the feature, which usually depends on what your Discord server is about. Let’s say you have a server that focuses on Minecraft. Many of your events can be streamed in voice channels. You can host your own 'Let’s Plays' via streaming, or you can create a bunch of voice channels for your members to join and share their gameplay with each other through streaming; the uses of the screen share feature are limitless.
While screen sharing is a great way to display information, show people stuff, make commentaries, and more, it’s also an amazing way to get personal with your members, which is one of the most important steps of being a server owner. Many server owners create the server, hire staff, and just leave the server to run itself, not interacting with members or being an active part of the server. This is a common mistake that holds many servers from reaching their true potential. Screen sharing is one of the best ways to prevent that!
Even if you don’t want to interact with a bunch of people you don’t really have a connection with, just join the voice channel, start a screen share, and continue the work you do. It’s a great way to create a connection between you, your staff, and your members.
How to stream video in Discord
You can only screen share in voice channels. When you join a voice channel, the app offers a few functions: muting your microphone, deafening yourself, starting activities within the voice channel, and more. One of them is starting screen sharing. Although it’s very simple to start a screen share, Discord offers a few useful settings for you to customize the experience. Let’s take an in-depth look at starting and adjusting your stream on desktop, iOS, and Android.
Screen sharing on desktop
There are many reasons why you may want to screen share on a desktop. Maybe you want to show your friends how to adjust your Bluetooth settings on a desktop, or maybe you want to share your gameplay so they can see the house you built in Minecraft. Let’s start by learning how to start a screen share; then, we’ll examine its settings. To start a screen share:
- Join a voice channel by clicking on it. This displays a new section above your mini-user dashboard at the bottom of your channel list. The new voice channel section will display your connection status, the channel you’re in, Krisp setting (sound bars icon,) the disconnect button (put-down phone icon,) the “Turn on Camera” button (camera icon,) the “Share Your Screen” button (the monitor icon,) the “Start an Activity” button (rocket ship icon,) and the “Open Soundboard” button (megaphone icon)
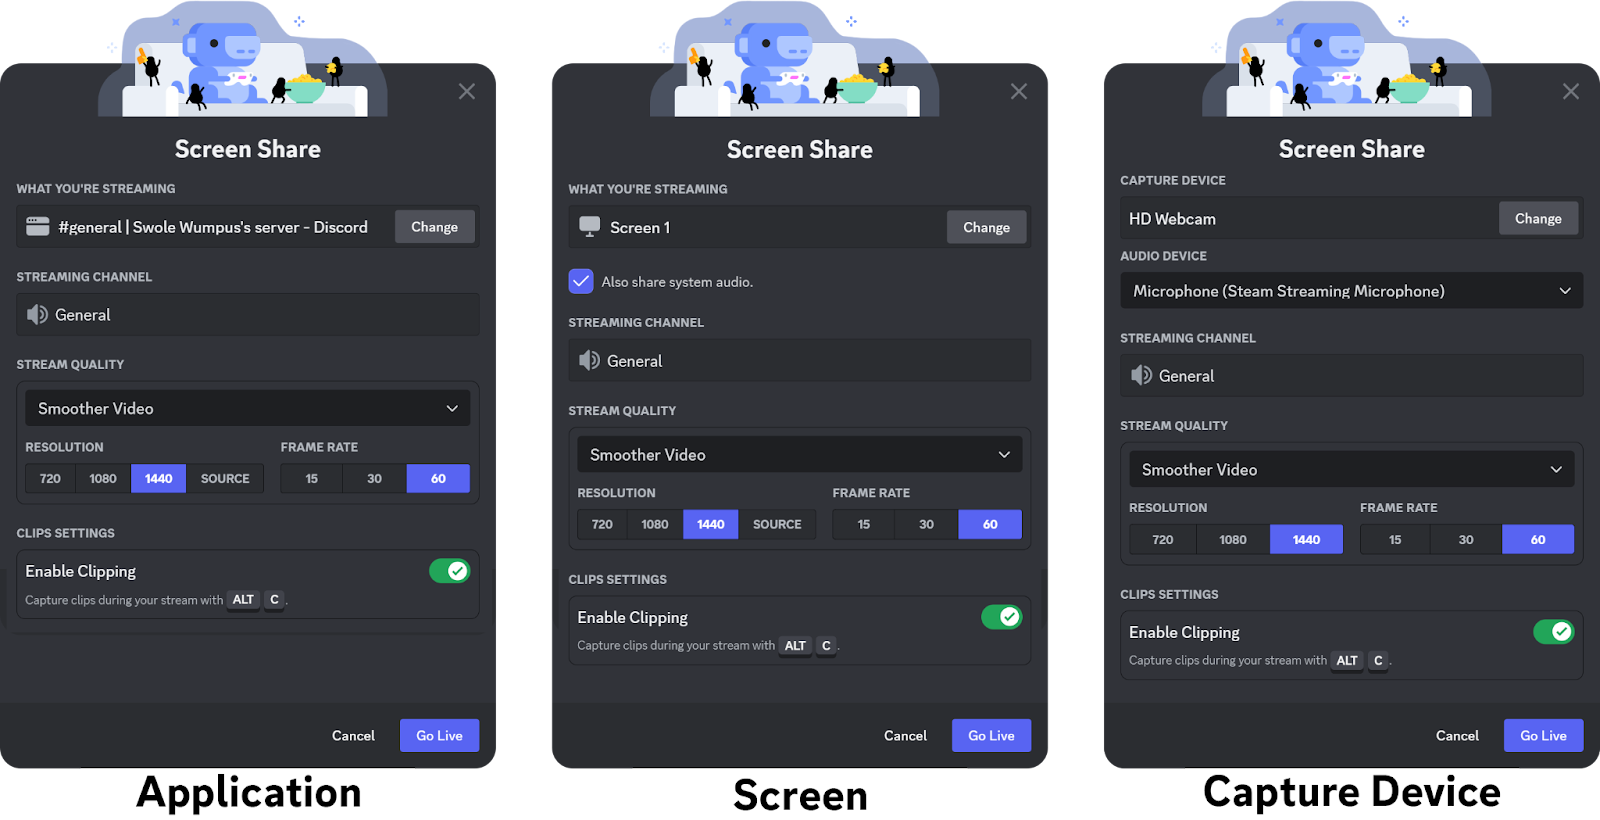
- Click the “Share Your Screen” button (monitor icon) to open the screen sharing screen. There, you’ll see three tabs: Applications, Screens, and Capture Devices. We’ll look at these later. For the sake of this walkthrough, let’s select an application by clicking on the thumbnail. This will direct you to the screen sharing settings screen.
- In the screen sharing settings screen, you can see what you’re sharing, which channel you’re sharing to, the stream quality, and the option to enable Clips. We’ll go into the details of the stream quality settings later. For now, you should decide on the resolution and frame rate of your screen share. You can select the highest options in both if you have a high upload speed. If not, you should lower them depending on what you’re planning to share. If you’re going to stream something that will have a lot of moving things in it (like a video or a game,) you should keep the frame rate at least 30.
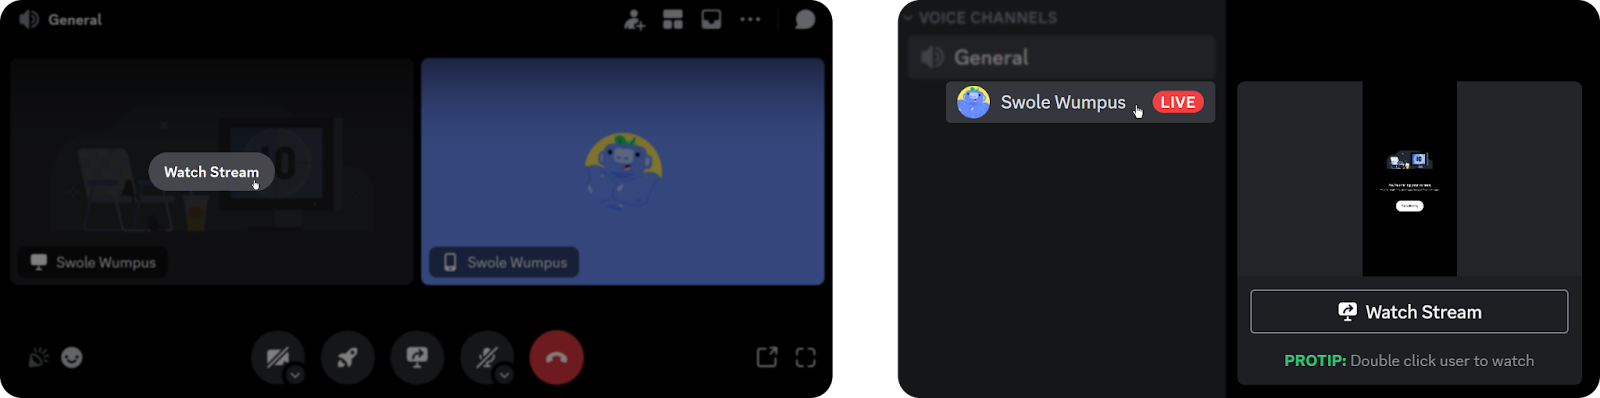
- Once you’re comfortable with your settings, click the “Go Live” button to start sharing your screen. This will display a mini view of your stream at the top right. The view is moveable, so feel free to drag it wherever you want within the Discord app. If you double-click on it (or click the voice channel you’re in), you’ll see the voice channel view.
Great! You’ve started your first screen share. Before moving on to the finer details, let’s review how to start sharing on iOS and Android.
Screen sharing on iOS
Screen sharing in iOS might be slightly different from starting a stream on a desktop, but both follow the same logic. Let’s see how you can start a screen share on an iOS device:
- Navigate to the Servers tab (bottom left) to see the channel list. Once there, press on a voice channel to see the preview of it.
- You’ll be able to see if there are users in the channel. You also have the option to turn your microphone on and off before joining by pressing the microphone icon at the bottom left. Pressing the chat bubble icon on the bottom right will open the voice channel’s text channel. Press the green “Join Voice” button to join the voice channel.
- Now you’re in the voice channel. In the main view, you’ll be able to see everyone in the channel and some functional buttons like turn on/off the camera, turn on/off the microphone, go to the text channel of the voice channel, start an activity, and leave the voice channel. Drag the bottom menu to the top to open up more options.
- In the options view, you can see several functions, such as soundboard, sharing your screen, deafening yourself, changing audio output, noise suppression, and more. Press the “Share Your Screen” button to start the process.
- Pressing the “Share Your Screen” button will prompt you to allow Discord to record your screen, which is needed for screen sharing. Press “Start Broadcast” to start your screen share.
- Now, everyone in the voice channel can view your screen share until you press the “Stop Sharing” button that replaces the “Share Your Screen” button or the “Stop Broadcast” button in the iOS prompt.

Screen sharing on Android
Sharing your screen on Android is very similar to iOS. Let’s take a look at how:
- Navigate to the Servers tab (bottom left) to see the channel list. Once there, press on a voice channel to see the preview of it. You’ll be able to see if there are users in the channel. You also have the option to turn your microphone on and off before joining by pressing the microphone icon at the bottom left. Pressing the chat bubble icon on the bottom right will open the voice channel’s text channel. Press the green “Join Voice” button to join the voice channel.
- Now you’re in the voice channel. In the main view, you’ll be able to see everyone in the channel and some functional buttons like turn on/off the camera, turn on/off the microphone, go to the text channel of the voice channel, start an activity, and leave the voice channel. Drag the bottom menu to the top to open up more options.
- In the options view, you can see a bunch of functions like soundboard, sharing your screen, deafening yourself, changing audio output, noise suppression, and more. Pressing the “Share Your Screen” button will prompt you to allow Discord to record your screen, which is needed for screen sharing. Press “Start now” to start your screen share. Now, everyone in the voice channel can view your screen share until you press the “Stop Sharing” button that replaces the “Share Your Screen” button.
Screen share settings
The initial screen share step prompts you to choose one of three types of streamable content: applications, screens, or capture devices. Clicking on the thumbnail will proceed you to the next step, which has different audio settings for each:
- Application - Screen sharing an application will share the application’s sound by default, so this settings screen doesn’t have a sound section.
- Screen - Screen sharing a screen gives you the option to share your system audio.
- Capture device - Screen sharing a capture device will require you to select an audio device as well. You might be wondering why I should screen share my capture device when I can just turn on my camera. Well, video calls have a user limit of 25 and screen sharing your capture device is a way to bypass that.
Discord streaming tips
You now know how to share your screen on Discord; that’s great! But there are always more things to learn, so let’s touch upon some tips for you to improve your experience:
- You can save a Clip of a screen share you’re watching by hitting the ALT + C keybind; this applies to your own screen shares as well. Visit the Clips section of your user settings to tweak your Clips settings.
- Users can watch multiple screen shares at once.
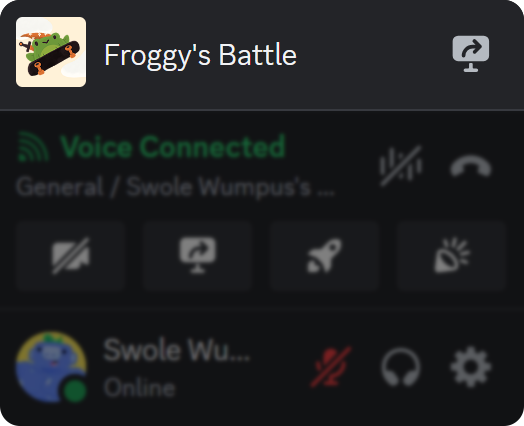
- You can change the resolution and frame rate settings of your screen share while it’s live. First, open the voice channel view by clicking on the voice channel, then click the little down arrow icon next to the “Stop Streaming” button (monitor icon). There, you’ll see the “Stream Quality” bar, which displays the resolution and frame rate options when hovered over. Clicking any of the settings will immediately adjust your stream.
- You can also click on the “Change Windows” button below the “Stream Quality” to change the application/screen/capture device you’re streaming on the go.
- When someone else starts a stream in a voice channel you’re in, you can join it by clicking on the “Watch Stream” button. If you’re not in a voice channel, you can still see that there’s a live stream and watch it (and join the voice channel) by clicking on the stream thumbnail.
- People who’re not in the same voice as you will be able to see a preview of your stream by hovering over your name under a voice channel. You can use a virtual camera (like OBS’s) to avoid this.
- If you’re playing a game recognized by Discord, you’ll see an additional tab above your user mini-dashboard that displays the game you’re playing and a monitor icon that prompts you to stream your game when clicked.
Monetize your community with Whop
Whether you’re planning to screen share a game, VIP content, or a business strategy, you now know how to do so. Everything you learn about managing servers will help you become a better server administrator, and Whop will help you monetize your server.
Whop is the leading Discord monetization platform available with thousands of communities using it to generate an income. You can be a trading expert, a content creator, a gamer, or a fitness coach, Whop can help you step up your game! Signing up and selling with Whop takes less than 10 minutes - what are you waiting for?