Need to transfer ownership of your Discord server? Find out how in this informative guide.
Key takeaways
- Discord server ownership transfers are irreversible and cannot be undone, so carefully consider trust before transferring.
- Transfer ownership through the Members section in Server Settings, requiring email or 2FA verification for security.
- Before giving up your server, consider alternatives like hiring moderators or migrating to platforms with expanded features.
Discord is one of the most popular social platforms – people use it to create all kinds of communities from sports betting to arts and crafts. But since all communities in Discord have members, moderators, managers, rules, and responsibilities, it can sometimes get overwhelming.
If the server isn’t performing as you expected or you think someone else could do a better job at running it – you can try transferring the server to them.
Transferring a server is easy to do in Discord. We’re going to help you through each step in this guide, so let’s dive in.
Transferring a Server on Discord
Transferring the ownership of a server means that you’ll no longer be the owner of the server. When you create the server, you’ll automatically get all the permissions, which means you have unlimited power. This means you can do everything with the server, including deleting it.
When you transfer the ownership of your server to someone else, you’ll be giving up all the power you have to them – but you’ll keep your roles. If you have a role with Administrator permissions, you can still do most things you want.
One thing you should keep in mind is that transferring a server is irreversible. So if you do transfer your server to another member, you can't revert it, and neither can Discord. You should take great caution when deciding to do this. Do you trust the person you’re transferring the server to? Do you think they will be able to keep the server going, or will they abandon it?
You can transfer your server to another member by using the Members section of Server Settings – let’s see how you can do that on desktop and mobile.
Transferring a Server on Discord Desktop
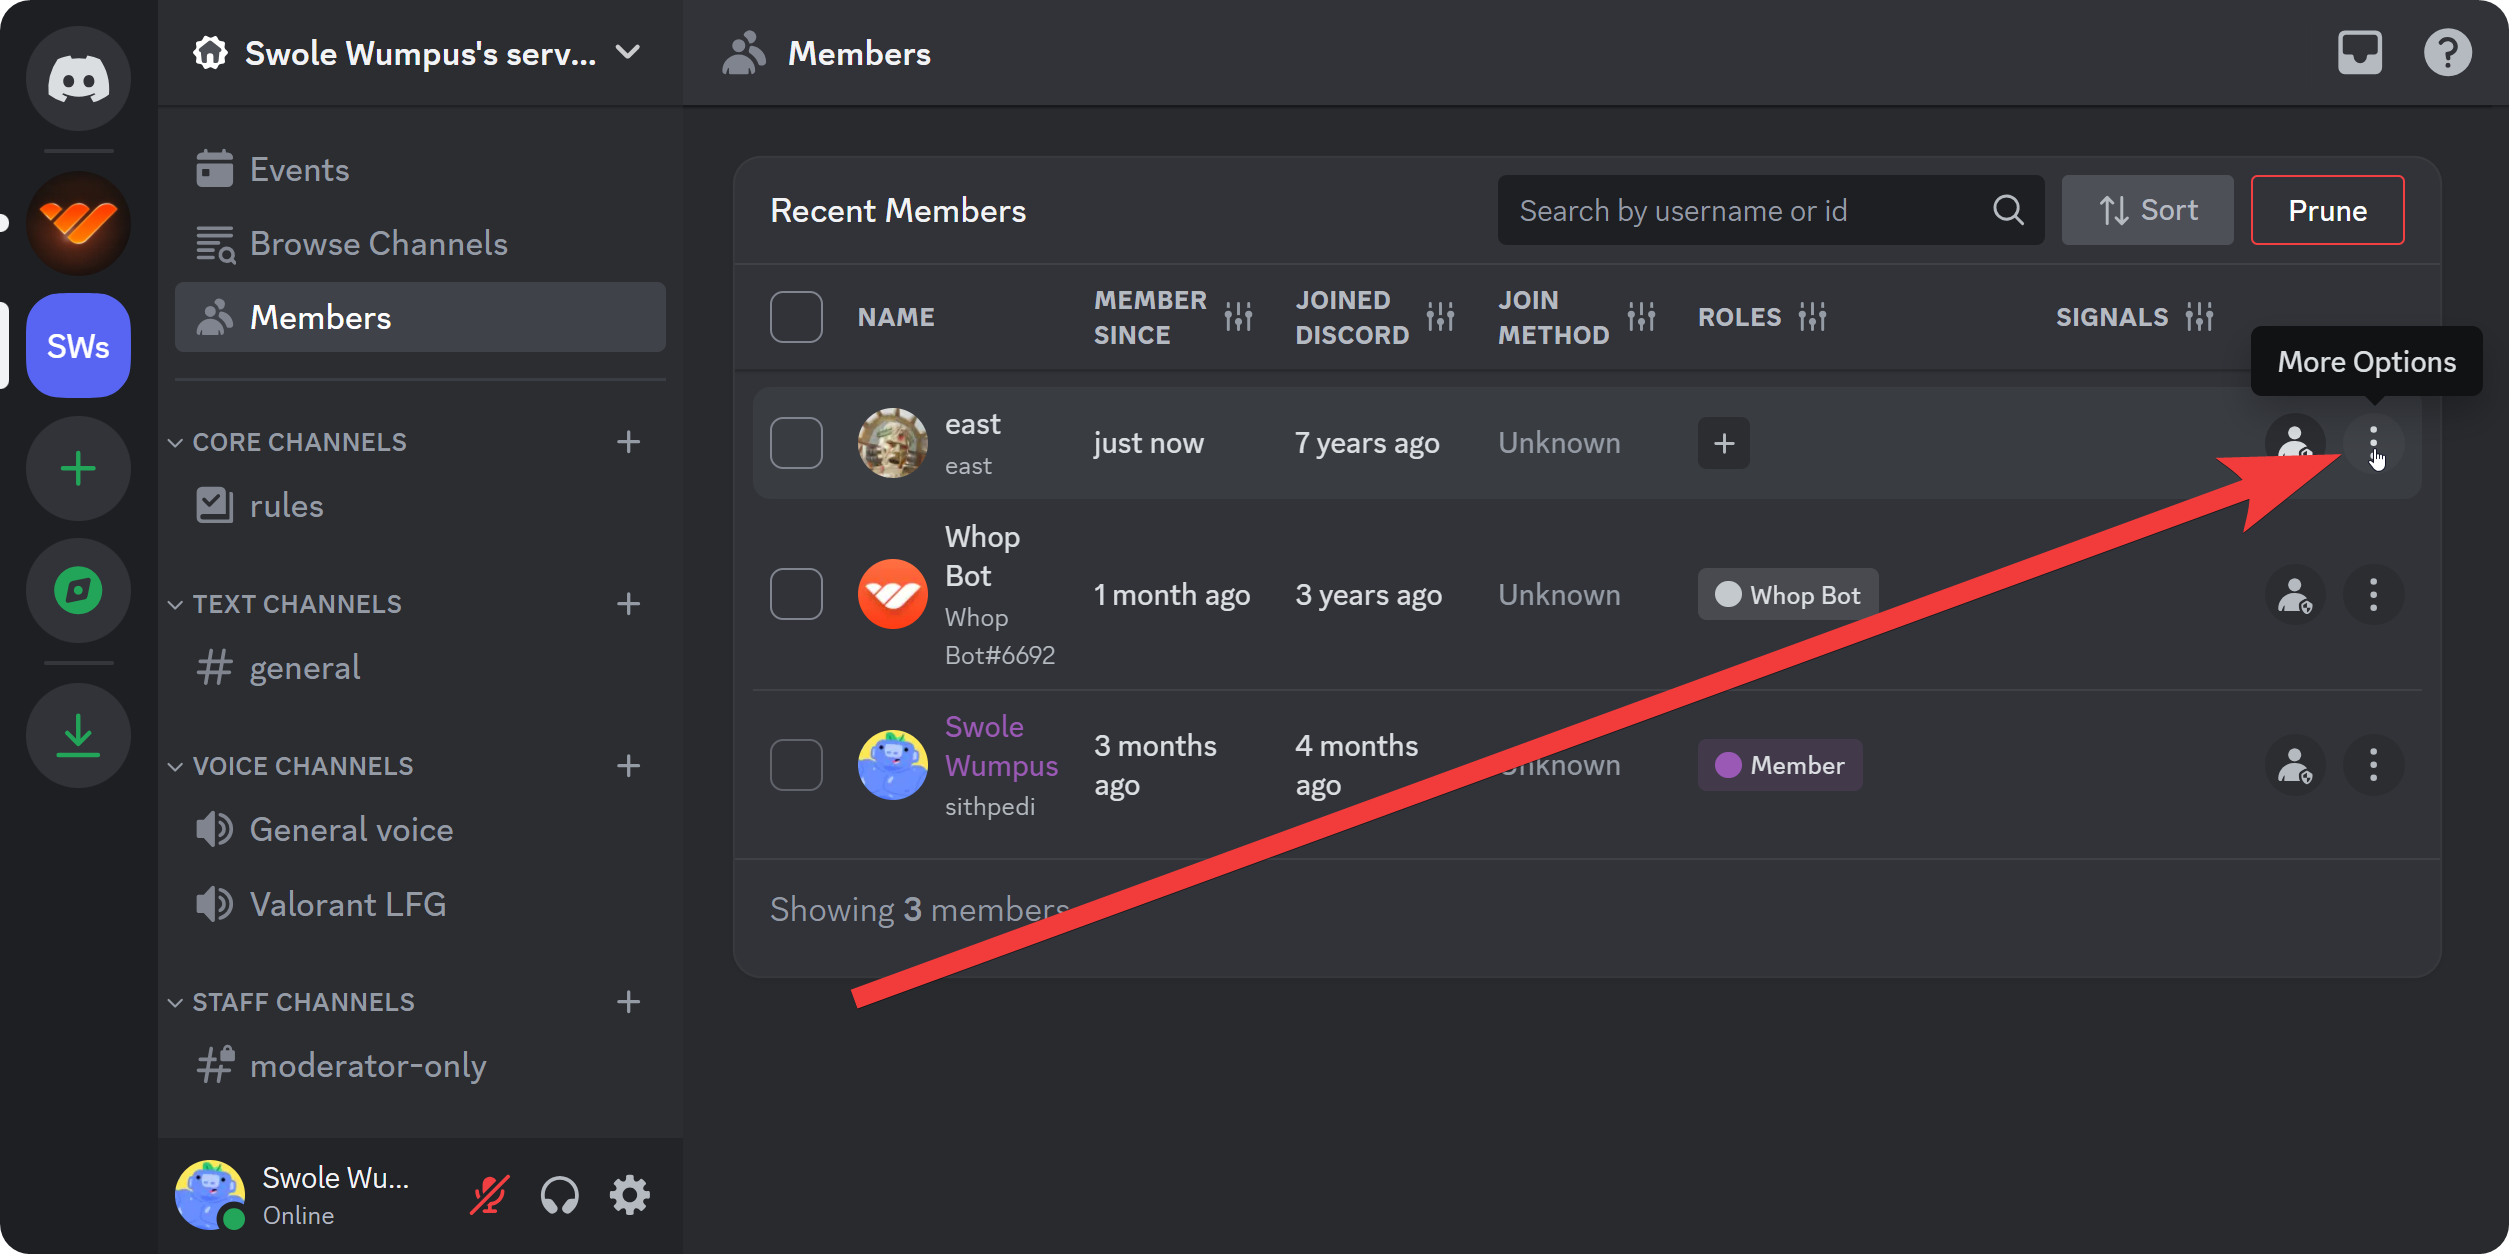
The process of transferring a server to another member can be done via the Members section of your server. When you take a look at the channels in your server, you’ll see three sections at the top: Events, Browse Channels and Members.
The Members section allows you to list all members on your server, sort them, filter them and more. When you hover over a member, you’ll see a three-dot button appearing to the right. You can click on it to display all the options for that member.
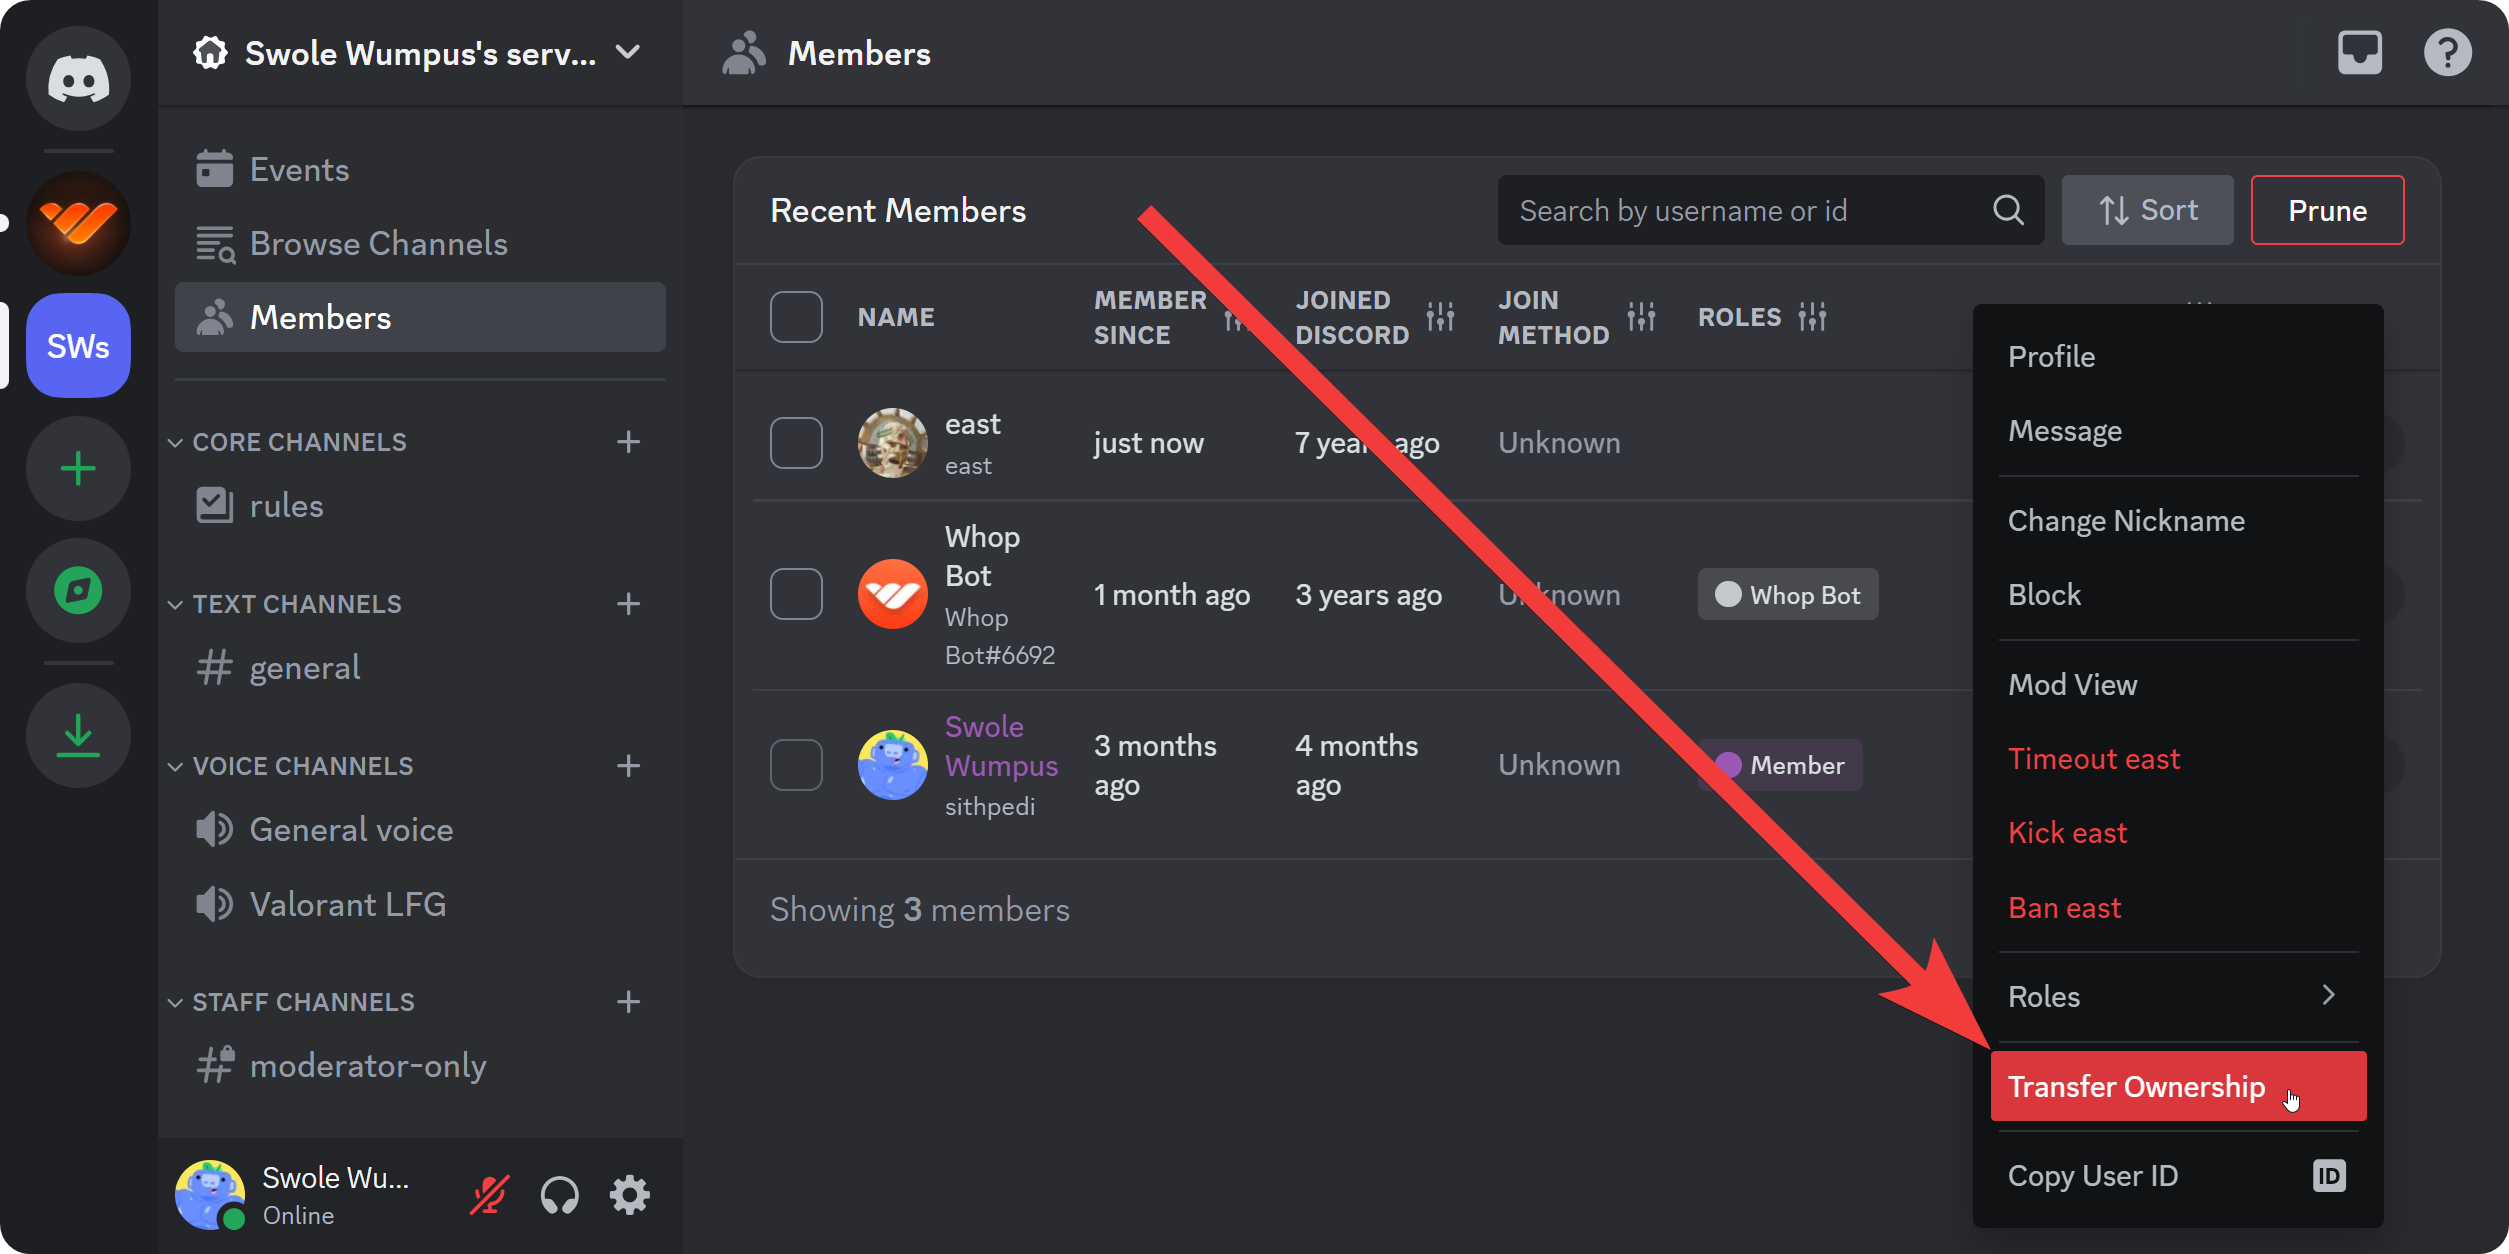
When you click on the three-dot button to display all options, you’ll see the red Transfer Ownership at the bottom of the option list. Clicking on it will start the transfer process. Remember, as long as you are the owner of this server, you can start this process.
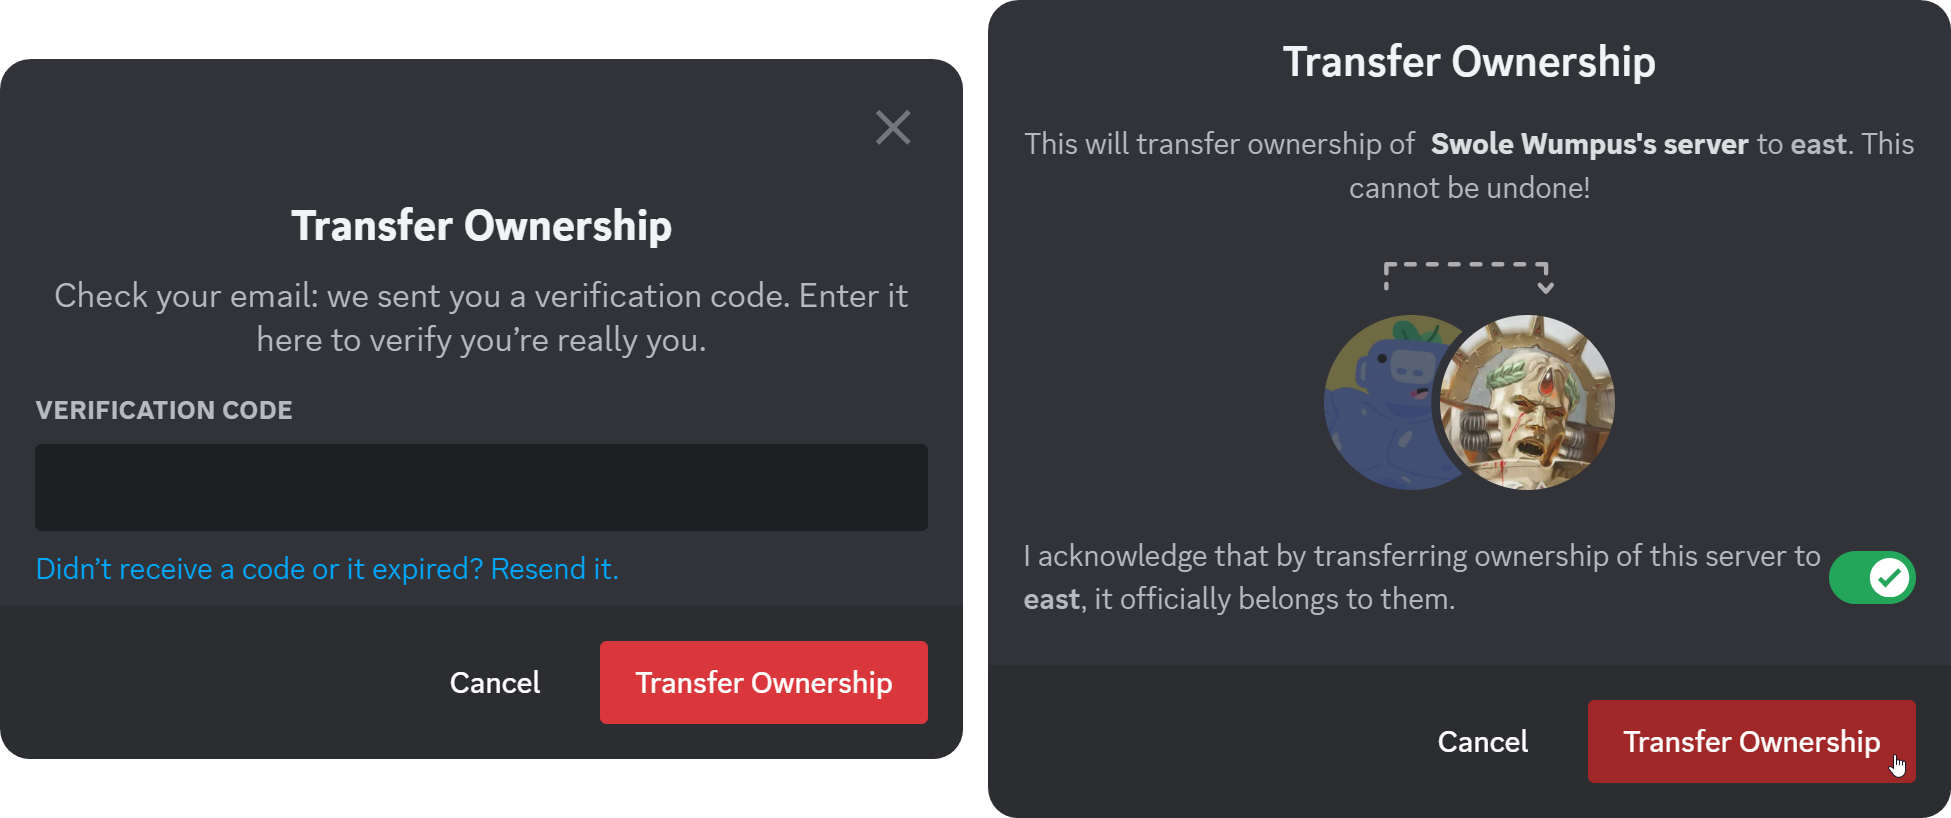
When you click the Transfer Ownership button, you’ll see a pop-up window asking you to enter a verification code that Discord sent to your account’s email address. If you have 2-factor-authentication, it will ask for the 2FA code instead. Once you enter the verification code, click the Transfer Ownership button at the bottom right.
In the second step, Discord will ask you to confirm if you want to transfer the server. Click the toggle button to acknowledge you're ready to make the transfer, then click the Transfer Ownership button that becomes available to finalize the transfer.
That is it – transferring a server on Discord is easy. Now, let’s take a look at how you can do the same thing on the mobile version of Discord.
Transferring a Server on Discord Mobile
To transfer a server on the mobile version of Discord, you can follow the steps below:
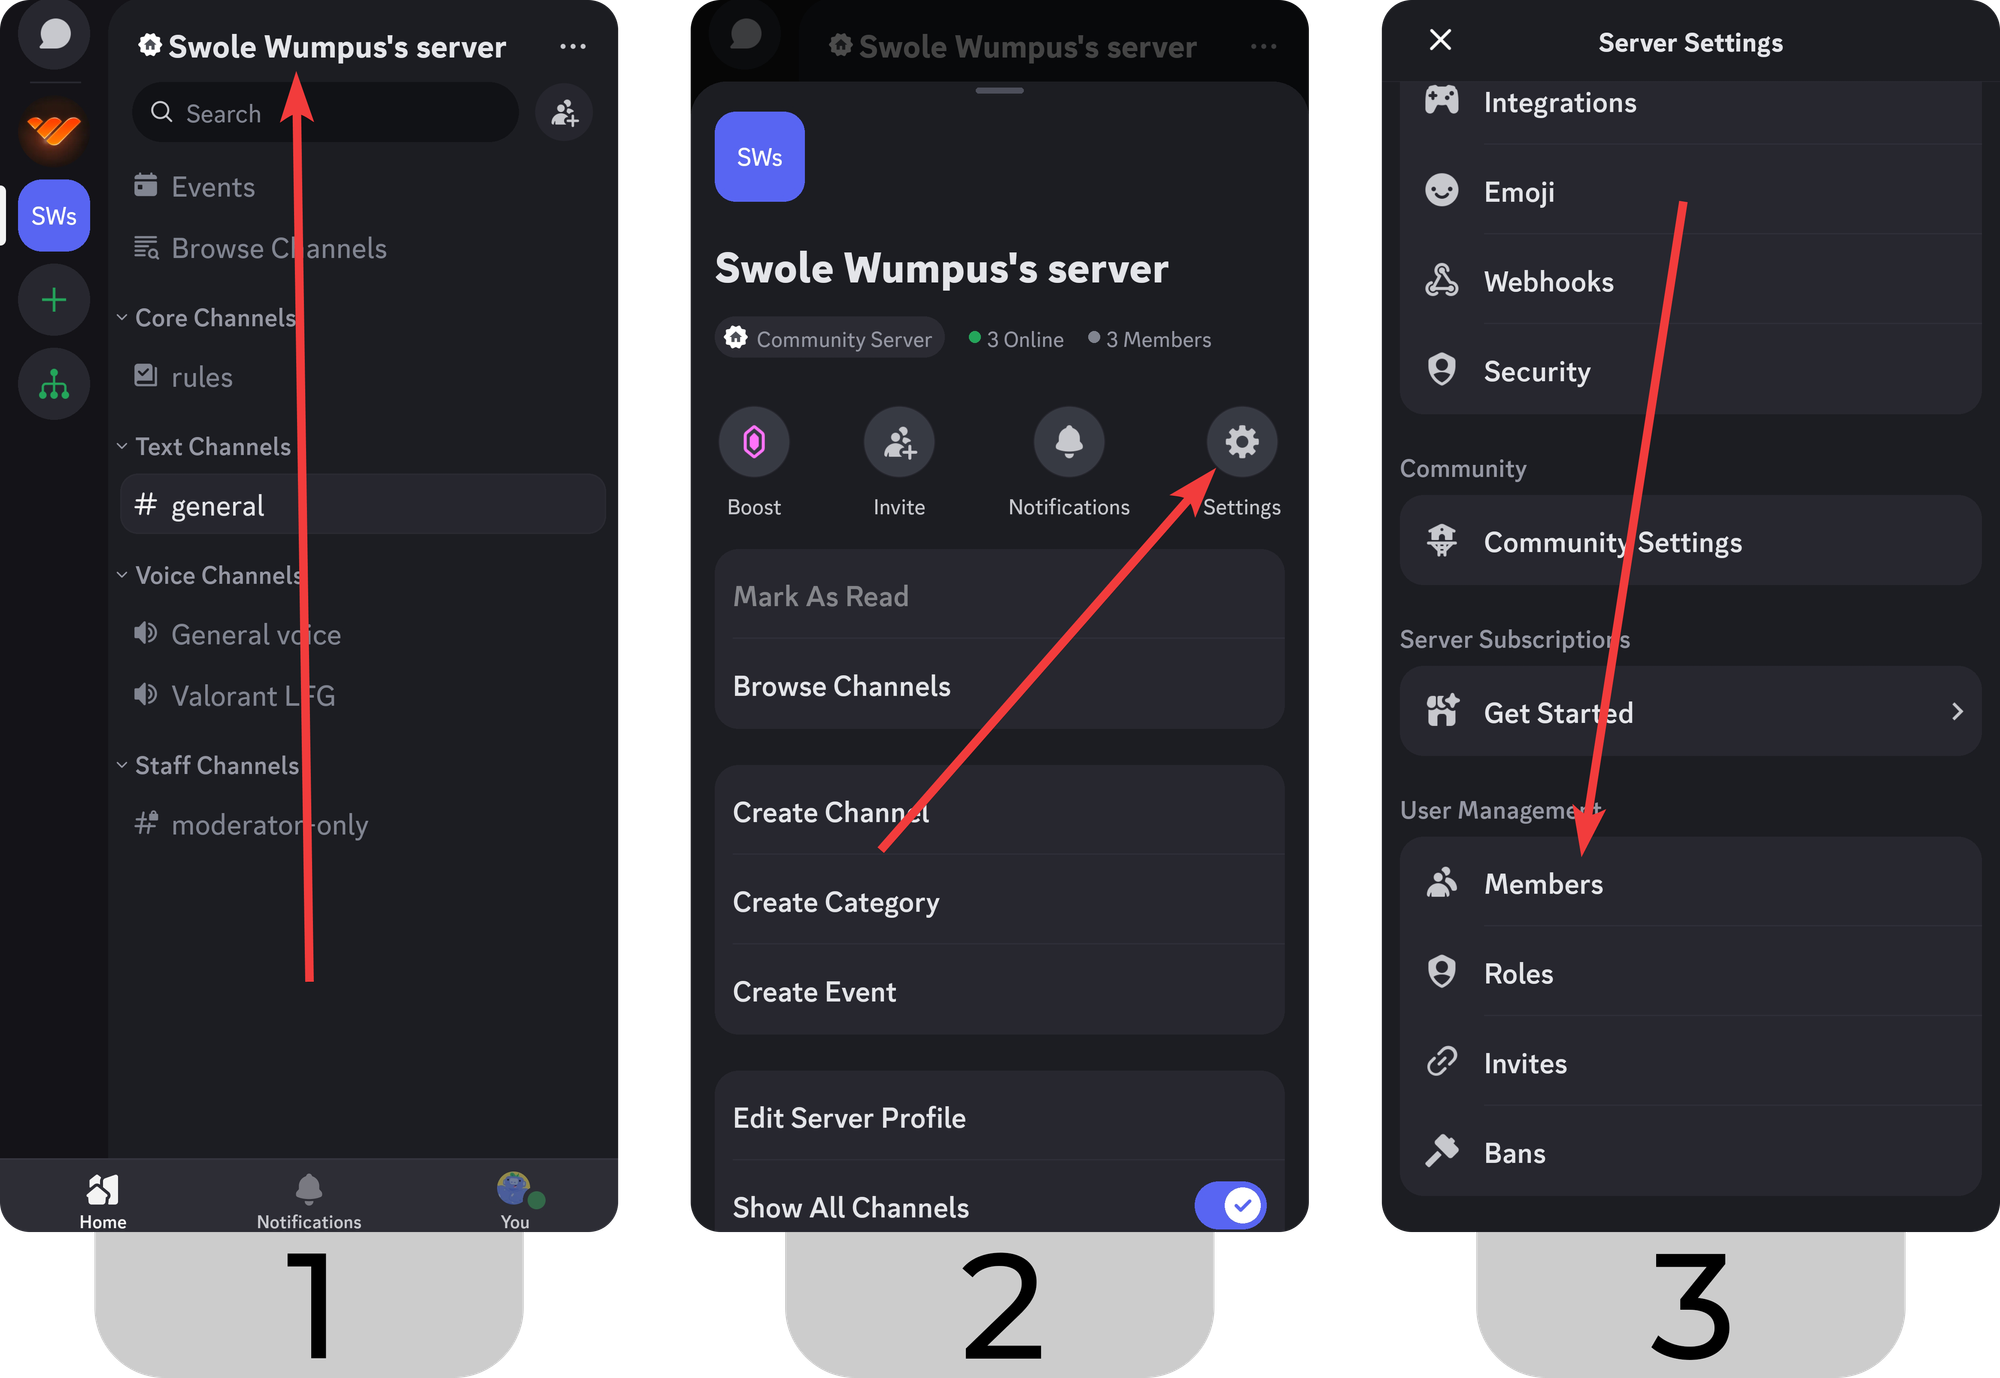
- Click on the server name at the top of the channel list to open the Server Context menu.
- In the Server Context menu, press the Settings button (cogwheel icon) to open the Server Settings.
- In the Server Settings, scroll down to find the Members section button and press it.
Now that you’re in the Server Settings, let’s see how you can start the transfer process:
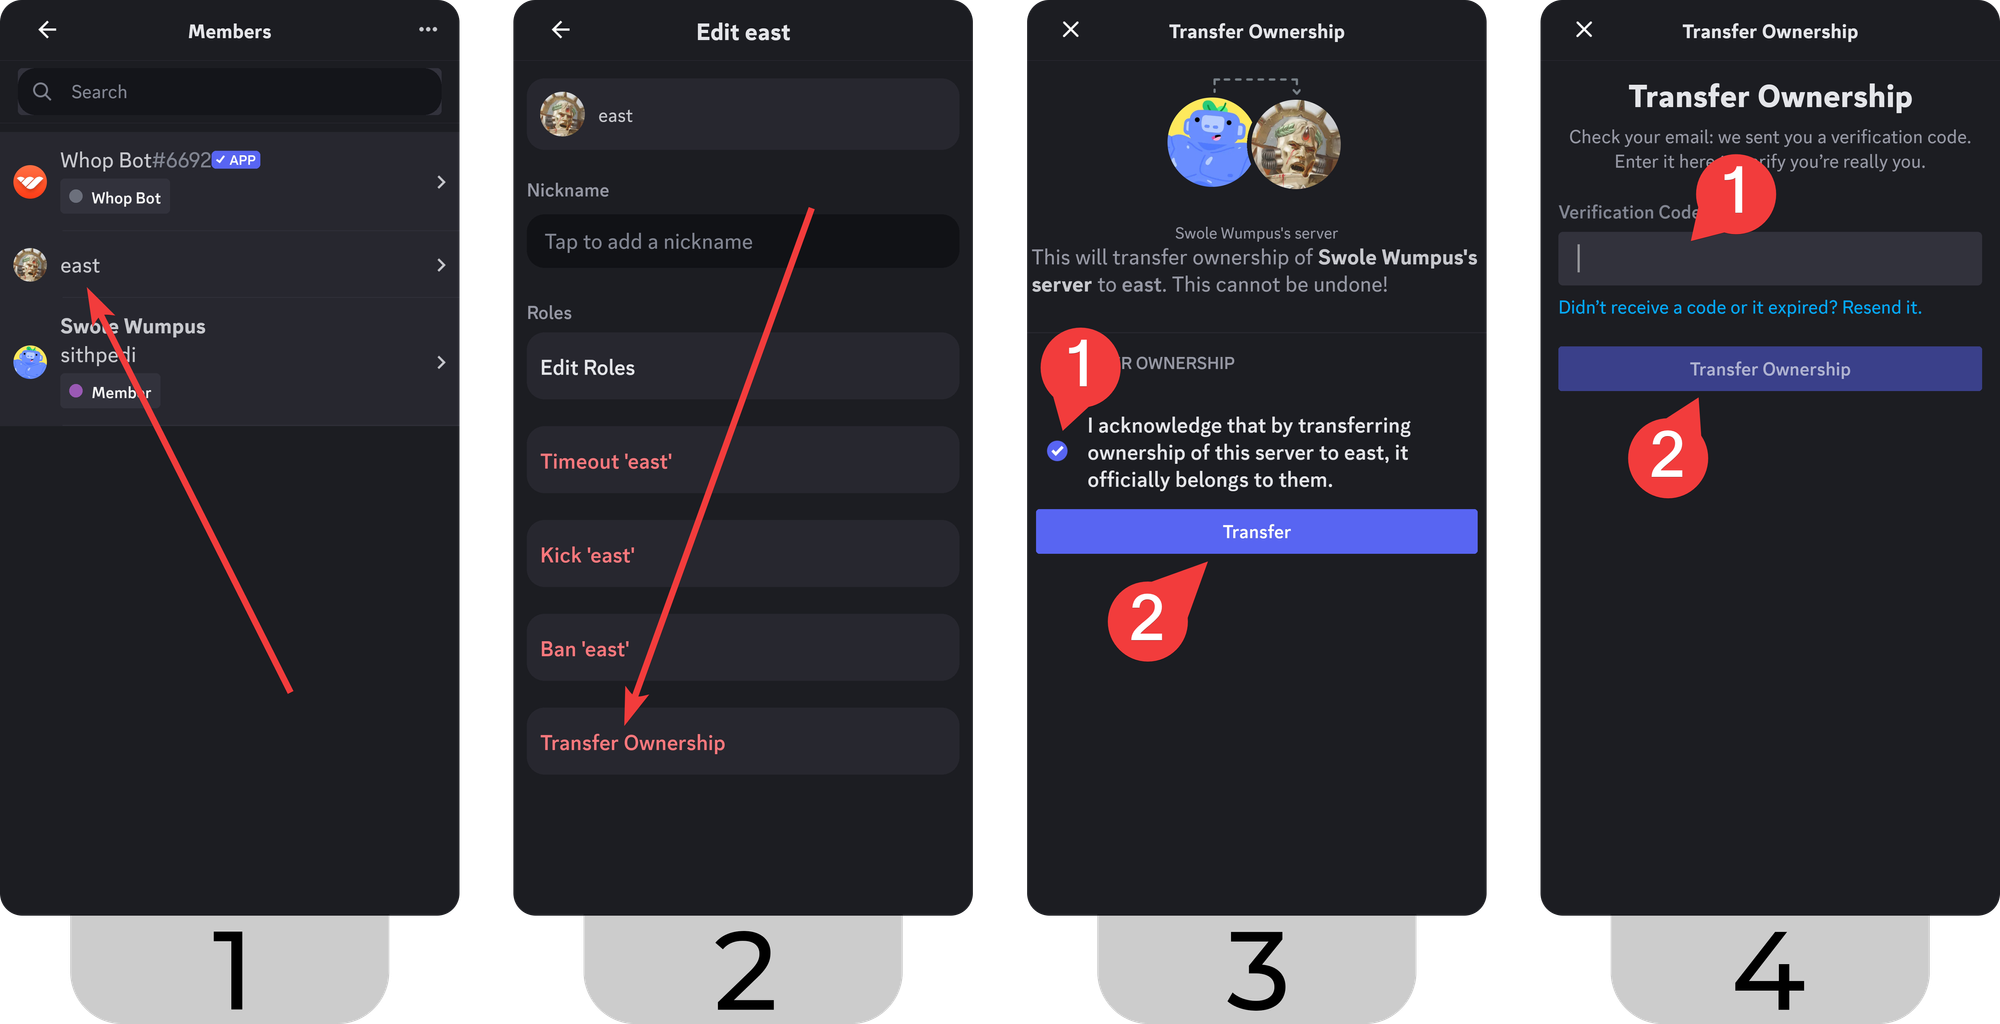
- In the Members section, press on the user you want to transfer the server to.
- Once you press on the user, you’ll be directed to the “Edit [user]” section. Press the Transfer Ownership button at the bottom.
- Discord will ask you to confirm the transfer by clicking the checkbox and then the Transfer button.
- Next, you’ll need to enter the verification code that Discord sent to your account’s email address. If you have 2-factor authentication, the app will ask for the 2FA code instead. After you enter the verification code, press the Transfer Ownership button to finalize the process.
Transferring Your Server? Try Migrating to Whop Instead
Now you know how to transfer a server to another user. Since transferring a server completely takes away your ownership, it's important to be cautious. The first thing you should think about before transferring a server is why you’re doing it.
If you’re not satisfied with how your server performs or if the responsibilities are too much for you to handle, you shouldn’t give up so fast. There are many ways to fix those problems, like hiring moderators or using the automod bot - or, choosing another platform for your community, like Whop.
Migrating to Whop
One of the most viable options to reduce the workload and let your members keep interacting with your community is to migrate your server to Whop.
Whop is home to thousands of premium communities. Just like how your Discord server has channels, your whop can have chat rooms as well. The best part is that whops aren’t limited to chat rooms – they can have voice chats, integrated software, forums, courses, embedded websites, courses and more.
To start your migration, you have to create a whop first, but before doing that, you need to have a Whop account – click here to get started.
Now, let’s create your first whop together:

- After you sign up, you’ll be directed to the creation process. In the first step, you should pick a cool name for your whop. After you’re done, click the Next button on the bottom right.
- In the second step, you should select which niche your community focuses on. There are over 25 niches for you to pick from. After you’re done, click Next.
- Boom – you have a whop. Now, the landing page titled “Welcome to Whop” will give you an introduction to the platform, so give it a look. After you’re done, start customizing your whop with apps. If you want to learn more about whops, join the Whop University.
There you have it - if you want to transfer ownership of your server, you know how. But, if you're looking for a streamlined way to run an online community off Discord, sign up to Whop. With a whole range of exciting features, apps, and incredible community management options, Whop is the best option for your online community.