Whop is a social commerce platform where anyone can sell access to digital products and services from their very own whop. In this article, we take a look at the pricing options on Whop, what they are, and how you create them.
Key takeaways
- Whop offers four flexible pricing types: free, one-time, recurring subscriptions, and limited sales to match your business model.
- Control access with waitlists, stock limits, and auto-expiring memberships to create scarcity or vet members before entry.
- Enhance checkout with custom questions, free trials, and multiple payment methods to improve conversions and gather user data.
Thousands of creators are making millions of dollars selling digital products and services with their whop.
If you're ready to start making money online with Whop, then you're in the right place.
In this article, we are going to take a look at how you can add pricing options to a whop, and the options you can adjust along the way.
What is a pricing option on Whop?
Before we start talking about pricing options, let's recap what a 'whop' is.
While Whop (with a capital W) is a social commerce platform, a 'whop' (small w) is your personal space on the internet.
Think of some other platforms that let you create a personal space. They largely fall into two categories: the ones that let you create monetized spaces (which means people pay to enter), and the ones that let you create free spaces, which leave you with no option to generate an income.
Whop is a bit different. Here, you decide what you want to do with your platform, aka whop. You do this by adding pricing options to your whop.
Pricing options can be one-time payments, subscriptions, limited sales, or even free. This flexibility lets you shape your whop into the ideal platform for your audience and goals.
If you don't already have a whop, learn how to create one with our How to create your own whop guide.
How to add pricing options to a whop
Ok, so you have your whop—now it's time to add a pricing option.
It is incredibly simple to add a pricing option to your whop. The first thing you should do is to click on the context menu button (aka the down arrow) next to your whop's name and then select Manage pricing.
This is going to display the Manage pricing popup menu on the right side of your screen. It has three tabs: Active for active pricing options, Hidden for hidden ones, and Archived for archived options.
The popup menu will display all the pricing options you have for your whop, but if you don't have any yet, the list will be empty.
Let's click on the Create pricing option button at the bottom of the popup to create one.
Once you click the Create pricing option button, you'll see the Manage pricing popup change into Create checkout link. This is where you create your pricing options.
The Create checkout link window has three options: Free, One-time, and Recurring. They all have unique settings, so let's break them down one by one, starting with Free.
Creating a free pricing option for your whop
Setting up a free pricing option on your whop is quick and straightforward.
Keep in mind that making your whop free means anyone online can access it and the apps inside—unless you enable a waitlist to limit access.
Let's walk through the steps to create a free pricing option.
1. Select the free pricing option
The first thing you're going to do to create a free pricing option is click the Create pricing option button at the bottom of the Manage pricing popup. This will show a new popup with three options: Free, One-time, and Recurring.
Select the Free option here.
Now, you can just go ahead and click Create to create the pricing option, but you have the option to click the Advanced options dropdown to see more settings.
2. Add a description and stock amount
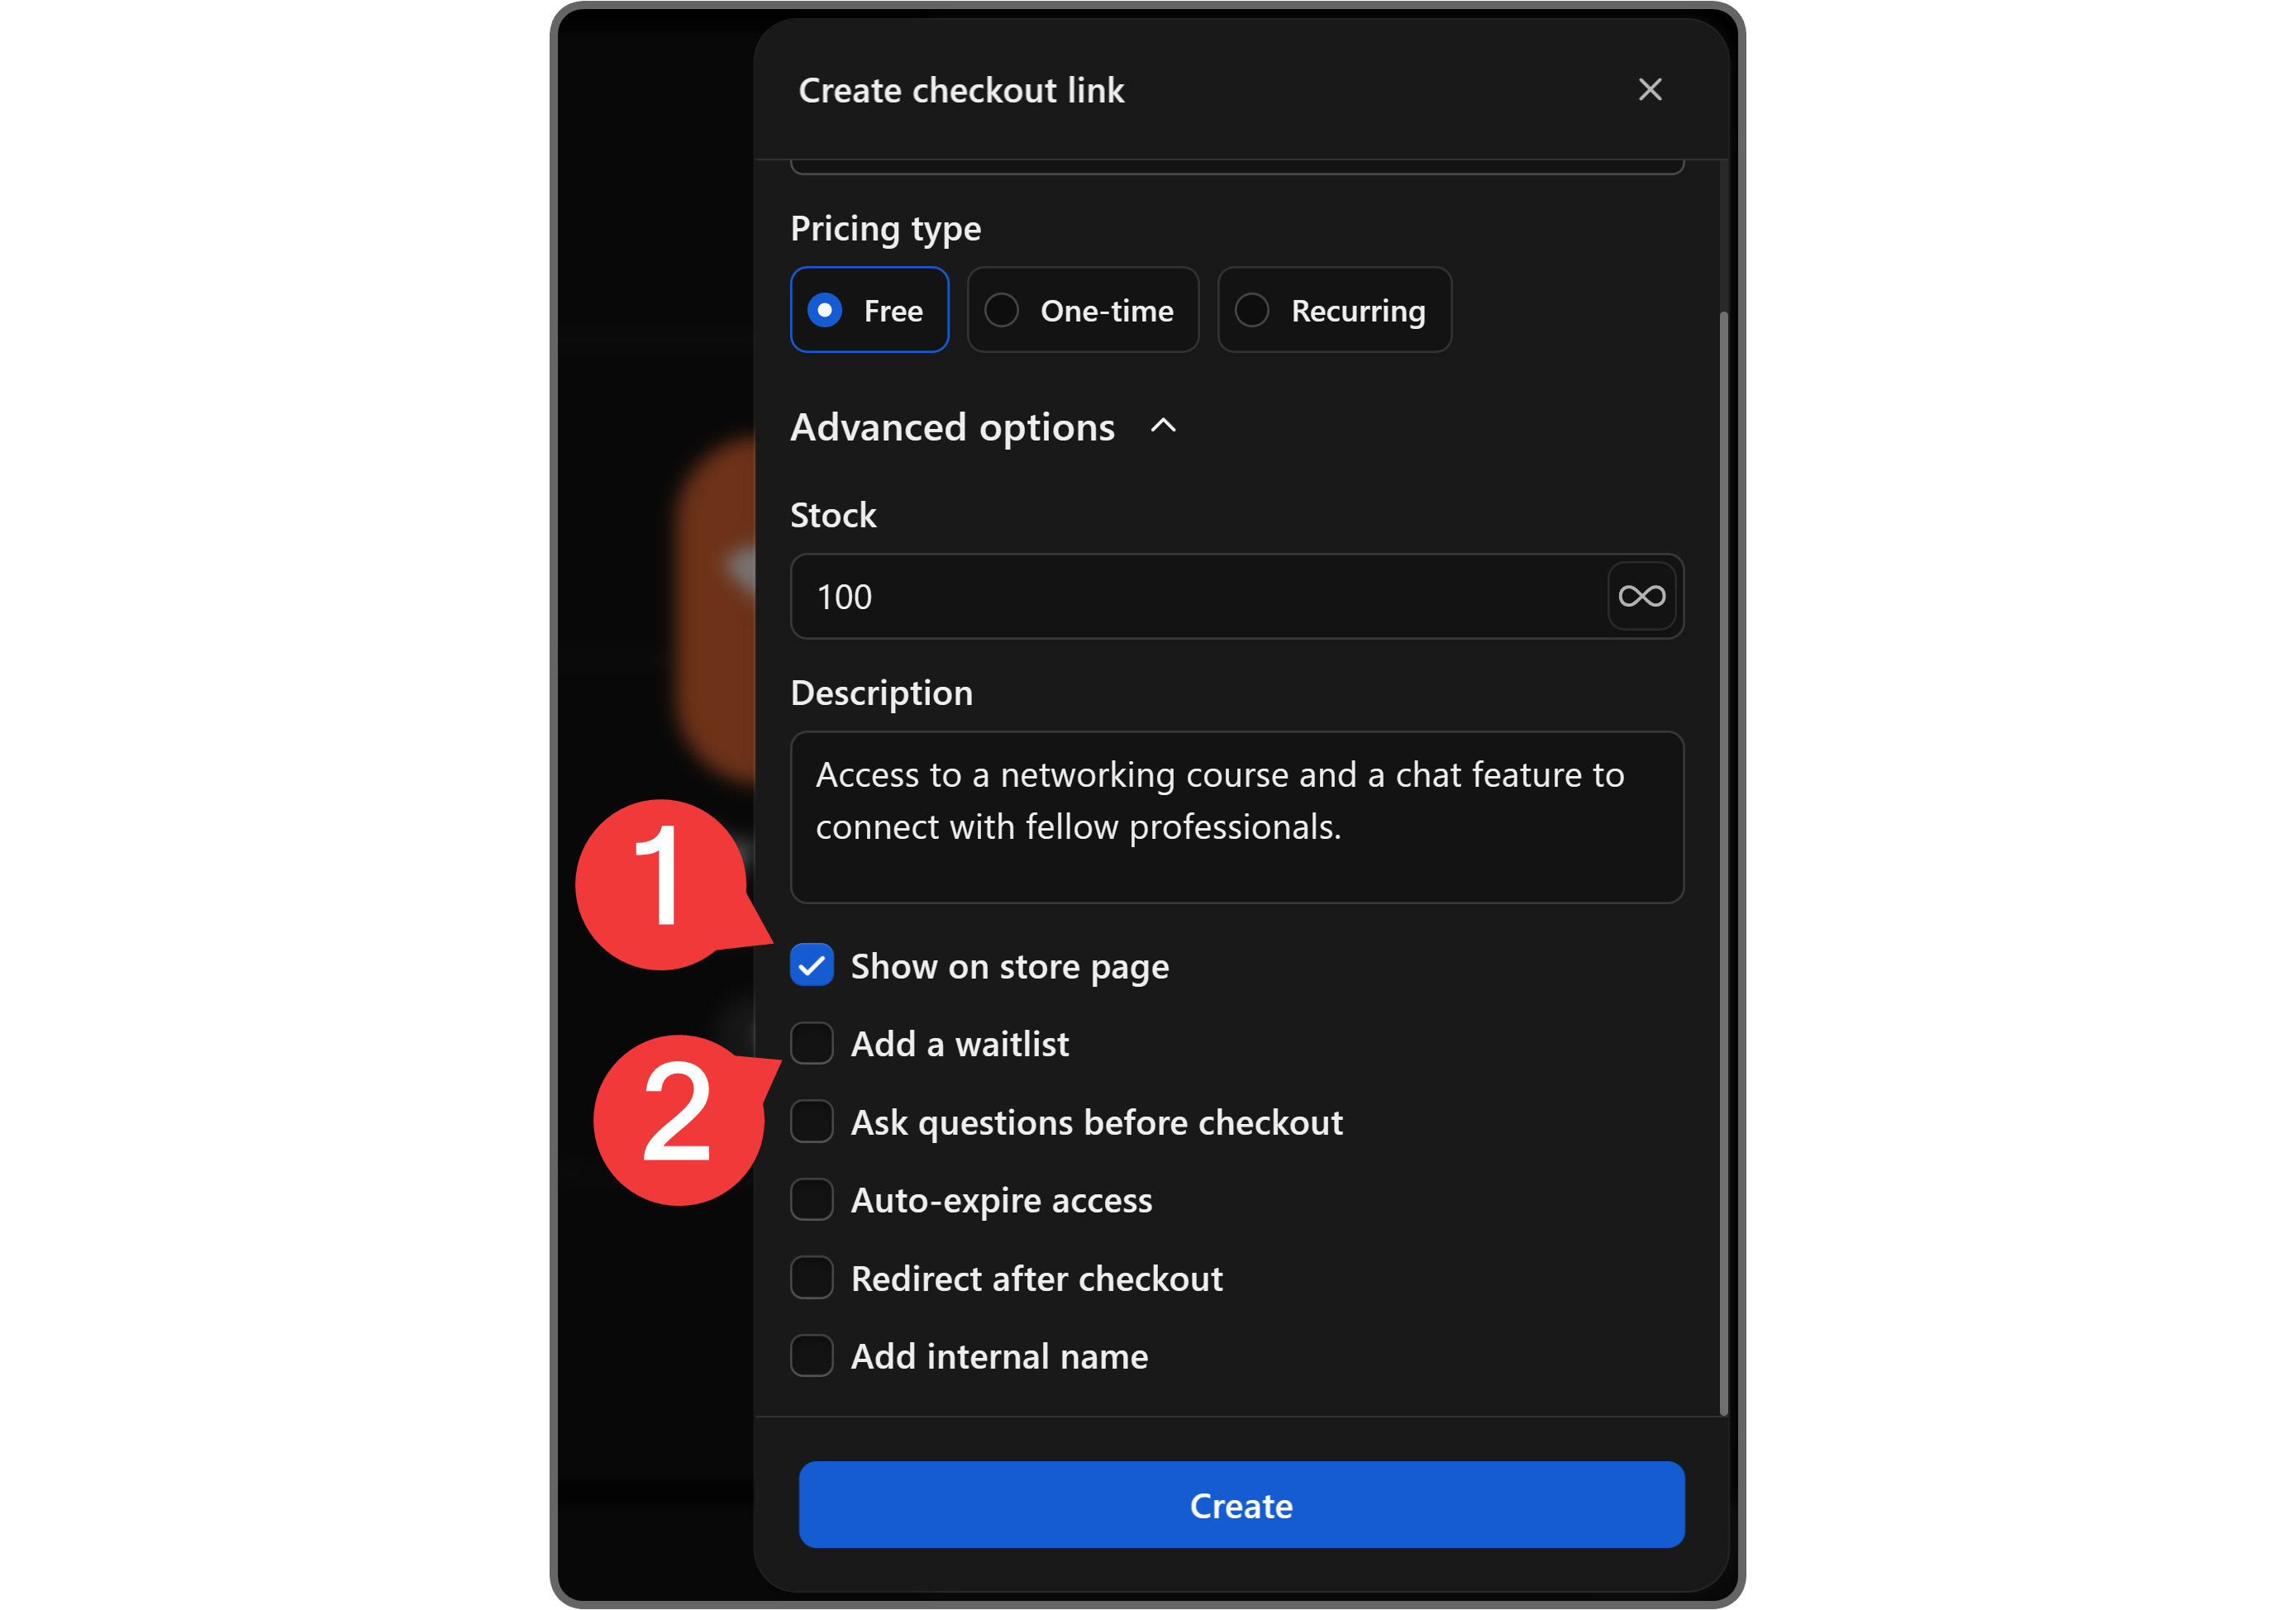
In the advanced options, you're going to see two input fields and six toggle settings. The first two settings are:
- Stock: The default stock of pricing options on Whop is unlimited. However, if you enter a number into the Stock field, the pricing option can only be used that many times.
- Description: When you provide a description for a pricing option, it will be displayed on the checkout page of the pricing option. Ideally, you should briefly mention what's included in the pricing option and how it can benefit the user.
3. Choose the visibility of your pricing option
The next two settings are Show on store page and Add a waitlist. When you create a pricing option, the Show on store page option will be enabled by default - if you want to hide it from your store page and only let people with its URL access it, you can disable it.
Enabling the Add a waitlist setting will make your users join a waitlist before they can access your whop once they complete the purchase.
Once a user joins your waitlist, you'll receive a notification and will have to either admit or reject them using your dashboard.
4. Add mandatory questions
Moving on, you'll see the Ask questions before checkout setting. If you enable it and add questions to your pricing option, users will be asked to answer them before they can join your whop.
You can add questions by using the Add another question button at the bottom of the setting section, and they have three fields:
- Title (the question itself)
- Placeholder (placeholder text for the user's answer)
- Optional (determines if the user has to answer the question to join or not - questions are required by default)
5. Set an expiry date
The next setting you'll see is Auto-expire access. Using the dropdown menu, you'll be able to automatically revoke people's memberships (that they got using the pricing option you're creating) after a set period of time.
The default option is After seven days, but you can set a custom number of days as well.
6. Redirect users after checkout
Below the expiry setting, you'll see the Redirect after checkout option, which allows you to redirect your users to a specific URL after they obtain a membership using the pricing option.
7. Name your pricing option (internal)
Lastly, if you enable the Add internal name setting, you'll see an input field for the name of the pricing option. This name will be visible to your whop team, and it makes it easier for you to differentiate between pricing options.
Once you're done with all the settings, click the Create button at the bottom of the popup to publish your new pricing option.
Creating a one-time paid pricing option for your whop
With this pricing option your members will pay just once for access to your whop.
1. Select the one-time pricing option
When you select the One-time option as the pricing option type, you'll see the Price input field below the type options, and the Advanced options and Payment methods dropdowns below the price.
2. Add a description and stock amount
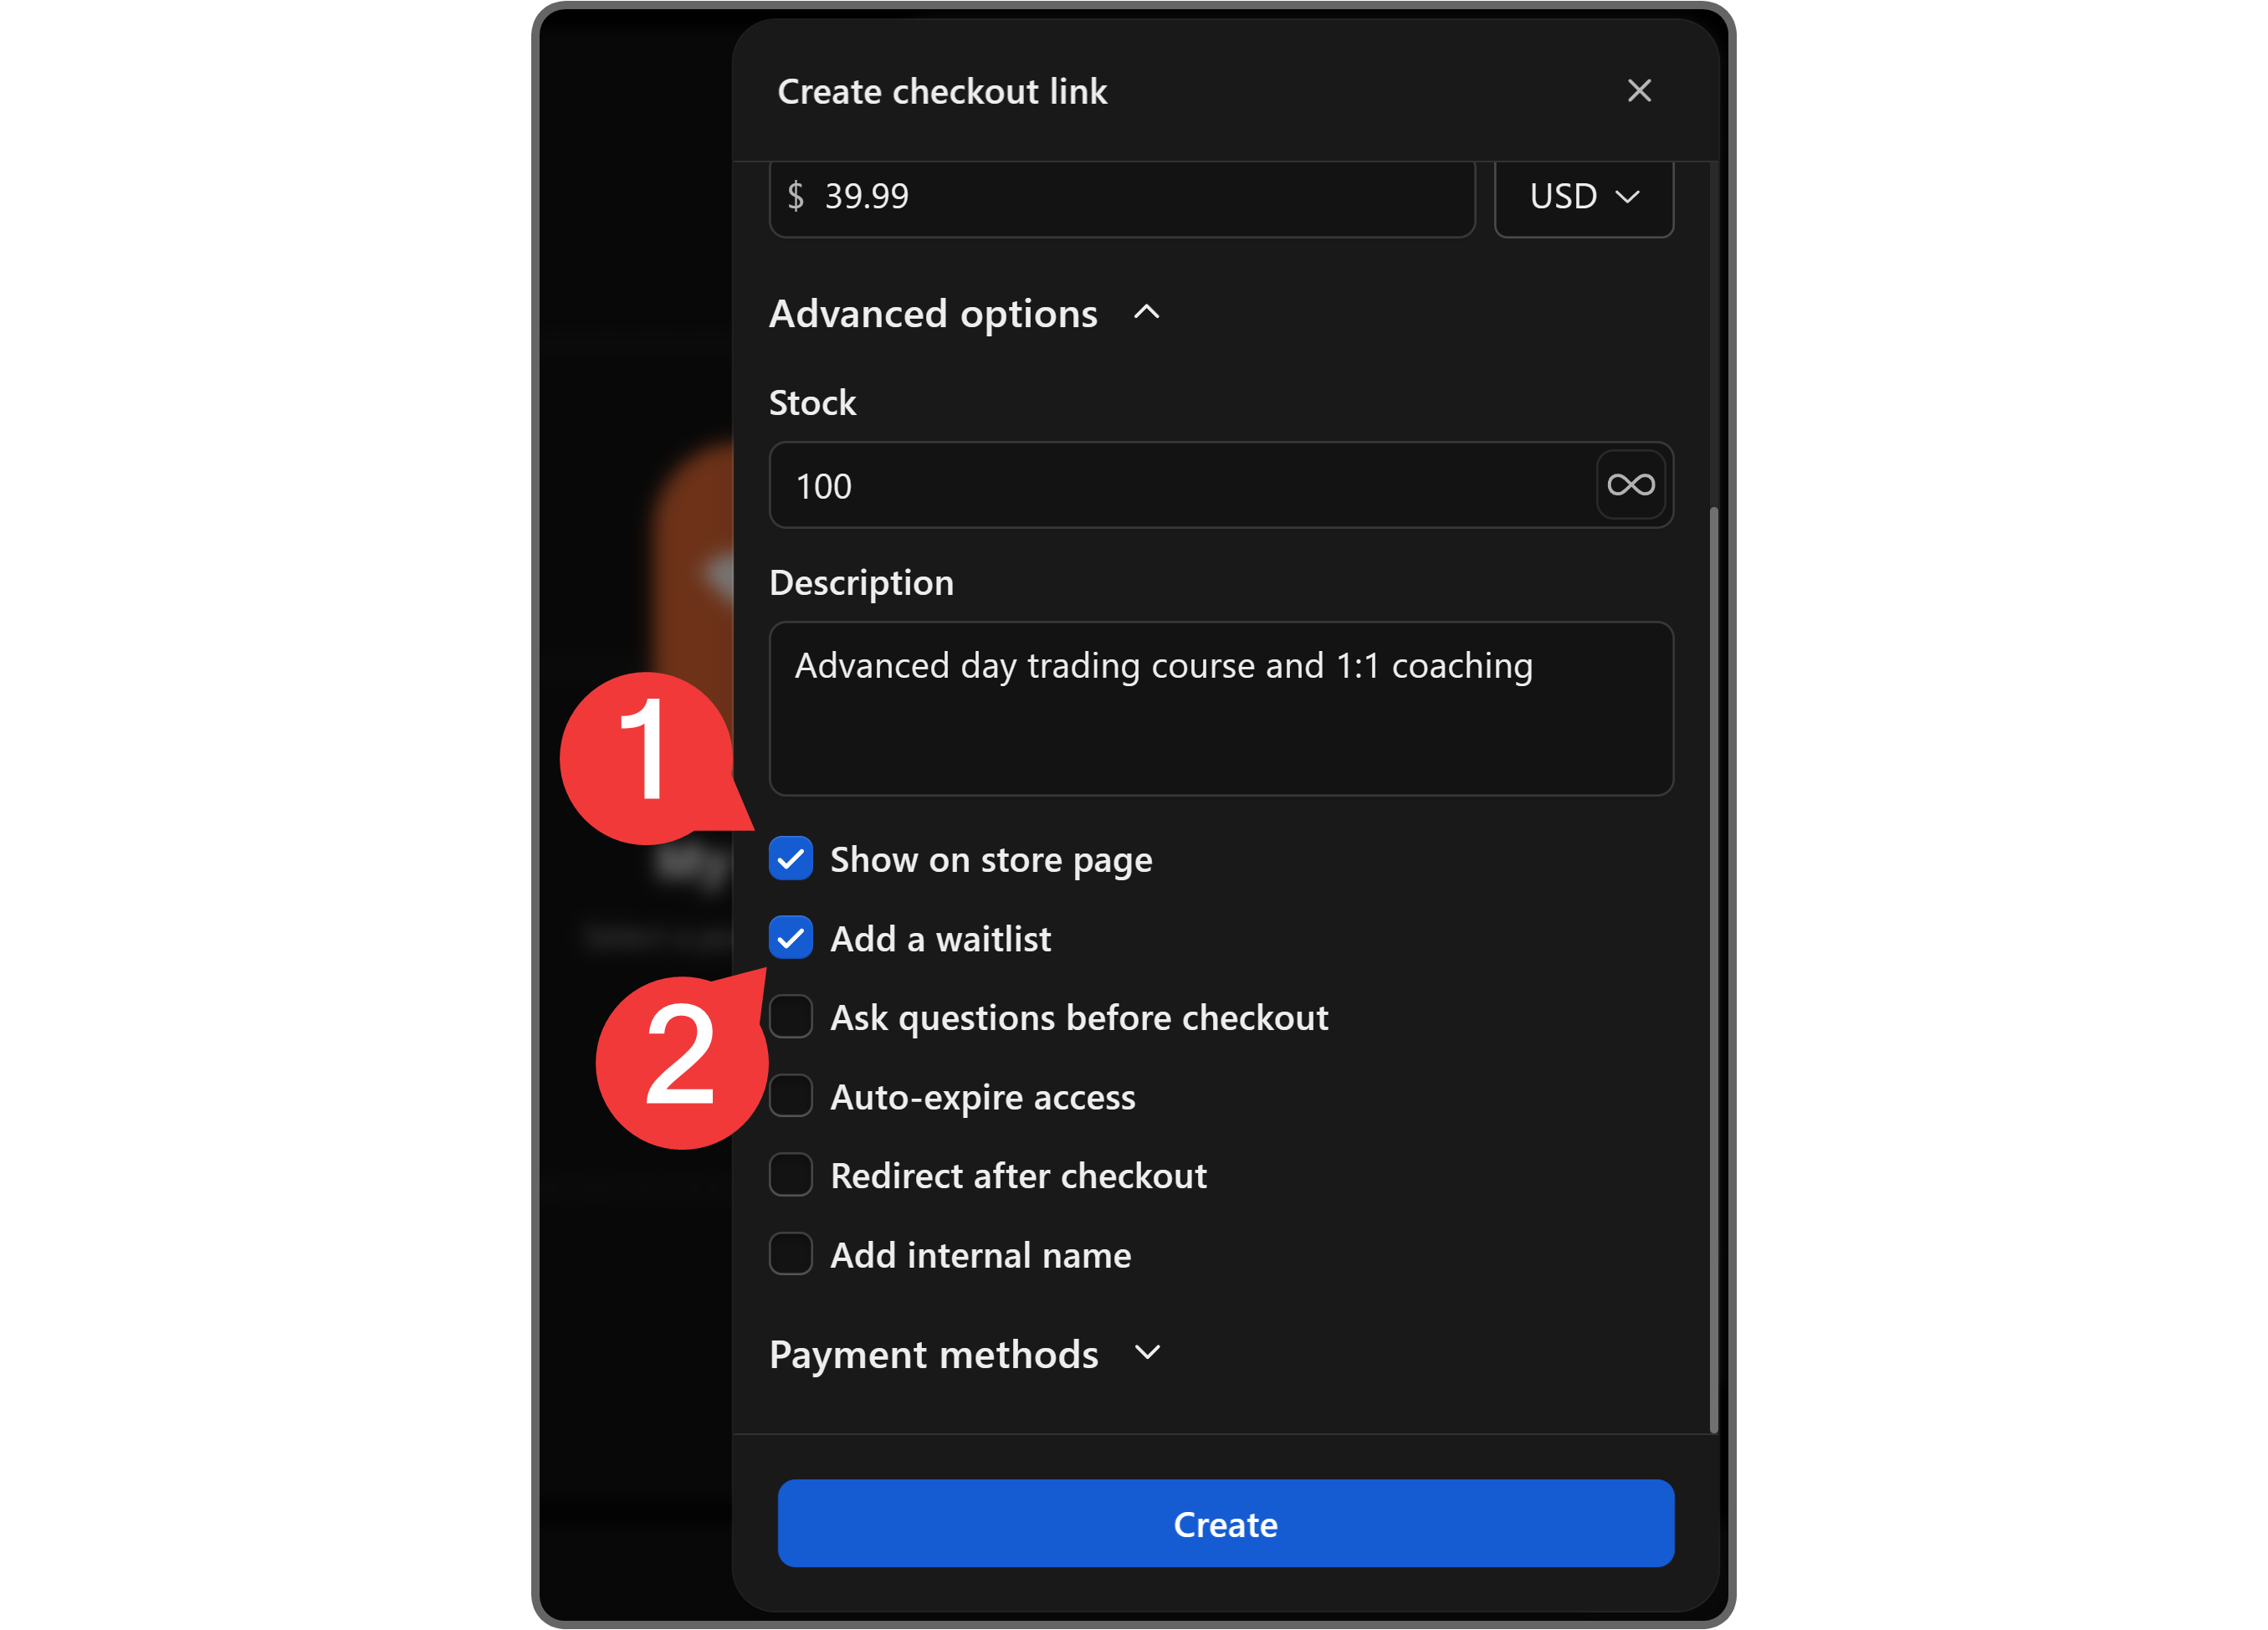
Just like the Free pricing option, the first two settings you'll see under the Advanced options dropdown are Stock and Description:
- Stock: Pricing options have unlimited stock by default, but you can change that by entering a number in the Stock field.
- Description: When you add a description to your pricing option, it shows up on the checkout page. Ideally, the description should briefly mention what the pricing option gets the user.
Below the Description field, you'll see six options that are disabled by default, except Show on store page. Let's break them down.
3. Choose the visibility of your paid pricing option
When you create a pricing option, it's visible on your store page by default. An enabled Show on store page option means users can see and buy the pricing option when they visit your store. If you disable it, you'll have to share the URL of the pricing option for people to use it.
Enabling the Add a waitlist option will make your users join a waitlist before they can access your whop content after purchase. You'll need to admit or reject users from the waitlist through your dashboard.
4. Add mandatory questions at checkout
When you enable the Ask questions before checkout setting, you'll see three fields: question title, placeholder, and the Optional button.
Filling out the question fields will prompt users to answer those questions before they can join your whop - they don't have to answer the ones you mark as Optional.
You can add more questions using the Add another question button at the end of the section.
5. Set an expiry date
By enabling Auto-expire access and selecting a number of days (or setting a custom one) from the dropdown menu, you can make user memberships expire after a set time.
6. Redirect users to a custom URL after checkout
The Redirect after checkout setting below the expiry setting allows you to redirect users to a custom URL when they complete their purchase through this pricing option.
7. Add an internal name for your paid pricing option
The Add internal name setting lets you give your pricing option a name that only your whop team can see. This makes it easier for your team to reference it.
8. Choose payment methods
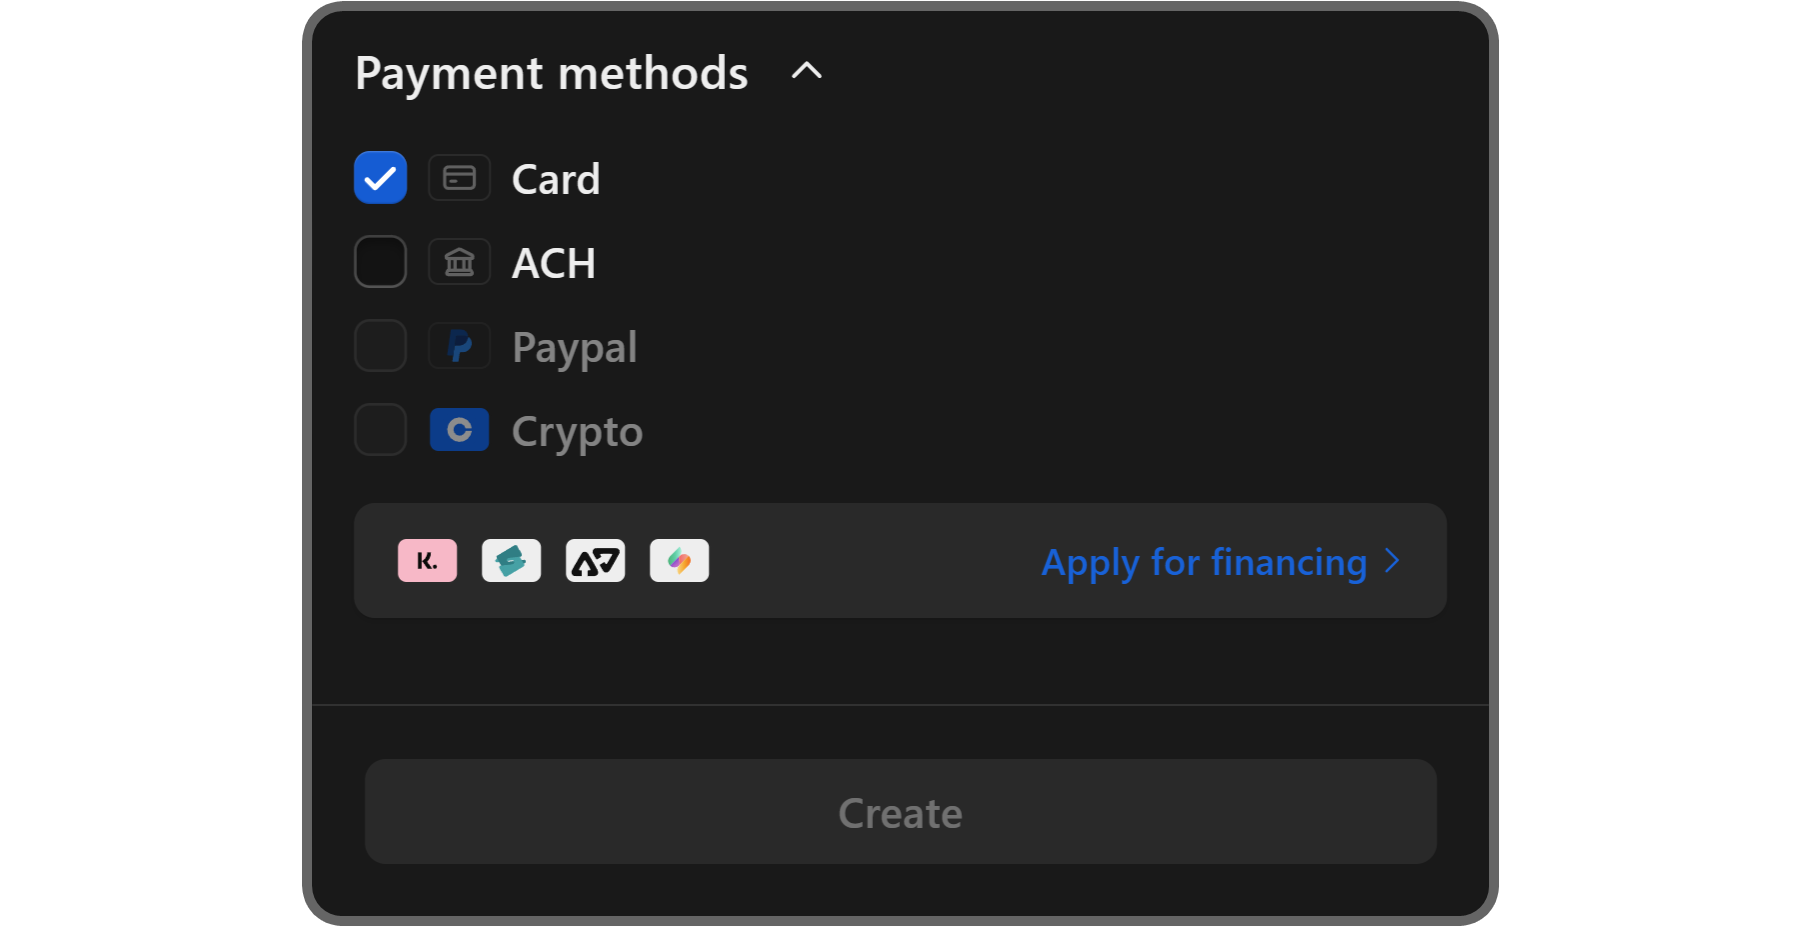
In the Payment methods dropdown, you'll see checkboxes for all available payment options like Card, ACH, PayPal, and Crypto. You can also apply for financing options using the Apply for financing button at the bottom.
Once you're done with all the pricing option settings, click the Create button at the bottom of the popup to publish it.
Creating a recurring paid (subscription) pricing option for your whop
The final pricing option is a recurring subscription. This payment option is best for community memberships, coaching services, masterminds—basically anything that is a regularly updated product that members have to pay for each week/month/three months (and so on).
1. Select the recurring pricing option
When you select the Recurring option as the pricing option type, you'll see three fields being displayed:
- Subscription price (how much each recurring payment will cost)
- Subscription period (how long the payment intervals are)
- Initial fee (how much you want users to pay on top of their first payment - this is optional)
2. Set the stock amount and write a description
Clicking on the Advanced options will display options that allow you to customize the pricing option even more. The first two settings you're going to see are the Stock and Description:
- Stock: Pricing options on Whop have unlimited stock by default. Entering a number into the stock field will put a usage limit on it
- Description: When you enter a description for the pricing option, it will be displayed to the users at the checkout page. Descriptions should be short and talk about how it's going to benefit the user
3. Choose the visibility of your pricing option
The next setting you'll see is Show on store page. Pricing options on Whop are visible on the store page by default - you can change this by disabling this setting. When disabled, users will need the pricing options URL to be able to use it.
4. Set a free trial
Below, you'll see the Free trial setting. This setting is unique to the recurring pricing type and lets you provide a free trial for a set or custom number of days to users who purchase membership.
5. Enable pay by installments
The Enable split pay (Installments) setting is another unique setting for the recurring pricing type. When enabled, you can set a maximum split payment limit for users who want to pay the recurring price in separate installments.
6. Offer discounts on cancellation
The Offer a discount on cancellation setting lets you offer a discount with a custom percentage and payment period (like the first payment, forever, 3 months, etc.).
This is a retention feature to keep paying customers by offering a lower rate.
7. Decide whether to add a waitlist
For the Add a waitlist option, you should think about if you want everyone to be able to instantly join your whop after purchasing a subscription, or if you would rather let them in yourself.
If you enable the waitlist, you'll receive notifications for each user, and you will have to either admit or reject them via your dashboard.
8. Add mandatory questions at checkout
Below the waitlist option, you'll see the Ask users questions setting. Enabling it will show three fields: question title, answer placeholder, and the Optional button.
All questions are required by default, but after entering the question and answer placeholder, you can use the Optional button to make the question optional. You can add more questions using the Add another question button at the bottom of the section.
Users who use this pricing option will need to answer all required questions to complete their purchase.
9. Set an after-checkout redirect
By enabling the Redirect after checkout option, you'll be able to determine a custom URL that users will be redirected to once they complete a purchase using the pricing option.
10. Give the pricing option an internal name
Internal names help you organize your pricing options - only you and your team can see them. Giving each option a descriptive internal name allows you to quickly tell them apart when managing your whop.
11. Add payment methods
At the bottom of the popup, you'll see the Payment methods dropdown, which includes available payment options you can enable or disable. You can also apply for financing for your Whop by clicking the Apply for financing button.
Once you're done with all the settings, click the Create button at the bottom of the popup to publish the pricing option.
How to get the secret link of a pricing option
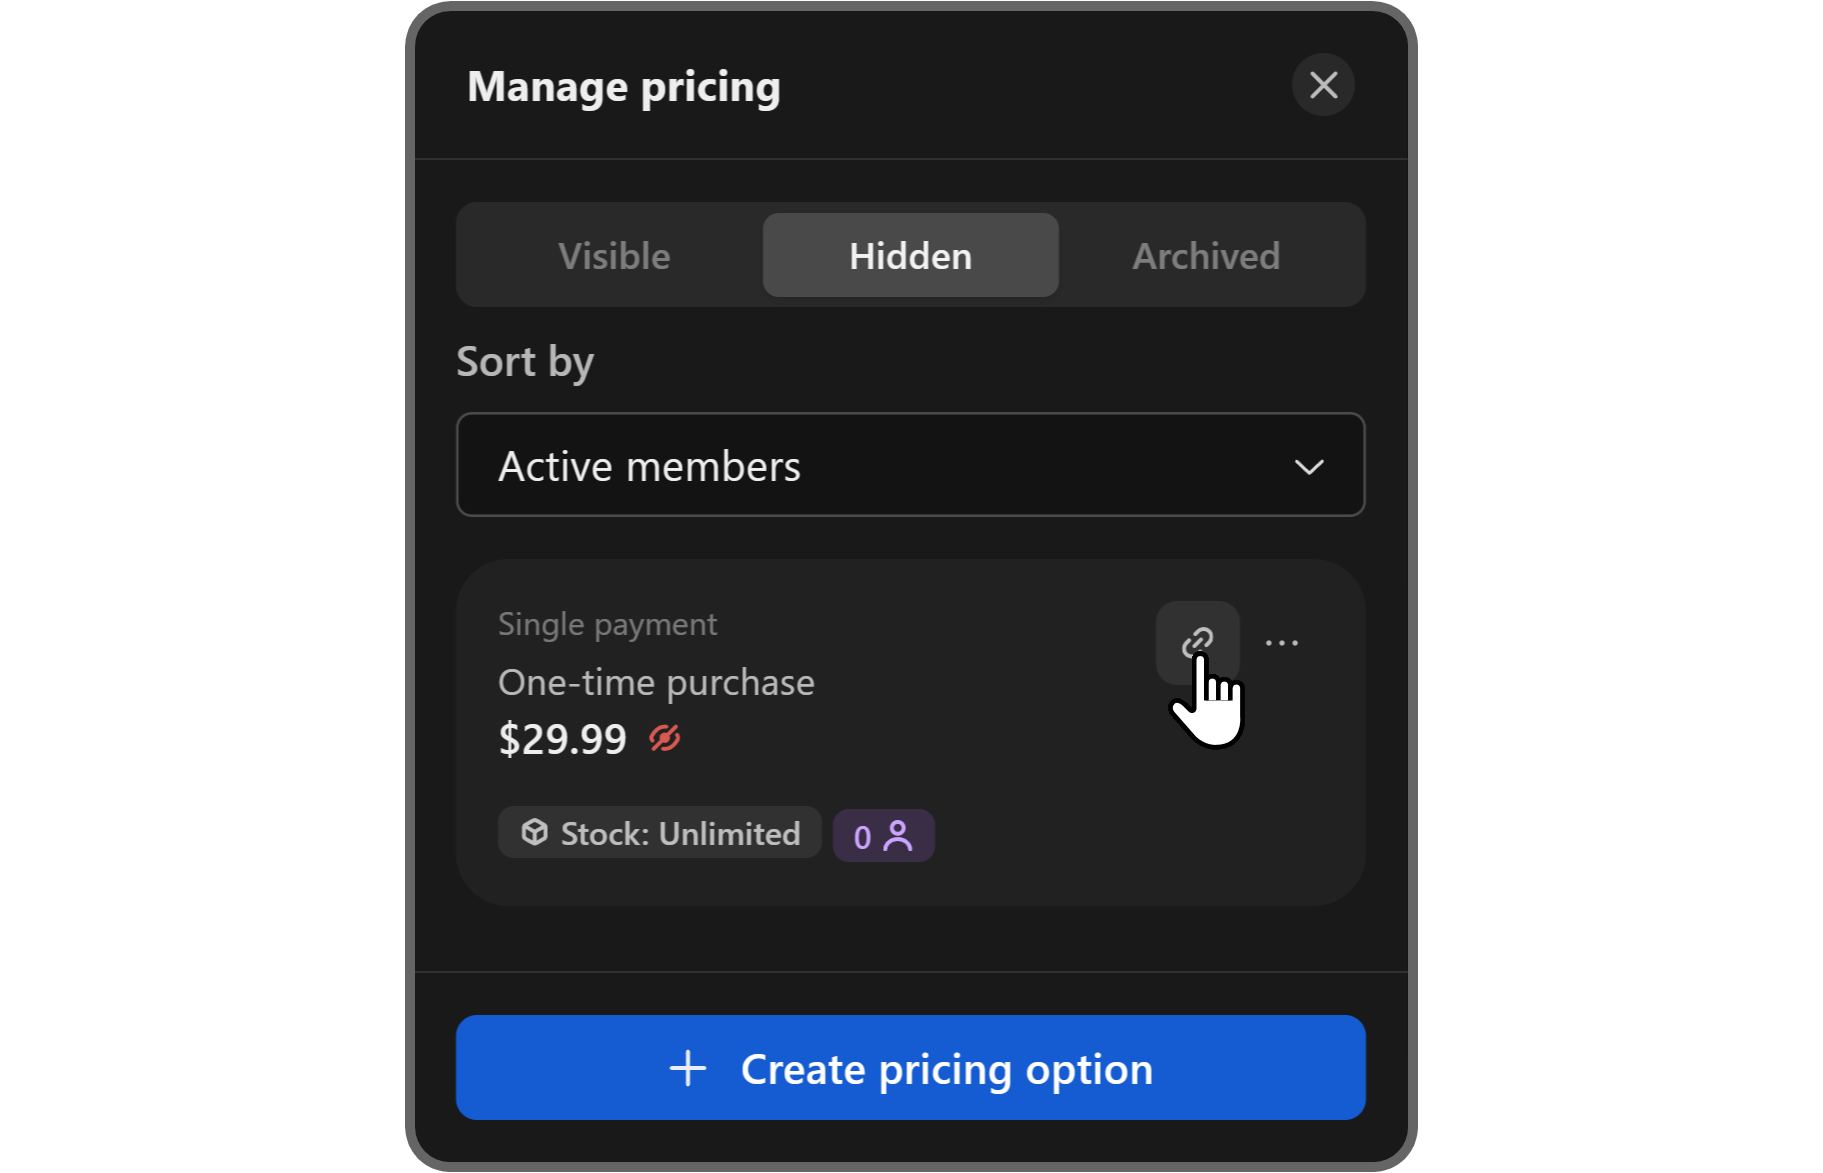
If you've set the price visibility setting of any of your pricing options to Hidden, only accessible via link, you might want to know how to get that link. It's super easy.
All you have to do is click on the Hidden tab button at the Manage pricing popup, which will display the hidden pricing options.
There, click the Copy link button (chain icon) of the pricing option you want to copy the URL to - that's it!
How will potential customers see the pricing options?
You've created the pricing options, now, it's time to look at how your potential customers will see them.
First, let's see where the pricing option will be listed. When you click on the Design store page button in the context menu of your whop, you'll be directed to its store page, and you can edit it directly there by reviewing its contents.
If you scroll down a bit on the store page, you'll see the Pricing section, which will be the pricing option(s) you've created.
Here, you have two things you can do: you can click on the Manage pricing button at the top right to create more pricing options, and you can click on the Edit benefits button at the right side of the section to add benefits to the pricing option.
Let's click on the Edit benefits button to see how you can add benefits.
By adding benefits to a pricing option, you can showcase what members will get once they join. For example, if your whop has online sports betting courses, you would add benefits like "Access to over 5+ sports betting courses" and "Live support for all educational content."
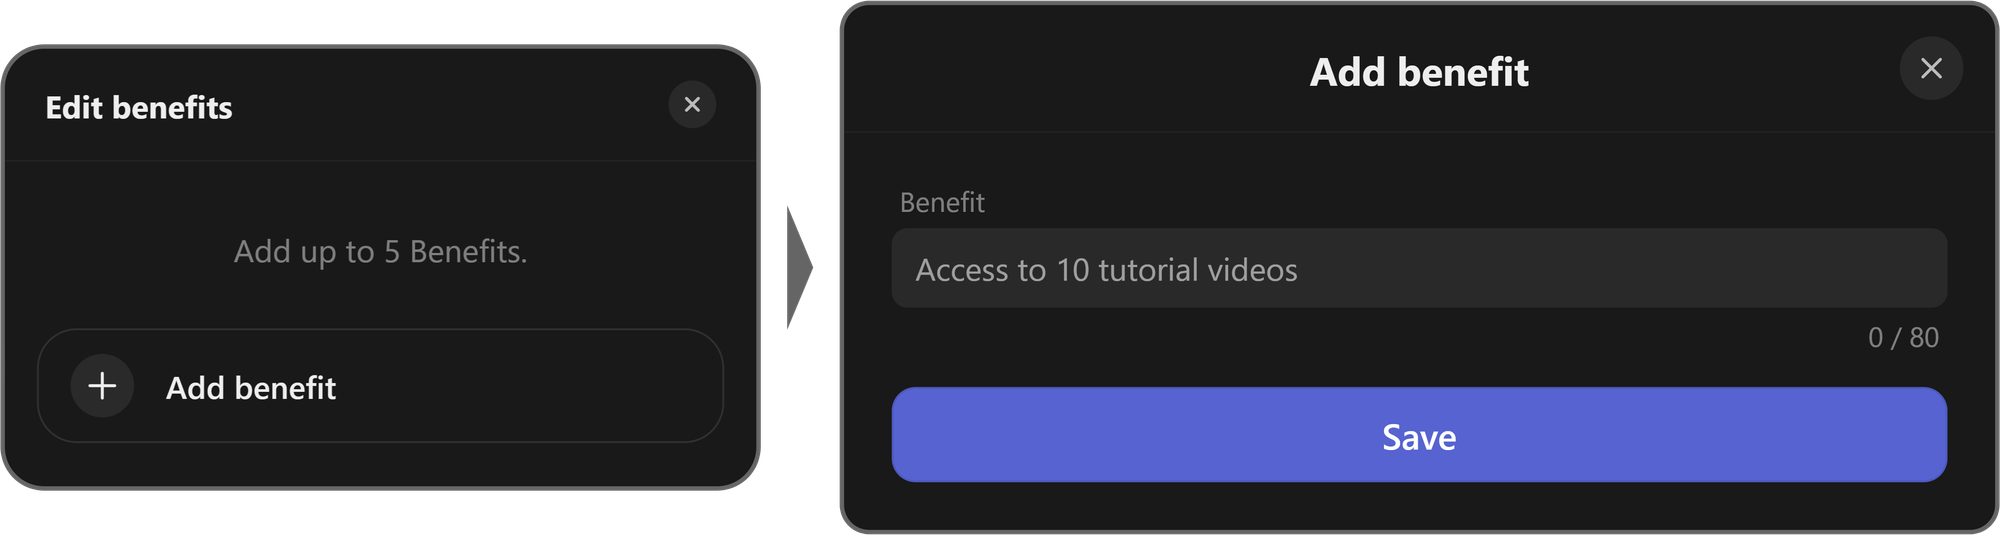
When you click on the Edit benefits button, you'll see a popup appear on the right side of your screen with the Add benefit button.
Clicking the Add benefit button will display an input popup where you can add a single benefit. You can add up to five benefits.
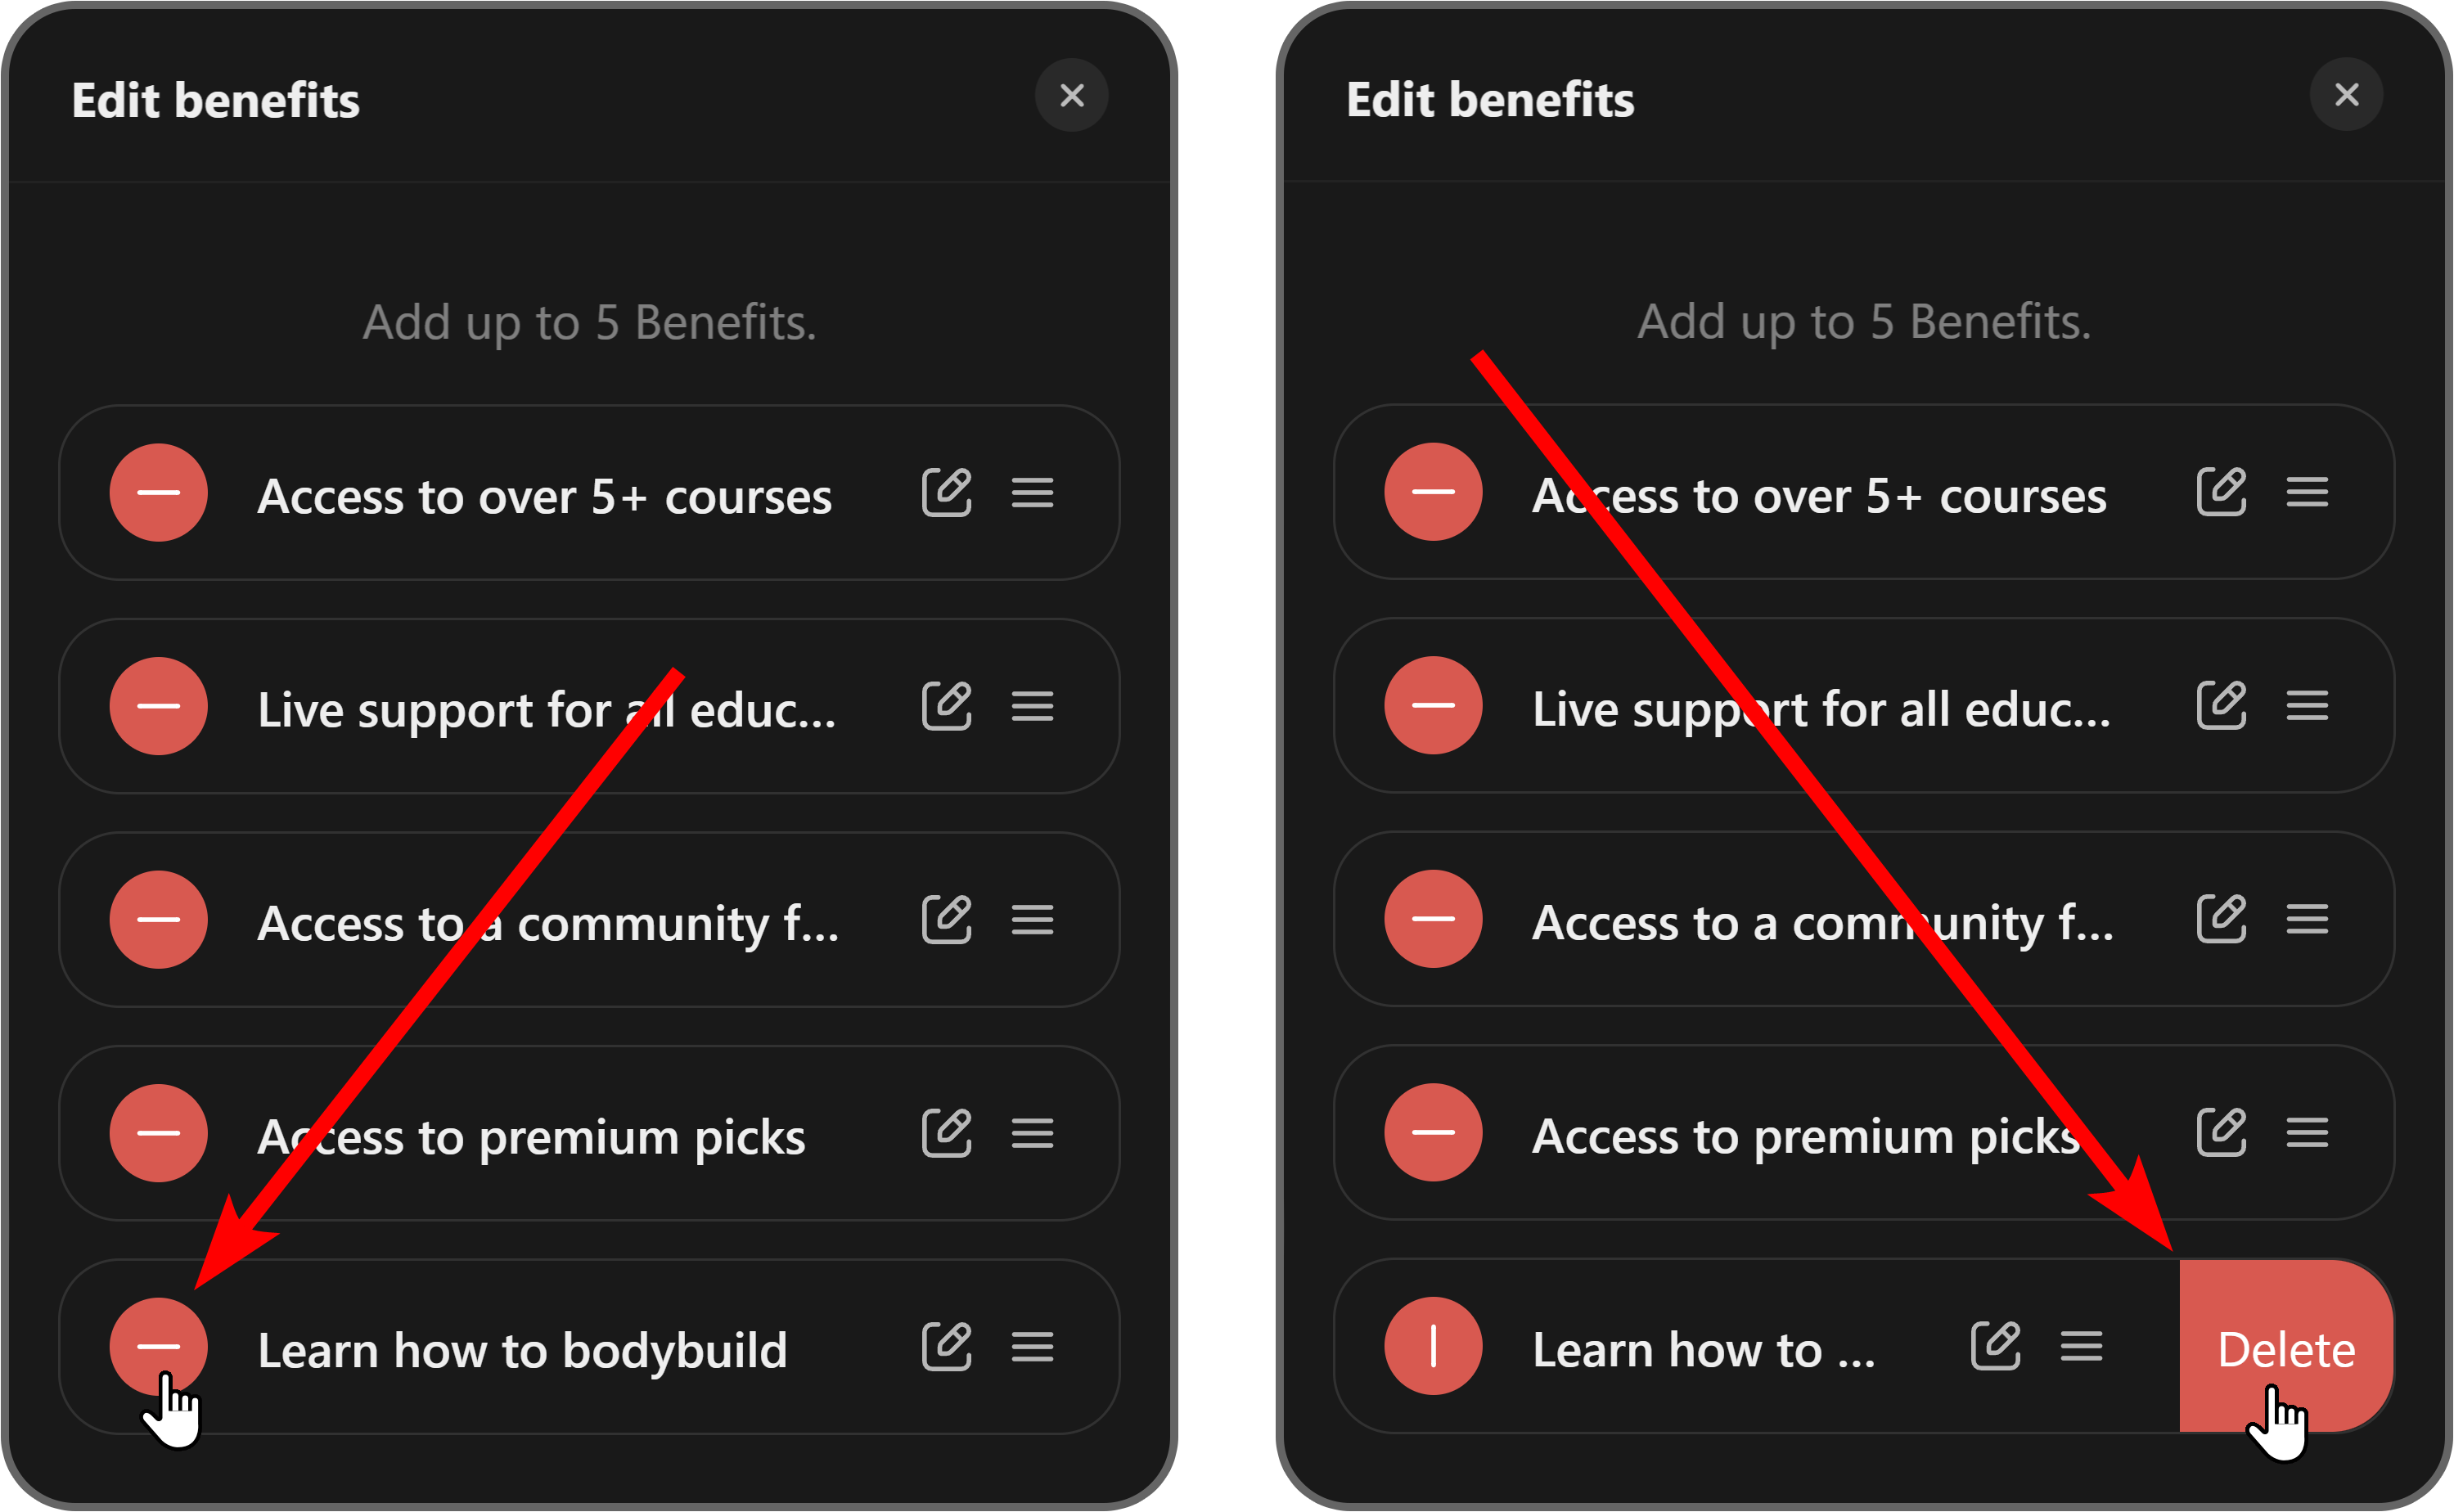
To remove a benefit you've added, click on the red remove button to the left of benefits. Then confirm the action by clicking on the Delete button that appears.
Tip: Keep in mind that this action is irreversible.
How to list your whop on the Discover page
After you design your store page and set the pricing options, it's time to apply for Discover.
Discover is where people go to find whops to join, and getting listed there can significantly boost your sales—but you’ll need to complete the Whop onboarding process first.
You can see where you're at on the onboarding by taking a look at the Set up your whop card at the bottom of your store page.
After you complete the onboarding, your whop will automatically go under an inspection and get listed on Discover if it meets all the requirements.
If you already meet the requirements but your whop isn't listed on Discover, you can apply by clicking on the context menu of your whop, selecting the Manage store, and scrolling down to find the Apply for Discover button.
Once there, click on the Apply for Discover button to apply.
Customize your whop today
Setting up pricing options on your whop is a great way to offer exclusive content to your audience and start earning. Add apps like Chat, Courses, and Content to your whop, and test out different pricing tiers to see what works best for your community.
Creating, customising, and launching your Whop takes less than 15 minutes — sign up today and start selling.


