
You can create and sell course on Whop by creating a whop, adding the Courses app to your whop, creating modules and uploading lessons, and creating products.
Key takeaways
- Whop lets you create, host, and sell online courses in minutes with built-in payments, analytics, and community tools.
- Subscription pricing with drip-fed content helps ensure minimum revenue per student while making courses more accessible.
- Complement your course with chat, forums, and livestreams to boost engagement and transform it into a learning community.
To create and sell a course on Whop, sign up at Whop.com, add the Courses app to your whop, create course modules and upload your content, create a product and set up your store page, and start selling.
More people than ever are buying and selling knowledge online, with the e-learning market expected to reach $325 billion by the end of 2025. Creators are cashing in by teaching everything from fitness and business to sports betting and art — and Whop gives you the tools to join them.
This guide walks you through how to create and sell a course on Whop, step by step, plus proven tips to make sure your course actually sells.
How to get started on Whop
You can sign up to Whop, create a whop, and start building your course in less than 5 minutes.
Whop will guide you through the sign-up process naturally, but just in case you want a little extra confirmation, here’s a step-by-step:
- Visit the Whop website.
- Click the Create a whop button on the left side of your screen.
- Create an account.
- Follow the onboarding steps
You'll be walked through creating your whop and a product during the onboarding. Once you're done with it, you'll be directed to your whop with a bunch of pre-installed apps.
Creating a course on Whop
Once you have created your whop, it's time to make your online course.
New whops come with pre-installed apps that are determined by the options you choose during the onboarding, like selecting 'selling courses' as your business definition.
1. Add the Courses app to your whop
You must have the Courses app pre-installed to your whop, but just in case, let's see how you can add the app to your whop:
- While viewing your whop, click the App store button under the Admin area of your whop to go to the Whop App Store.
- Find the Courses app and click its Add button.
- Select which products should be able to access your course.
Note: One Courses app equals one course, so every time you want to add a new course, you should add a new 'Courses' app. To keep track of them, you can change the app name to match your course name—just click the little settings cog to edit them.
2. Set up your first module
Once you add the Courses app to your whop, you'll see the Add module button. Clicking on it will display a popup with three fields: module name, description, and thumbnail.
After filling out the fields, click the Create button to create your first module.
Now, it's the fun part—adding lessons to your course.
3. Set up your first module
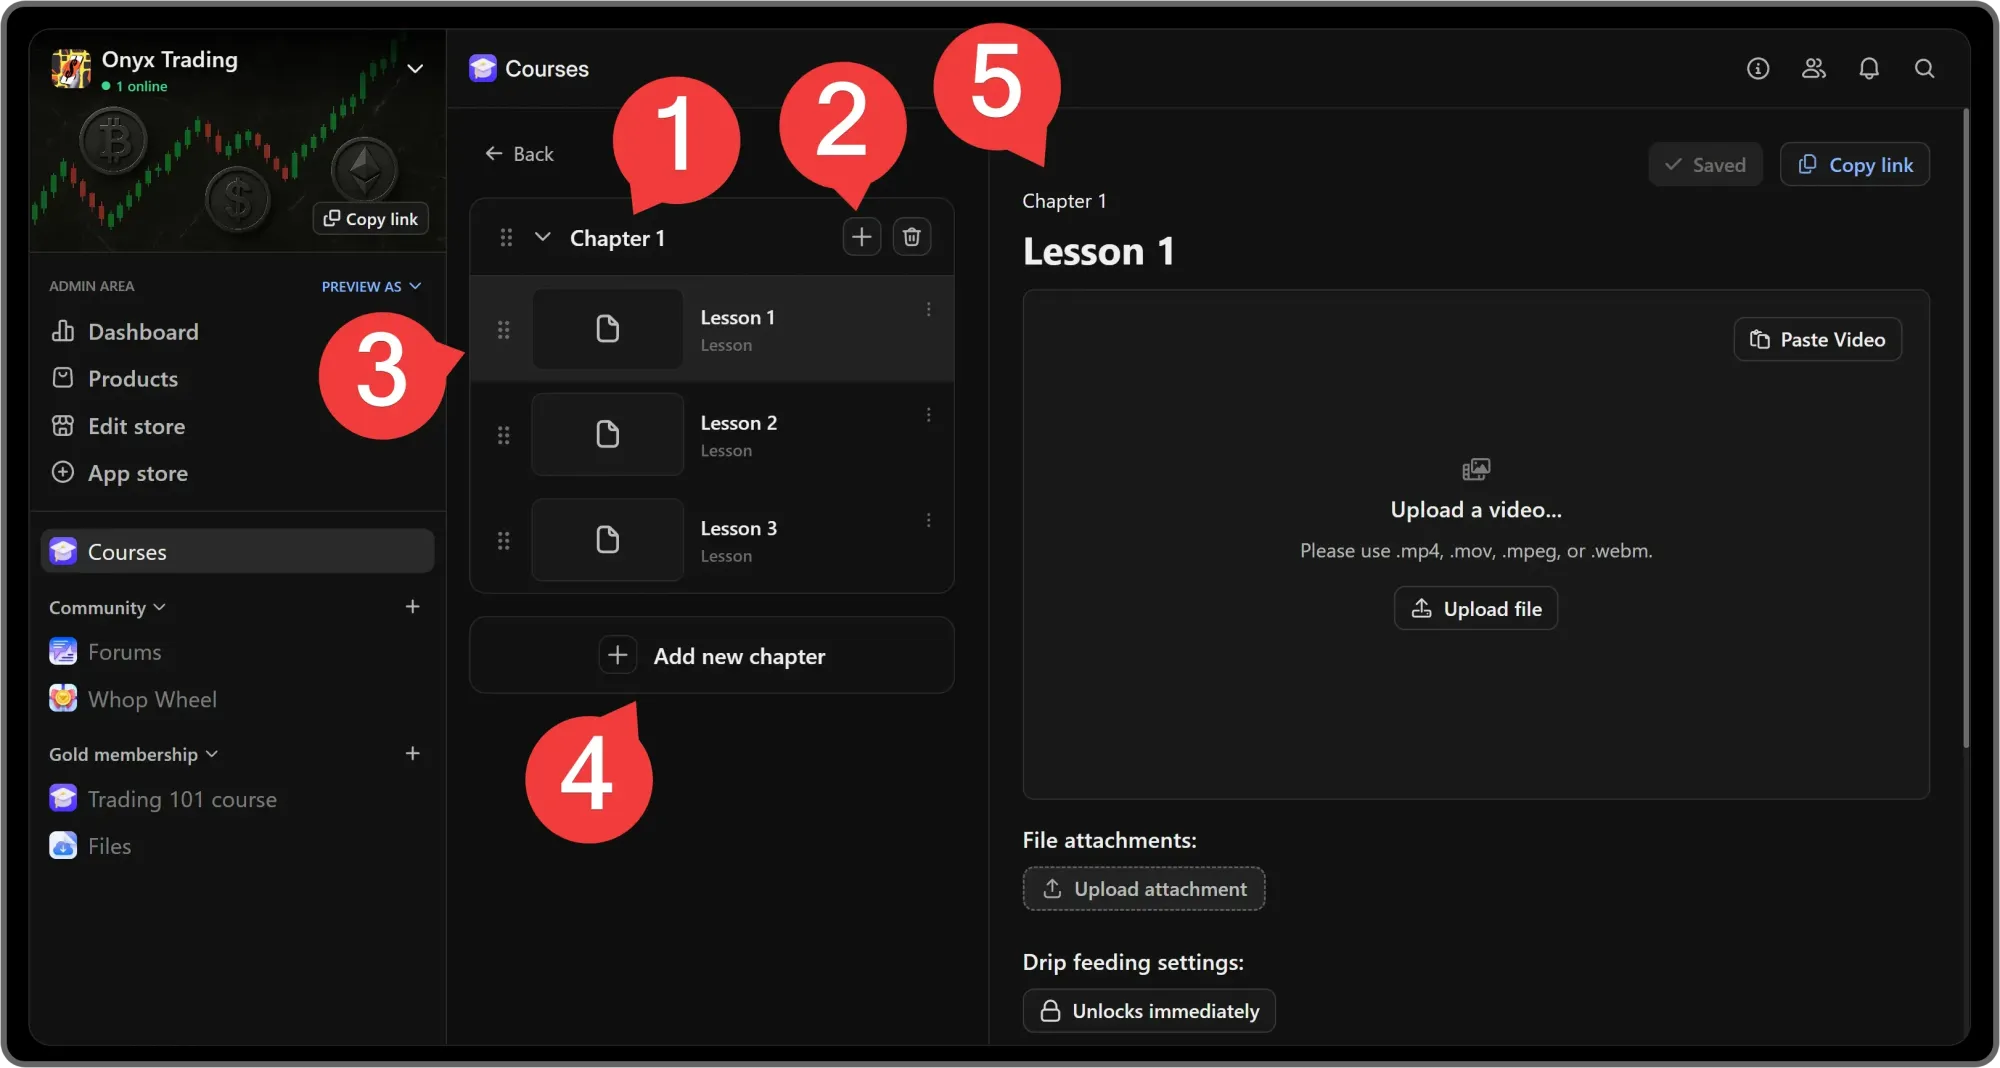
Once you create the module, you'll be directed to its contents.
- This is your first chapter - you can click on its name to change it
- This is the Add lesson button, you can use it to add a multimedia, PDF, or quiz lesson
- These are your lessons, you can drag them by the reorder handle and change their order. You can also click their context menu button (at the top right of each lesson) to delete them
- This is the Add new chapter button which will create a new chapter
- This is the lesson field where you can add content to the lesson (based on the lesson type), attach files, and drip feed.
Pro tip: After making changes to a lesson, make sure to save the changes by clicking on the Save changes button at the top right, next to the Copy link button.
4. Fill your course with content
Now that you know how to create a lesson, you can go ahead and make as many as you want.
If your course is long then you can organize lessons into chapters if your course is long (but you don't have to).
5. Check out your course analytics
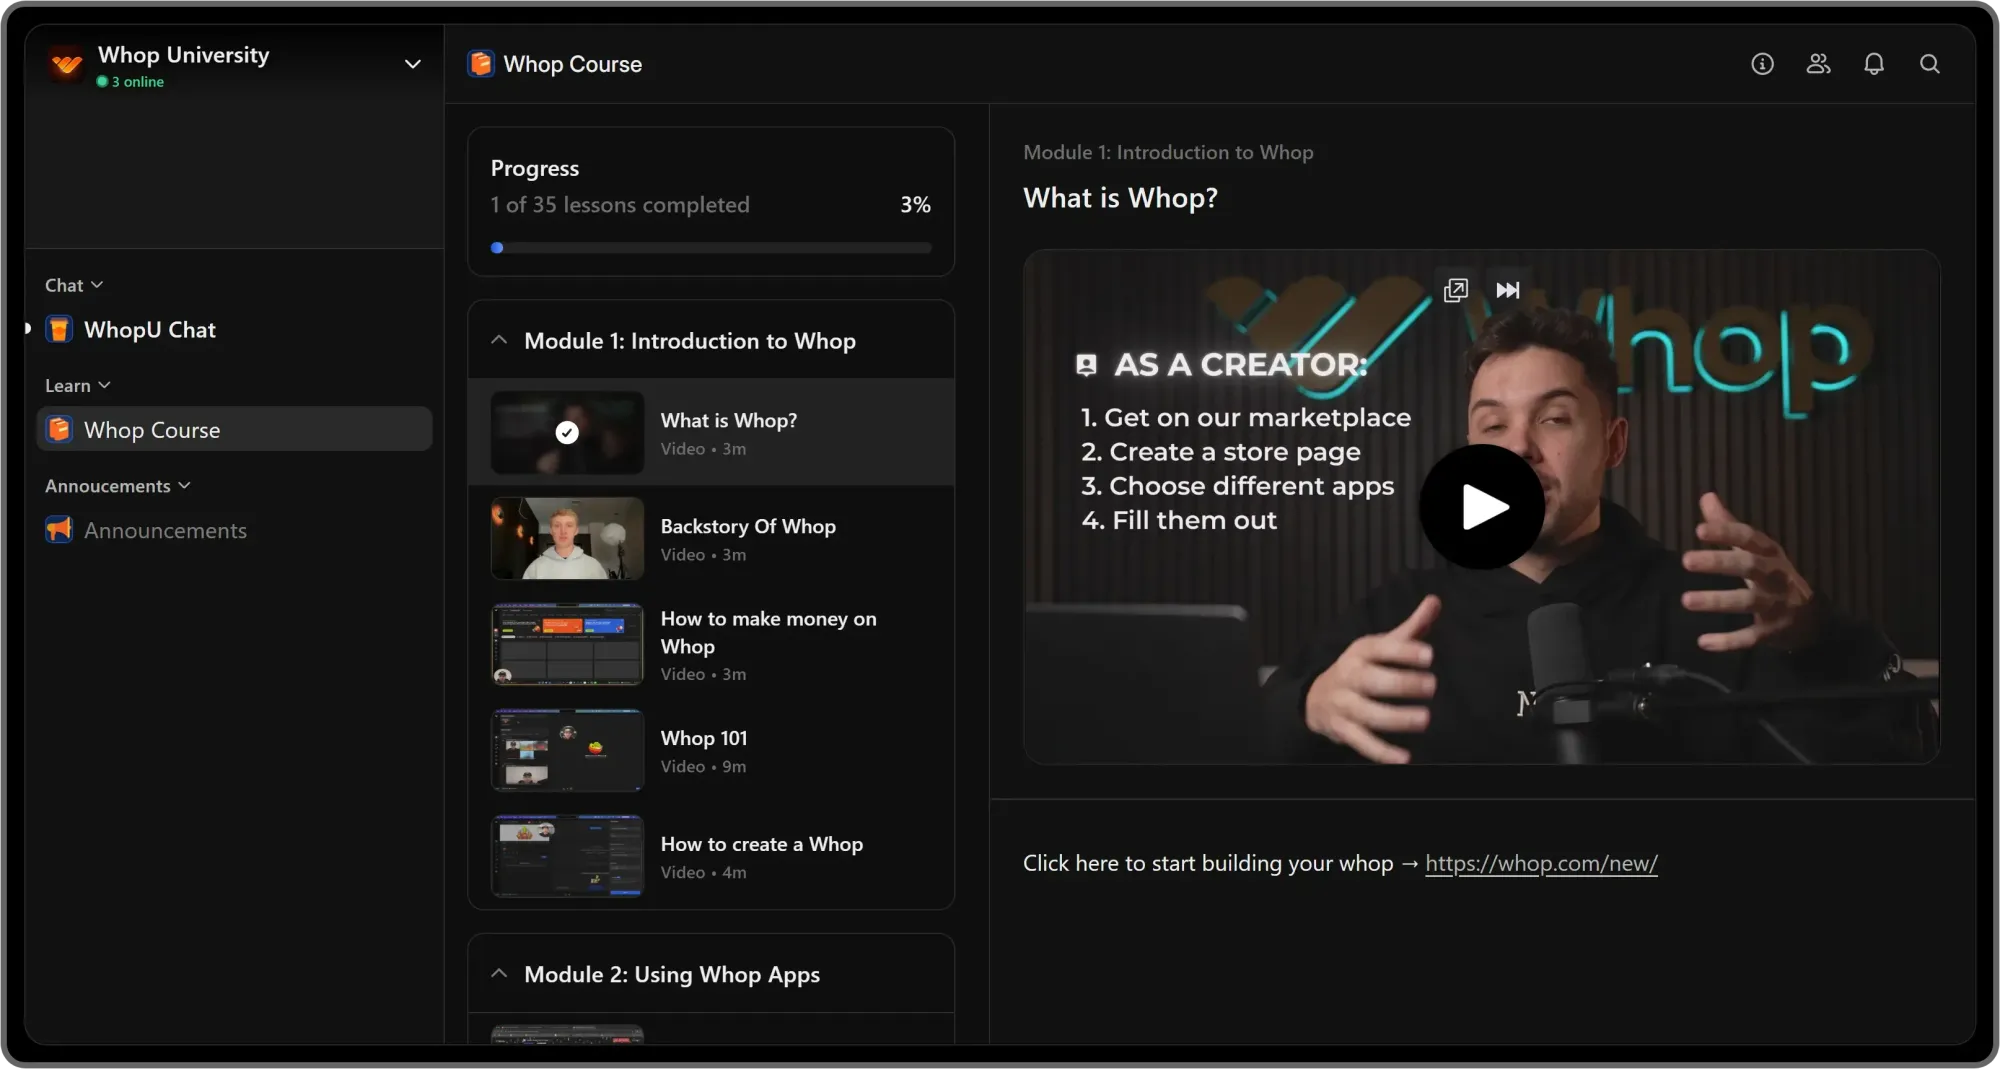
When your course is ready, publish it to make it live. As sales roll in, use the module menu to open View analytics.
You’ll be able to track progress by student or by lesson — see which lessons get the most attention, and how far each person makes it through the course.
These insights show you where to improve and when to step in to support a student who might need extra help.

Top tips for making a course on Whop
So, now you know the basics of making a course on Whop. But knowing how to put a course together is a bit different from knowing how to make a successful course.
Here are some top tips for making a course that actually sells.
1. Choose the right type of course
If you’re building a course as a passion project, go for it. But if your goal is to make money, the first step is choosing a topic that sells.
Online courses are booming, but some topics perform better than others. On Whop, courses on affiliate marketing, social media growth, crypto, and sports betting are especially popular. Other fast-growing areas include fitness, reselling, ecommerce, and personal finance.
The key is balance — pick something that sells, but also something you can confidently teach. Don’t worry if you’re not an expert yet. If you’re willing to research, read, and pull the best insights together into one course, that in itself is a valuable offer.
Online course ideas across all niches
2. Add lots of personal branding
Online courses are everywhere right now. You can even buy massive PLR bundles of ready-made courses to resell. The problem? If you publish them as-is, they’ll feel generic, boring, and more like “mandatory workplace training” than something people are excited to buy.
The fix is simple: add your personal touch.
- Brand the materials with your logo
- Record yourself walking through the lessons
- Create custom visuals and graphics
- Add your own insights and opinions throughout
Keep your style personal and conversational. Even if you’re teaching something academic, you don’t need to sound like a textbook. Make it accessible, easy to follow, and engaging.
And if you’ve got real expertise in the topic, lean into it. Build your course around your own experiences, share what’s worked for you, and give students the strategies they can use to find success too.
Personal branding examples (and how to create your own brand identity)
3. Set the right price
Pricing an online course isn’t as simple as slapping on a number. Some courses run hundreds of hours, taught by industry pros, and cost hundreds of dollars. Add one-on-one coaching and you’re in the thousands. On the other end, short and simple courses often sell for $10–$50.
Most people see courses as an investment, so higher prices aren’t a dealbreaker. But a $1,000 upfront price tag can be a hurdle. That’s why many creators use subscriptions to make pricing more accessible.
Subscriptions work best for:
- Longer courses that take weeks or months to finish
- Course libraries, where one subscription unlocks multiple offers
With drip-feed settings (unlocking a lesson a certain number of days after a user starts the course), you can make sure each subscriber hits a minimum spend. For example, if your subscription is $25/week and you want at least $100 per student, split your course into four sections.
Each unlocks weekly, so completing the course requires at least four weeks of payments. Just be transparent so customers know exactly what they’re signing up for.
The smartest way to price? Put yourself in the customer’s shoes. What would you pay? Don’t undervalue your work, but don’t overprice and scare people off either.
4. Revisit and update your course regularly
No one wants to buy a course that’s been abandoned. Outdated content, no support when something breaks — it feels like money wasted.
A course that’s updated regularly, on the other hand, builds instant trust. You can even announce when the next update is coming so both new and returning students know the material is fresh.
What you update depends on your topic. Sometimes it’s a brand new lesson. Other times it’s smaller tweaks — refreshed info, tighter edits, or a few extra quizzes.
5. Create channels of communication with your students
Another great thing about Whop is that you can add all kinds of apps alongside your Courses app.
Many of these apps are designed to help you connect with your customers—through chat, announcements, exclusive communities, and more. Staying in touch with your audience like this can seriously boost engagement and improve how well your course performs.
Here are a few of the apps that can complement your course:
If you want to keep your online course business as a passive income stream, you don’t have to go too crazy with different communication channels. You can just create a Forum where your users can ask each other questions and get in contact with you if they need help.
If you’re willing to put in some hours and make some extra cash—you can go all in. Create a chat channel for your course members to communicate and host livestreams for live course lessons,
At this point, you could argue that your whop is less of an online course and more of an “exclusive learning community.”
How to promote your Whop course
Once your whop is ready, it’s time to get customers in the door. Share your link anywhere — post it on social, send it to your audience, run ads — whatever works for you.
Need a boost? Whop has you covered. Add your whop to the Discover page, our marketplace where people search by topic and browse thousands of offers. It’s a built-in way to get in front of customers who might never have found you otherwise.
Another way to market your whop is to join Whop Affiliates. This works like any other affiliate program out there—you give your affiliates a link that they can share with their networks, and when someone makes a purchase through an affiliate link, the affiliate gets a commission.
Build, launch, and sell — all on Whop
Building a course is one thing. Selling it is where creators win — and Whop makes that part effortless.
From hosting and payments to community and analytics, everything you need to grow your course is already here. You can launch today, reach new students through Discover, and keep more of what you earn.
So if you’ve got something worth teaching, don’t wait. Create your course, publish it on Whop, and start earning from what you know.


