Discover what sort of rules you should be putting in place for your server, how you can create them and the best way to make them accessible.
Key takeaways
- Clear community guidelines prevent chaos and help members understand expected behavior, making your server enjoyable.
- Combine standard rules (respect, no spam, no harassment) with topic-specific guidelines tailored to your community's focus.
- Rules Screening forces new members to accept your guidelines before participating, requiring Community server status to enable.
Discord communities are just like real-life communities – almost all of them have management structures, and one of the most important parts of managing a server is having clear rules.
Of course, there are Discord communities with no rules at all. But when there are no rules, the only thing that governs the community is chaos, and users won’t want to stay on the server. Creating and maintaining a good server requires the management team to set clear rules so members of the community understand how they should behave. When everyone knows how to behave in the comrules are in place, the server will prosper as a fun and comfortable place to be in.
In this guide, we’re going to examine what kind of rules you need when managing a server, how you can create them, and the best way to make them accessible. Let’s dive in.
What Kind of Guidelines Does Your Community Need?
When you first hear that “every community has different guidelines,” you might wonder why there isn't a single set of guidelines everyone can use. In fact, there are a bunch of rules every single server on Discord can incorporate into their own.
Discord server managers rarely come up with rules from scratch, they use the well-known guidelines, which have become almost common sense, and add their own specific rules on top of them.
For example, a server about the NBA might restrict its members from sharing NFL clips on the server, and they will mention this in their rules. On the other hand, a server about arts & crafts might ban sports talk. When creating your own set of guidelines for your community (which we will get into in a minute) you should think about how you want your members to behave, what you don’t want them to do, and what you will encourage them to do. These will help you when coming up with rules.
Now, let’s move to actually creating guidelines for your community.
Creating Guidelines for Your Community

There are two approaches you can take when creating guidelines for your community. The first one is keeping it really simple and inclusive. Of course, this method will significantly increase the number of situations where an event doesn’t really fit into a rule, so you end up having to take initiative. The other approach is to make a detailed set of guidelines. This doesn’t mean you have to sit down and come up with thirty unique rules – just enough to cover most things that can happen within the server. Still, you’ll have to use simple/inclusive and detailed guidelines no matter which approach you take.
Below, we’ve created a set of guidelines to help you start. You can copy the guidelines and use them directly, but we suggest you modify them to suit your server.
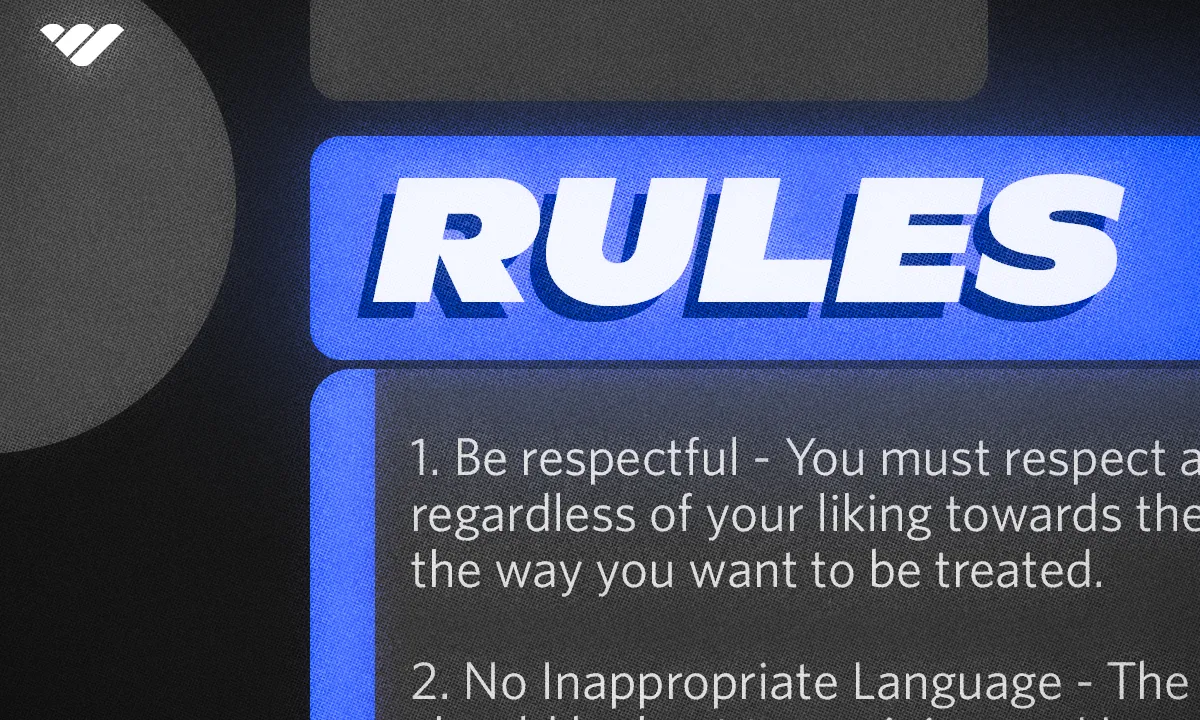
- Be respectful to all members: Our server is a community and we expect everyone to respect others.
- No spamming or excessive self-promotion: Please do not spam or excessively self-promote to keep our server usable. If you want to promote something, contact our staff.
- No offensive or inappropriate content: Our server hosts members of all kinds – no one likes offensive people, and inappropriate content might get you banned.
- No trolling or harassment: To keep a friendly environment, please don’t disturb other members by trolling or harassing them.
- Comply with Discord ToS: As with all Discord servers, our server is subject to the Discord Terms of Service, so please comply with it.
Now that you have your set of guidelines, it’s time to add them to your server. Almost all Discord servers create a dedicated “rules” (most preferred) or “guidelines” channel at the top of their channel list so that it is easily accessible.
Let’s see how you can create a rules channel in your server.
Creating a Discord Channel for Your Guidelines
As we mentioned, most Discord servers put their guidelines in channels called “rules” or “guidelines”. The permission setup of these channels doesn’t let regular users send messages so that the channel can stay a stable source of information. There are many ways to create channels on Discord, and they differ from desktop versions to mobile versions.
Let’s start by taking a look at how you can create a channel on a desktop.
Creating a Channel for Your Guidelines on Desktop
Perhaps the easiest way to create a channel on Discord desktop is the right-click method. As you can see in the Discord interface, the leftmost side will list the servers you’re in, and you can see the channels of servers to the right. You can create channels by right-clicking on that section.
Here are the steps:
- Right-click the channel list section and select the '"Create Channel" option. Note that if you don’t have the Manage Channels permission, you cannot do this. If you’re the server owner, you have all the permissions by default.
- When you click the "Create Channel" button, you’ll see the Create Channel window. There, the first step is to select which type of channel you want to create and its name. Since you want to post your rules in it, it should be a text channel. Then, give your channel a clear name. We suggest “rules”. Once you’re done, click the "Create Channel" button.
- There you go. Creating a channel is really easy. Now, if you want to move the channel’s position, you can do so by dragging it wherever you want. Since it’s a rules channel, we recommend you drag it to the top of your channel list.
Creating a Channel for Your Guidelines on Mobile
While the windows of creating a channel process are different on the mobile version of Discord, it’s still extremely simple. Just like the desktop version, you need to have Manage Channels permission to create channels on a server. If you’re the server owner, you already have all of the permissions.
Let’s see the steps:
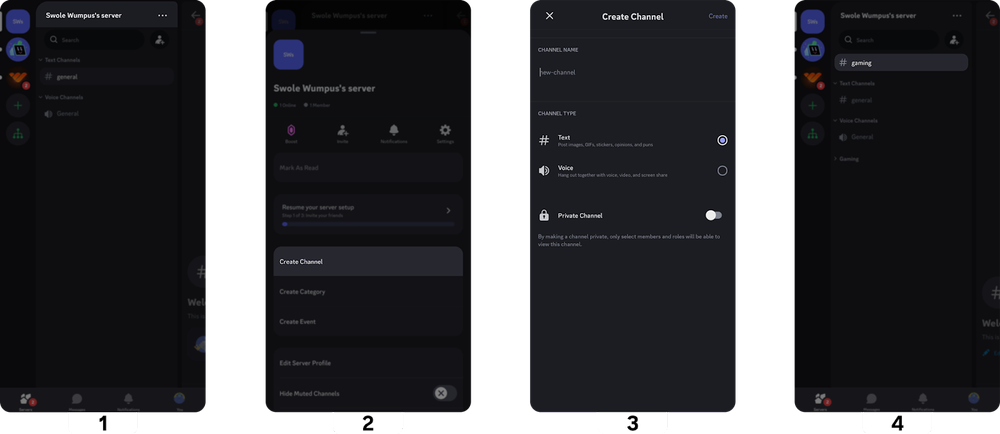
- Press the server name at the top of your channel list to open the server context menu.
- In the server context menu, press the "Create Channel" button.
- Once you press the "Create Channel" button, you’ll be prompted to give your channel a name. We suggest “rules,” and in this case, you can select its type. Since you want to create a channel to post your rules in, you should select Text. Once you’re done, click the "Create" button at the top right of your screen.
- There you go. You just created a channel.
How to Set Up Discord Rules Screening and Make New Members Read and Accept Rules Before Joining Your Server
Rules Screening is a great way to introduce new members to your rules before they can interact with your server. You can think of Rules Screening as a way to make users agree to the rules. However, to be able to use the Rules Screening, your server needs to be a Community server. Luckily, it’s very easy to do. Let’s see the steps of turning the Community feature on:
- Click on the server name at the top of your channel list to open the server context menu. In the context menu, click on the "Server Settings" button.
- In the Server Settings, navigate to the Enable Community section and click "Get Started". This will open a new window with three steps. The first one requires you to turn on two settings. After you’re done, click "Next".
- In the second step, you’ll have to select a rules or guidelines channel. You have the option to select “Create one for me,” which will create a new channel, or you can select your rules channel from the dropdown menu. The second is to select a community updates channel. Community updates are basically Discord updates – you should select a channel that only your staff can access. Once you’re done, click Next.
- In the final step, Discord will ask you to remove risky permissions from @everyone, which is the role that every single member will have. If you’re all good, click the “I agree and understand” checkbox and then the "Finish Setup" button.
Now that you have the Community feature turned on in your server, you can use the Rules Screening feature. Of course, turning on the Community feature allows you to do much more – like creating an announcement, forum, or stage channels and applying for Server Discovery.
Let’s move on to setting up the Rules Screening. Here are the steps:
- Click on the server name at the top of your channel list to open the server context menu and select Server Settings. In the Server Settings, navigate to the Safety Setup section.
- In the Safety Setup section, click the "Edit" button of “DM and Spam Protection”. There, you’ll see a setting named “Members must accept rules before they can talk or DM”. Click either the block itself or the "Set Up" button next to it.
- Once you expand the setting, click the "Get Started" button to start adding your rules. You can add up to 16 rules, each with a 300-character cap. Once you’re done, click the "Save" button at the bottom right.
- After you’ve added your rules, click the toggle button at the top right of the settings box to turn the feature on. Optionally, you might want to write a 300-character description of your server, which will be displayed on the Rules Screening.
- You’re all good to go. Now, if you want, you can preview the Rules Screening by clicking on the preview button (eye icon) next to the toggle at the top right of the setting box.
Monetizing Your Discord Server with Whop
Ready to turn your Discord server into a profitable community? Then join Whop today. Whop simplifies server management and rule enforcement while enabling you to monetize your community effectively.
Thousands of people have been monetizing their servers with the help of Whop and earning more than $1 million each year – you can be one of them. Start earning through subscriptions within minutes. Sign up now and get started.