Did you know that Discord has Forum channels? Read this guide to understand what a Discord forum is and how you can create one.
Key takeaways
- Forum channels let users create individual threads for each topic, eliminating clutter in busy Discord servers.
- You must enable Discord's Community feature before you can create forum channels on your server.
- Forum channels offer customizable settings like tags, slowmode, default reactions, and post guidelines for better organization.
There are a lot of Discord channel types, but perhaps one of the most powerful of those is forum channels. Forum channels will help you organize the communication of your community by allowing users to create their own threads.
Although forum channels are a great feature, they can’t be created like text channels - there are prerequisites. In this guide, we’re going to recap what Discord channels are, what a forum channel is, how you can create a forum channel, and all of its settings.
What are Discord channels?
Discord channels can be explained as chat rooms of a community. Think of a Telegram or WhatsApp group - they have group chats that can host a lot of people, but there’s only a single place they can chat in, the group itself. On the other hand, Discord has what’s called “servers.” Servers can simply be explained as a combination of multiple group chats.
You can create up to 500 channels within a Discord server, which allows you to create dedicated spaces for topics. For example, if you have a server that’s about basketball, you can create a live-match channel for people to talk about the current live match and another exercise channel for people to talk about training to get better.
Since Discord servers can hold tens of millions of people at the same time, being able to create different chat rooms that users can switch between easily and talk about the topic they want is a huge relief, especially from the manager's perspective. Having a hundred people talking about six different topics in a single chat room at the same time is an open invitation to chaos - having different channels fixes this problem.
Of course, Discord channels aren’t just chat rooms. You can create voice channels for people to join and talk to each other. They can even turn their cameras on to have video calls. You can create announcement channels to access more features for announcing things to your community. One of the many channel types in Discord is Forums - one of the most useful channel types.
What is a Discord forum channel?
As the name suggests, forum channels on Discord allow you to create a channel where users can create threads. Forum channels were introduced to Discord in September 2022, and they’re mainly used to keep the clutter off regular text channels.
We gave the example of a basketball server before, so let’s keep going with that. Imagine you create a channel called “feedback” where users post videos of themselves doing free throws and ask for feedback on their form. A user posts their video asking for feedback, but before anyone can answer them, another user posts their video, and another one. Now, it’s all cluttered - people don’t know who to give feedback to, and even if they do, it might not be clear who they’re talking with.
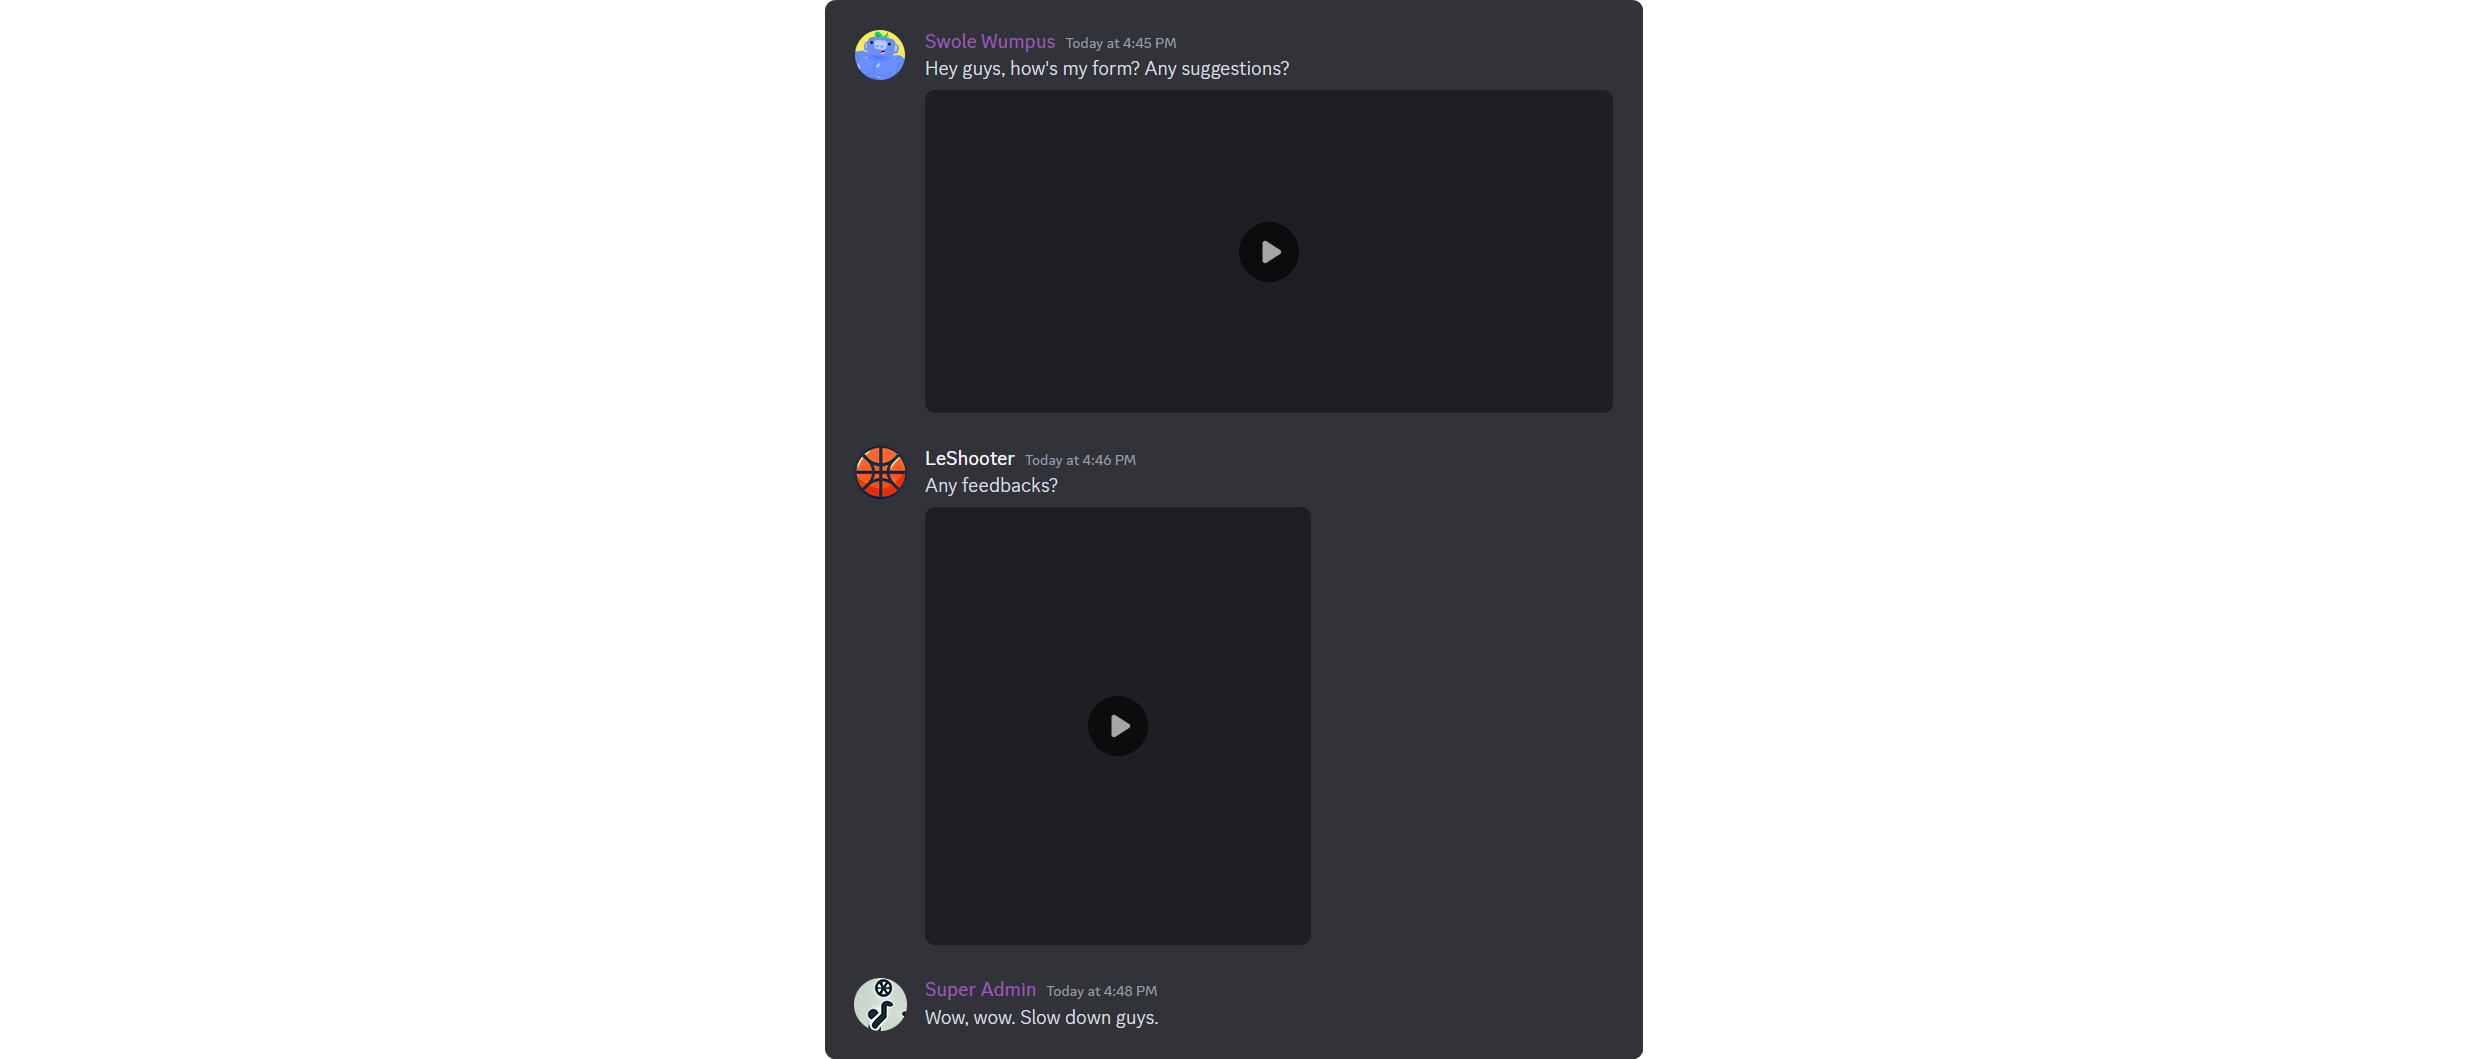
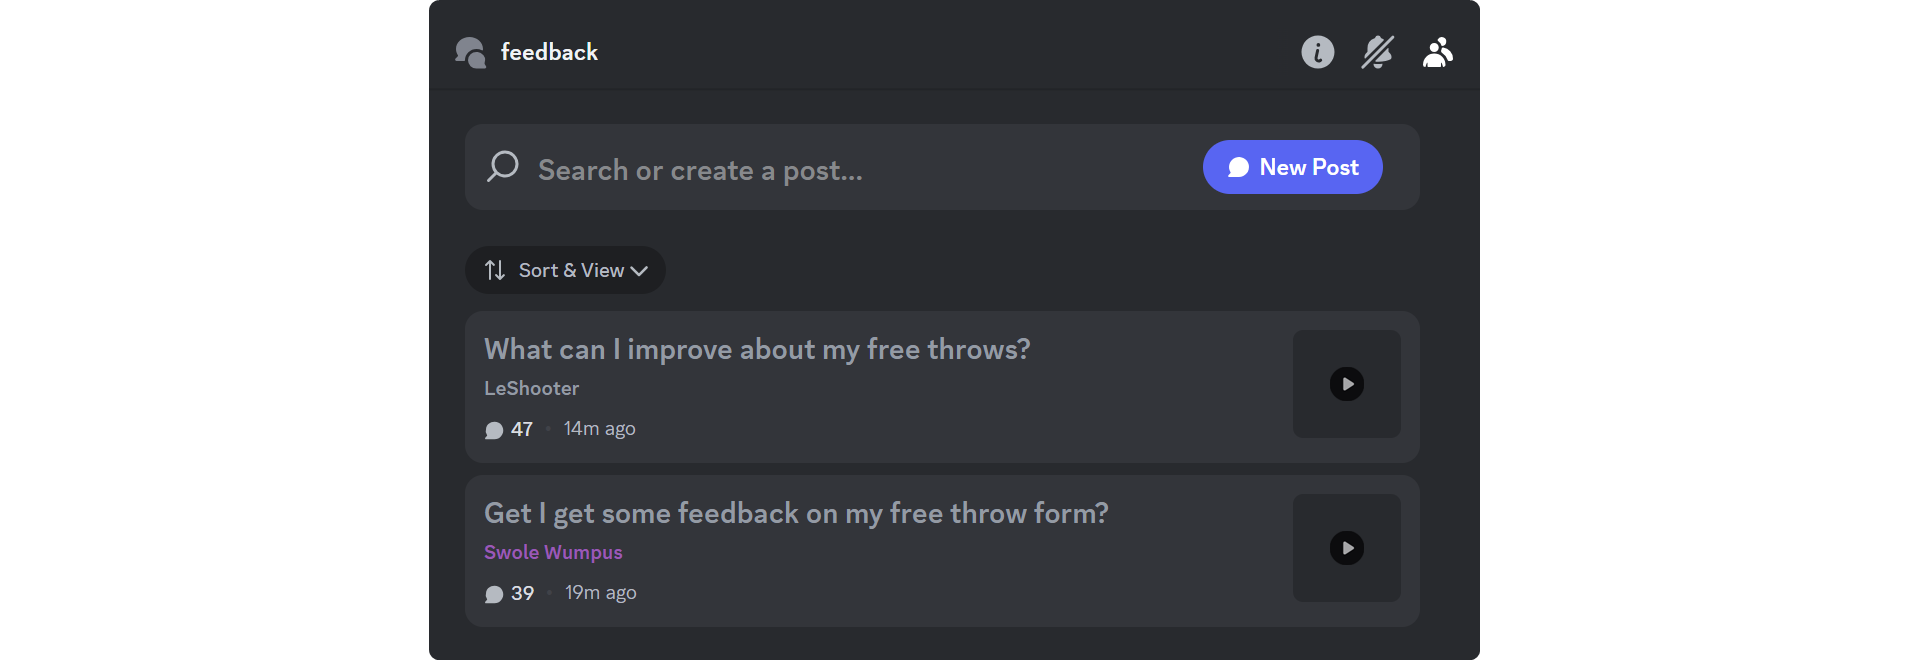
Instead, if you create a forum channel where people can create their own threads (or posts) and put their videos in it, now it’s all clear since all feedback requests basically have their own text channel. Clutter? Gone.
Creating a forum channel on Discord
Creating a forum channel on Discord is a simple process - but there’s a prerequisite. You need to enable the Community feature.
The Community feature allows you to create new types of channels like Announcement, Forum, and Stage. On top of that, it gives you access to a wide variety of tools that will help you manage your server, such as server insights, onboarding, and more. Let’s see how you can turn the Community feature on with a few simple steps.
First, let’s click on the server name at the top of your channel list to see the server context menu and select Server Settings from there.
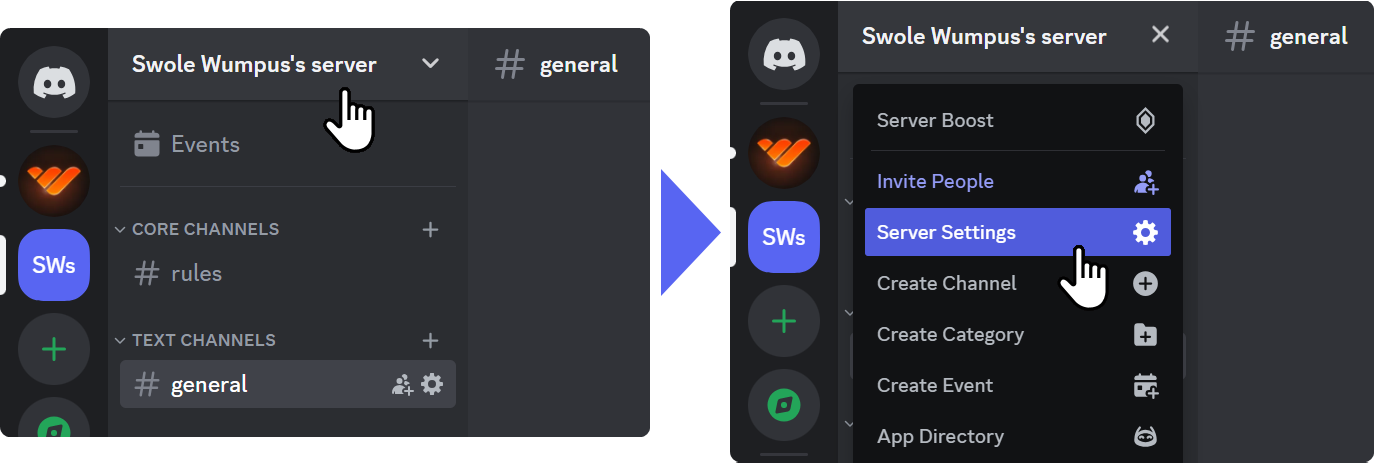
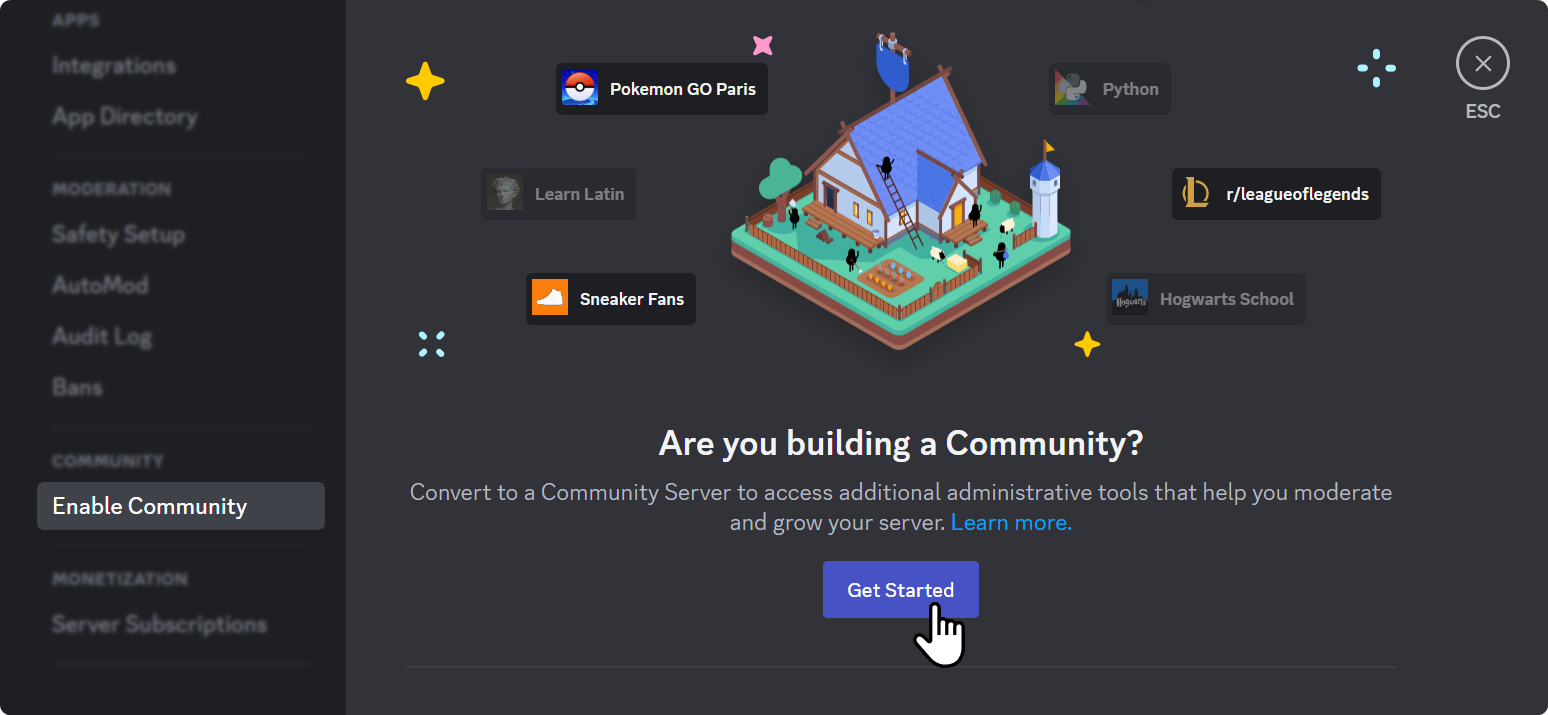
Once you’re in the server settings, scroll down on the left-hand side until you find the “Enable Community” option. Click on it to open the Community page. There, you’ll see the introduction page of the Community feature and a Get Started button. Click on it to start the process.
If you can’t see the Community section, you might not have the Administrator permission. Only the server owner and users with the Administrator permissions are allowed to see and enable the Community feature.
- Tip: If you already have the Community turned on, you’ll see a Community section with Overview, Discovery, and Server Web Page tabs under it - if you do see those, skip this section and go to the Creating the Channel section.
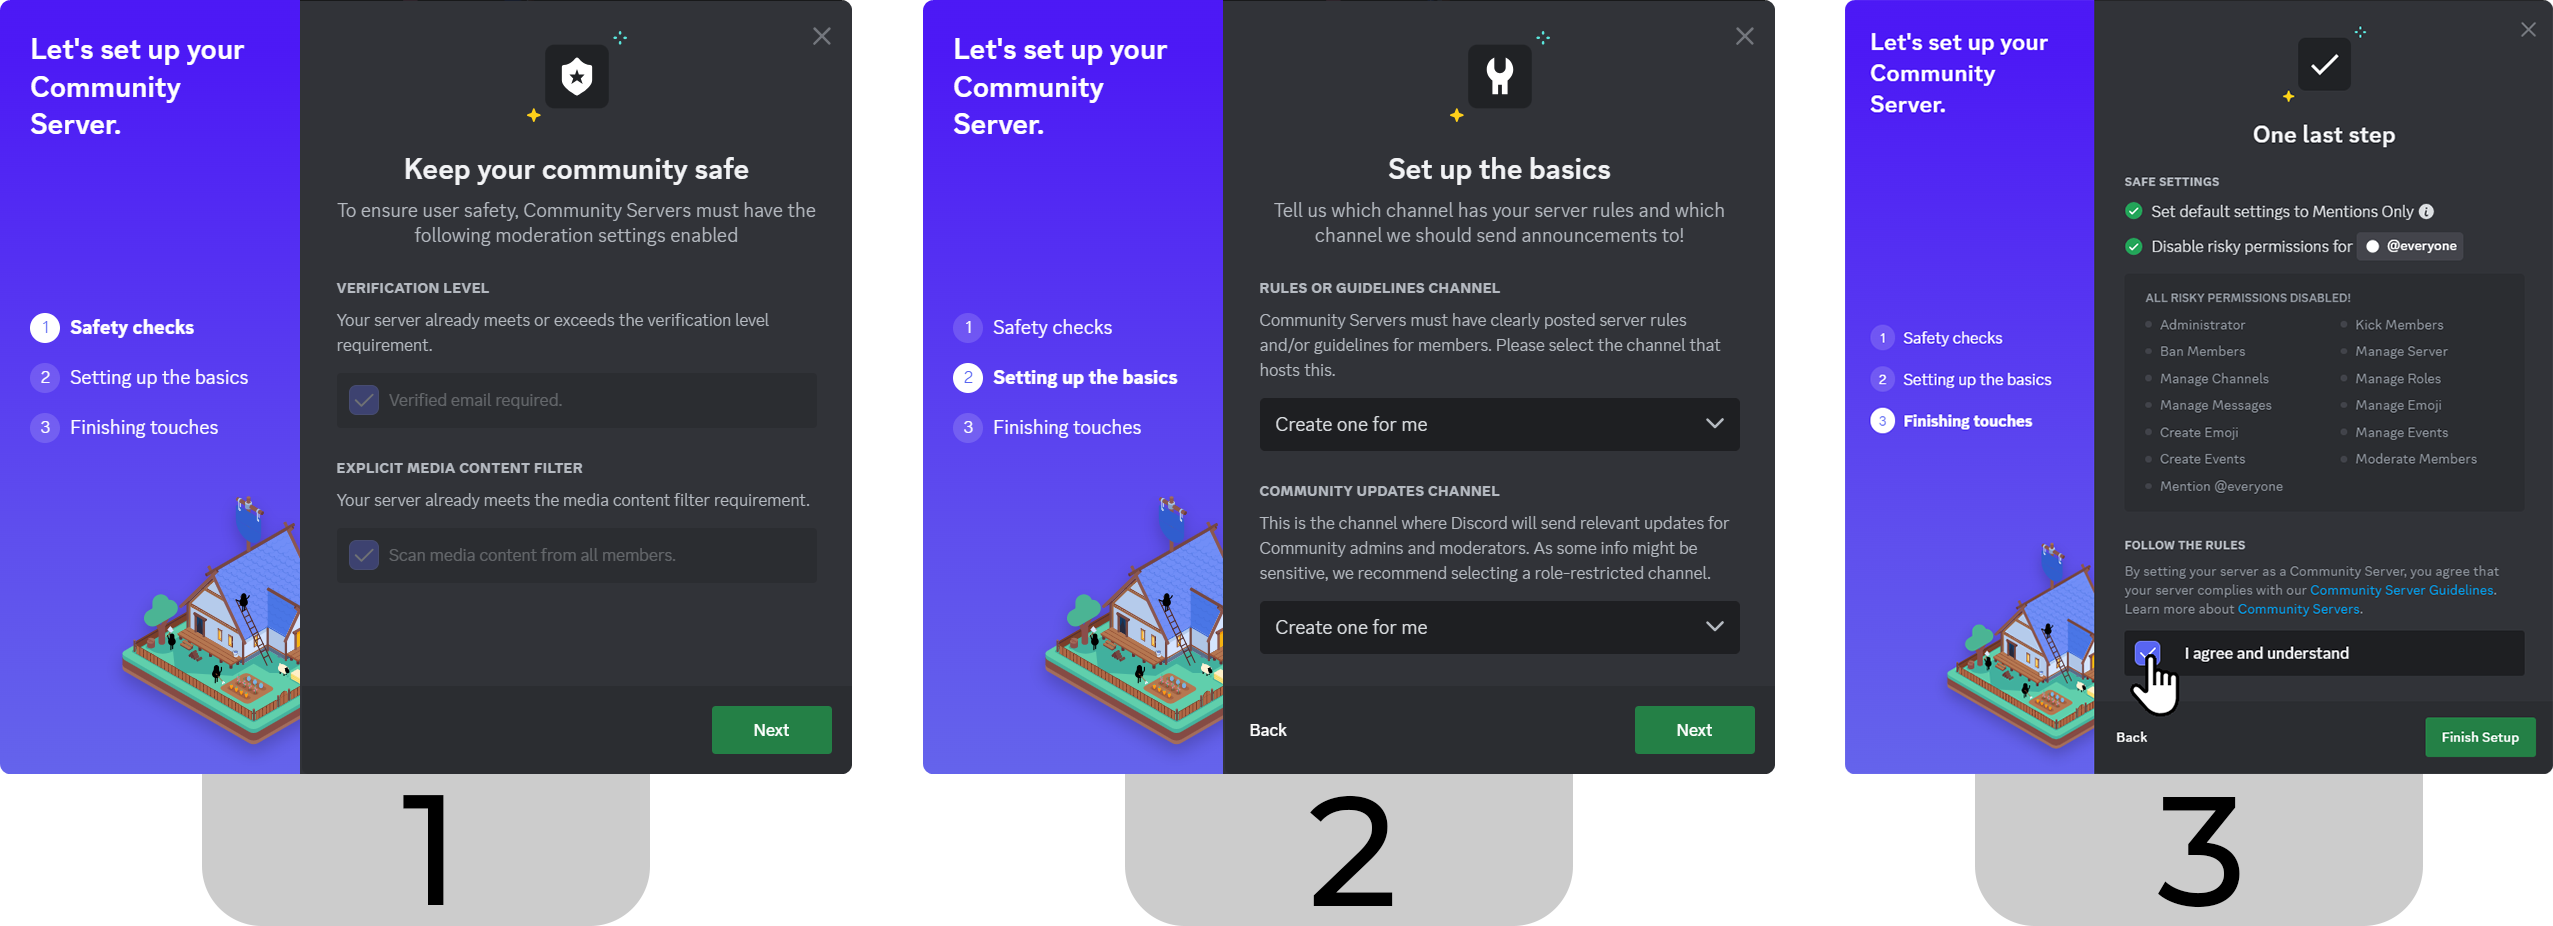
Once you click on the Get Started button, you’ll see a new screen popping up. Now, there are three steps you should follow:
- In the first step, Discord will ask you to set the verification level of your server to the email required, and then it will ask you to turn on the media content filter. You can click on the checkboxes to do that. After you’re done, click the Next button at the bottom right.
- In the second step, Discord will prompt you to choose rules and community updates channels. You can select the “Create one for me” option to make Discord create brand new channels for you, or you can select a channel you already have. After you’re done, click the Next button at the bottom right.
- In the third and final step, Discord will prompt you to disable risky permissions from @everyone (everyone on the server) so that your community will be safe. Then, you should check the server guidelines checkbox (we suggest you read it first) and click the Finish Setup button.
Alright, you’re done. Now you can create forum channels - let’s see how.
Creating the channel
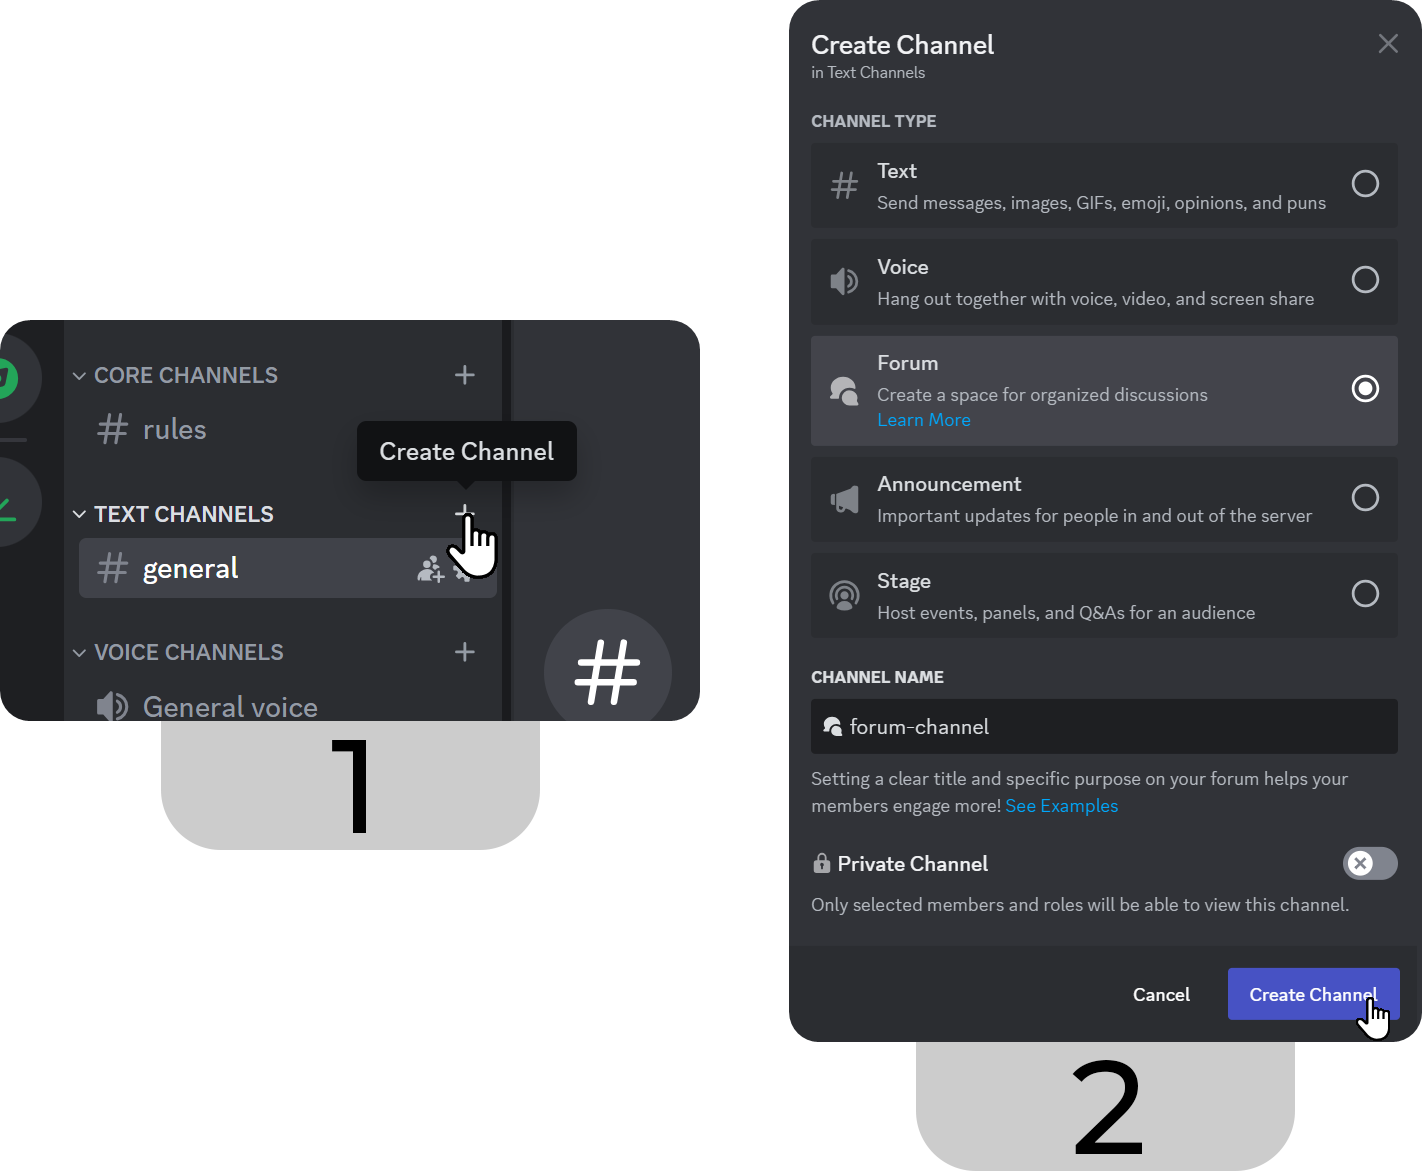
If you were to try creating a channel before enabling the Community feature, you’d only be able to see the Voice and Text channel options - but now, you can see options for Text, Voice, Forum, Announcement, and Stage. We’re now going to take a look at how you can create a forum channel but first, you should remember one thing: to be able to create channels, you need to have the Manage Channels permission. If you’re the server owner, you have all permissions by default. Now, let’s see how you can create a channel:
- There are many ways to create channels on Discord. We’re going to use one of the easiest of them. Let’s hover over the category we want to create our channel under and click the Create Channel button (plus icon) to see the Create Channel window.
- In the Create Channel window, we have a couple of channel-type options. Since we want to create a forum channel, select the Forum option. Then, give your channel a name. Remember, it’s best if you keep the channel name under 32 characters so that it will be visible on most devices. Once you’re done, click the Create Channel button on the bottom right of the window.
After clicking the Create Channel button, you’ll see that the channel will be successfully created. If you take a look at the channel, you’ll see a window titled “Get Started,” telling you to complete five steps so that the channel is ready to use. However, those five steps do not cover the entire setup of the forum channel. So, instead of following those steps, let’s navigate to the channel settings to fully prepare your new channel.

Discord forum channel settings
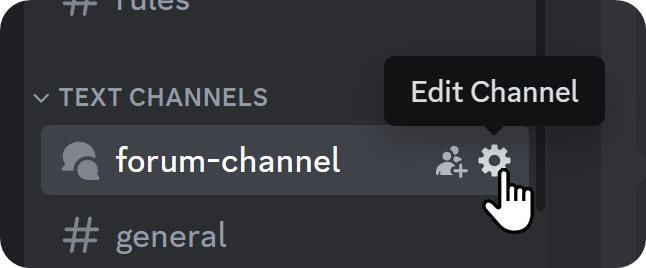
In order to open the channel settings of your newly created forum channel, hover over the channel and click on the Edit Channel button (cogwheel icon).
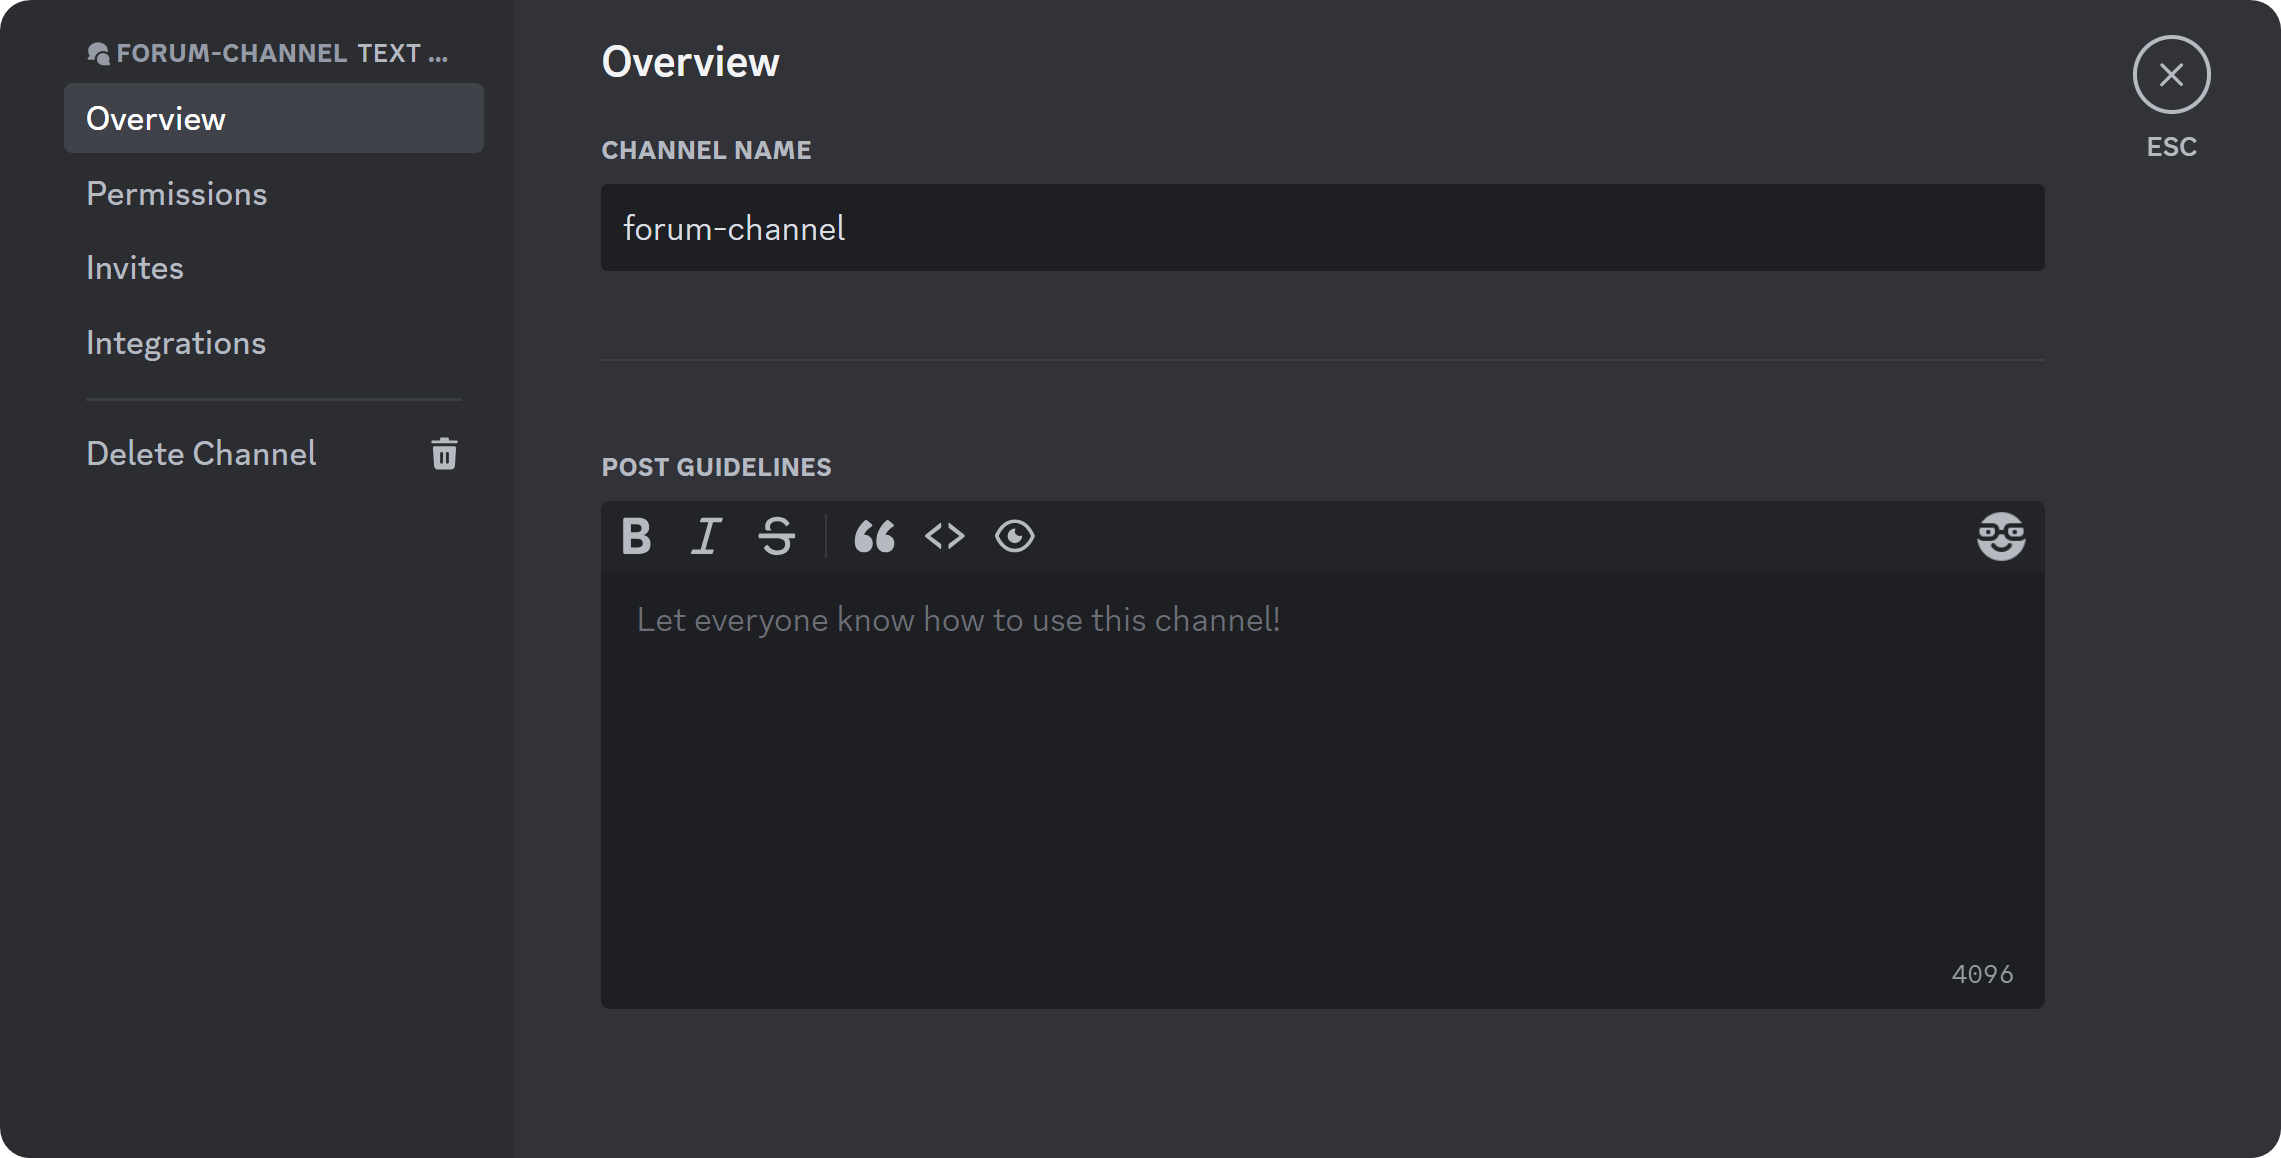
Once you’re in the channel settings, you’ll notice four different setting sections: Overview, Permissions, Invites, and Integrations. Let’s examine the Overview section first.
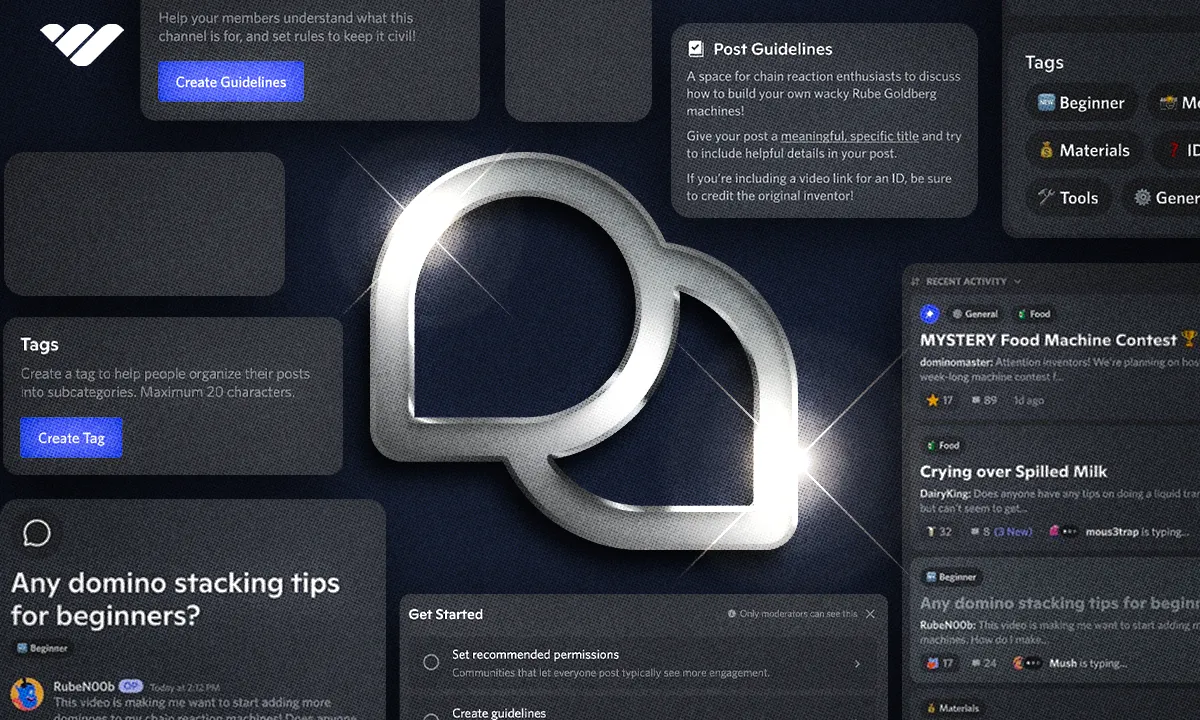
There are a lot of settings in the Overview section, so let’s go over each one-by-one. The first setting you’ll see is the Channel Name, this is the name you gave your channel when you first created it. You can change this any time you want. Under it, you’ll see the Post Guidelines text box. There, you can write a comprehensive guide on how users should use the forum channel - up to 4396 characters. Although you can write a lot here, we suggest you to keep it semi-short and to the point.
- Fun Fact: The post guidelines section of forum channels supports Discord markdown, so you can make them accessible and attractive.
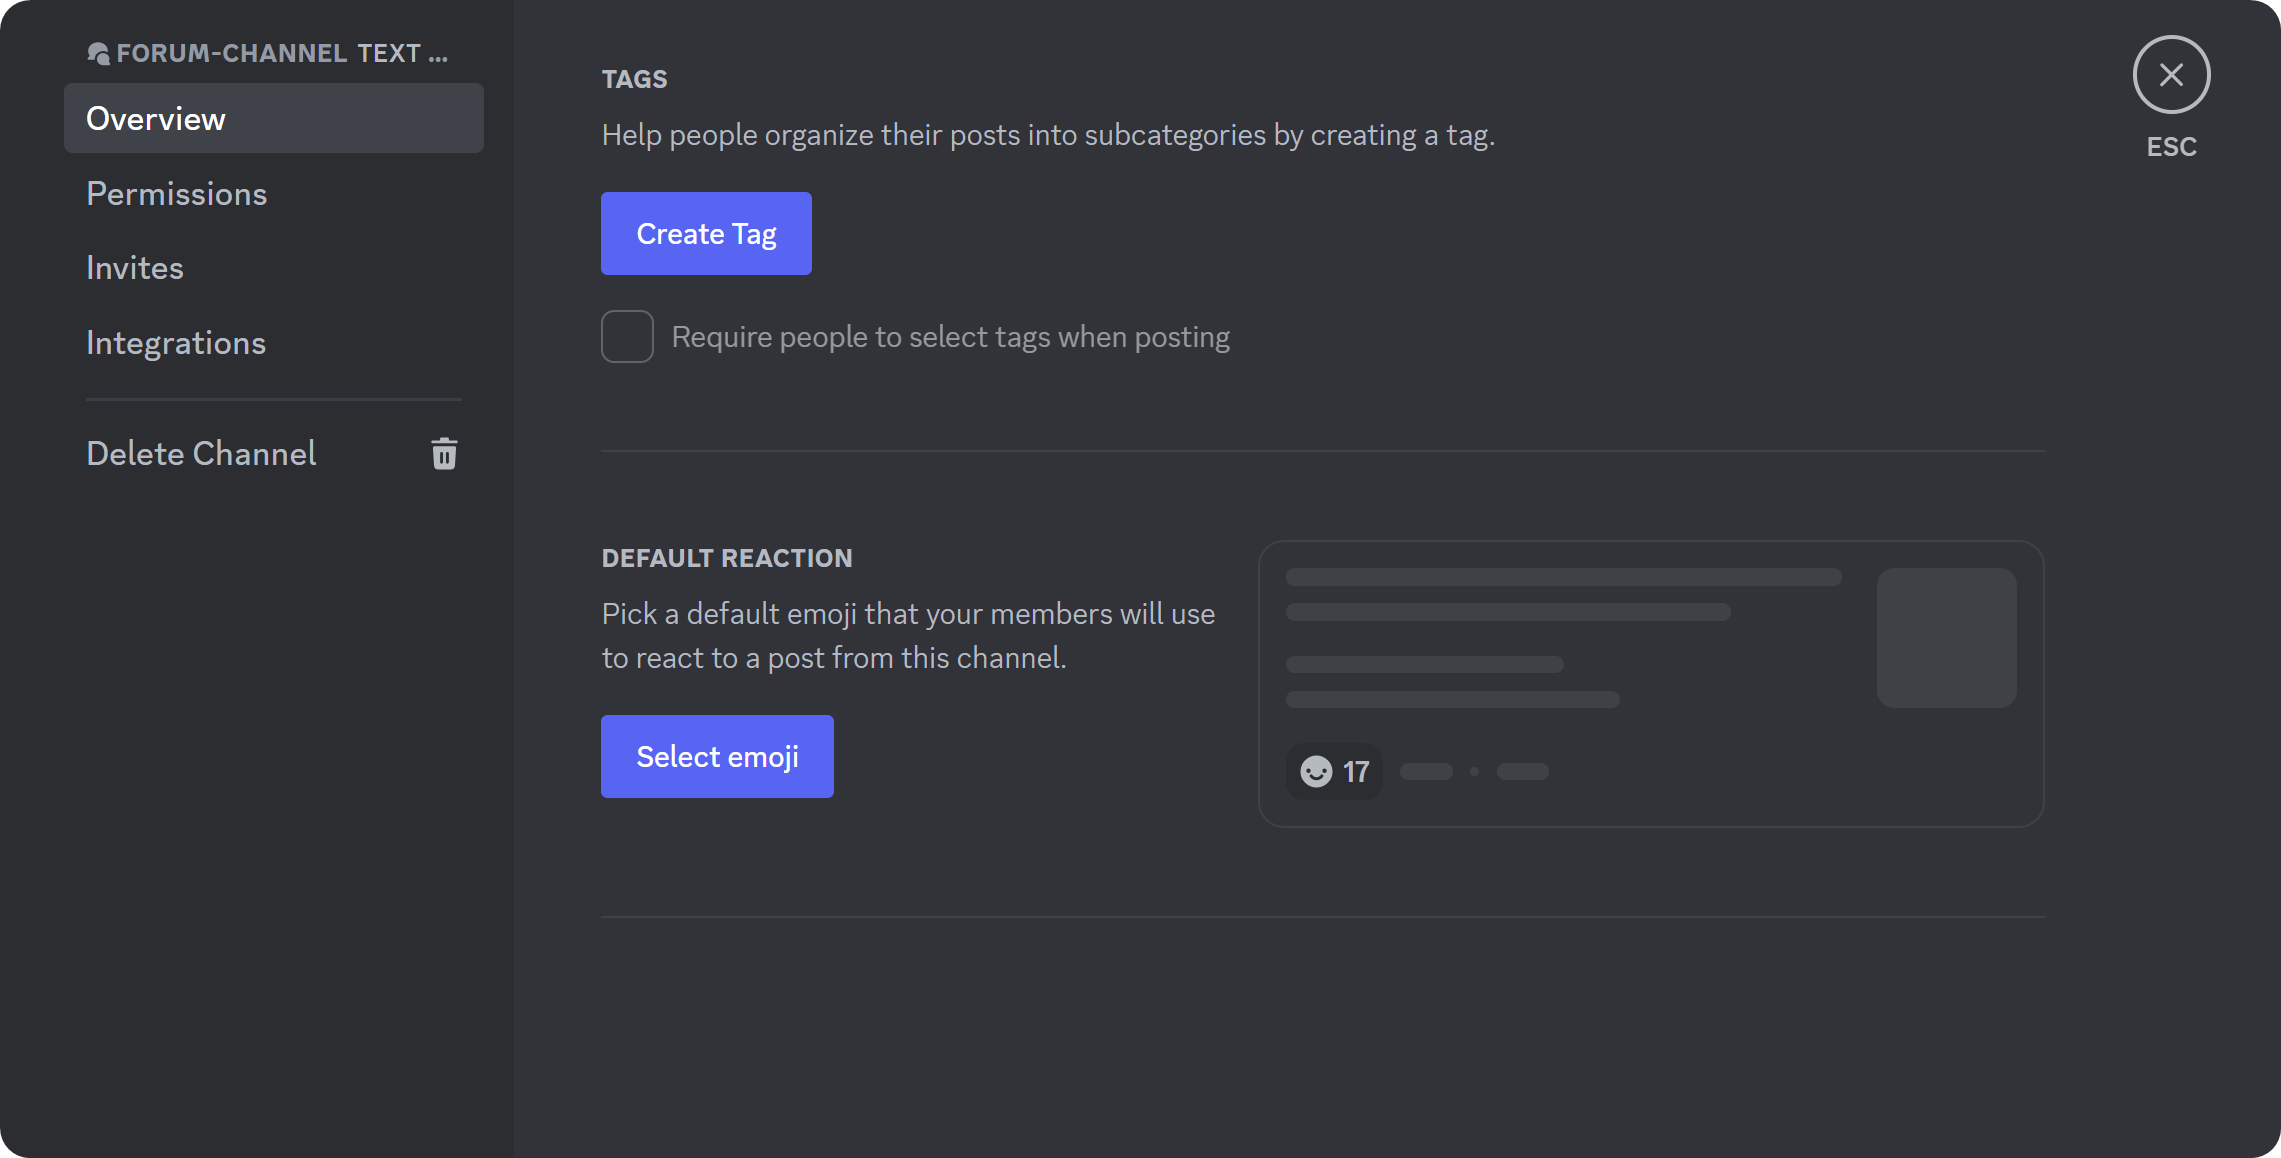
When you scroll down a bit, you’ll see the Tags section. You can create tags by clicking on the Create Tag button, which will let users tag their posts so that it’s easier to find them. It can also imply a topic even before opening the forum thread. You should keep tags simple so that users won’t have a hard time deciding what to tag their posts. You can also click on the checkbox below the Create Tag button to require users to select tags before being able to post something.
The next setting, Default Reaction, allows you to select a built-in or custom emoji that will be automatically added to every post in the forum channel.
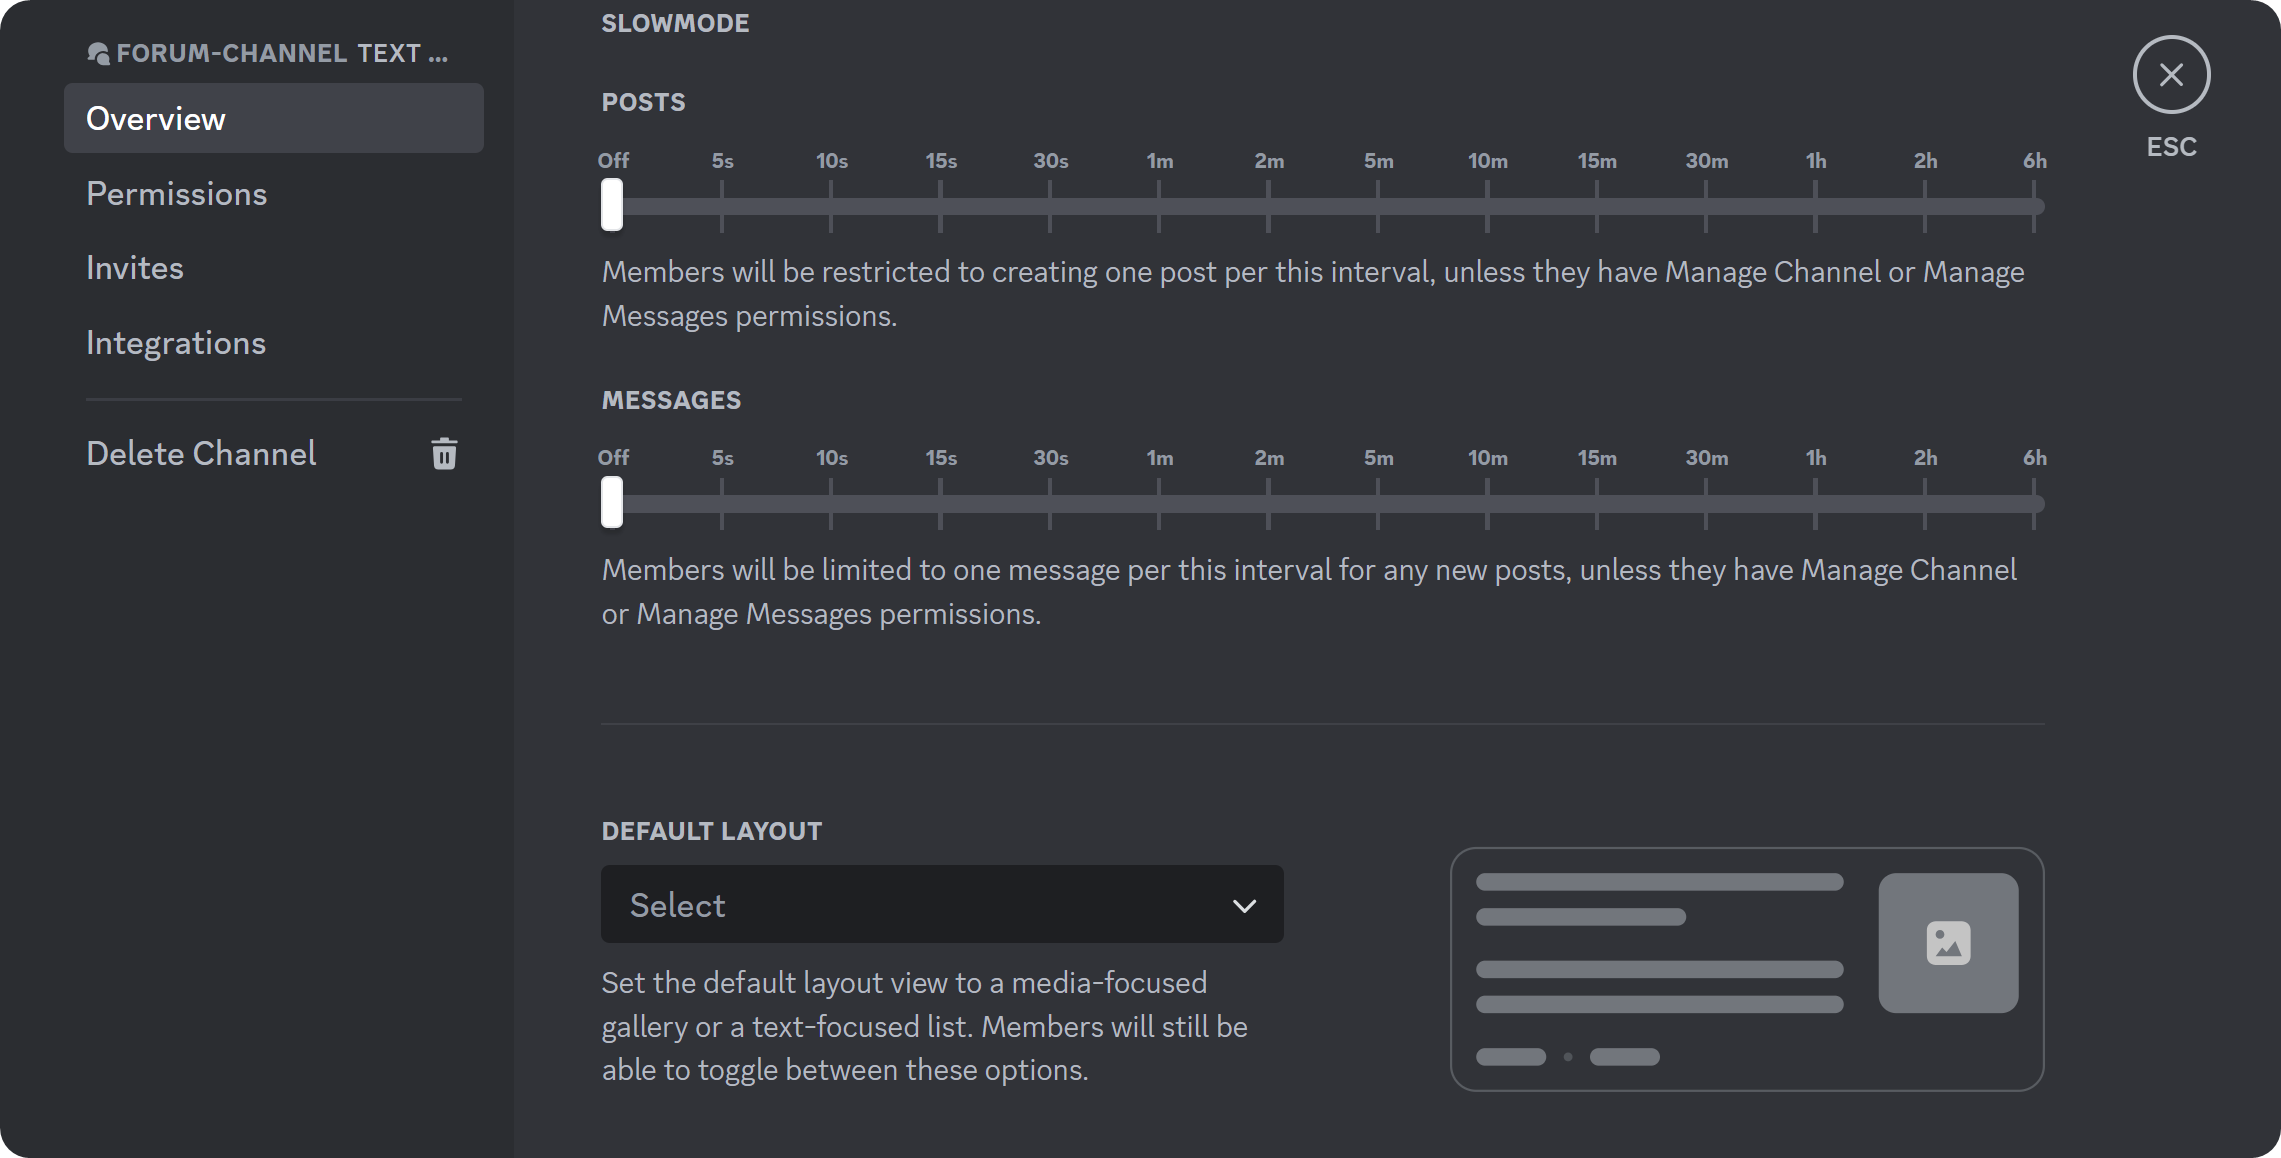
Scrolling down a bit more and we find the Slowmode section of the Overview settings. The first setting of the Slowmode is Posts - this setting will determine how much users need to wait between posts. Messages, on the other hand, determine how much users need to wait between messages within posts.
Below the Slowmode, you’ll find the Default Layout setting. There are two options in this setting: List View and Gallery View. The list view, as its name suggests, will display the posts in the forum in a list with small thumbnails (images that were added to the initial post are the thumbnails), while the gallery view will list them in bigger bento grids with bigger images. If your forum channel is expected to have a lot of posts, it might be better to select list view here.
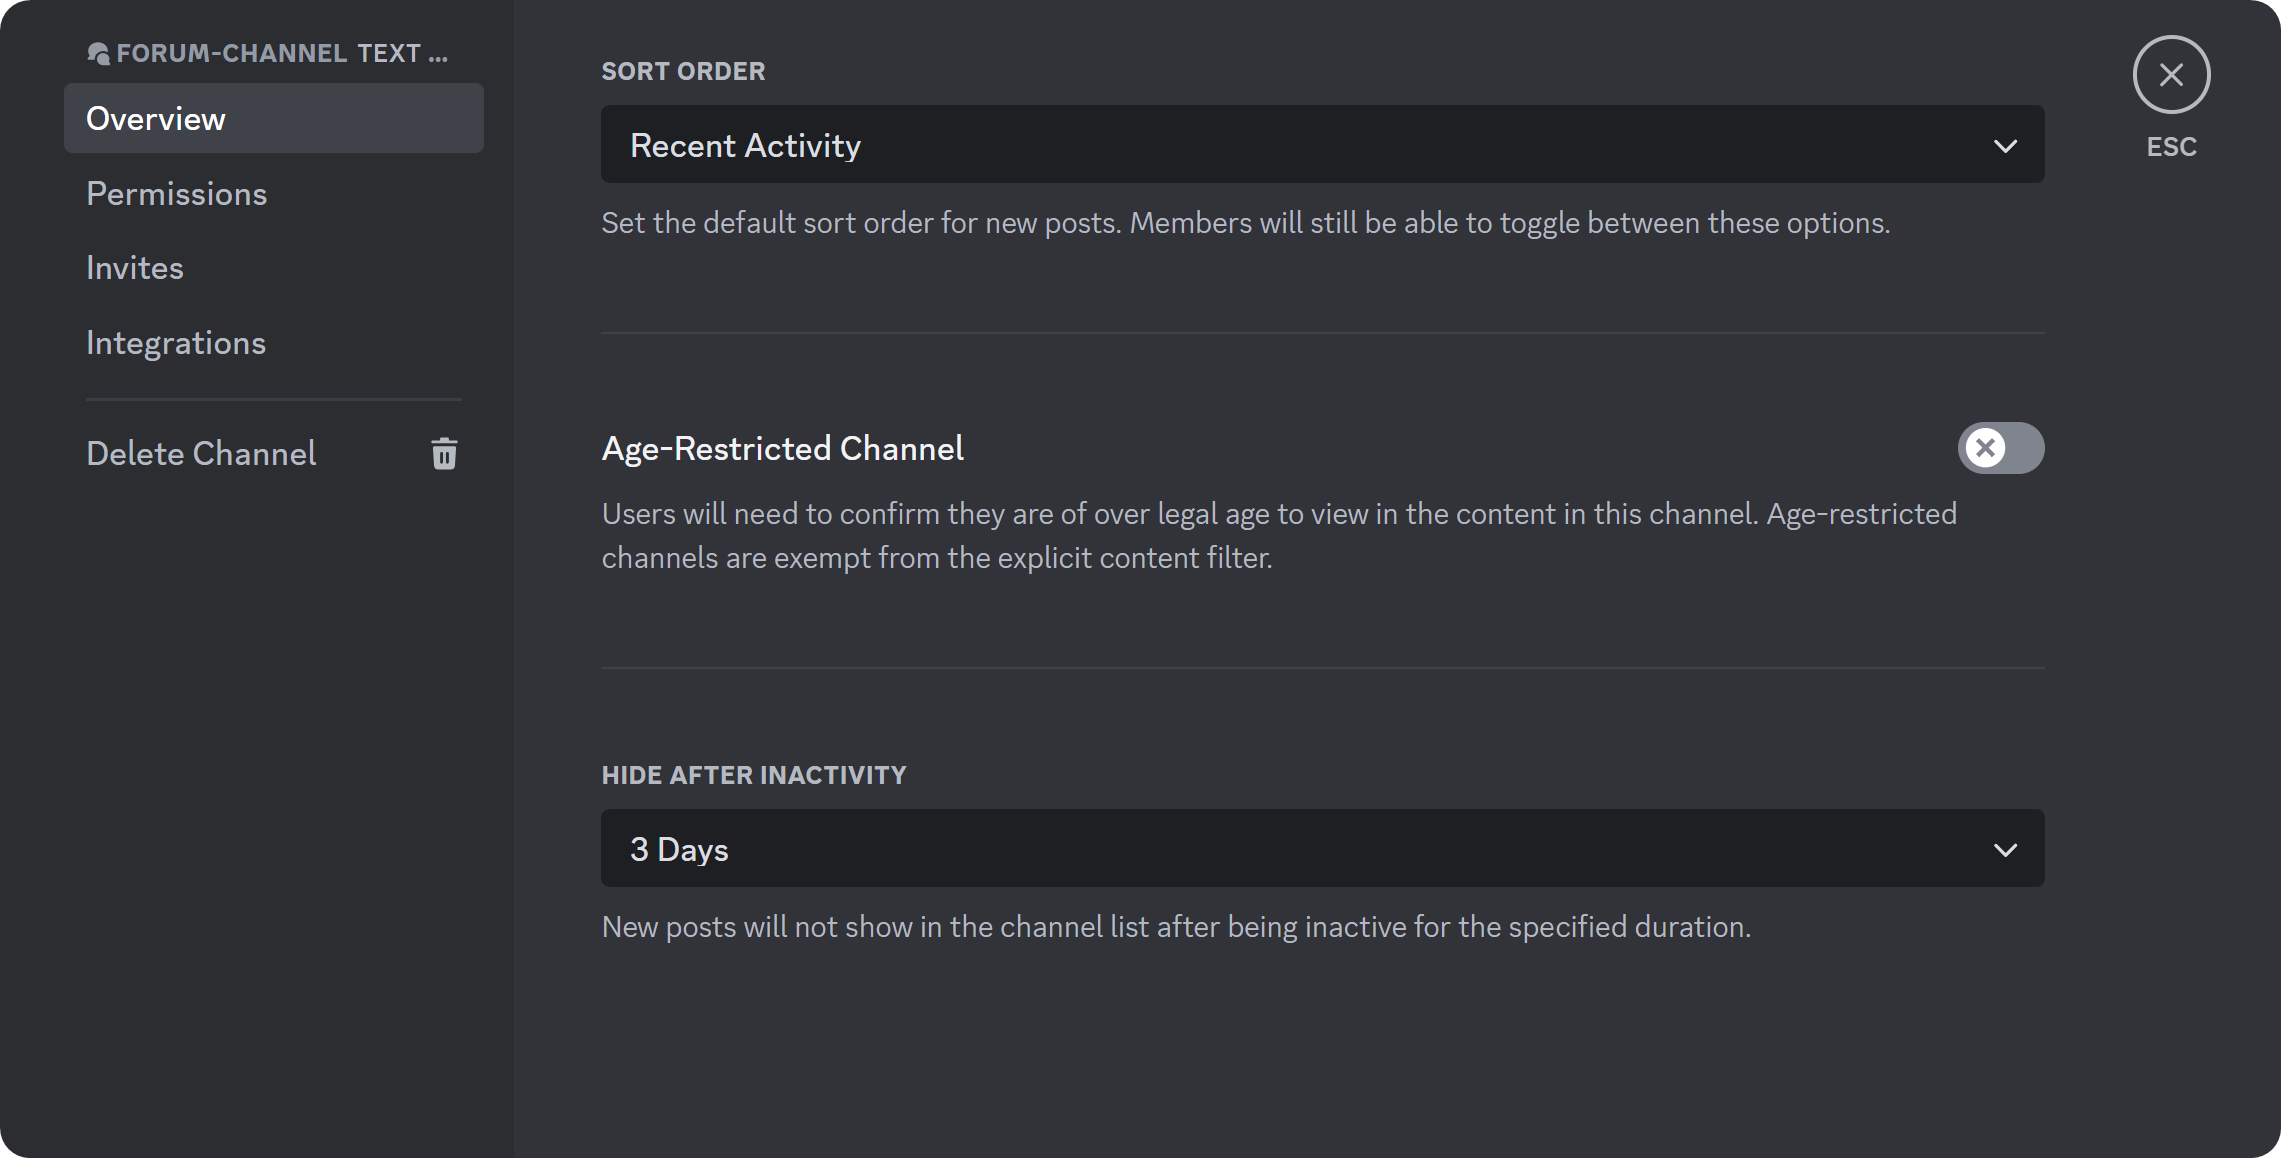
We have three settings left in the Overview section of the channel settings. The first one is Sort Order. As its name suggests, this determines how the posts are sorted in the forum channel. You can select from two options: Recent Activity, which sorts posts based on their activity, and Creation Time, which sorts posts based on when they’re created.
Below, you can see the Age Restricted Channel toggle setting. This setting is toggled off by default - toggling it on will mark the channel as age-restricted, and users who are younger than 18 (based on their Discord account) won’t be able to access the channel.
The last setting in the Overview section of the channel settings is Hide After Inactivity. As we mentioned, forum posts work just like threads - if they’re inactive for some time, which you can determine in this setting, the post will be “closed.” They can be reopened by sending a message to them. The options for this setting are 1 hour, 24 hours, 3 days, and 1 week.
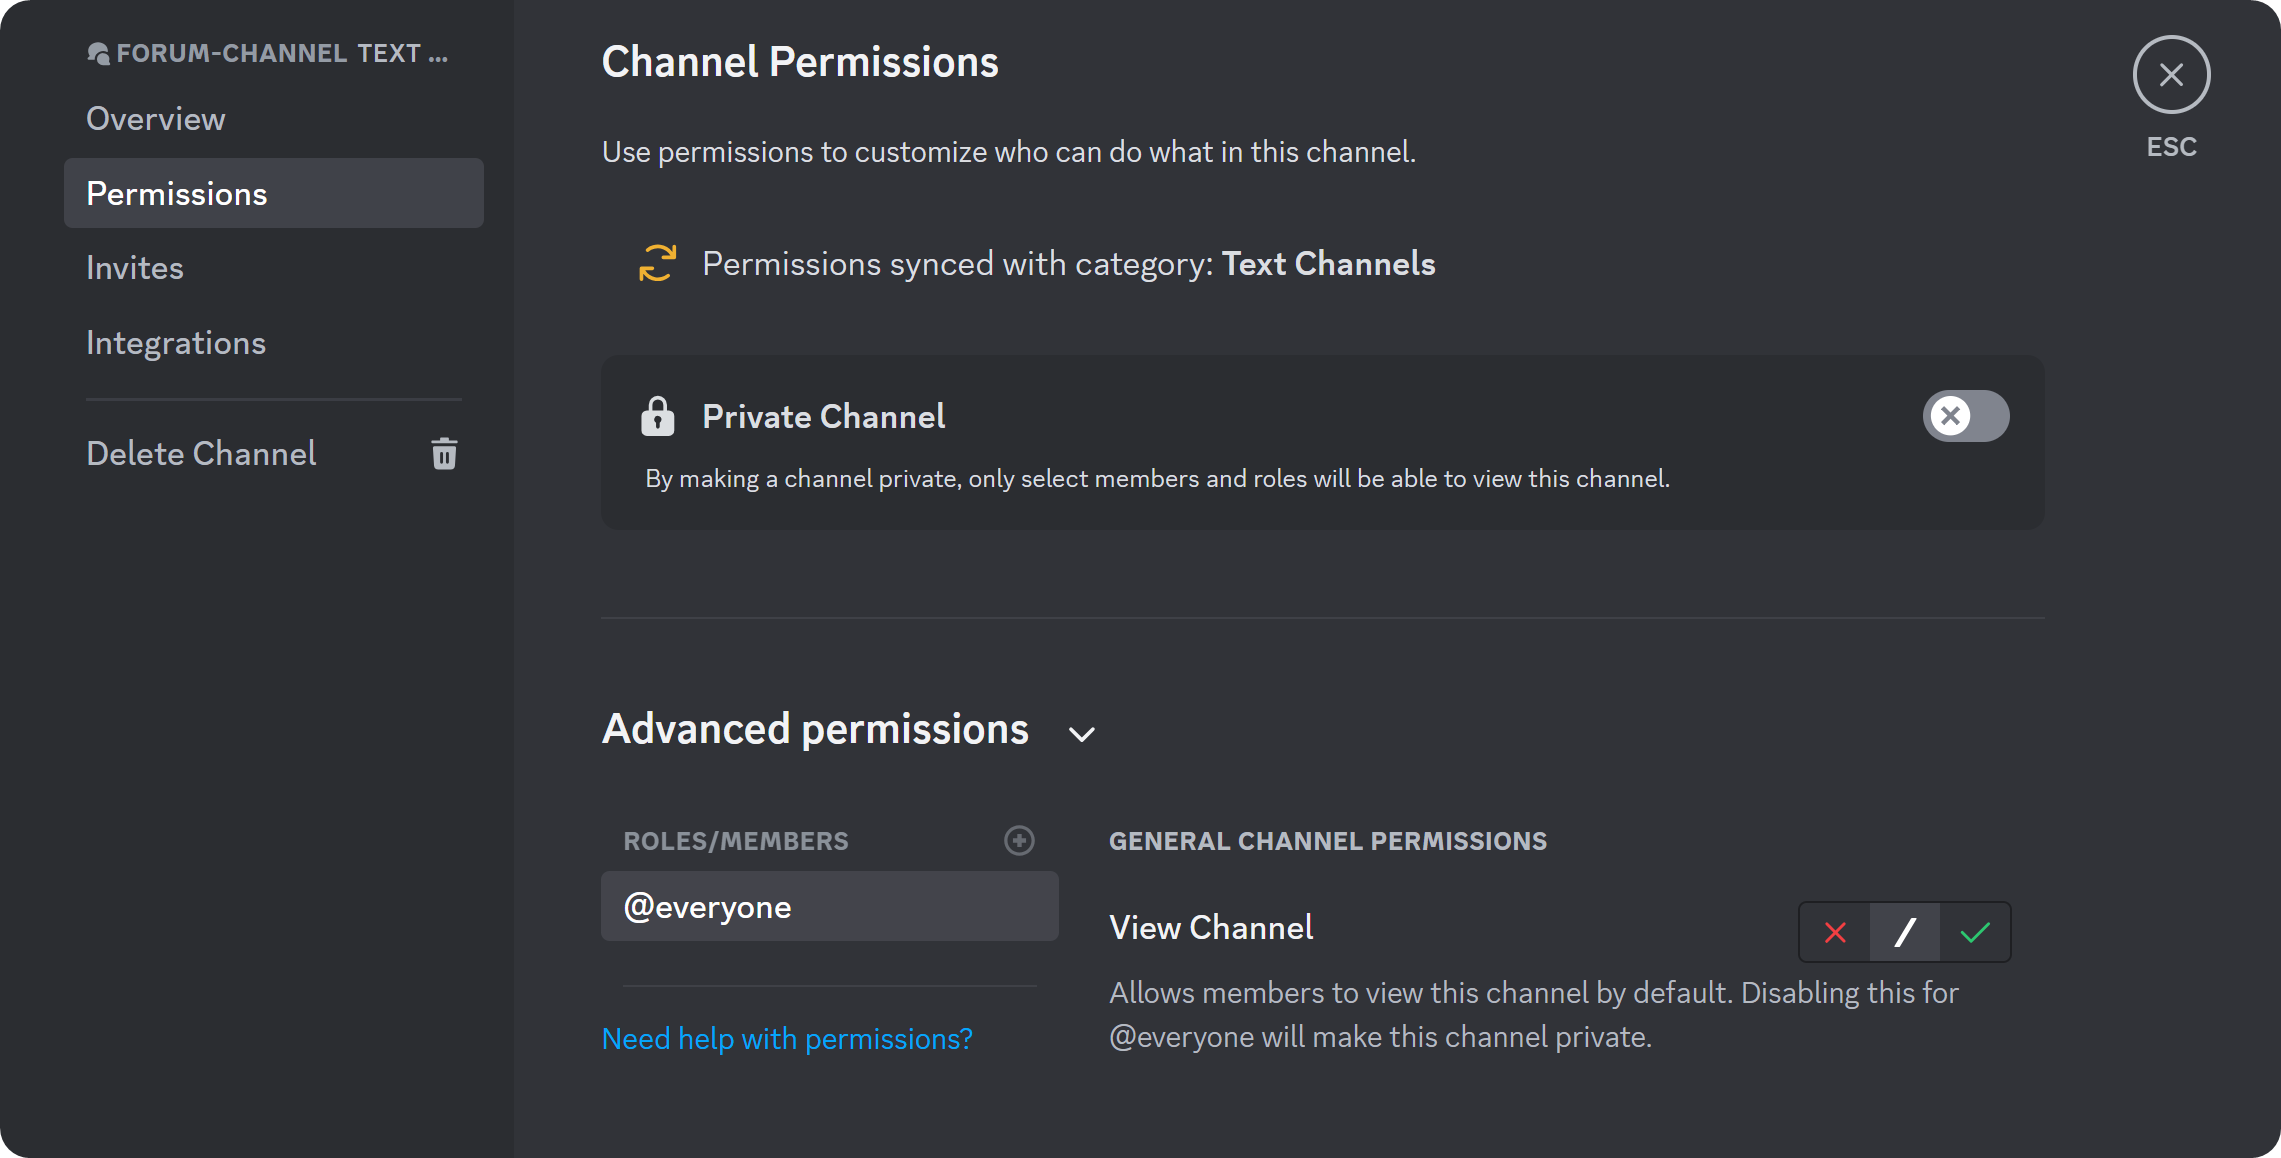
Let’s move on to the Permissions section of the channel settings. In this section, you can assign channel-specific permissions. This means that even if a role has the Send Messages permission, you can disable that permission in this just for that role. This is essentially a second layer upon the role permissions.
You can easily adjust which roles can access this channel by using the Private Channel section (by the toggle button next to it) or, if you want to go more in-depth, you can use the Advanced permissions section below.
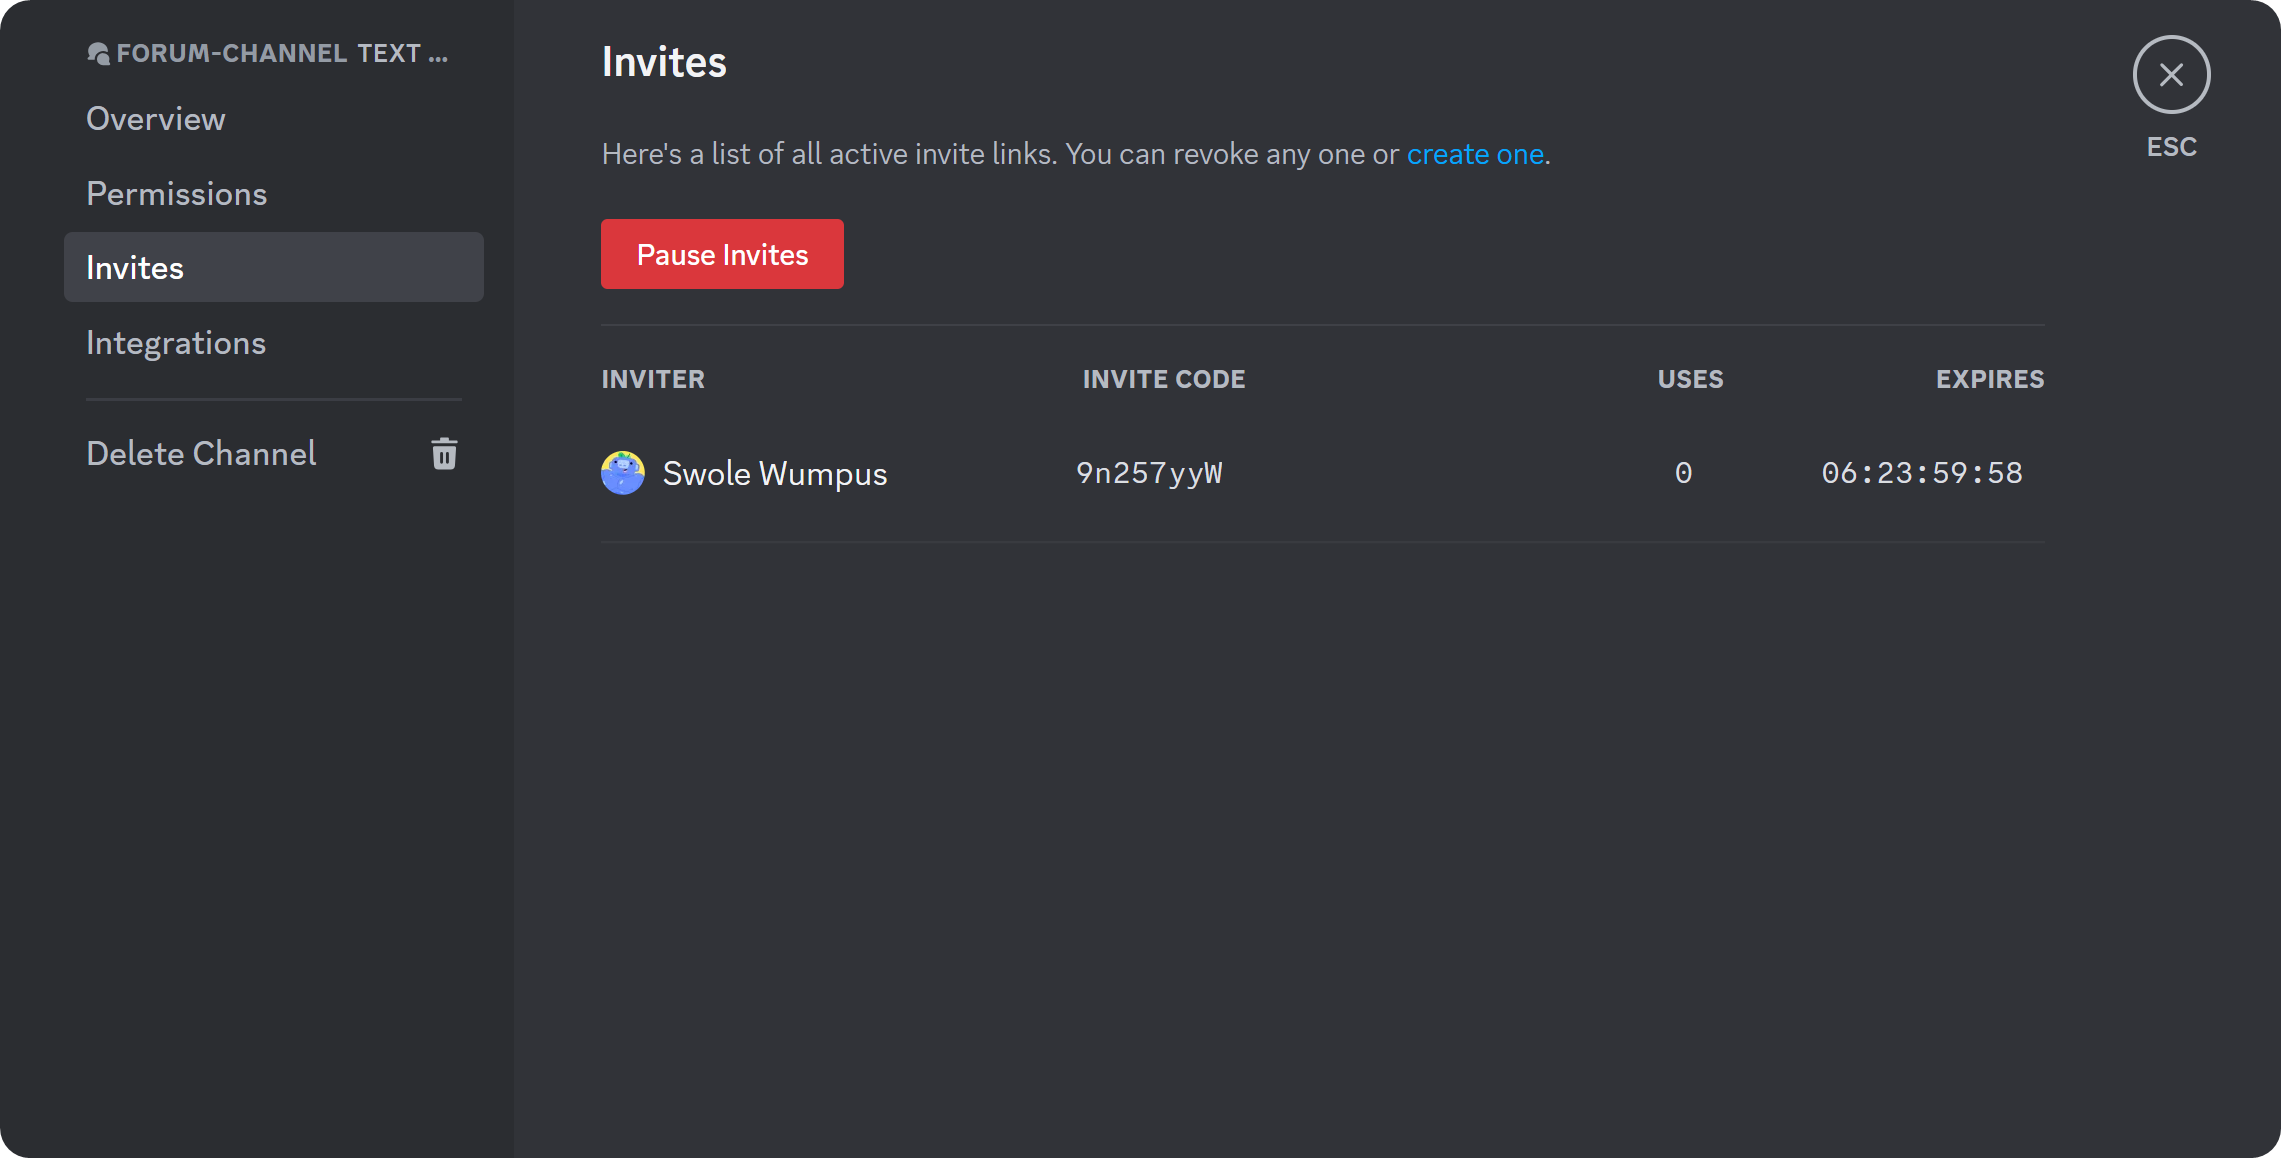
Let’s move on to the Invites section of the channel settings. You can see all the channel-specific invites here. You might know that when inviting a user to your Discord server, you’re most likely to use server invite URLs. But did you know those invite links can be created for channels as well? Users will see the channel at the top of your channel list when you create a regular invite link for your server. However, if you create an invite link for a channel, it will be the first channel the users see upon joining.
In this section, you can see all the invites created for this channel and its information. You can hover over the invites to see an “X” button appearing - clicking it will remove the invite and make it appear as an invalid link to others. You can also use the Pause Invites button at the top to temporarily disable all invites in a non-destructive way.
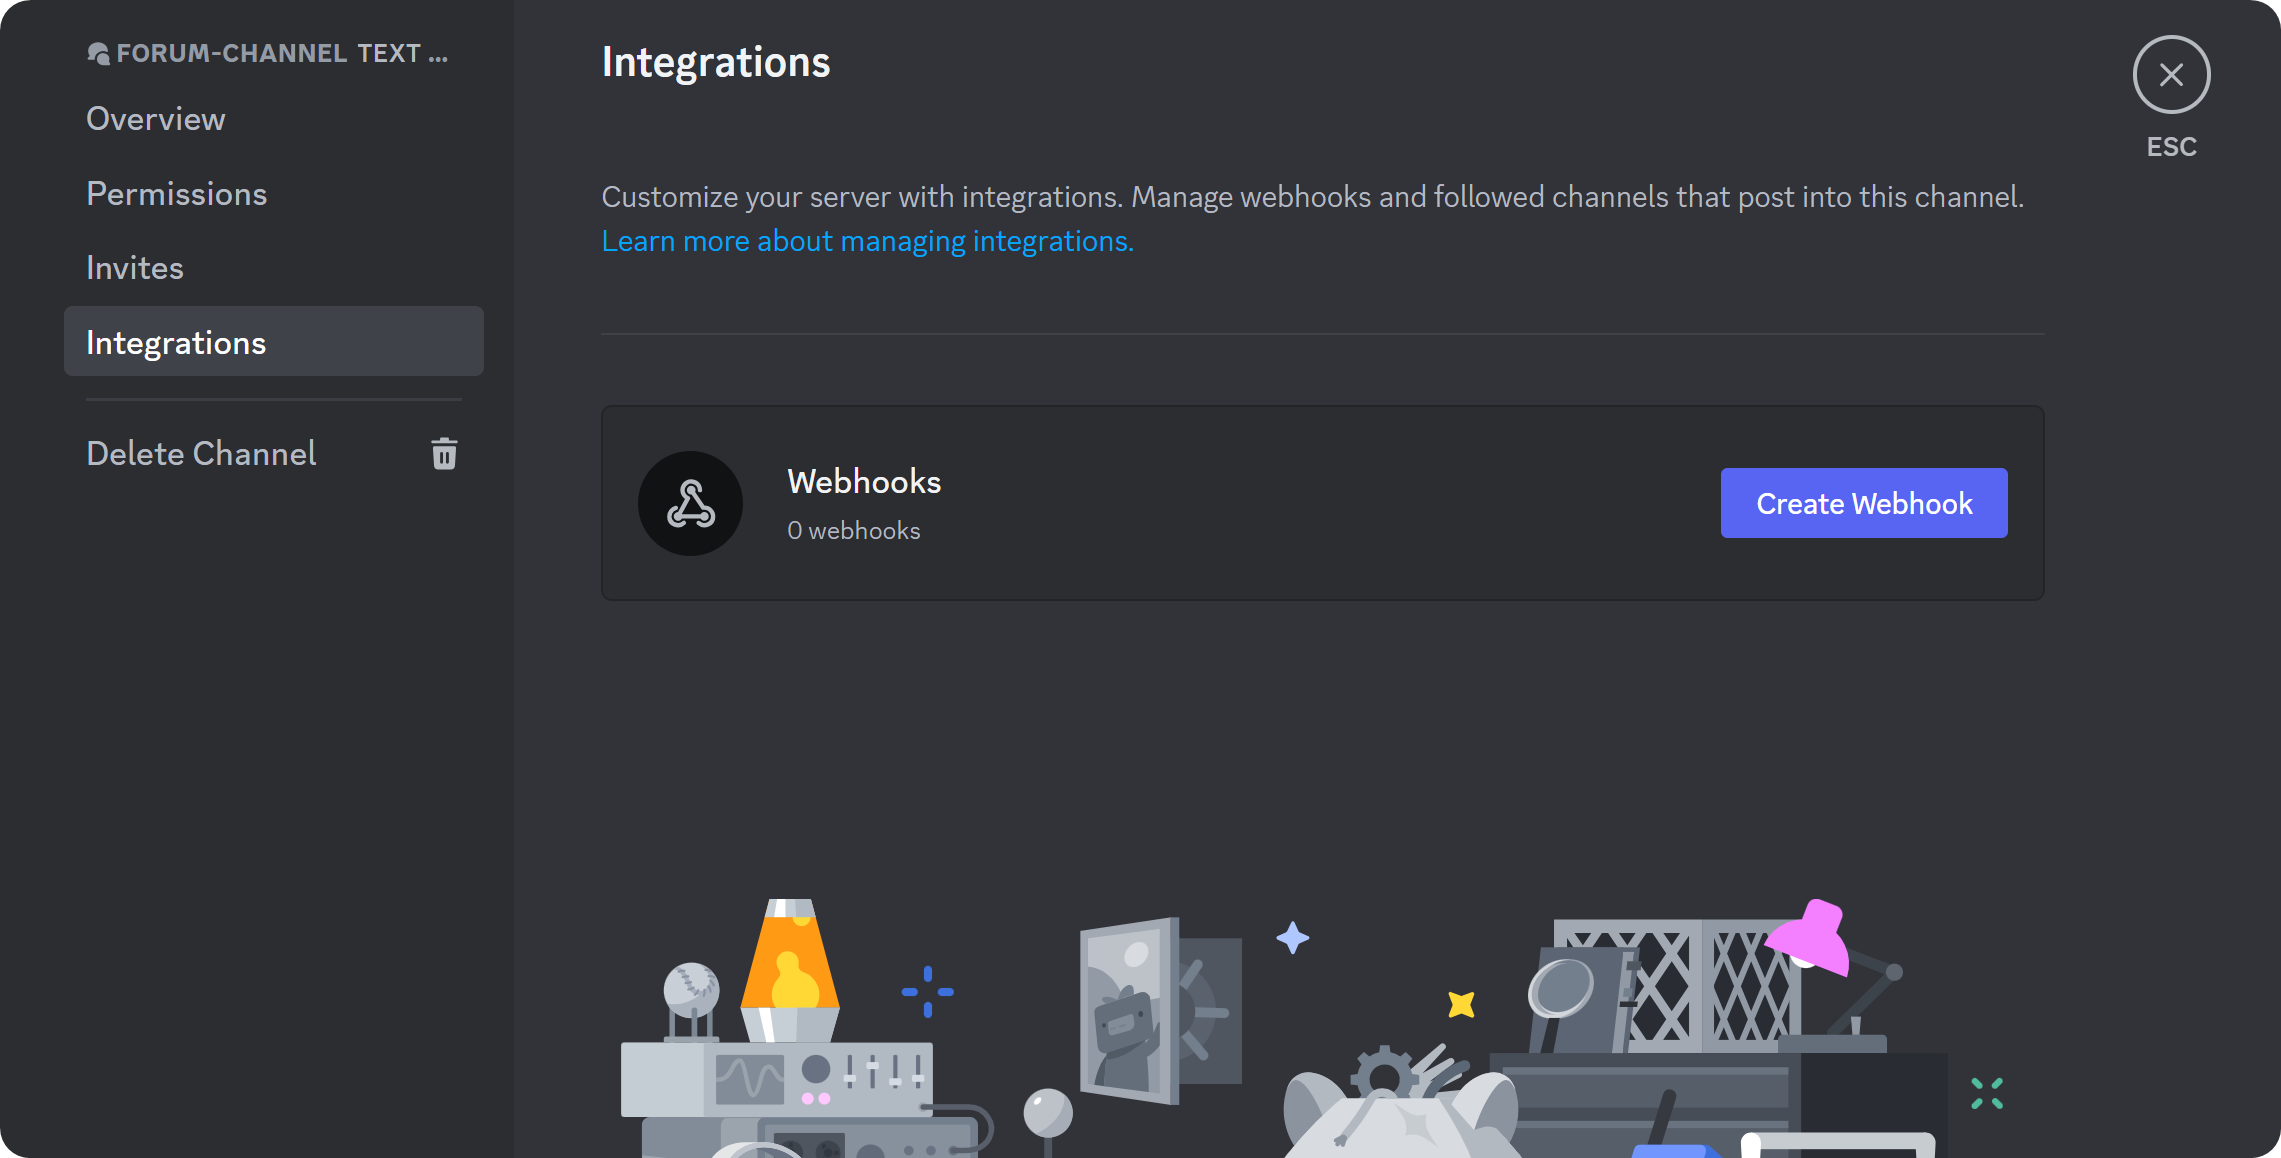
In the last section, Integrations, you can see the channel's webhook settings. You can create webhooks for this channel by clicking the Create Webhook button. When you send a webhook message to a forum channel by using a service like Discohook, you’ll have to fill out the Forum Thread Name section.
Sending a webhook to a forum channel will create a new post with the title that you’ve determined on the Forum Thread Name section of your webhook service. Check out our How to Use Discord Webhooks guide to learn more about webhooks.
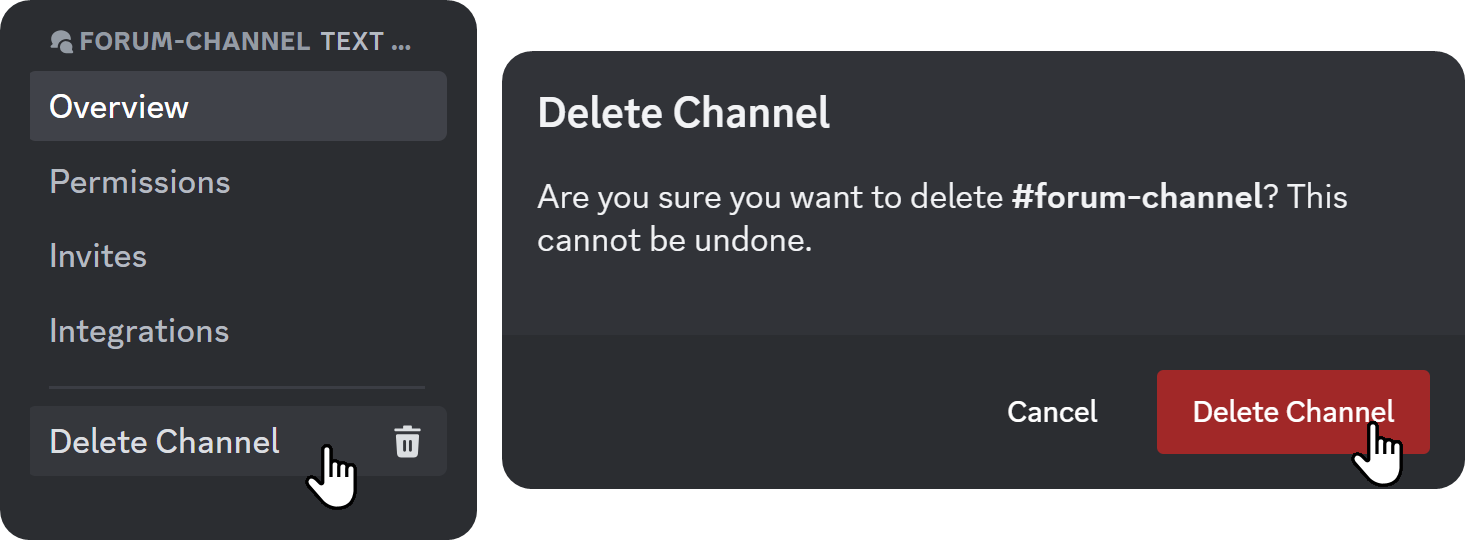
Although it’s not a channel settings section, you might have noticed a “Delete Channel” button below the sections of the settings. Clicking on it will display a confirmation message about deleting the channel. If you click the Delete Channel in the confirmation message, the channel will be deleted - remember, this action is irreversible, and you’ll lose everything in the channel.
Take the next step – monetize your server
Now you know one of the most powerful channel types in Discord. Since you’re here, learning about forum channels, chances are you’re a Discord server owner. Did you know that Whop has been helping thousands of server owners with monetizing their Discord servers?
With Whop’s easy-to-use platform and comprehensive toolset, you can start monetizing your server in under 10 minutes.
Alternatively, you should consider hosting your community on Whop. Unlike other platforms, you can create your own internet hub on Whop and tailor it specifically to your needs by adding and removing features as you see fit. You can create chat rooms, forums, host giveaways, set up meetings, share sports bets, and even embed your website into your whop. The best part is, you can charge any part of your whop the way you please. Check out Whop today and create your whop for free.


