Read this step-by-step guide to learn how to link a Discord server to your whop.
Key takeaways
- Whop's Discord app lets you monetize your Discord server by selling memberships and controlling access.
- Connect your Discord server to Whop in minutes by adding the Discord app and authorizing the Whop Bot.
- Automatically manage member access with role assignments based on subscription status and payment history.
Whop and Discord are both incredible platforms for creating and managing online communities and sharing content. One of the biggest differences between the two platforms is that Whop allows its users to create their own modular internet hubs - called whops - and sell access to them. Whops can be transformed into all kinds of platforms by using apps like Chat, which allows you to create chat rooms, Courses to provide online courses, and Sports App to sell access to sports picks.
One of those apps is the Discord app, which lets you connect your whop to your Discord server, allowing you to sell memberships to your server. In this guide, we’re going to take a look at what whop apps are, how you can use Whop's Discord app to connect the two platforms, and all the details about the process.
What are Whop apps?
Every app has its own features - for example, WhatsApp has voice and video calls, Discord has powerful chat rooms and threads, and Coursera has courses and forums. Now, think of those features as modules, and you have a modular platform with basically nothing in it. You start with a blank canvas and select which modules (features) you want to add to your platform. Do you want to create a platform where you can create courses and have video calls at the same time? You can do that with Whop.
Whop apps are exactly that, modules. When you first create your whop, there will be nothing in it. Once you start adding apps like Chat, Courses, Forums, Content, Website Embed, and more, it will transform into the platform of your dreams. The biggest advantage of this is that you’ll only add the features you need, nothing more. This way, you can create a personalized platform without bloat, which will make your whop easy to use.
Of course, the examples we mentioned above are just a few apps among many that are available on whop. One of the apps we didn’t mention is the Discord app - let’s take a look at what it is and what it does.
What is the Discord app on Whop?
Discord is one of the most popular social messaging apps. Using the Discord app on your whop, you can connect the two platforms. This is especially useful if you want to monetize your Discord server.
The Discord app essentially prompts your whop members to connect their Discord accounts to their Whop accounts, and then allows them to join your server.
This is a very superficial explanation of the app. It has features like monetizing the app access, therefore monetizing your Discord server, assigning roles based on the whop membership the user obtains, managing the users based on their subscription status, and more.
Adding the Discord app to your whop
Setting up the Discord app in your whop is really easy, but we’re still going to go over every single step together. Before starting, you need to have two things: a whop and a Discord server of your own.
You can check out our guides on creating your own whop and Discord server if you don’t already have those two. If you’re good to go, let’s add the Discord app to our whop first.
Once you got your whop ready to go, let's add the Discord app to it:
- Click the Add app button under the Admin area of your whop. This is going to take you to the Whop App Store.
- In the App Store, find the Discord app and click its Add button. This is going to add the app to your whop and take you to it.
Now, it's time to learn how you can set up the app so that your members can claim access to your server.
Connecting the Discord app to your server
The first step in setting up the app is going into the configuration tab using the Configure Discord button at the top of the app.
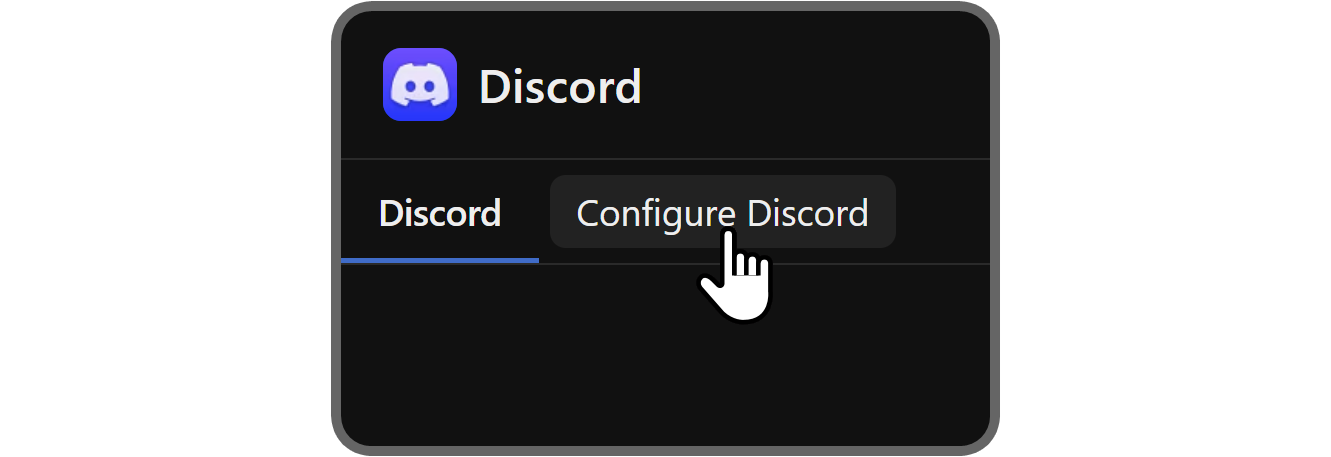
If it's your first time adding the Discord app, you're going to see the Connect Discord button in the app.
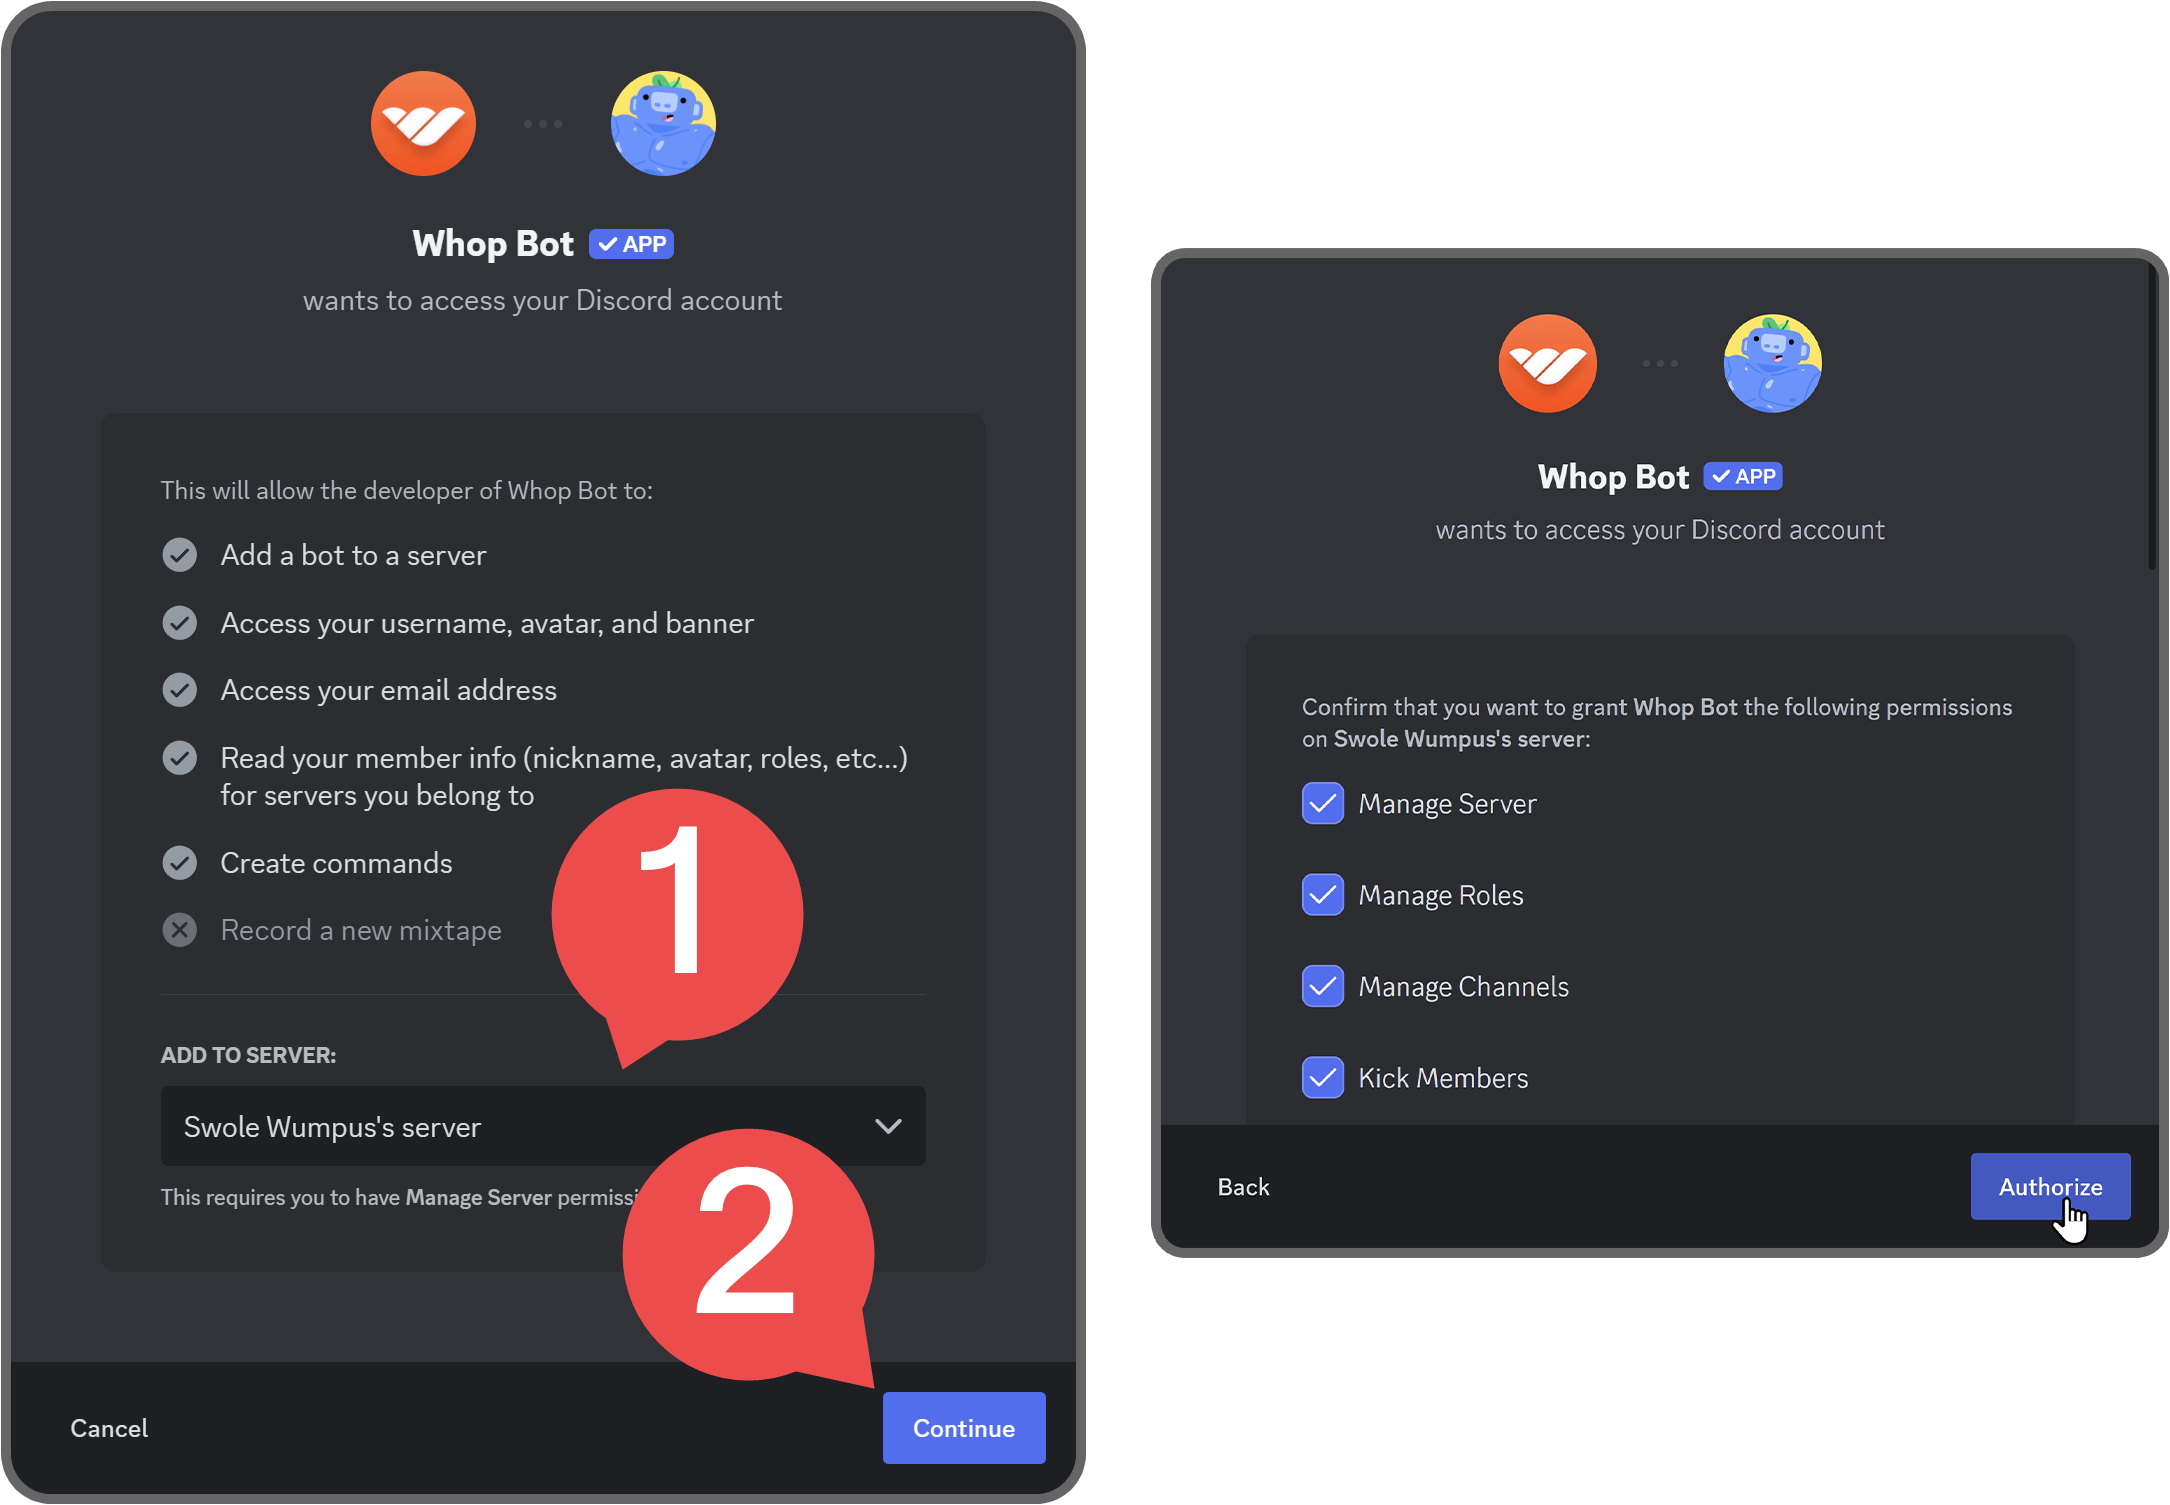
The Connect Discord button is going to direct you to Discord's add bot prompt. There, select the server you want to connect from the Add to server dropdown and click Continue.
In the second screen, you're going to see the permissions that the bot requests - it's safe to grant these permissions to the bot. Let's click the Authorize button to add the bot to your server.
After authorizing the connection, there's one more thing we should do before continuing on Whop - correcting the role order on your server.
The Whop Discord bot's role (Whop Bot) needs to be at the top of your server's role hierarchy in order to work. Let's see how you can do it step-by-step:
- Click your server's name to see the server context menu and select Server Settings
- Navigate to the Roles section of your server settings
- In the roles section, scroll to the bottom to see the Whop Bot role and drag it to the top
- Click the Save Changes button
Now that you've corrected the hierarchy, let's go back to Whop.
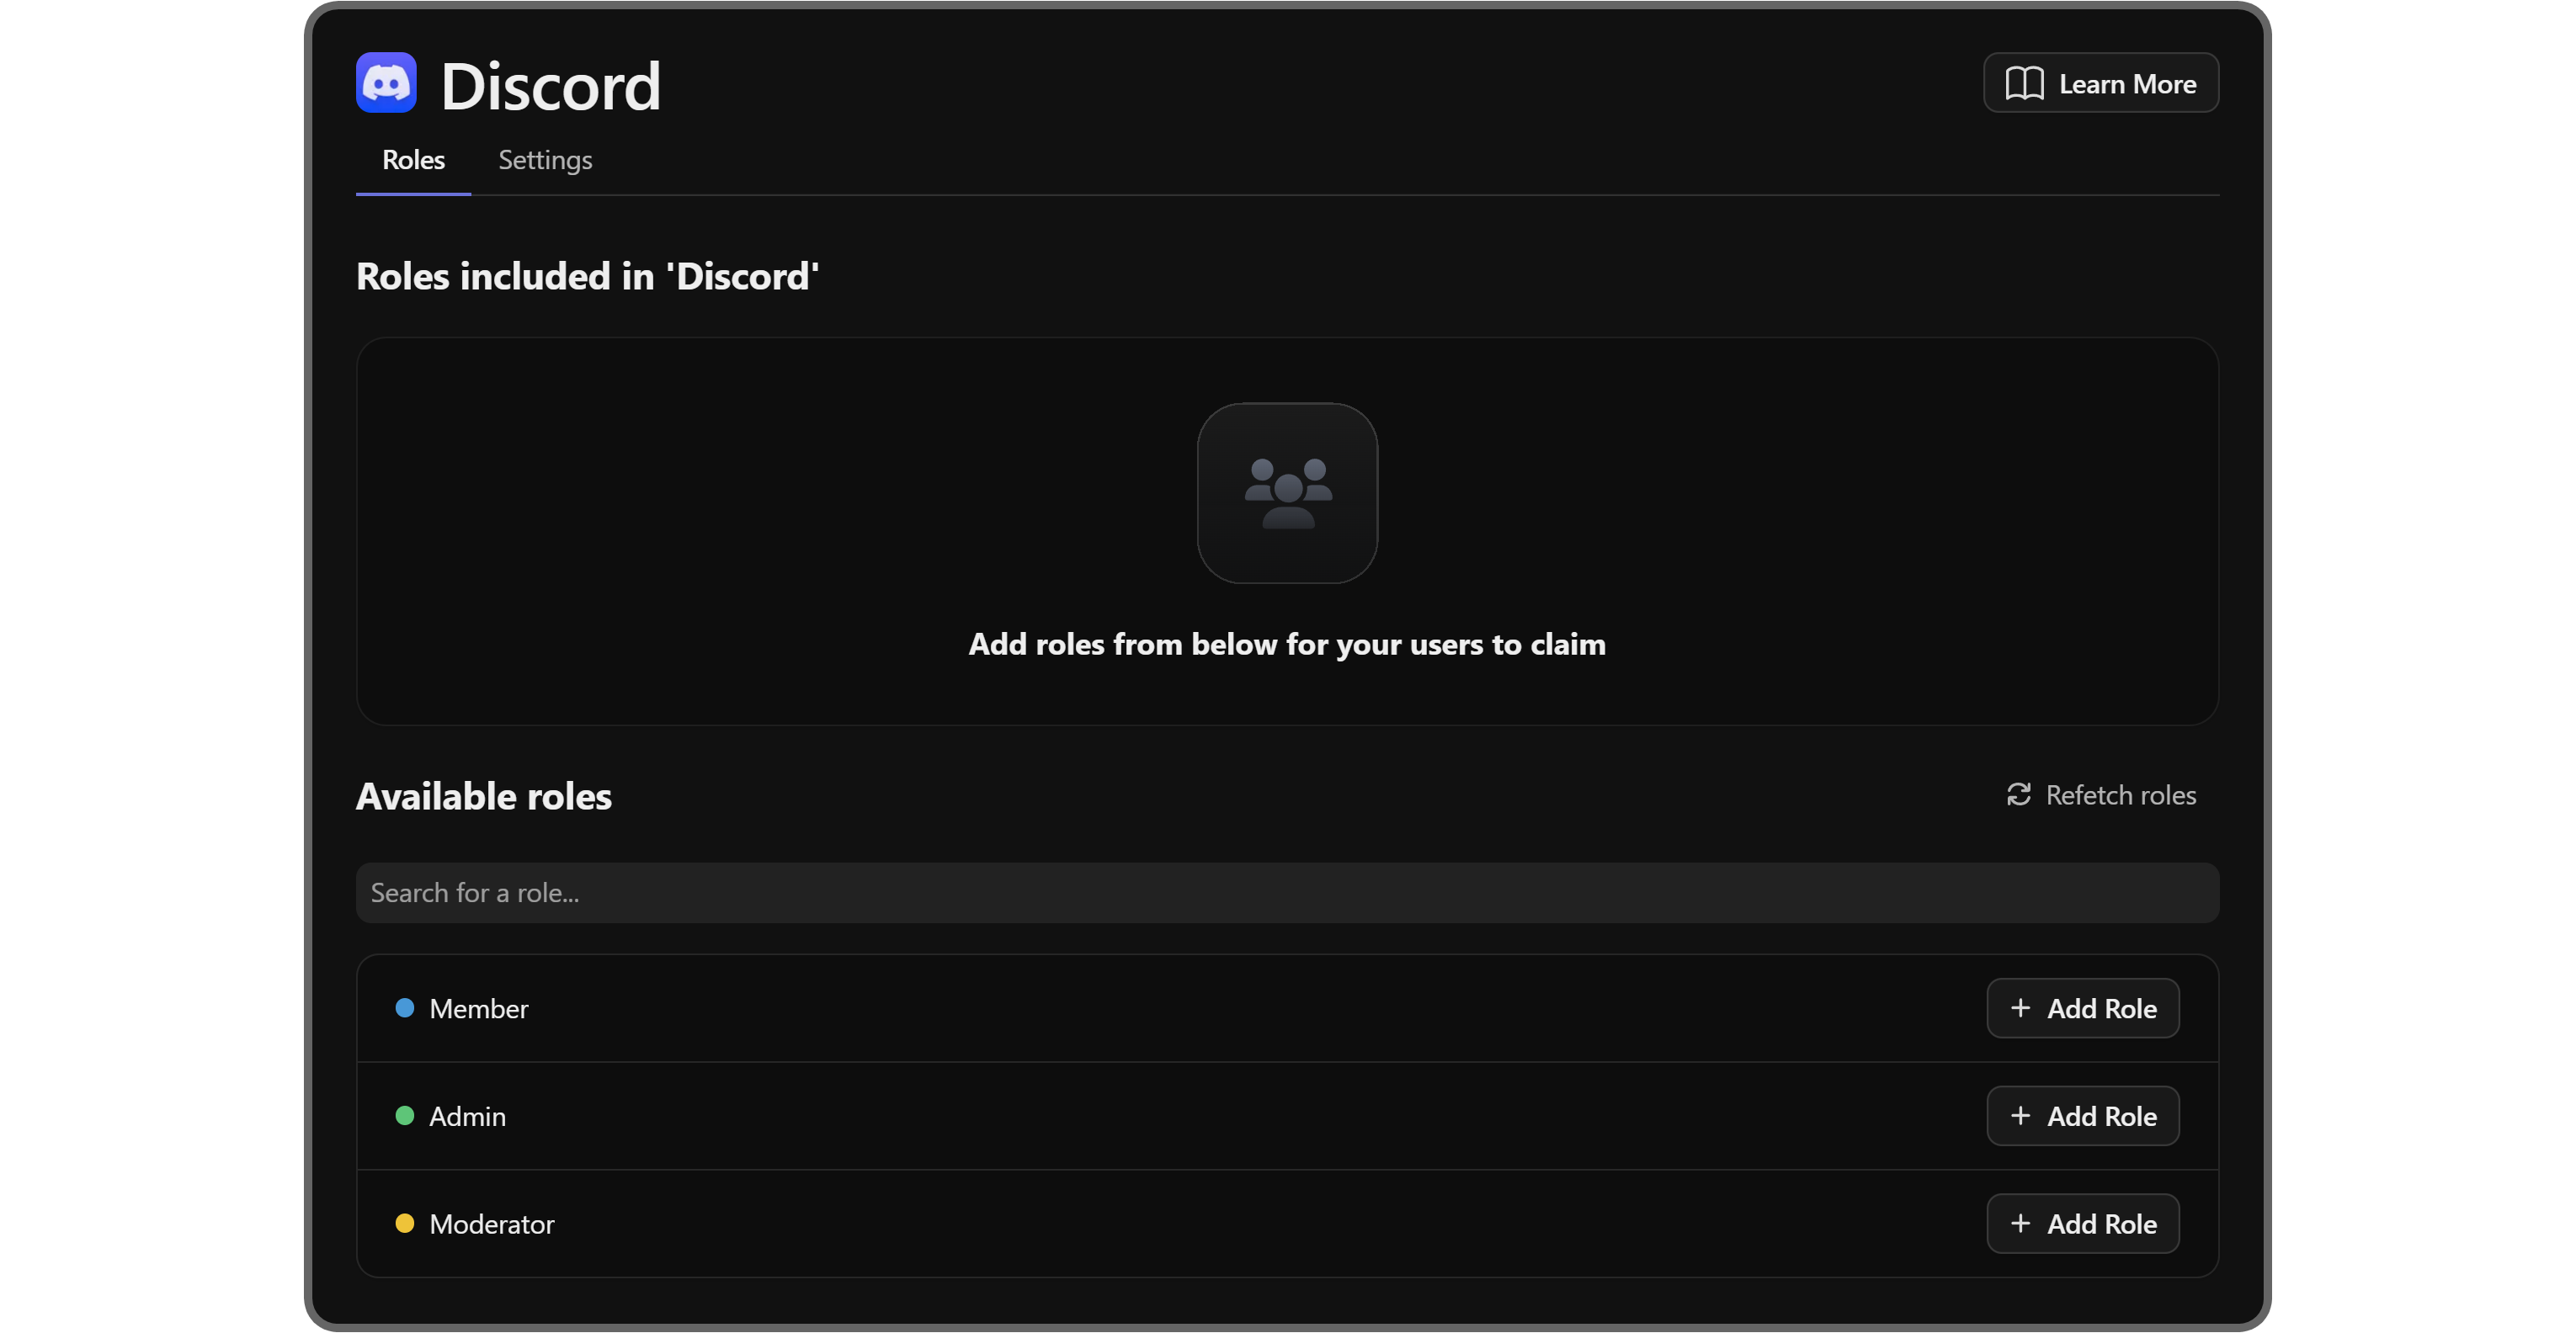
In the app settings, you're going to see two tabs: Roles and Settings. The Roles tab is the place where you select which roles the member will acquire once they claim access to your server through whop. The Whop Bot will automatically grant them to users.
To add roles, click the Add Role button next to them. If you want to remove roles, you can use the Remove button in the field above.
If you've made changes to your roles, make sure to click the Refetch roles button on the top right of the Available roles section to refresh them.
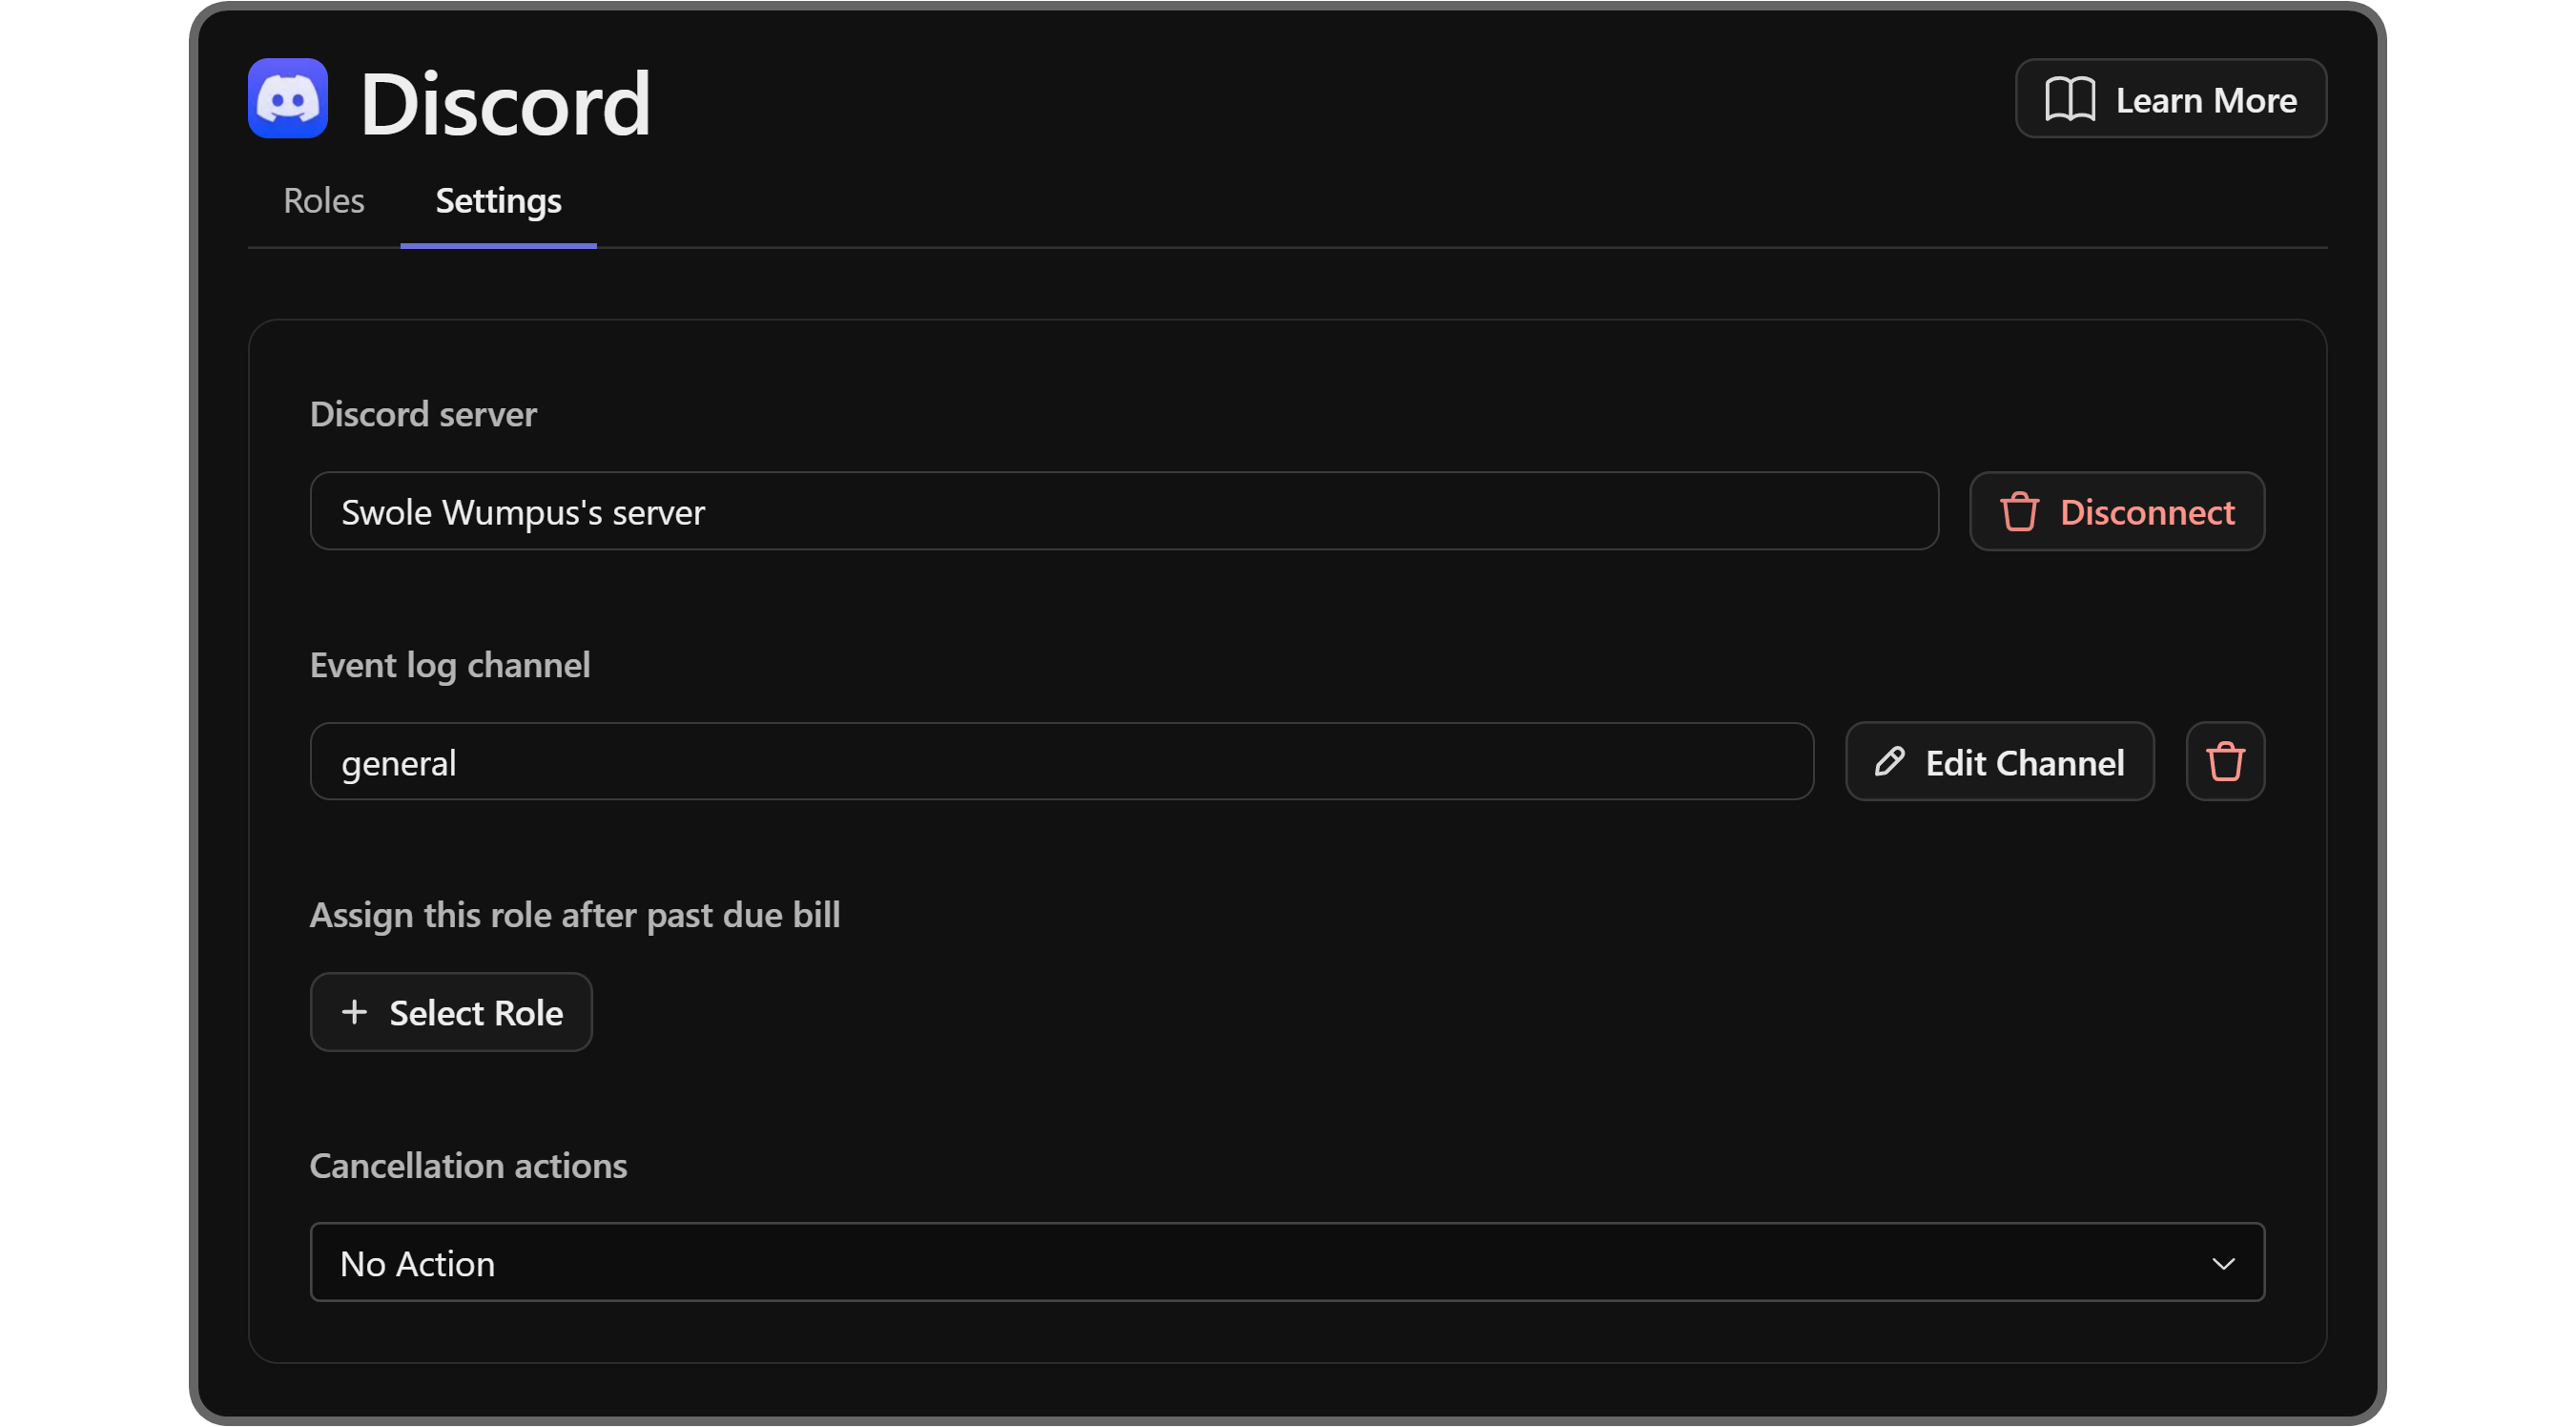
Under the Settings tab, there are four different settings. Let’s take a look at each:
- Discord server: Under this setting, you can see which Discord server the app is connected to. You can click the Disconnect button to change the server.
- Event log channel: When you click the Add Channel button under this setting, you can select a channel where the Whop Bot will keep logs of everything that’s happening related to the Discord app, user access, user roles, and more.
- Assign this role after past due bill: If you want the Whop Bot to assign users a different role when their bill is past due, you can use the Select Role button.
- Cancellation actions: Now, when a user cancels their subscription to your whop, the Whop Bot can take action against them. In this setting, you can select whether you want the bot to:
- No Action: Don’t do anything.
- Remove Role: Remove the role that you’ve selected in the Roles tab.
- Kick User: Remove the user from the server.
- Remove All Roles: Remove every single role that the user has in your server.
After completing the setup of the Discord app, let's click the Discord tab button at the top left of the app.

When you click the Discord tab button, you'll notice the Discord app's interface transforms into something much simpler.
Users who have connected and linked their Discord and Whop accounts will be able to click the Claim Access button to join your Discord server.
If a user hasn't linked their account, they will be prompted to.
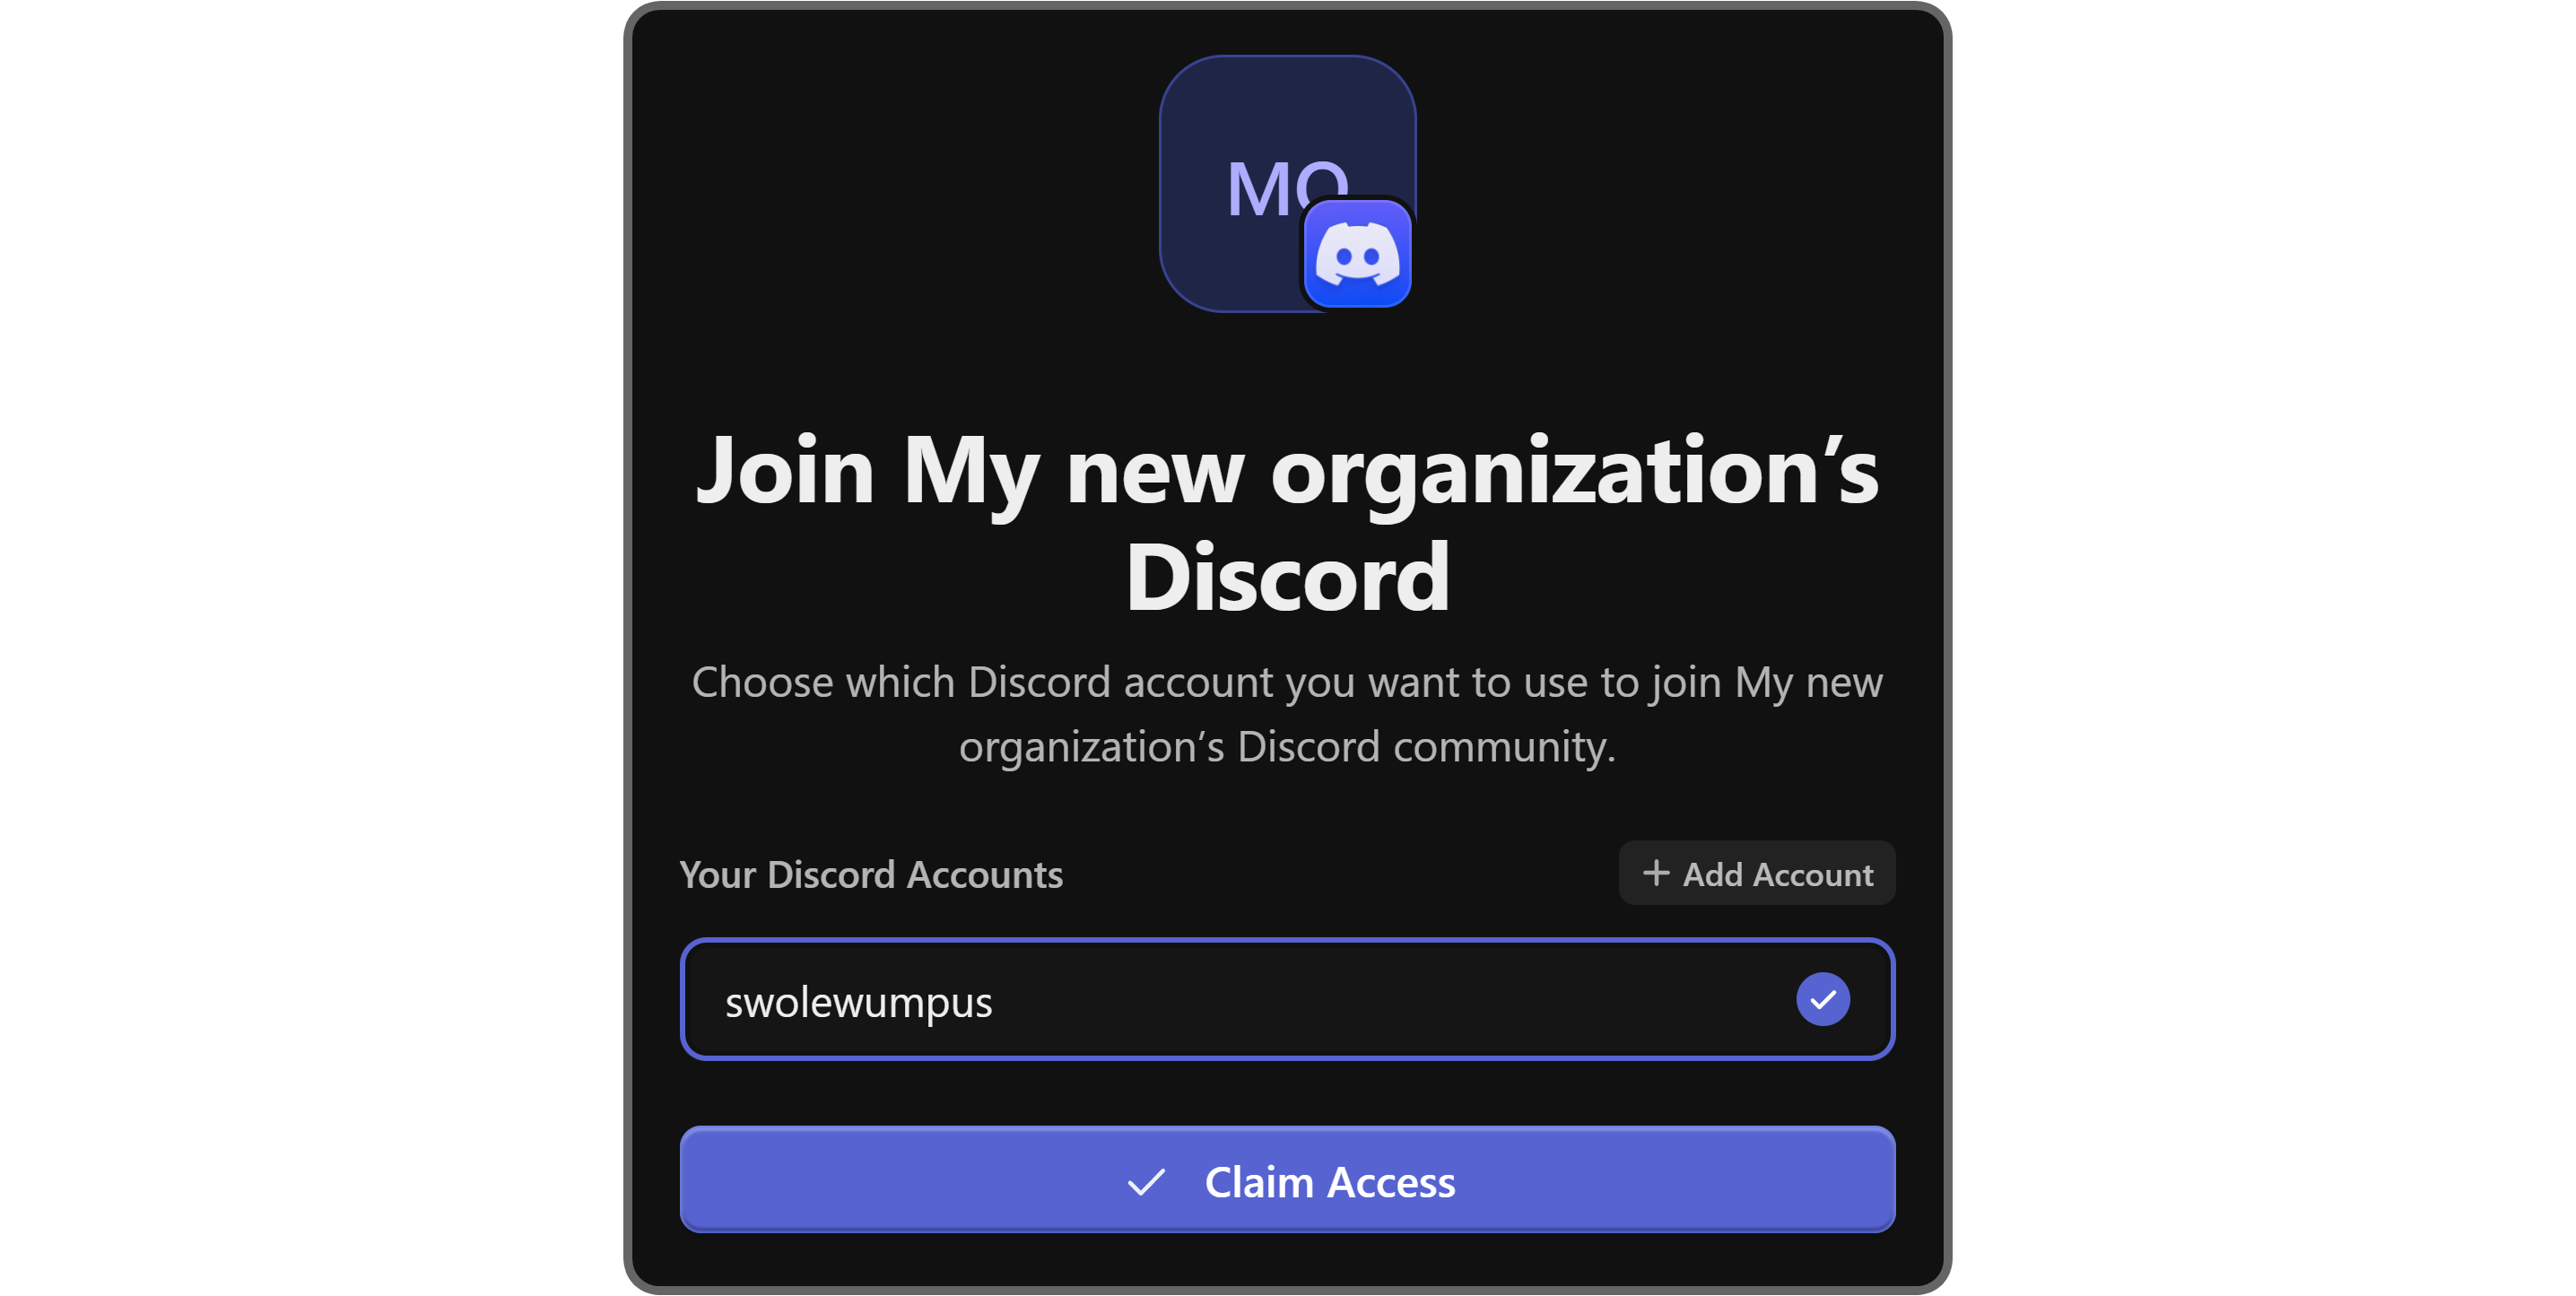
Now, your whop users can claim access to your Discord server with just two clicks.
Time to earn money by monetizing your whop or your Discord server
Now you know how you can add apps to your whop, how you can link your whop to Discord, and how you can paywall them. You can now monetize your content on your whop or your Discord server and start selling access to them on Whop.
It takes less than 10 minutes to get started, and you can use tools that Whop offers, like comprehensive dashboards, an easy-to-use platform, and 24/7 help so you can nourish your product. Link Discord to your whop today and start making money online.
Still using Discord? Try creating a whop for a better experience
There are many reasons to create a Discord server for your product or community, but there are better ones for creating a whop instead.
If you're using Discord to create different channels for different topics, you can do the same thing by adding the Chat app to your whop as many times as you like.
If you're using Discord to host video-call events, you can do the same thing by adding the Video Calls app to your whop.
If you're using Discord to create engagement via giveaways, try adding the Whop Wheel app to your whop - the best part? Whop will cover the prizes, so you don't have to worry about actually giving them out.
If you're using monetization and donation bots on Discord, it's time to level your game up. Instead of relying on third-party integrations, you can monetize your Whop with our built-in monetization system.


