Key takeaways * Strategic server customization helps you stand out from competitors, attract ideal members, and build lasting engagement. * Visual branding elements like icons, banners, and custom emojis create recognition and foster community belonging. * Personalized welcome messages, clear rules, and custom roles shape member experience beyond just aesthetics. Do you feel
Key takeaways
- Strategic server customization helps you stand out from competitors, attract ideal members, and build lasting engagement.
- Visual branding elements like icons, banners, and custom emojis create recognition and foster community belonging.
- Personalized welcome messages, clear rules, and custom roles shape member experience beyond just aesthetics.
Do you feel like your Discord server is a bit mundane? Could your community benefit from a bit of Discord server customization? If so, you’ve come to the right place. We’re excited to teach you how to customize a Discord server in this complete guide!
With so many different communities competing for the attention of the same individuals, standing out is of the utmost importance. It can be the difference between building a thriving, engaged community that you’re able to monetize and all your efforts being wasted as your community is unable to capture or maintain attention.
But, by the time you finish reading this discussion on how to make your Discord server look better, you won’t have to stress about being lost in a crowd of similar servers. You’ll effortlessly attract your ideal community members and keep them around for the long haul.
We’ll talk about the basics, like enhancing the actual look of your server with custom icons, banners, emojis, and stickers, along with personalizing the actual experience users have in your community. We’ve obviously got a lot to cover, so let’s not waste any time!
The Importance of Discord Server Customization
Before we actually teach you how to customize your Discord server, we want to make sure you’re fully aware of the consequences of failing to do so.
More and more individuals are realizing the power that comes from learning how to build an online community. Thus, you’re competing for the same pool of attention with more and more creators. This means that you need to do whatever it takes to stand out among the crowd.
Customizing your Discord server goes beyond just aesthetics - it's about aligning your server with your community's values and preferences. By tailoring your server to your target audience, you create a space where members feel like they belong, fostering a sense of unity and ownership. As a result, you'll see increased engagement, higher member retention, and a more vibrant community that continues to grow organically.
One of the key benefits of customizing your server is the ability to create a strong visual identity. A unique server icon, banner, and custom emojis that resonate with your community help establish your server's brand. Members will easily recognize and remember your server, creating a sense of familiarity and loyalty.
Another advantage of server customization is the organization and structure it brings. By setting up well-defined roles, permissions, channels, and categories, you cater to different interests, preferences, and conversation topics. This creates a welcoming and inclusive environment where every member can find their niche and feel comfortable participating.
Customizing your server also allows you to create a safe and enjoyable space for your community. Tailoring your moderation settings and tools to match your server's values ensures that members feel respected and heard. By fostering a positive atmosphere, you encourage members to invest their time and energy into your server, leading to long-lasting connections and friendships.
How to Customize Discord Server: Customization Tips & Aesthetic Inspiration to Help You Stand Out
Failing to customize your server can have several drawbacks. Your server may fade into the background, lost among the sea of generic servers that don't stand out. This makes it harder to attract and retain members, limiting your server's potential to grow and thrive. But, a lack of Discord server customization can also continue to disorganization and confusion among members.
The good news? All of this is avoidable. We’re going to teach you how to customize your Discord server below, touching on all the different ways you can develop strong branding and provide unique experiences for your awesome community members. Let’s start with the basics: customizing the name and icon of your Discord server.
Start With the Icon and Name of Your Server
Your server's name is the first thing potential members will see, so make it count.
Choose a name that reflects your community's theme, purpose, or interests, and craft a name that concisely communicates what your server is all about. You should also consider what types of keywords your ideal members would search for and make sure they’re in the name of your server. This will help you grow your Discord server organically. To update your server's name:
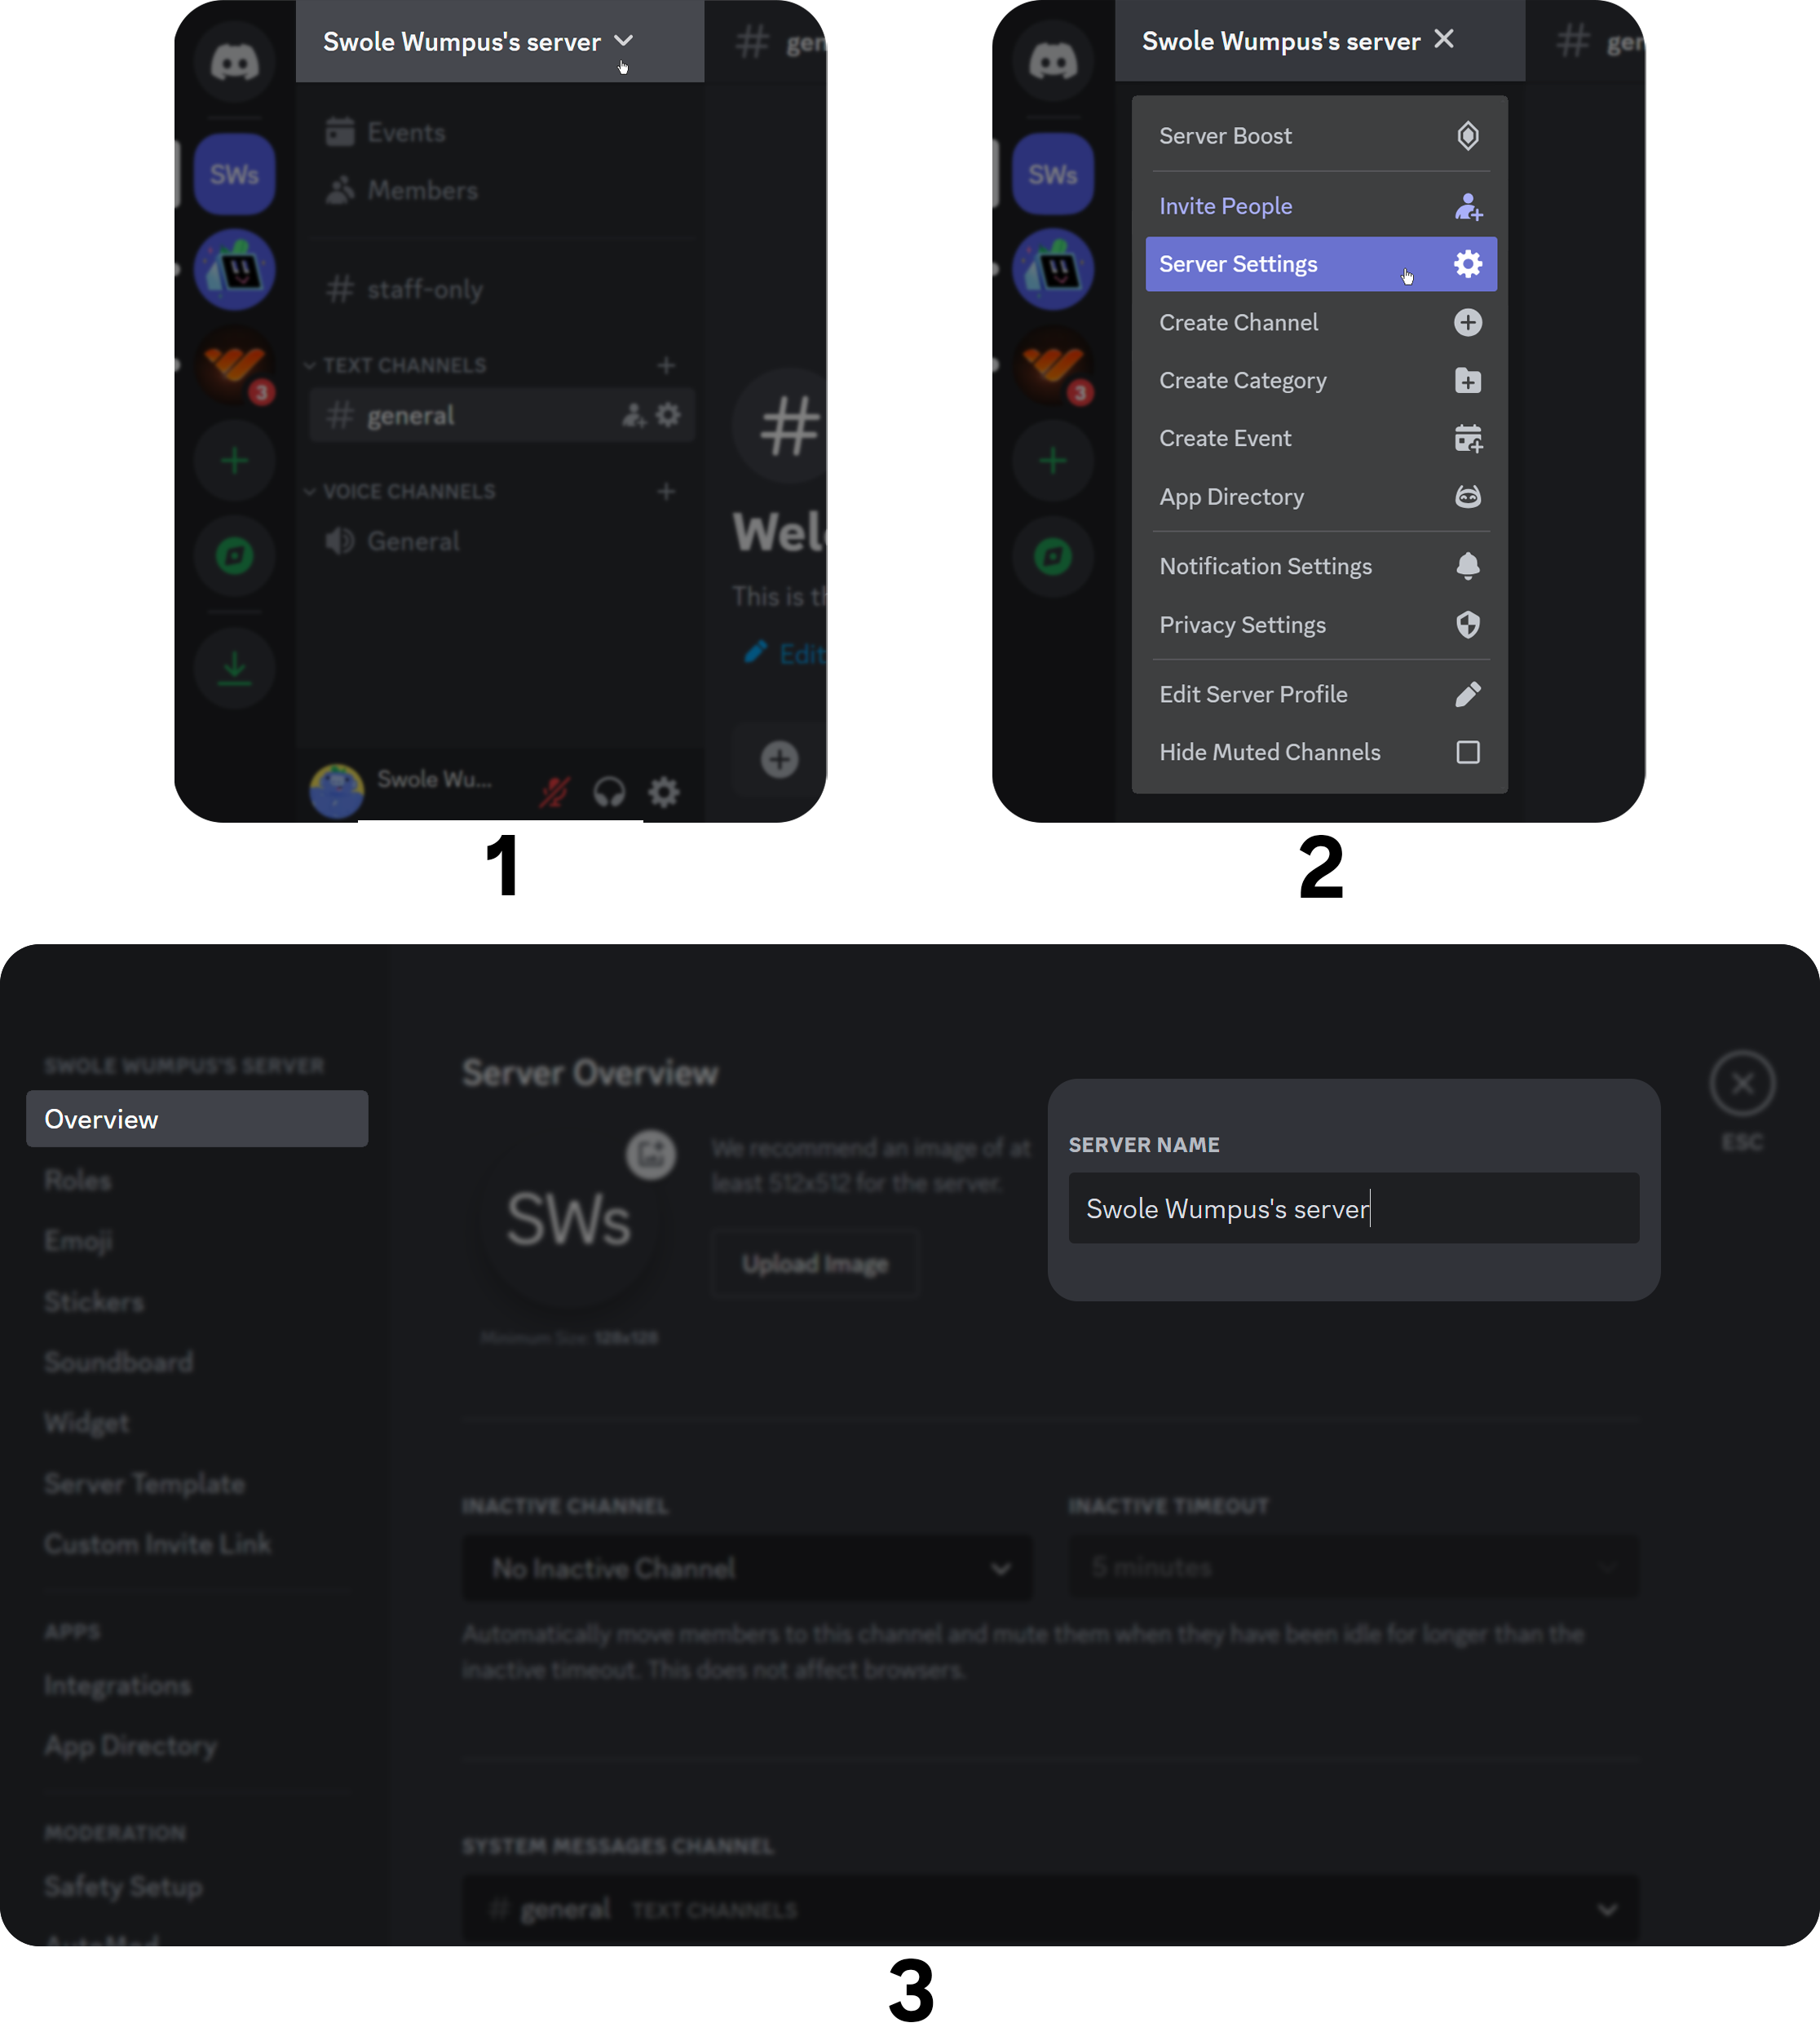
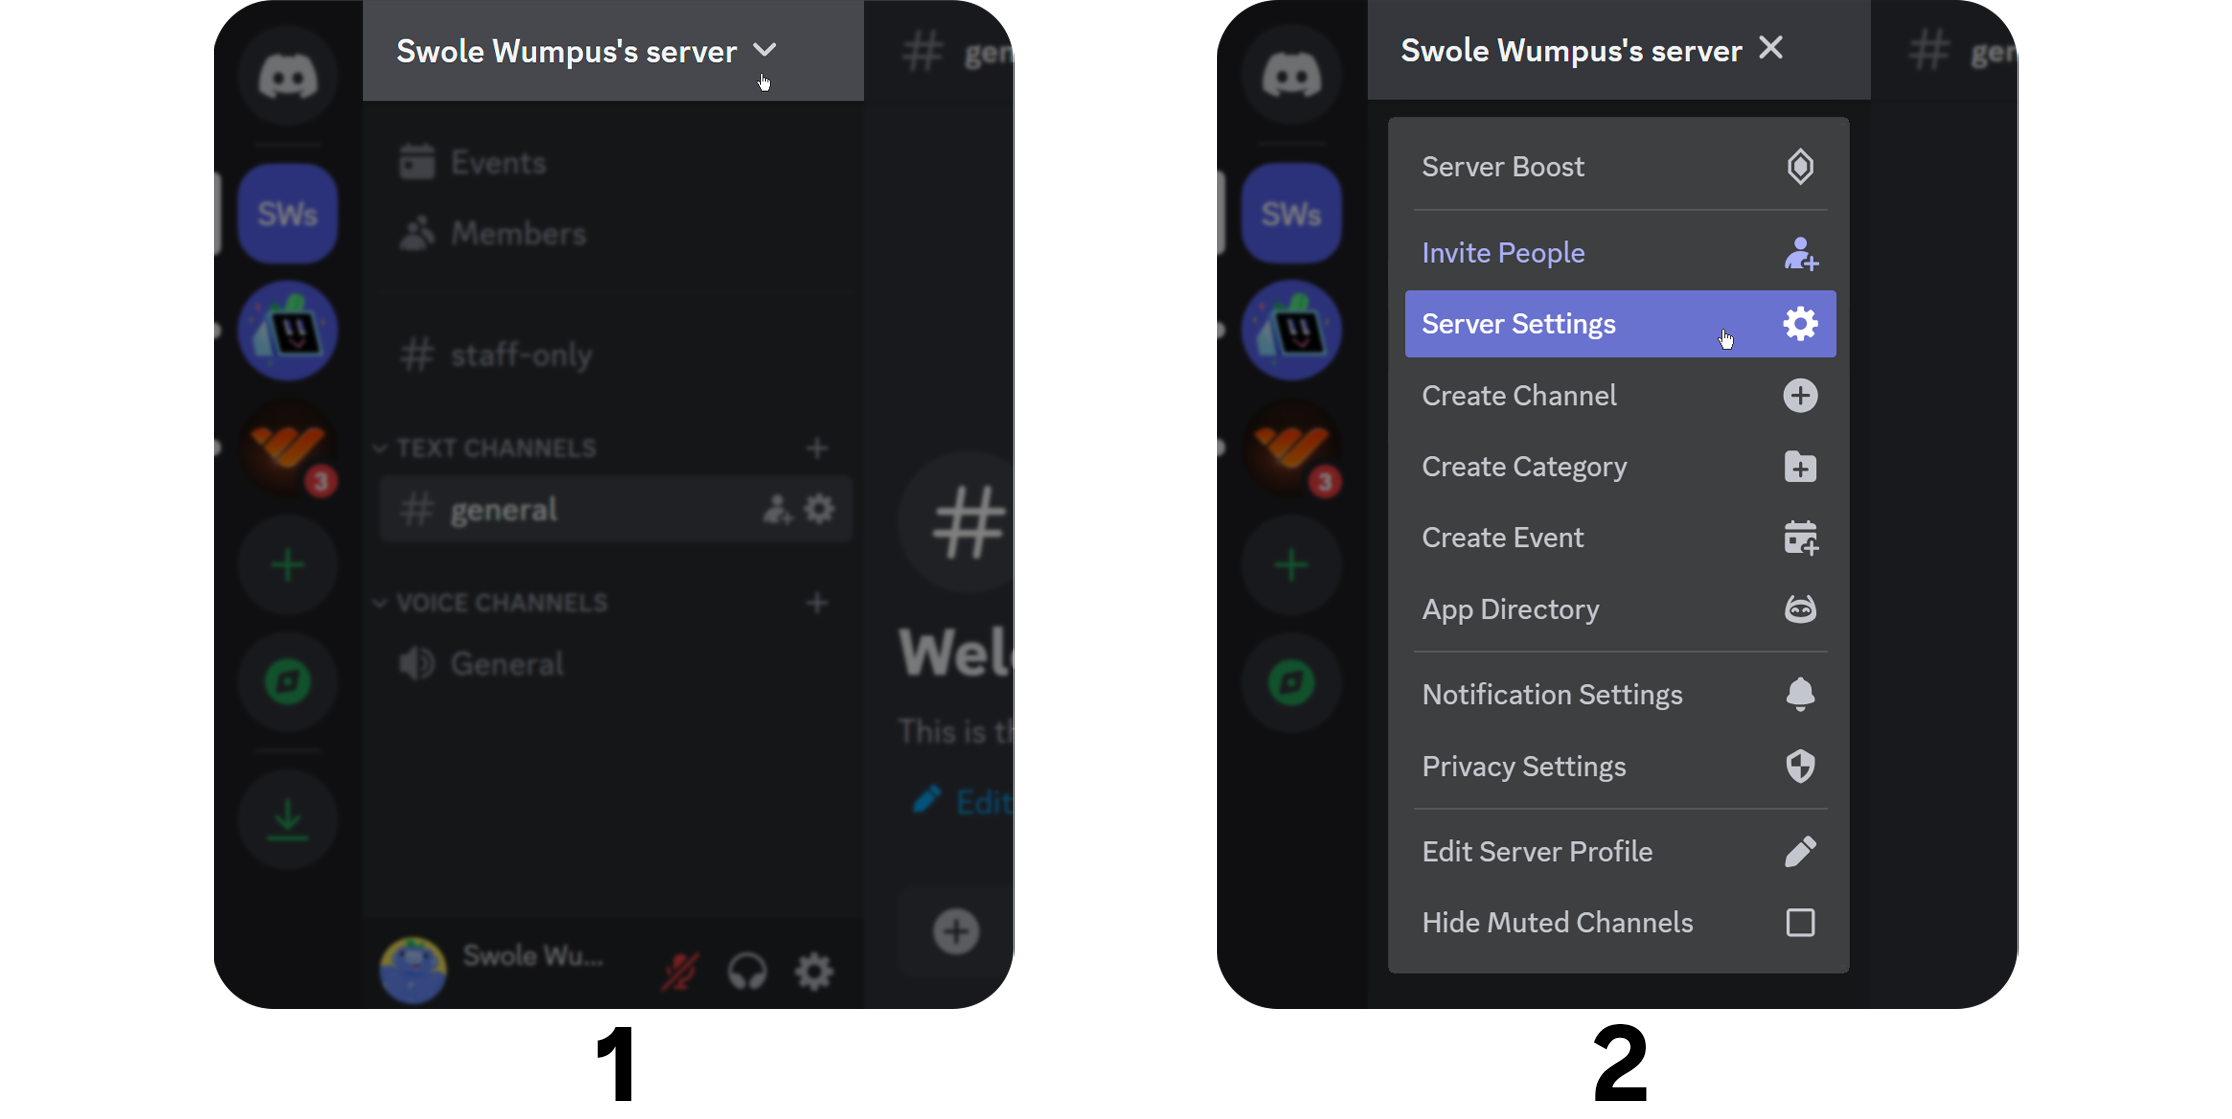
- Click on your server's name at the top of your channel list.
- Select "Server Settings" from the dropdown menu.
- You can see the Server Name input box in the Overview section of the Server Settings. After setting a server name, click the Save Changes button at the bottom. The character limit of server names are 100.
Make sure to keep the name short and memorable and the description informative yet concise. It is not recommended to use non-standard characters.
Personalize Your Server Icon
A unique server icon is crucial for establishing your server's identity and making it easily recognizable. A visually appealing and distinctive icon can make your server more memorable and leave a lasting impression on potential members.
If you already have a logo, this is a no-brainer - that’s what you want to use as your server icon. If you don’t have a logo already, this is a good reason to get one made. Otherwise, you can use a free image you found somewhere or take one yourself. In terms of actually personalizing your server icon, here’s how you do it:
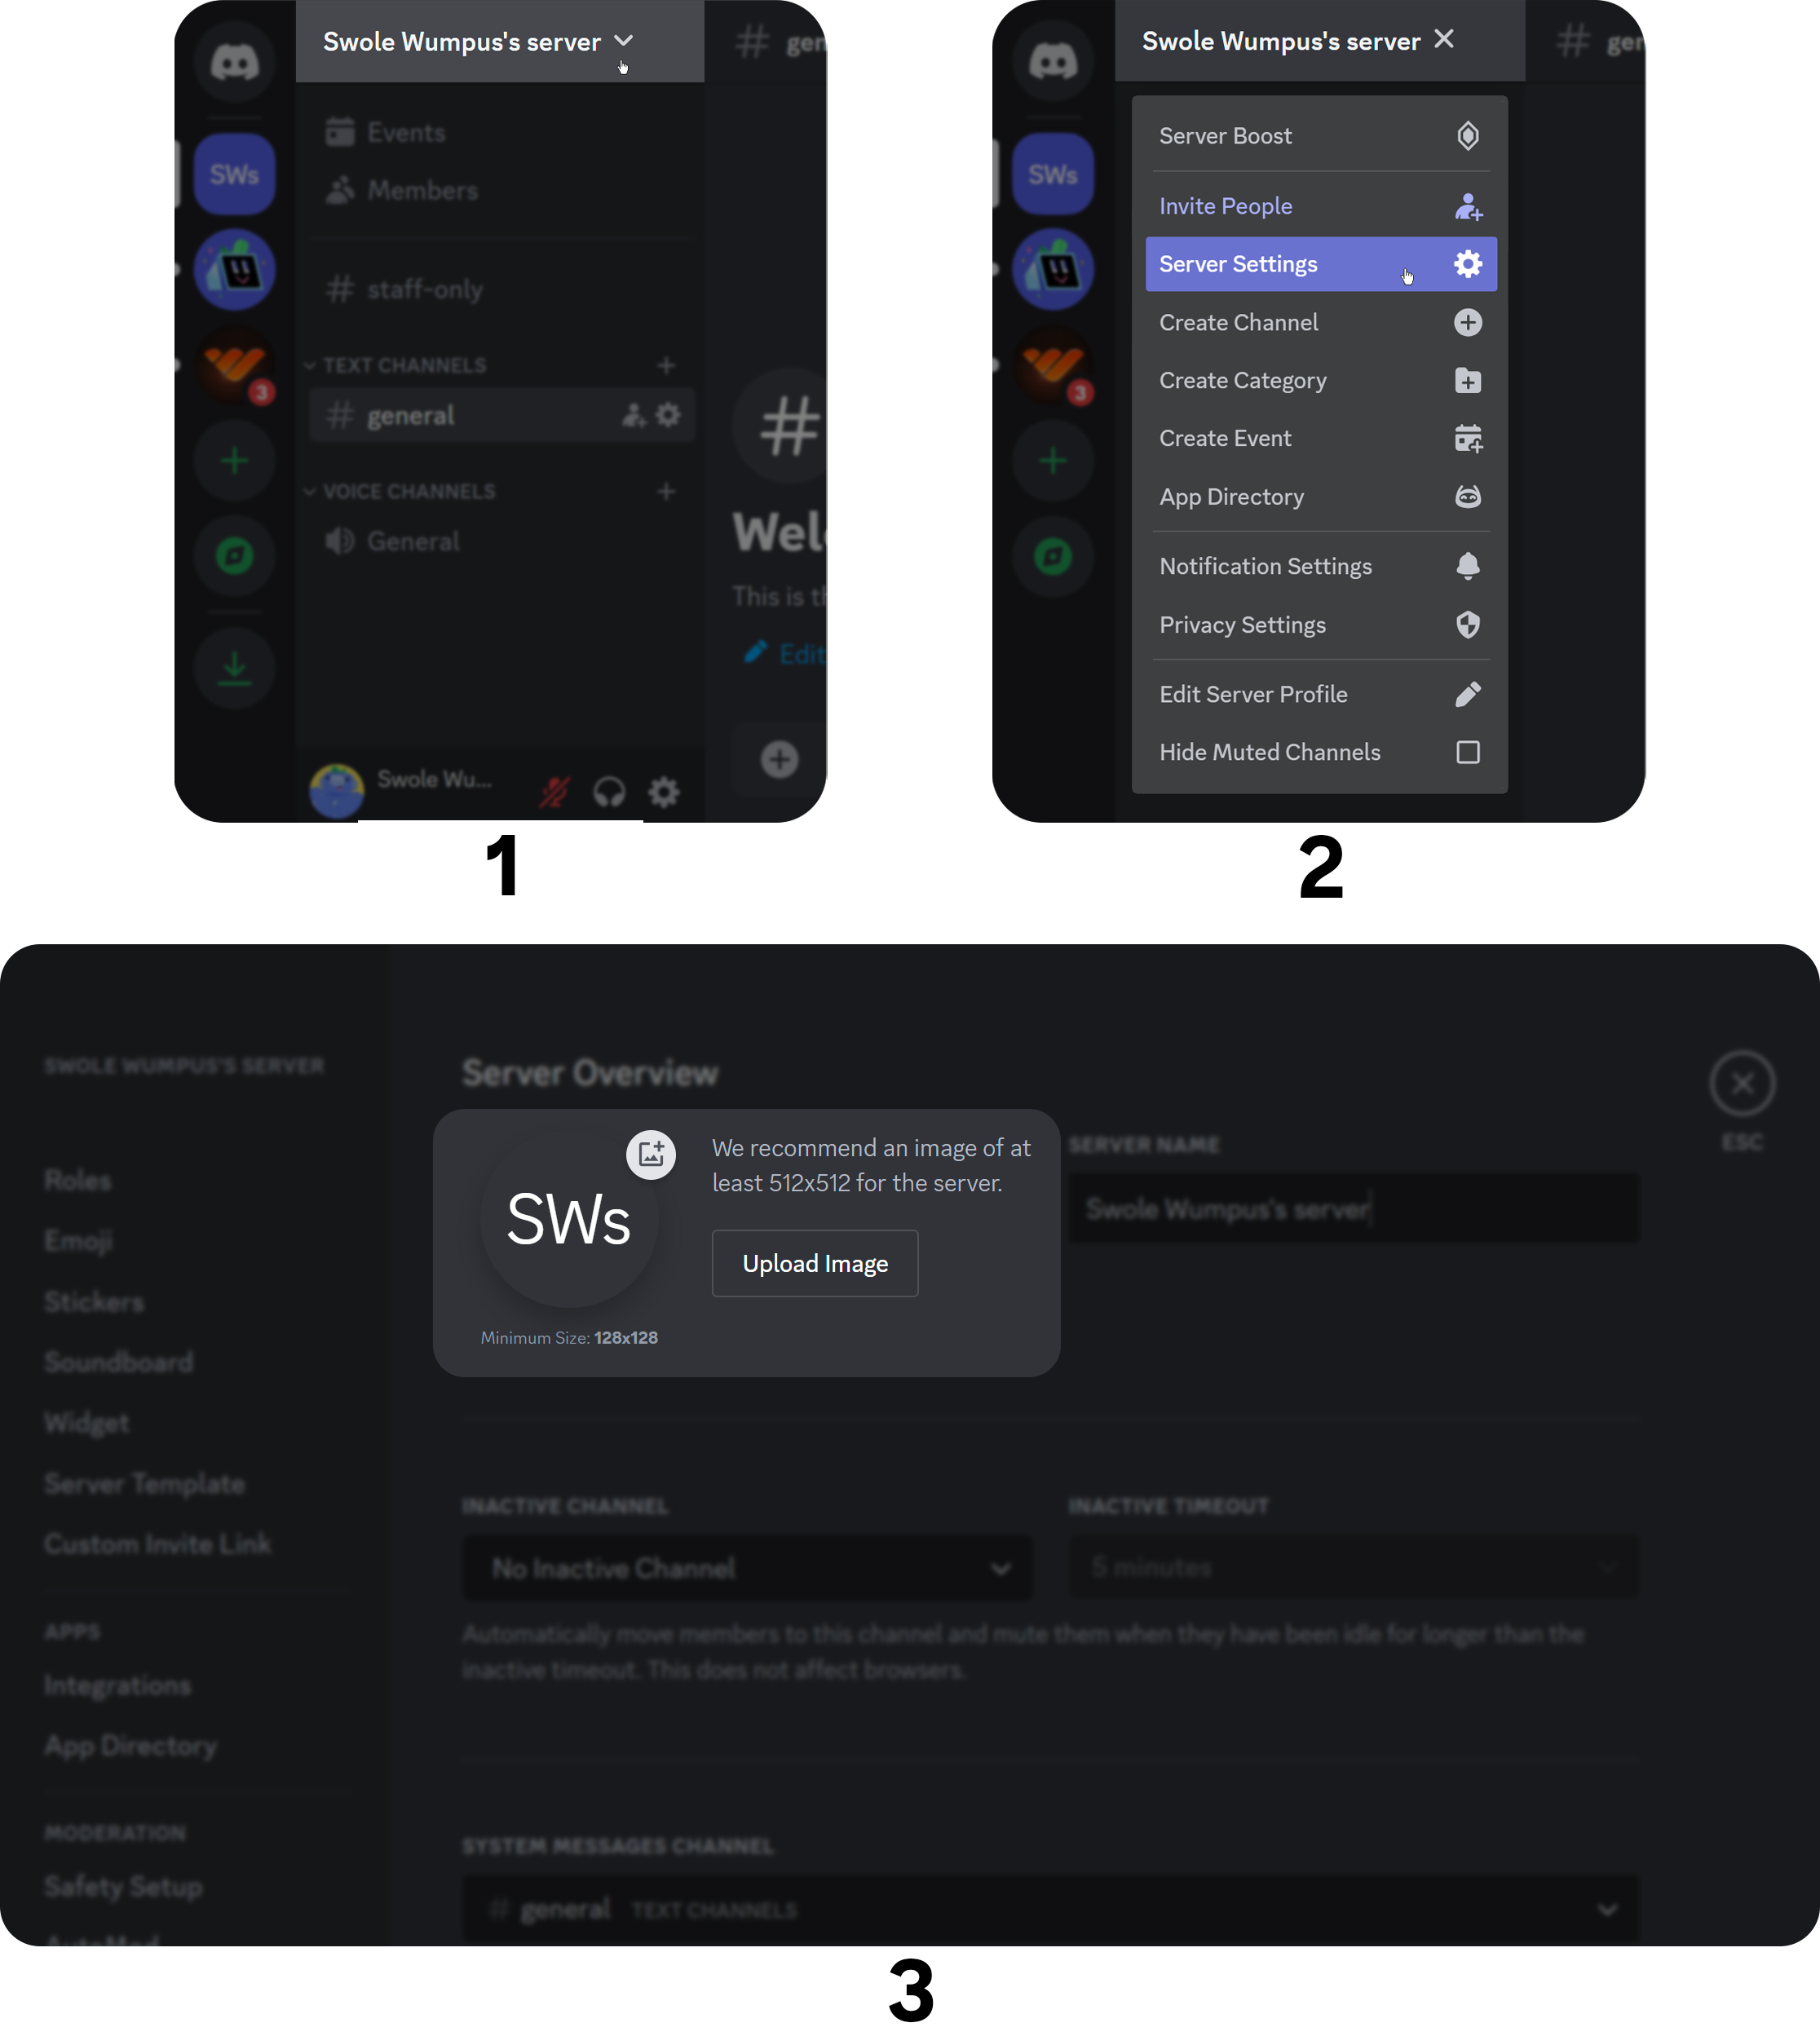
- Click on your server's name at the top of your channel list.
- Select "Server Settings" from the dropdown menu.
- You can see the server icon section in the Overview under the Server Settings. After setting a server icon, click the Save Changes button at the bottom. You can use GIF files as server icons if you have a Server Boost level of at least 1.
Utilizing Custom Emojis
Custom emojis add personality to your server and enhance communication among members. They can reflect inside jokes, community events, or the server's theme, helping create a sense of belonging among members. This is a powerful branding tool that you definitely need to use to your advantage. Here’s how to offer these emojis in your community:
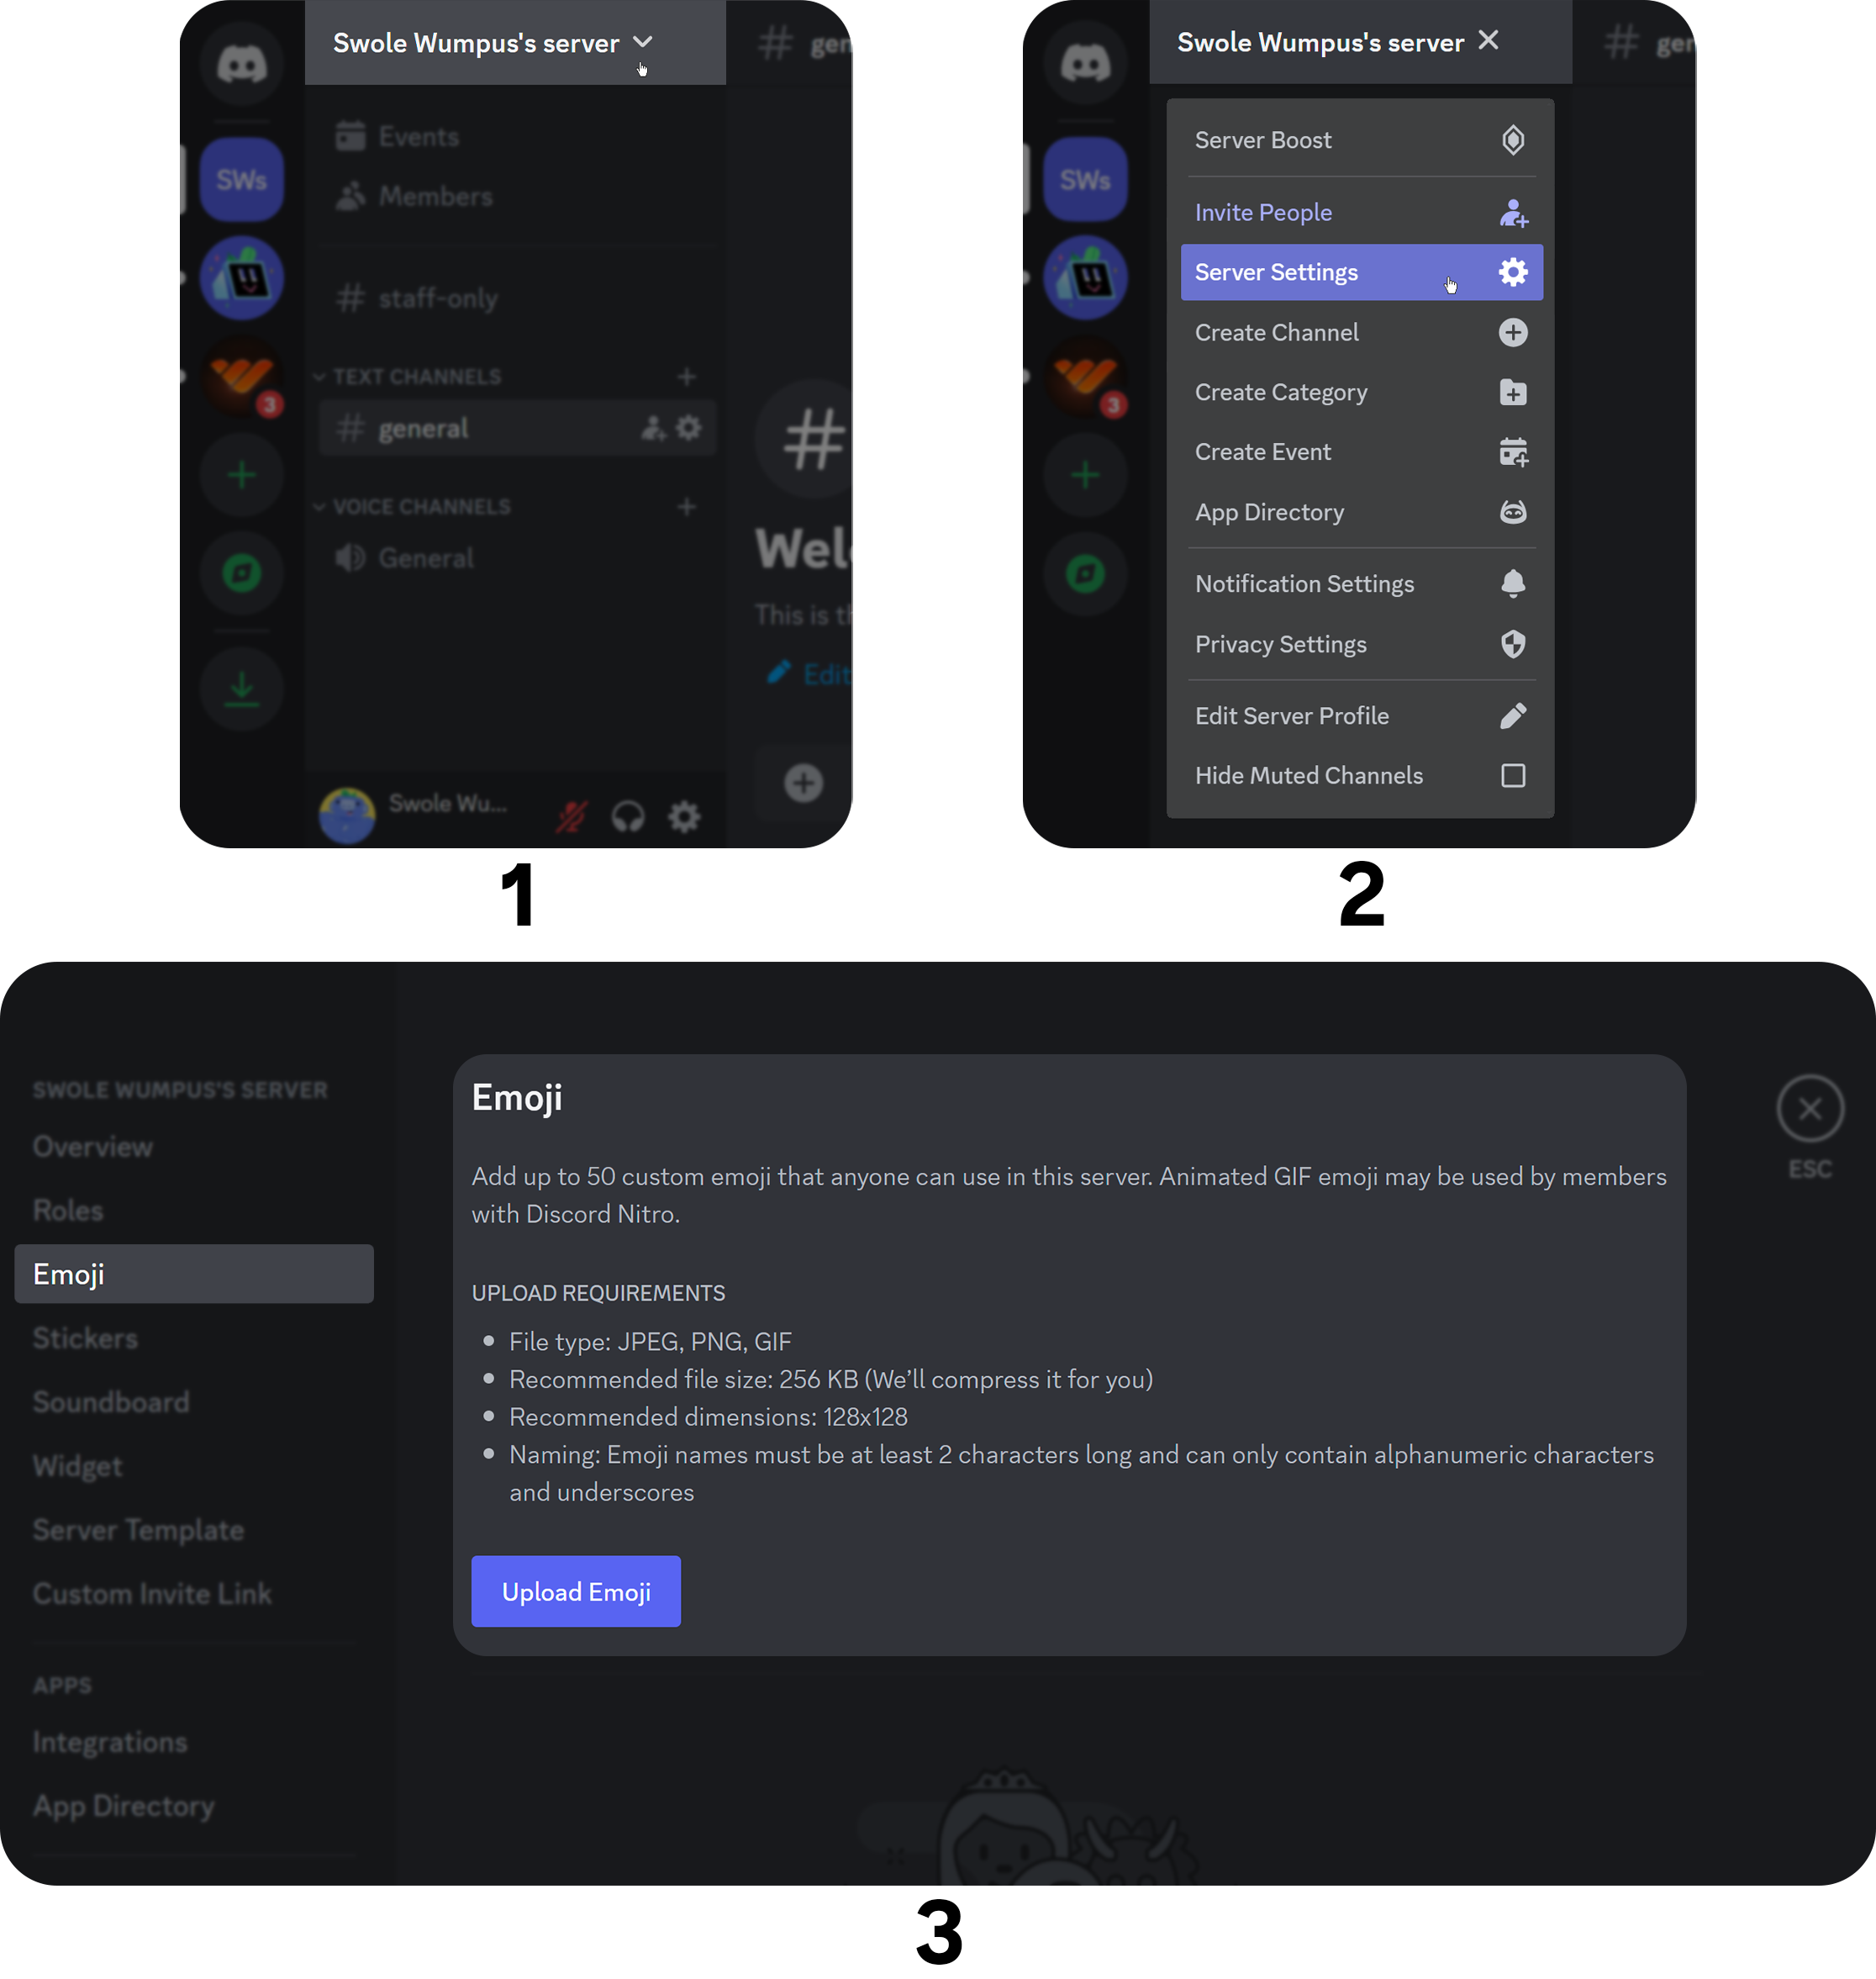
- Click on your server's name at the top of your channel list.
- Select "Server Settings" from the dropdown menu.
- Click "Upload Emoji" and choose your desired image files (the maximum size is 256KB). After uploading an emoji, make sure to change its name! The limit for both emojis and animated emojis is 50, and it increases by 50 with each Server Boost level.
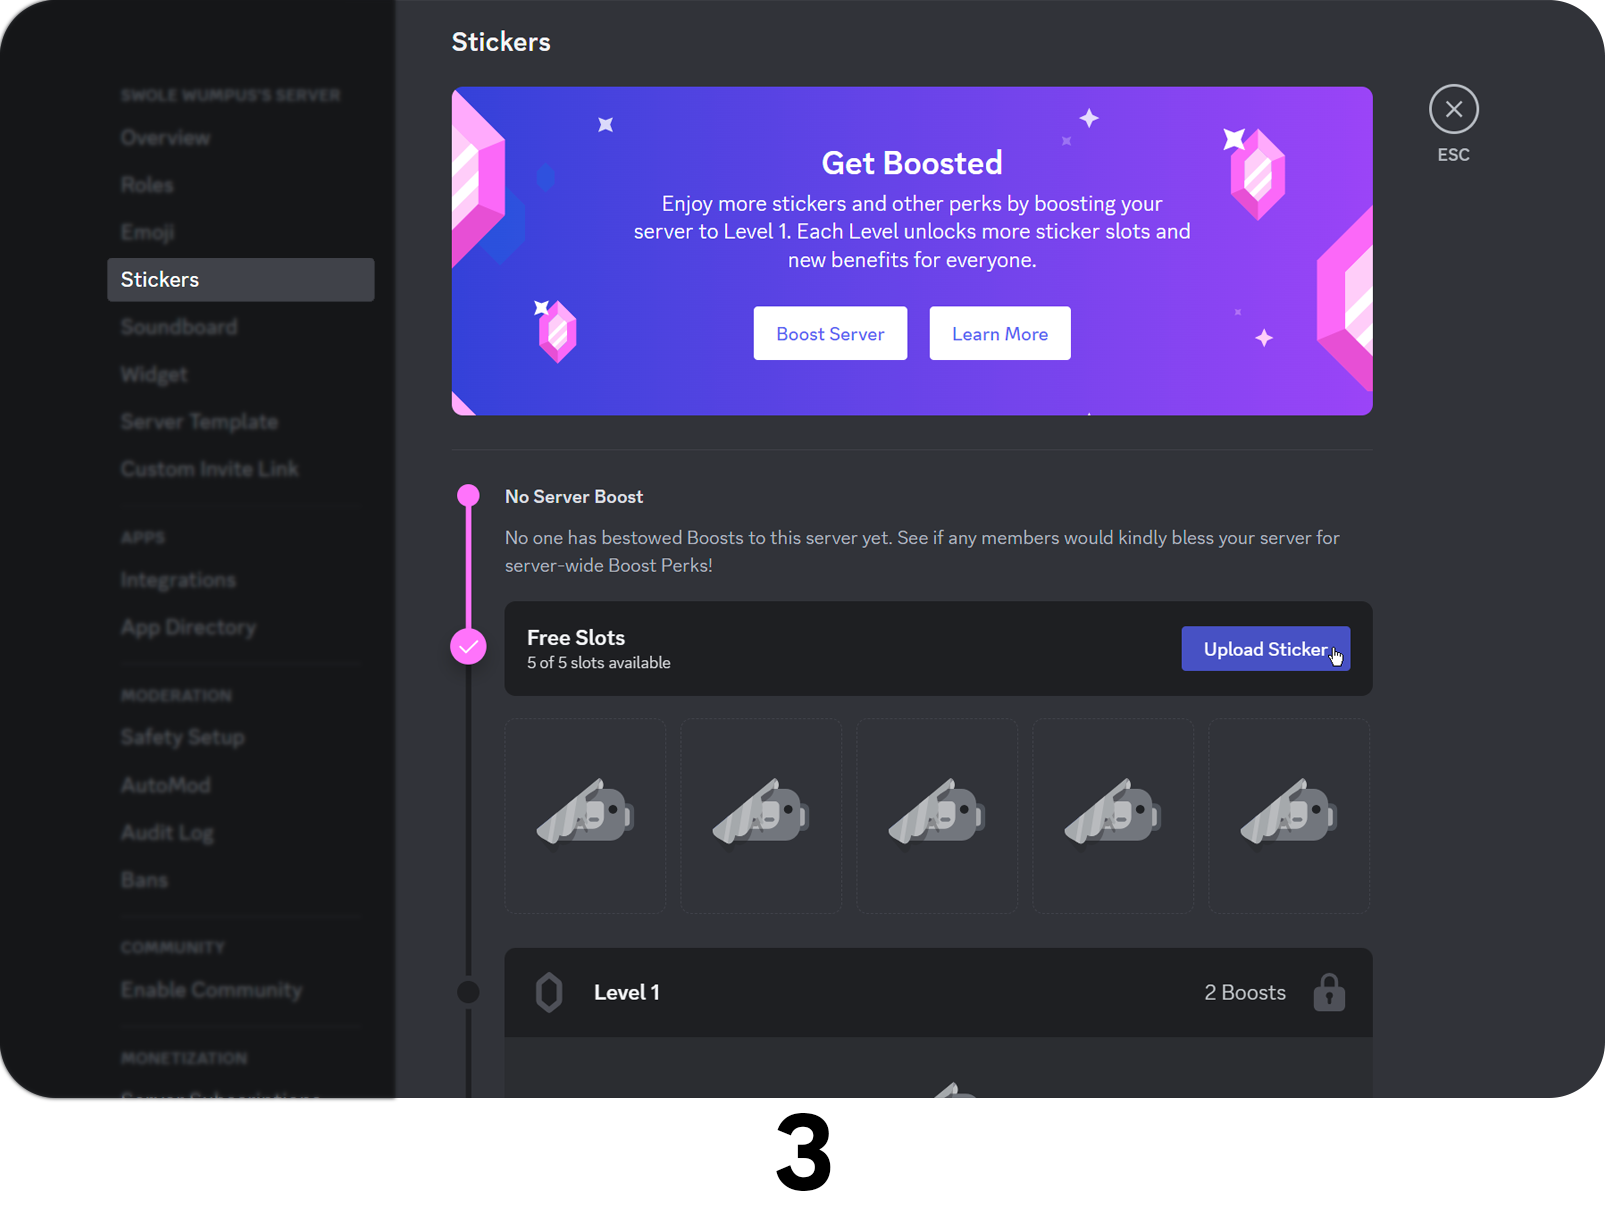
Utilizing Custom Stickers
The process of adding stickers is really similar to adding custom emojis. Non-boosted servers have 5 sticker slots, Level 1 has 15, Level 2 has 30, and Level 3 has 60. Here's how to do it:
- Click the server name at the top of the channel list.
- Click the Server Settings.
- Navigate to the Stickers section of the Server Settings and click Upload Sticker.
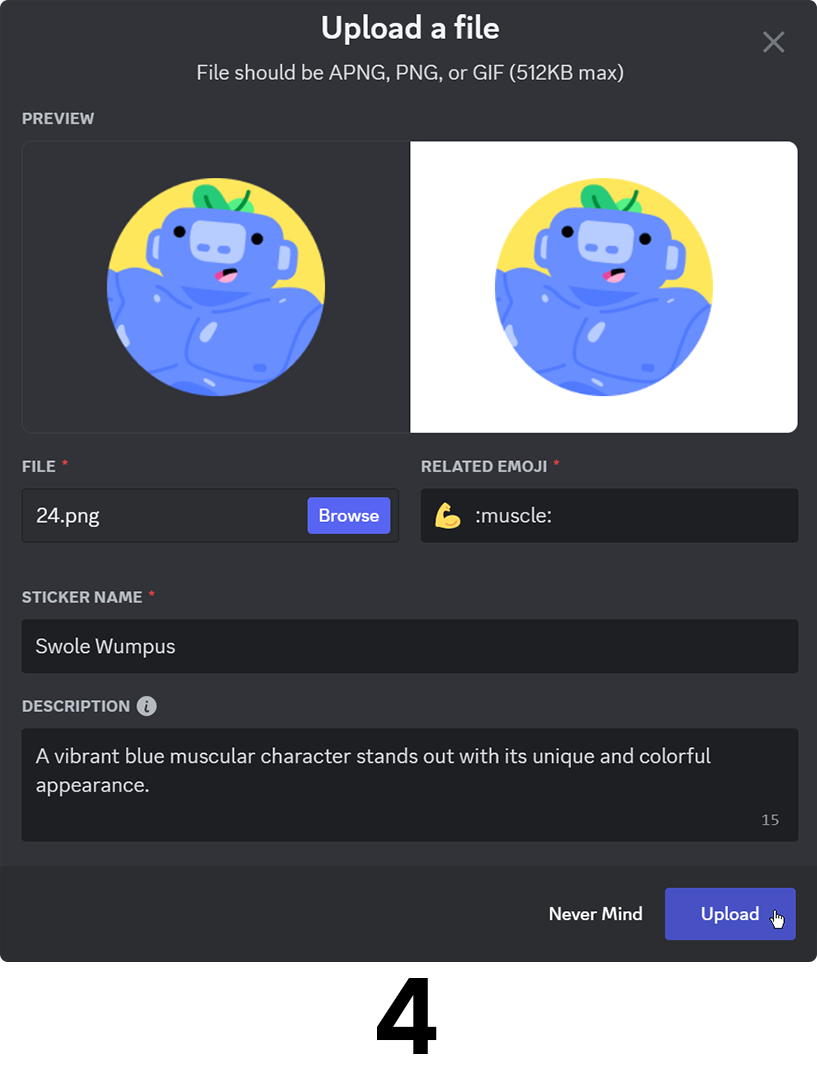
- In the Upload a File prompt, upload a sticker, select a related emoji, give it a name, and optionally write a description (alt text). When you're done, click Upload.
Add a Server Banner
We have a complete guide on how to add a Discord banner - that’s how important this aspect of Discord server customization is! This does require your server to be boosted to Level 2, but it’s well worth it.
A custom banner adds a professional touch to your server and helps create a strong visual identity—much like your server icon. Your banner can showcase your server's theme and values or even feature artwork from your community members.
That previously linked article will walk you through the process and offer more inspiration for how you can leverage this customization to your advantage. But here’s a short summary of what you need to do to make it happen:
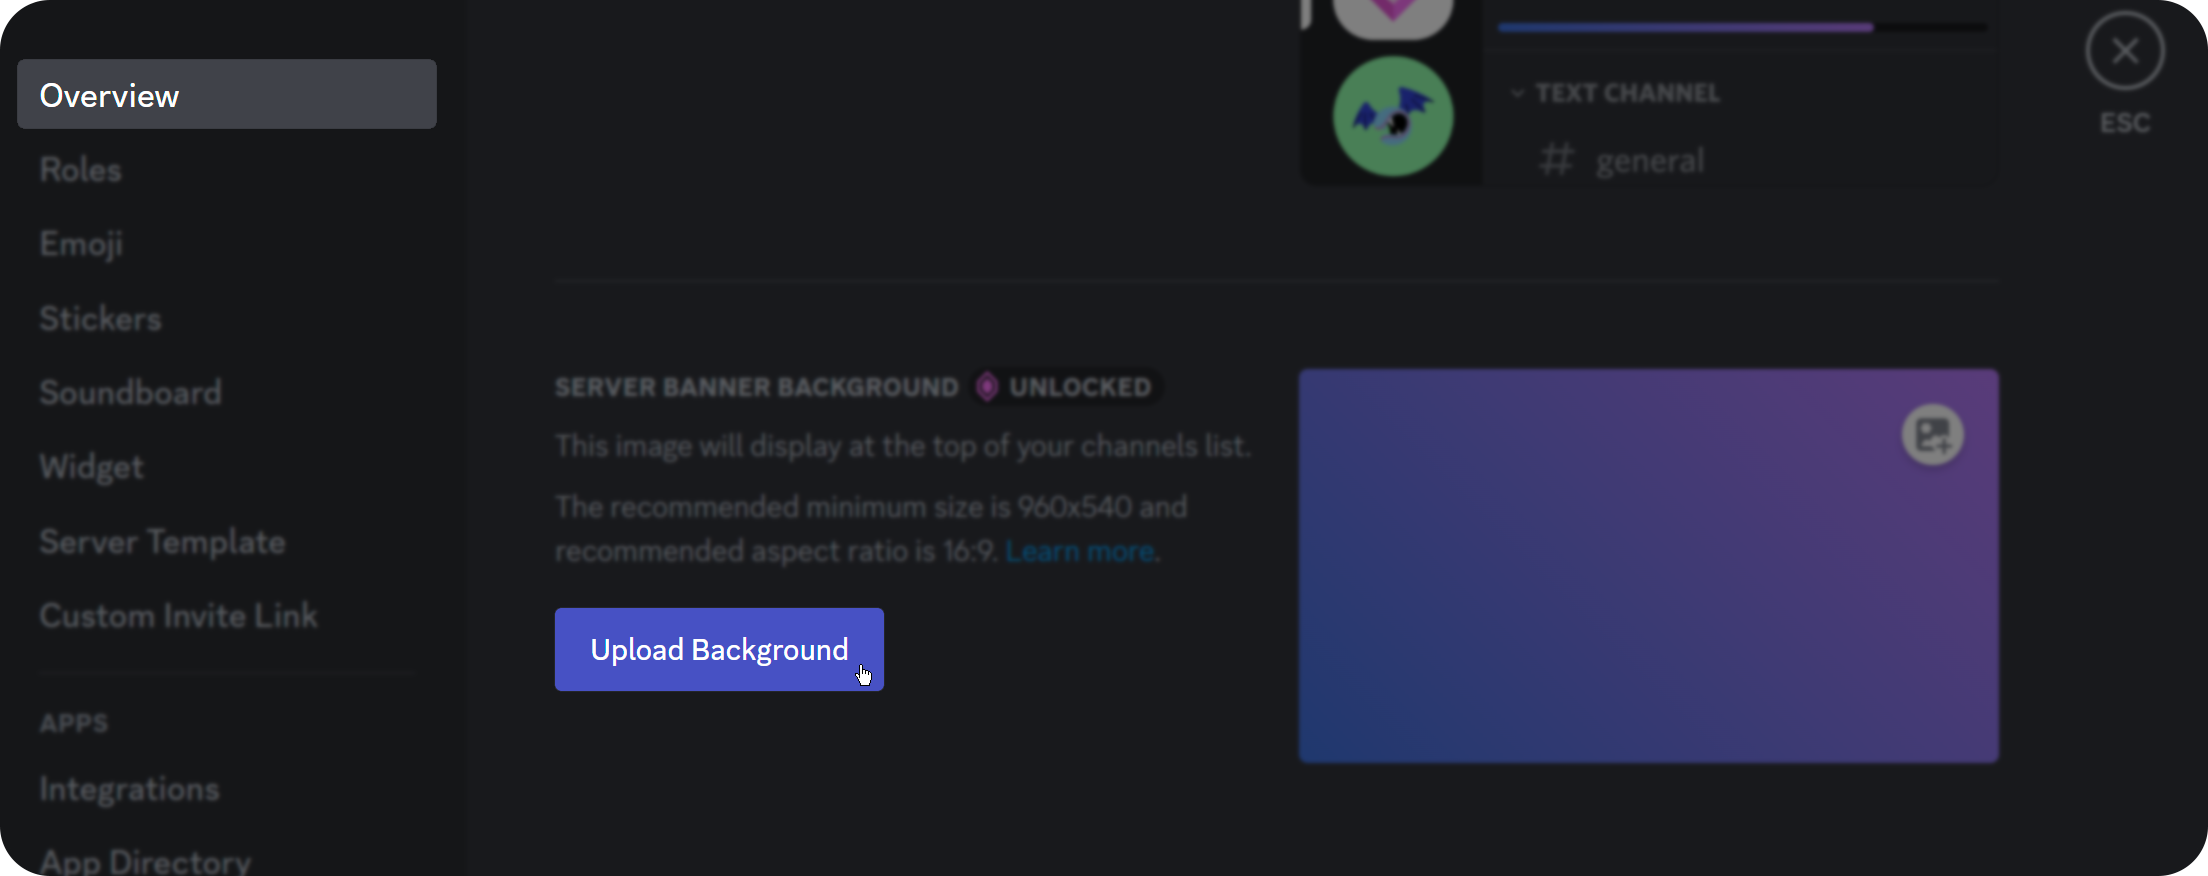
- Go to "Server Settings” and navigate to “Overview”
- Scroll down and click on "Upload" next to "Banner" (available for Level 2 boosted servers).
- Choose a high-quality, visually appealing image and click "Save Changes.” The recommended minimum size is 960x540 pixels with an aspect ratio of 16:9.
Whatever approach you take to banner customization, take the time to design something that represents your server well. You can use design tools or collaborate with a professional designer to create an eye-catching banner if you’re struggling with inspiration.
Take Advantage of Other Boosted Assets Like Vanity URLs, Invite Splashes, and More
We encourage you to read our full explanation on how to boost a Discord server if you haven’t already - as you’ll discover all that’s possible through boosting. Beyond the capabilities we’ve mentioned thus far, there are other customizations you can make after boosting your server. Some of these include a vanity URL, invite splashes, themes, and more.
Vanity URLs provide a personalized invite link, making it easier to share and remember. To set up a vanity URL, go to "Server Settings" and select "Vanity URL" (available for Level 3 boosted servers). Choose a unique and memorable URL, then click "Save Changes”.
Invite splashes appear when someone clicks on your server's invite link, providing an opportunity to make a strong first impression. To customize your invite splash, go to "Server Settings" and select "Invite Splash" (available for level 1 boosted servers). Upload a high-quality, visually appealing image and click "Save Changes.”
Give Out Custom Roles and Permissions
Most of what we’ve discussed thus far has been in regard to how to make your Discord server look better. Now, we want to talk a bit about how to customize a Discord server and actually enhance the experience users have in your community. And for that, we need to start by talking about custom roles and permissions.
Custom roles and permissions help organize your server and empower members with responsibilities. They can also add a sense of hierarchy, recognition, and accomplishment, making members feel more valued and engaged. If you plan on charging access to Discord, this will be a key part of differentiating between subscription tiers. Here’s how to go about this customization:
- Go to "Server Settings".
- Click on "Roles" in the left-hand menu.
- Click the "+" button to create a new role, then assign a name, color, and permissions.
- Click "Save Changes”.
We have a more detailed resource on how to create roles on Discord if you’d like the full scoop. But you can branch out your roles for different interests, responsibilities, and levels of involvement. You can also use role colors to make your server more visually appealing.
Stand Out With Your Welcome Message & Rules
When a new user joins your server, it’s an opportunity to show them that they made the right choice with a fully customized, seamless onboarding experience.
Sure, you could save a few minutes when starting a Discord server by using the standardized, copy-and-paste approach. But trust us when we say that customizing your welcome message and rules is worth the work.
A welcoming message and clear rules set the tone for your server, ensuring a positive atmosphere and setting expectations for behavior. A personalized and warm welcome message can make new members feel instantly at home, while well-defined rules help maintain order and harmony within your community.
We encourage you to set up a dedicated Discord rules channel where the new user will be welcomed and made familiar with the guidelines on your server. You can then pin this channel/message for easy access.
Every channel has a welcome message and rules, so how do you stand out in this area? Our advice is to get creative with formatting, emojis, and images. Use examples of what is/isn’t allowed specific to your niche. Make sure you’re clear and concise.
Consider Which Integrations You Can Add
Part of what separates Guilded from Discord is the sheer number of integrations you have at your fingertips as a Discord creator. These connect your server to external platforms, enhancing its functionality and offering additional features to your members. Popular integrations include Twitch, YouTube, Patreon, and GitHub, but there are countless others.
So, sit down and think about what specific integrations you envision yourself using. What would your community benefit from? Once you have a list of what you need to integrate, here’s how to do it:
- Go to "Server Settings"
- Click on "Integrations" in the left-hand menu.
- Select the platform you wish to integrate and follow the on-screen instructions.
For each of these, you will likely have a bit of configuring to do after integration to ensure the app works as you intend it to. One specific type of integration that can make or break your server’s success is a bot - so let’s talk about that next.
Leverage the Power of Bots
The best Discord server bots, like Whop, are capable of providing a better experience for your users while helping you cut back on tasks. Some of the specific customizations these bots unlock include:
- Custom Commands: Bots can be programmed to respond to custom commands, allowing you to create shortcuts for frequently used actions or retrieve specific information.
- Auto-moderation: Bots can be configured to automatically delete messages containing specific words, phrases, or links, helping maintain a safe and friendly environment.
- Role Management: Bots can assign or remove roles based on specific criteria, such as server activity, join date, or participation in events.
- Custom Welcome Messages: Bots can send personalized welcome messages to new members, including information about the server or specific channels.
- Scheduled Messages: Bots can send scheduled messages or announcements at predetermined times, reminding members of events or important updates.
- Music and Audio Playback: Bots can play music or other audio content in voice channels, allowing members to enjoy shared listening experiences.
- Reaction Roles: Bots can assign roles based on reactions to messages, making it easy for members to opt-in to specific roles or access specific channels.
- Polls and Surveys: Bots can create and manage polls or surveys, helping you gather feedback from your community.
- Customizable User Profiles: Bots can create customizable user profiles with various fields and statistics, allowing members to showcase their interests, achievements, or server activity.
- Leveling Systems: Bots can track member activity and reward them with experience points, leveling them up as they participate in the server.
- Currency and Economy Systems: Bots can introduce custom currencies or economies, allowing members to earn, spend, or trade virtual currency within the server.
- Mini-games and Trivia: Bots can host mini-games, quizzes, or trivia sessions, providing fun and engaging activities for your community.
How incredible would it be to harness all these capabilities with just a single bot? When you get Whop, you can! Our solution is widely considered to be the most powerful Discord membership bot. It makes it easier than ever to manage a paid Discord server.
We encourage you to learn more about our Discord subscription bot and see all that you can accomplish with Whop on your side. Many of the Discord server customizations we’ve discussed thus far are more powerful and easier to attain with Whop - so take a look at some of the facts and features you stand to gain today!
What About Custom Server Templates?
Many who are wondering how to customize Discord Servers want a simple, fast solution. Maybe you’ve come across a server you love the look and feel of - and you want to replicate it yourself. That’s where custom Discord server templates come in.
These are pre-configured server setups that include channels, roles, permissions, and other settings. They can be helpful for streamlining the process of creating and customizing a new Discord server or replicating a particular server structure across multiple servers.
Server templates can save time and effort, especially when you want to maintain a consistent layout or format for similar server purposes, such as gaming communities, study groups, or fan clubs.
If you’ve been lucky enough to get your hands on a template, implementing it is easy. Click the "+" icon on the left-hand side of your Discord client, then select "Create a Server." Choose "Use a Template" and either paste the template URL you've received or select a template from the available options. Click "Create" to set up your new server based on the chosen template.
Wrapping Up Our Guide Our Guide on How to Make a Discord Server Look Good With Discord Server Customization
At this point, we’ve covered everything you need to know in regard to how to customize a Discord server. You’ve learned how to make a Discord server look good, along with specific Discord server customizations that enhance the experience your members have.
The branding you’ll work to create will earn you a higher multiple. And in the meantime, you’ll find it easier to grow your community and monetize it. Your members will have more fun and gain more value if you implement what you’ve learned in our guide on how to customize your Discord server.
It’s time to get to work customizing your Discord server and experiencing all the benefits that come with it!
👉 Do you run a Discord community you want to sell access to? Find out how Whop can help.